


THE BIRTHDAY BEVS ONE
Sometimes it's just gotta be drinking food and a cake

Menu to serve 8 - 10 people
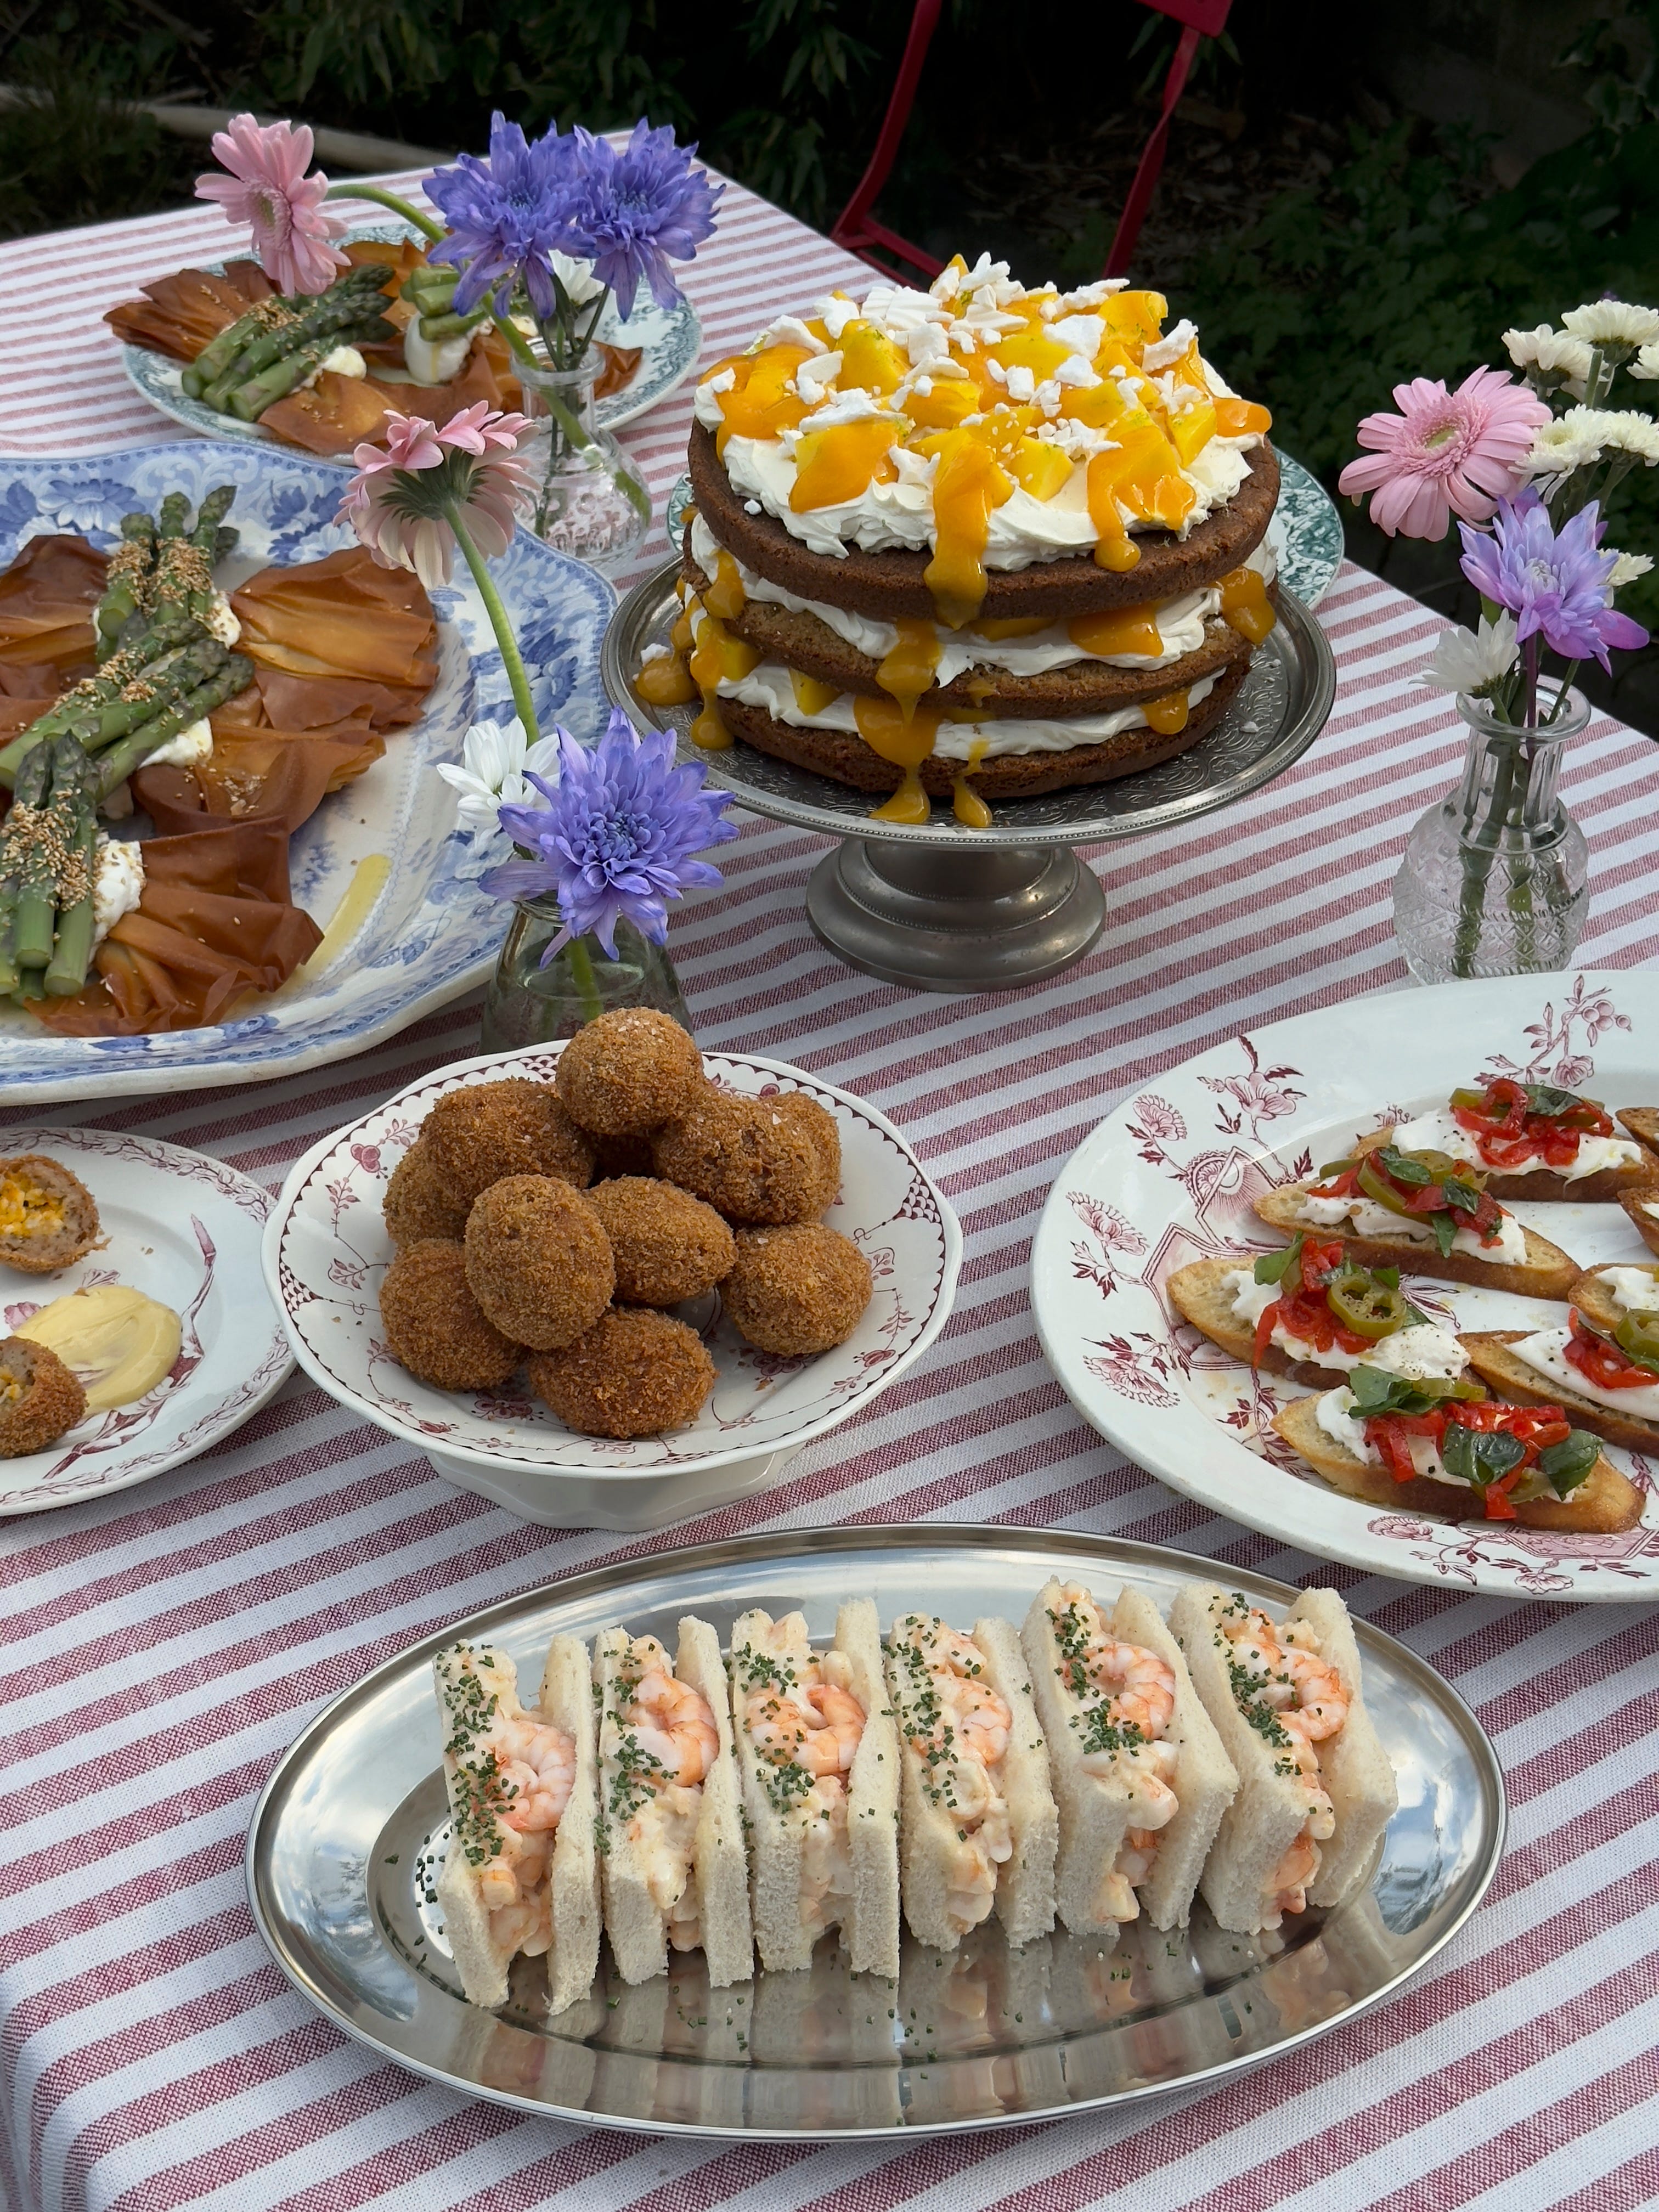
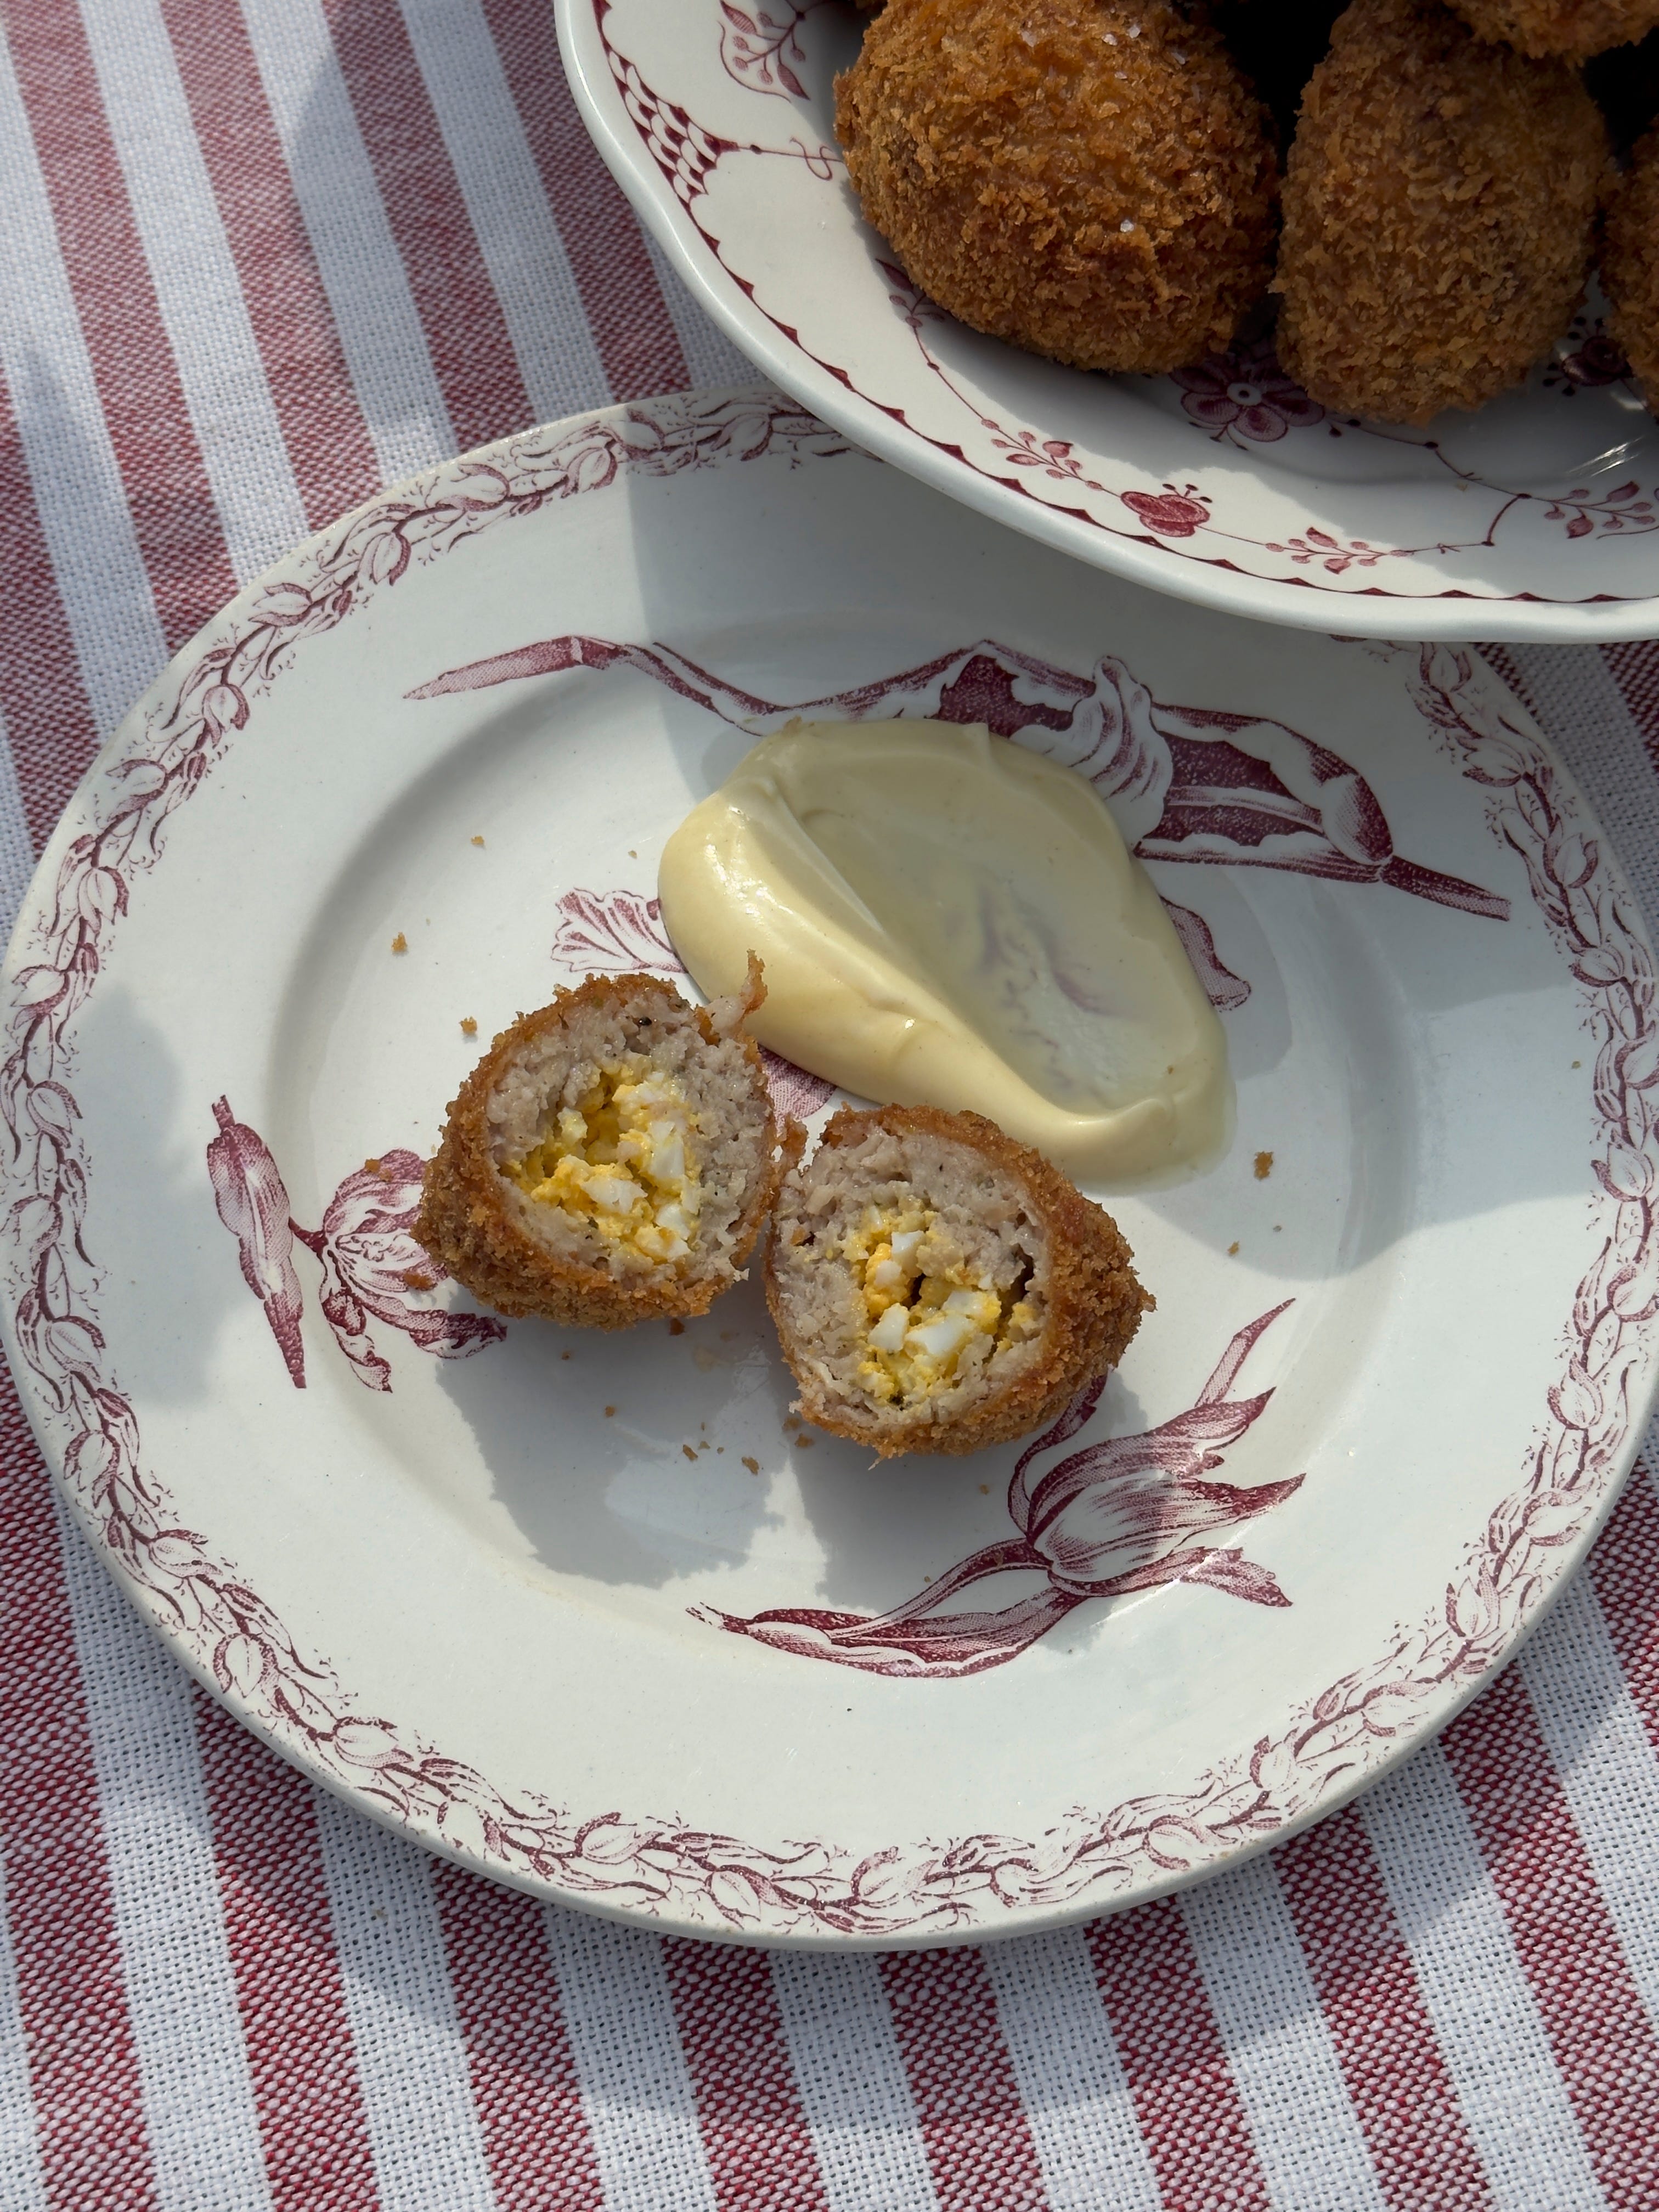
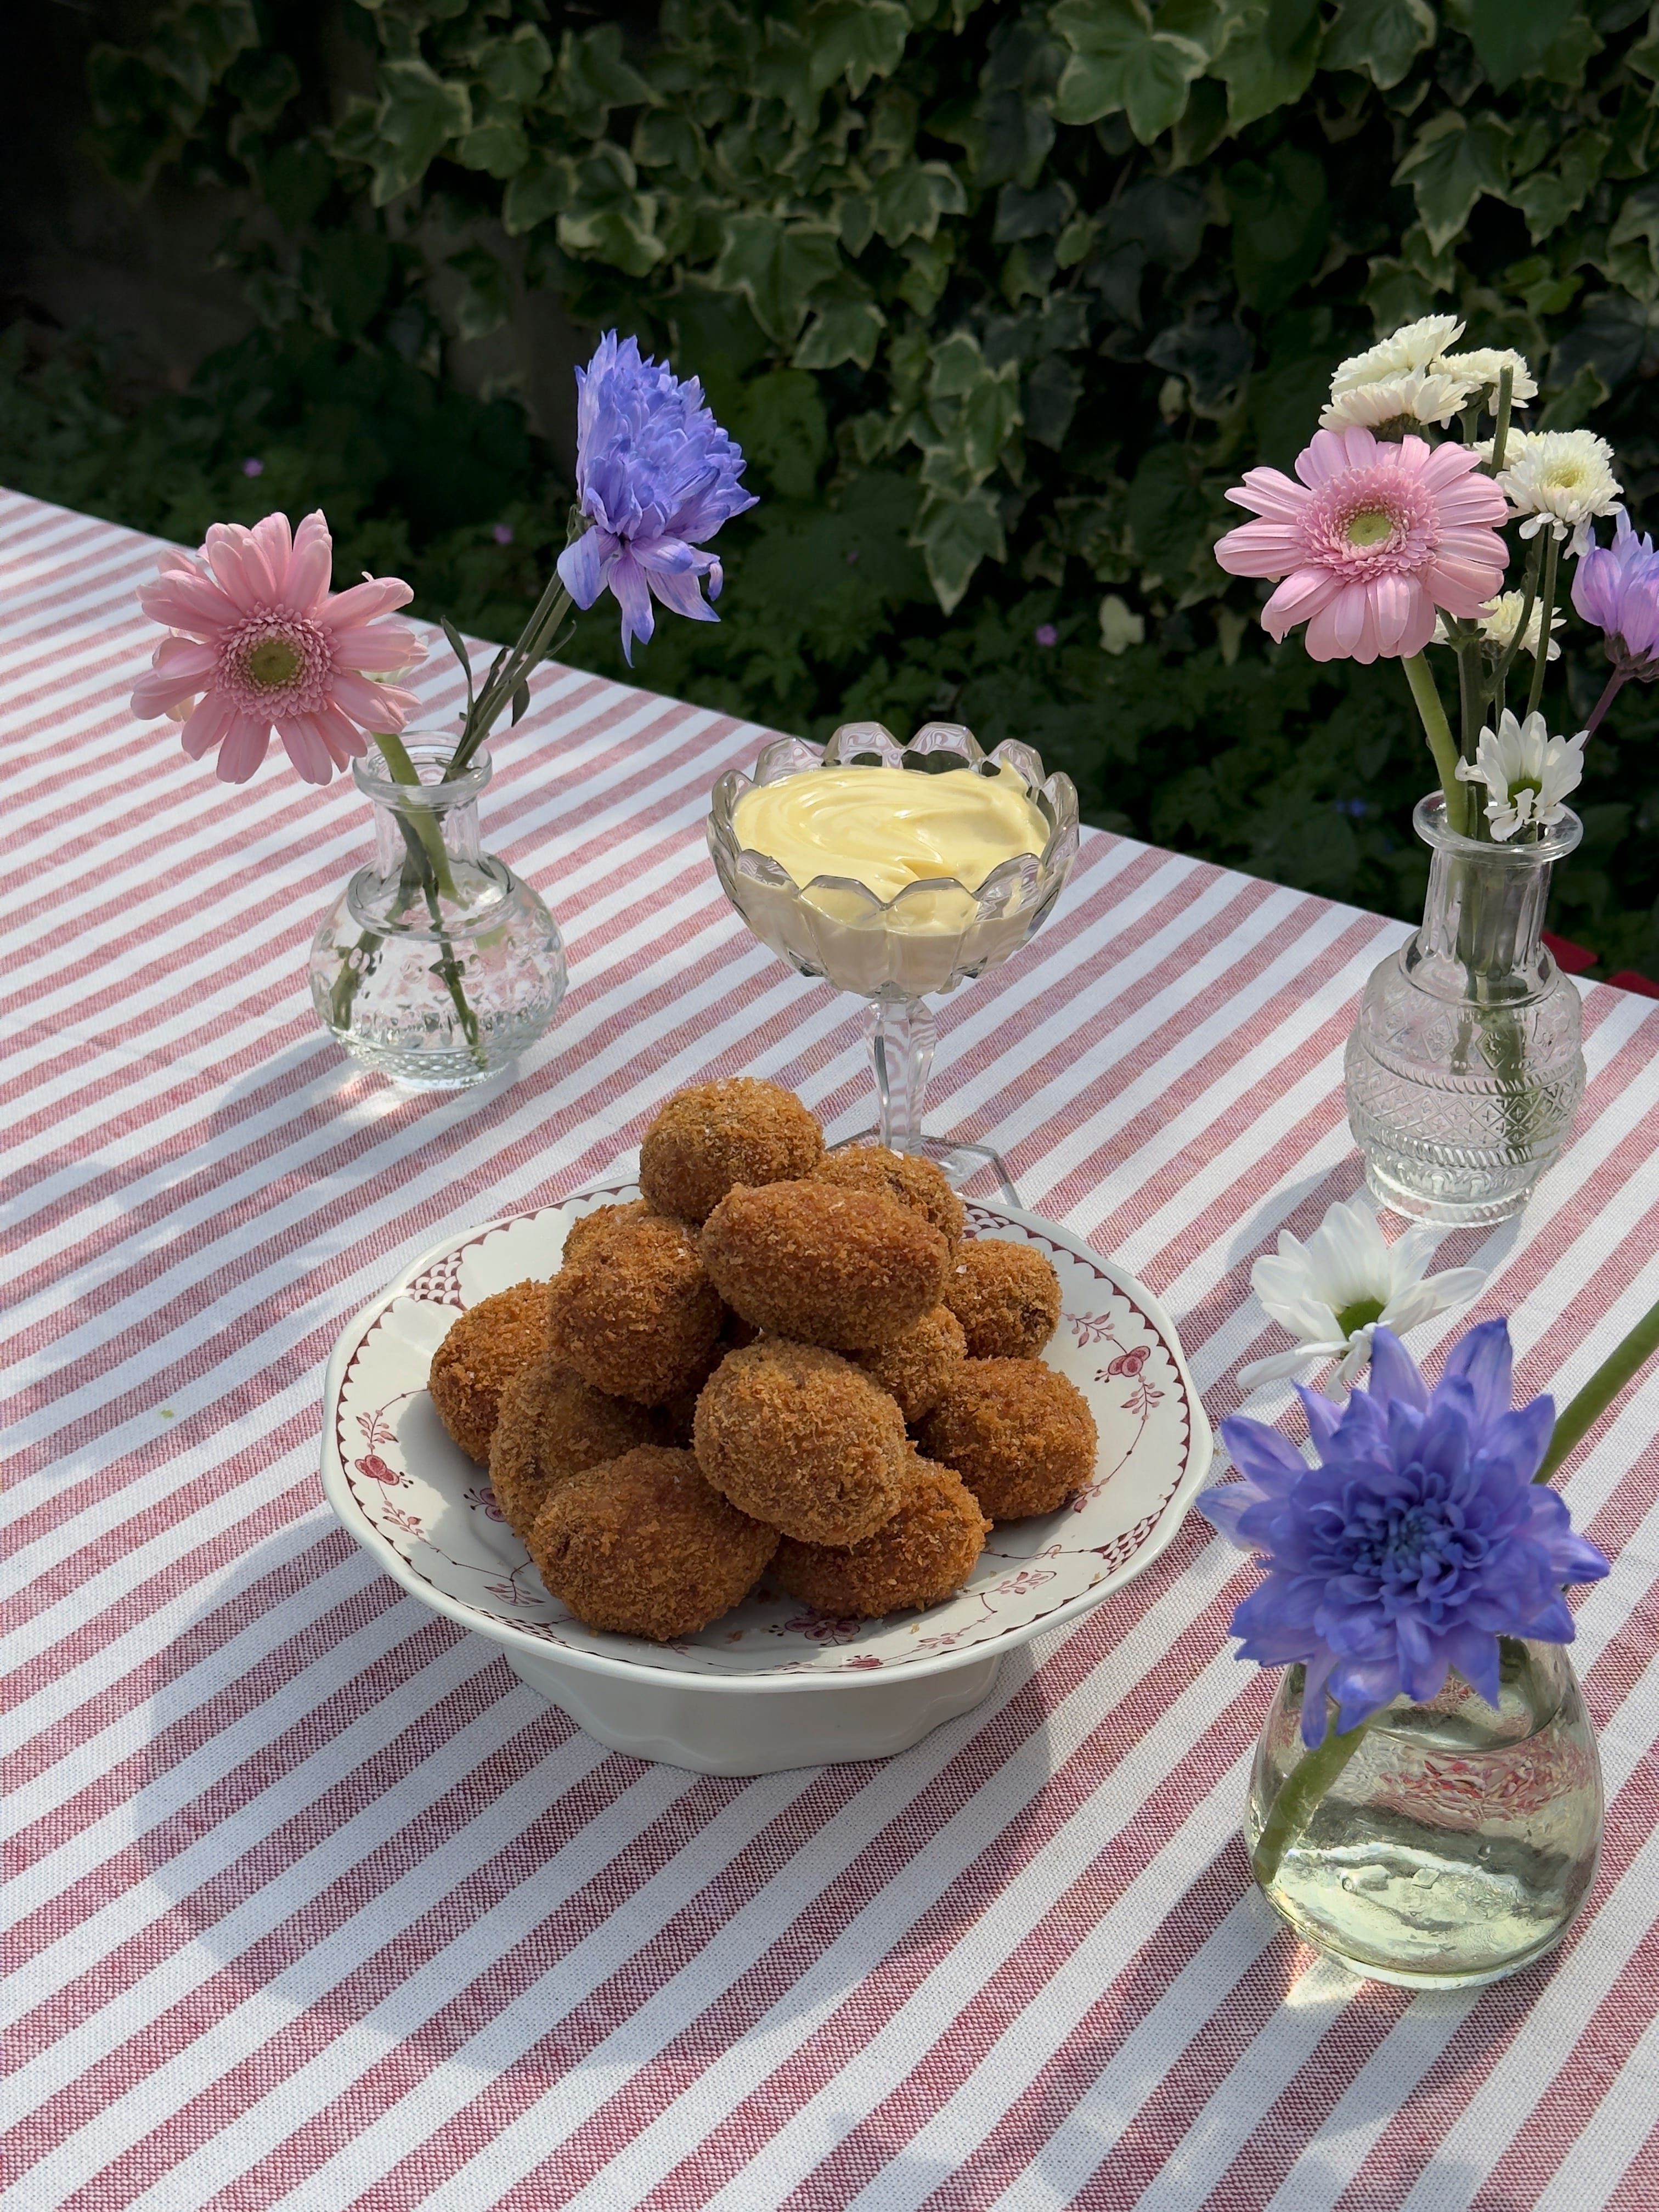
SAUSAGE EGGS
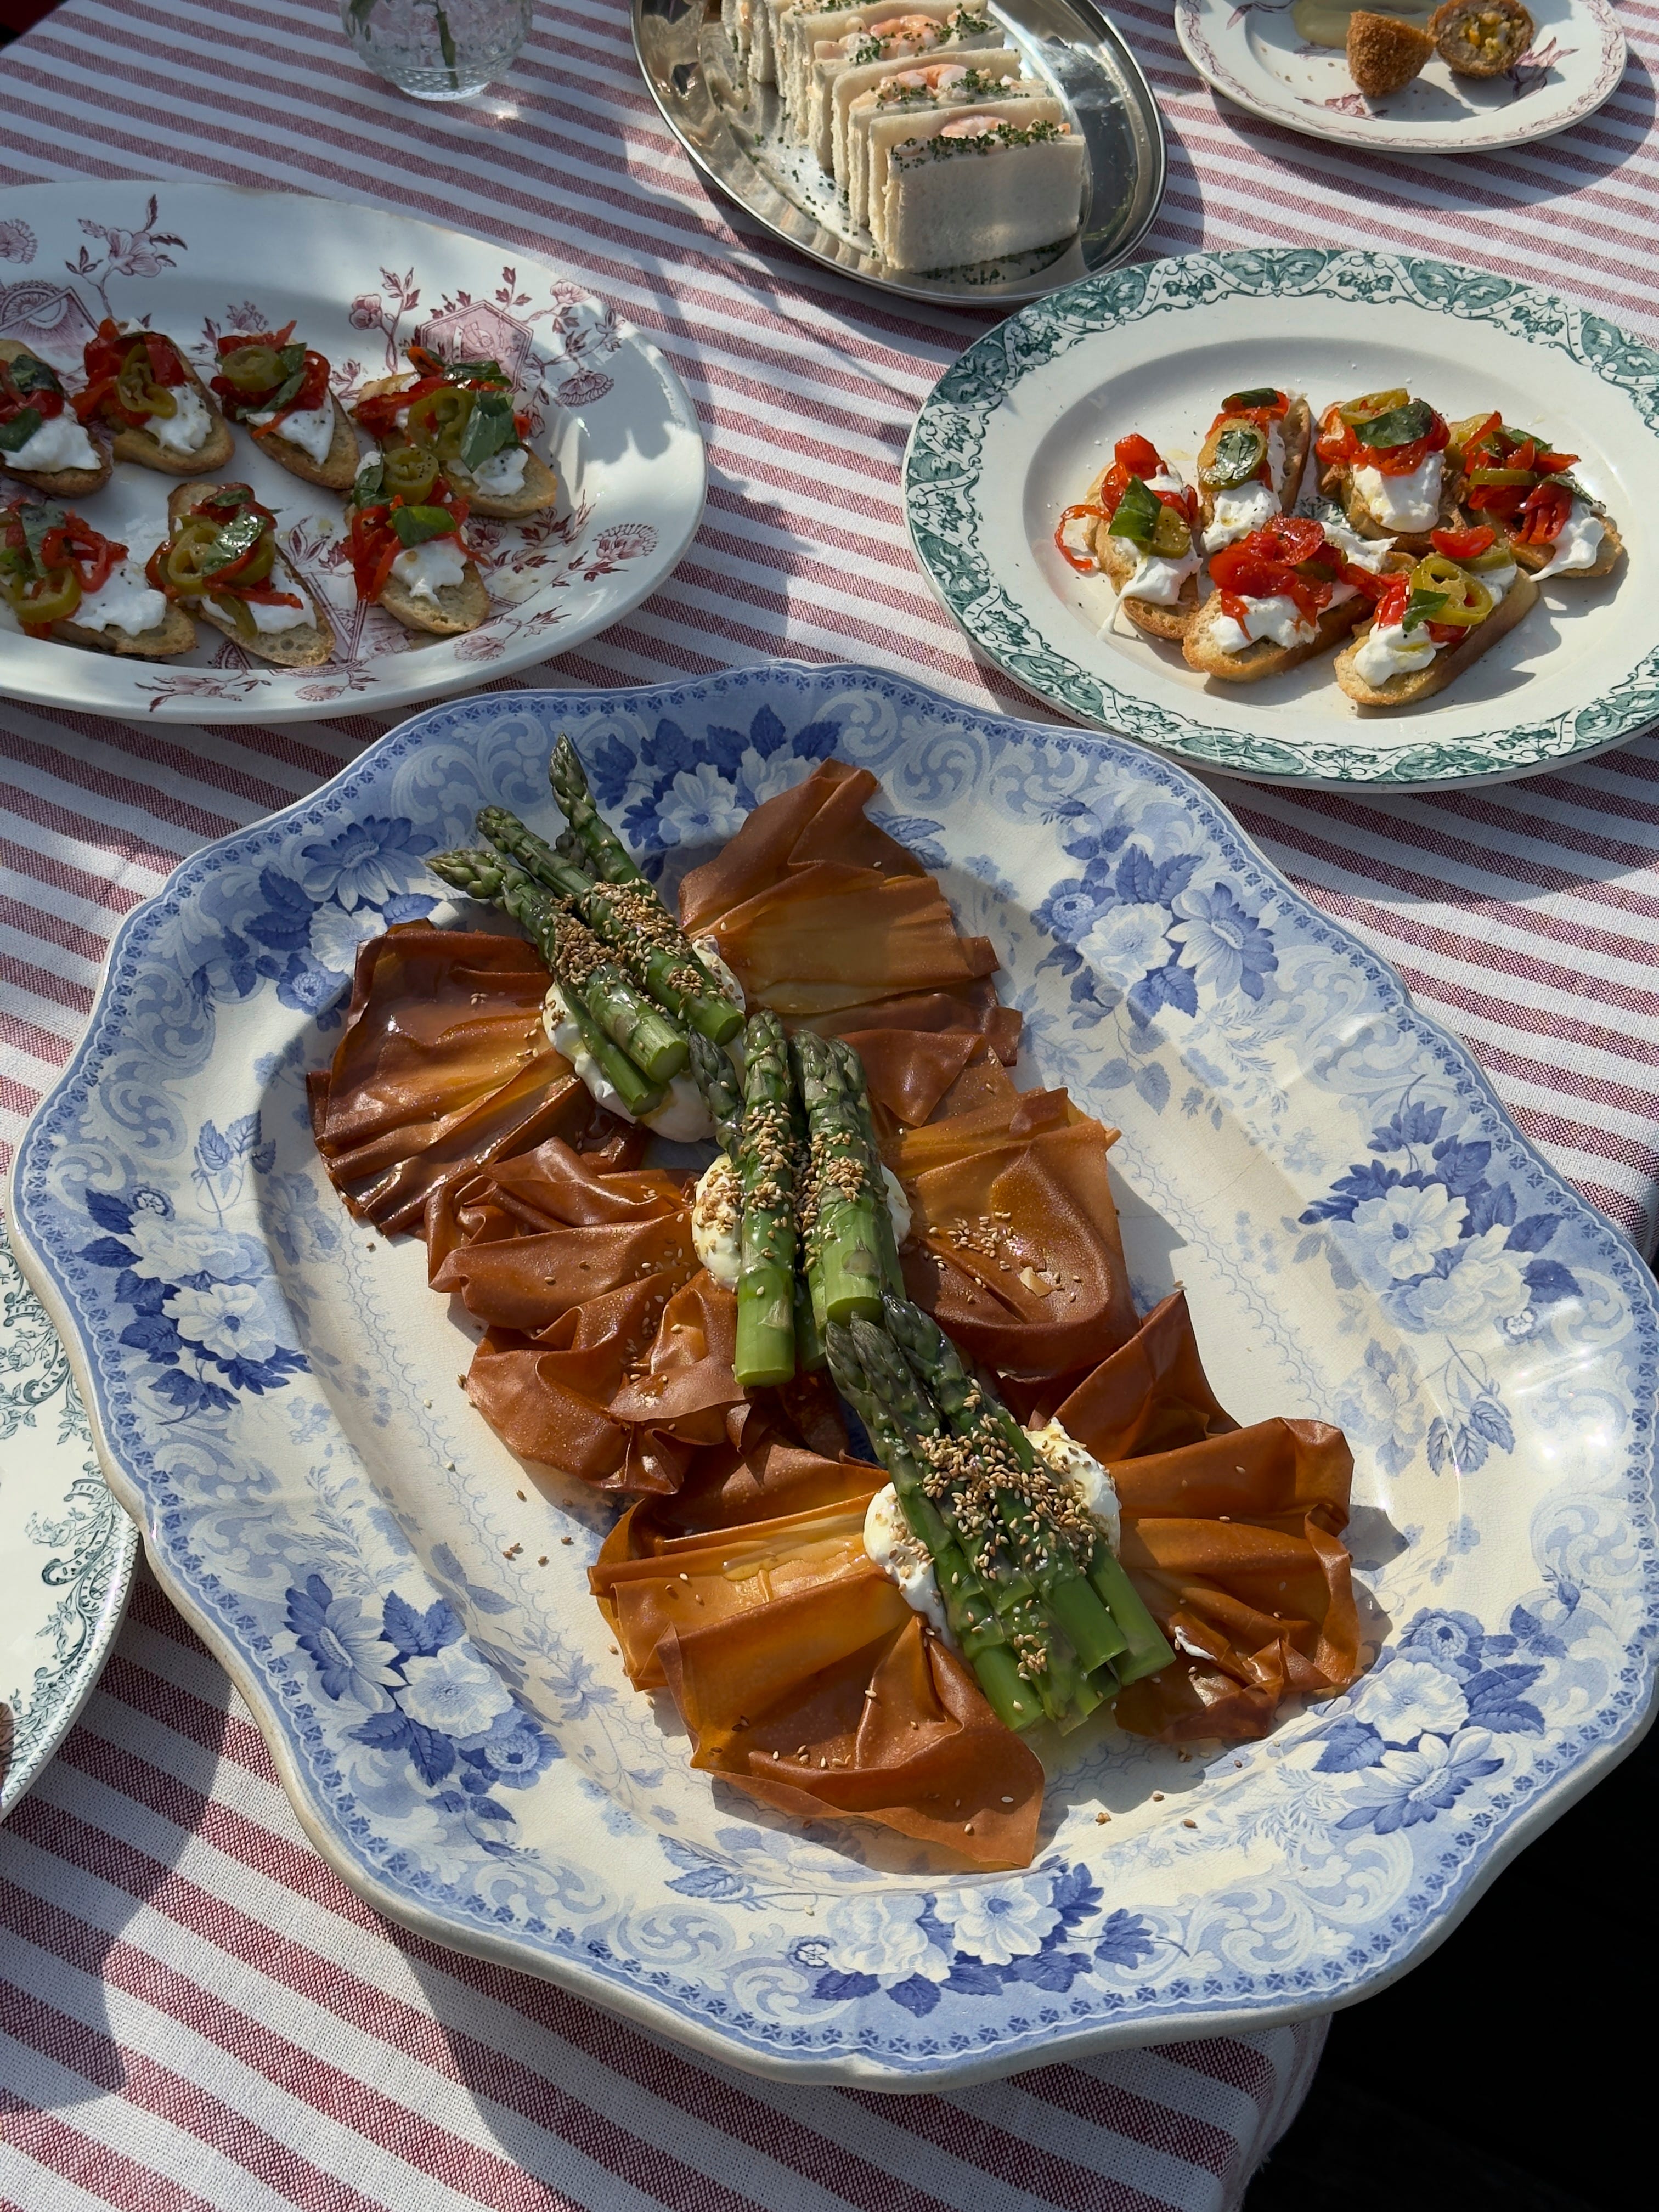
ASPARAGUS WITH FILO, LABNEH AND SESAME
PRAWN SANDWICHES
HOT PEPPER AND BURRATA BRUSCHETTE
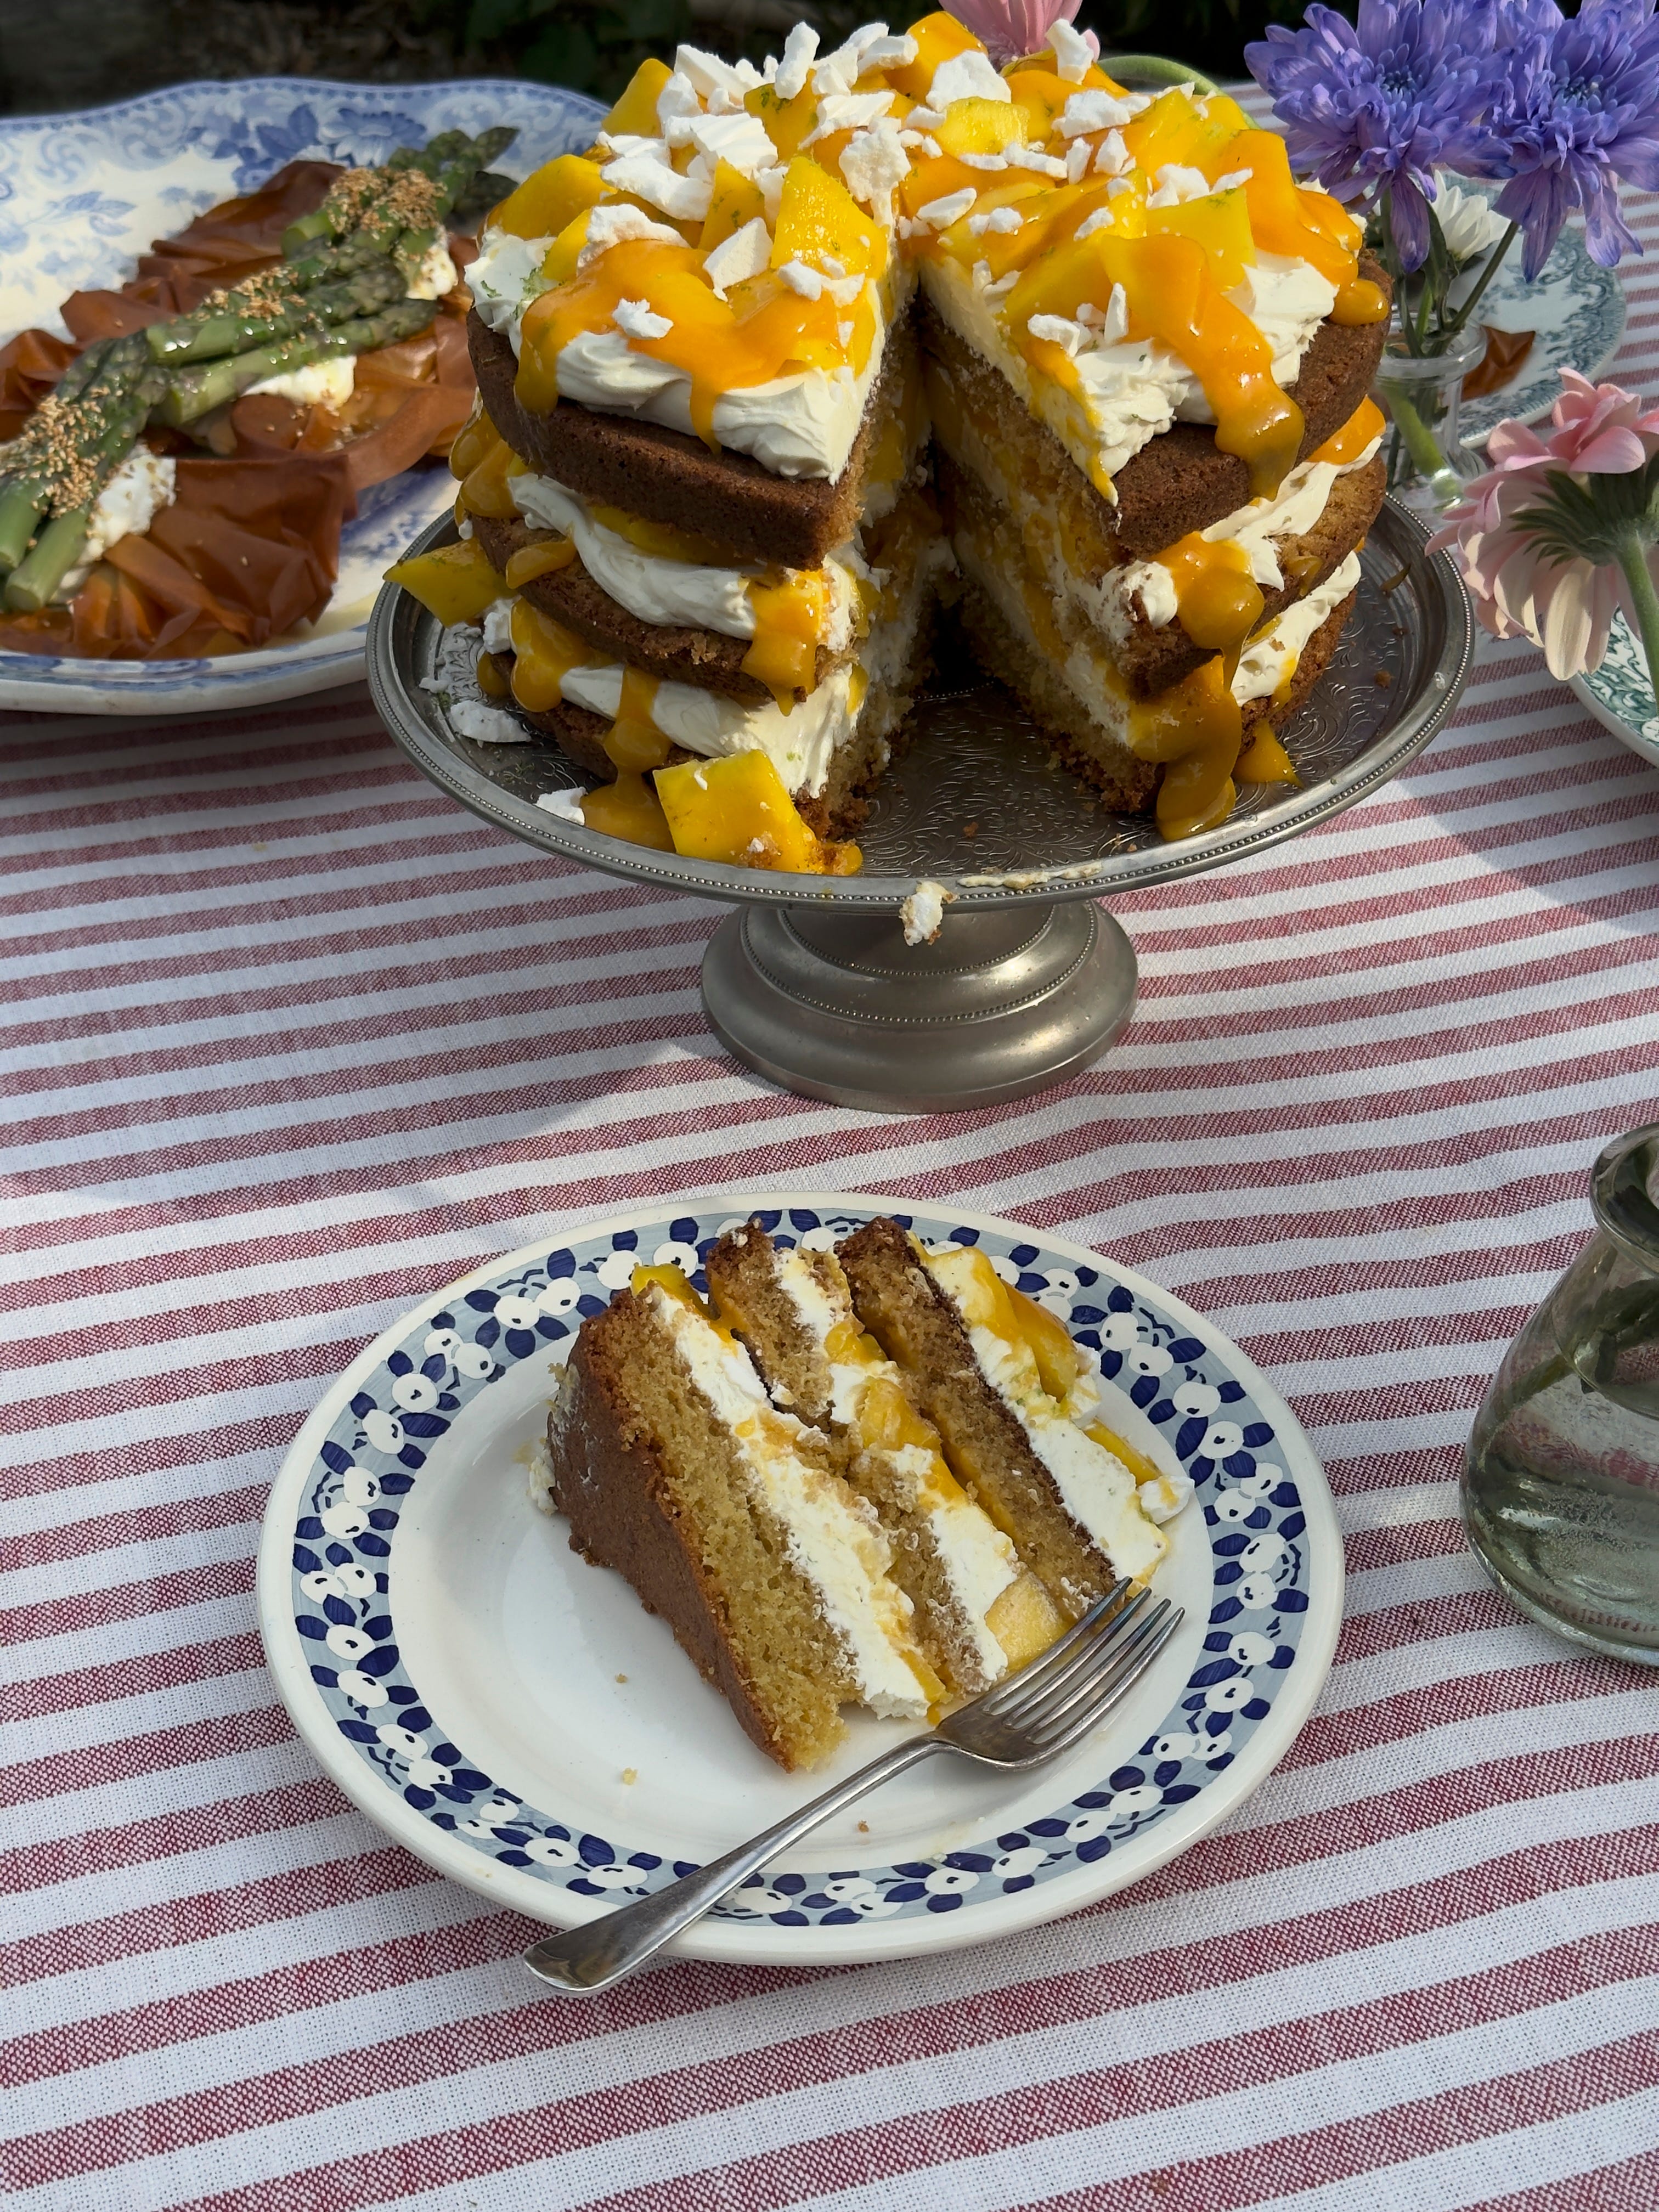
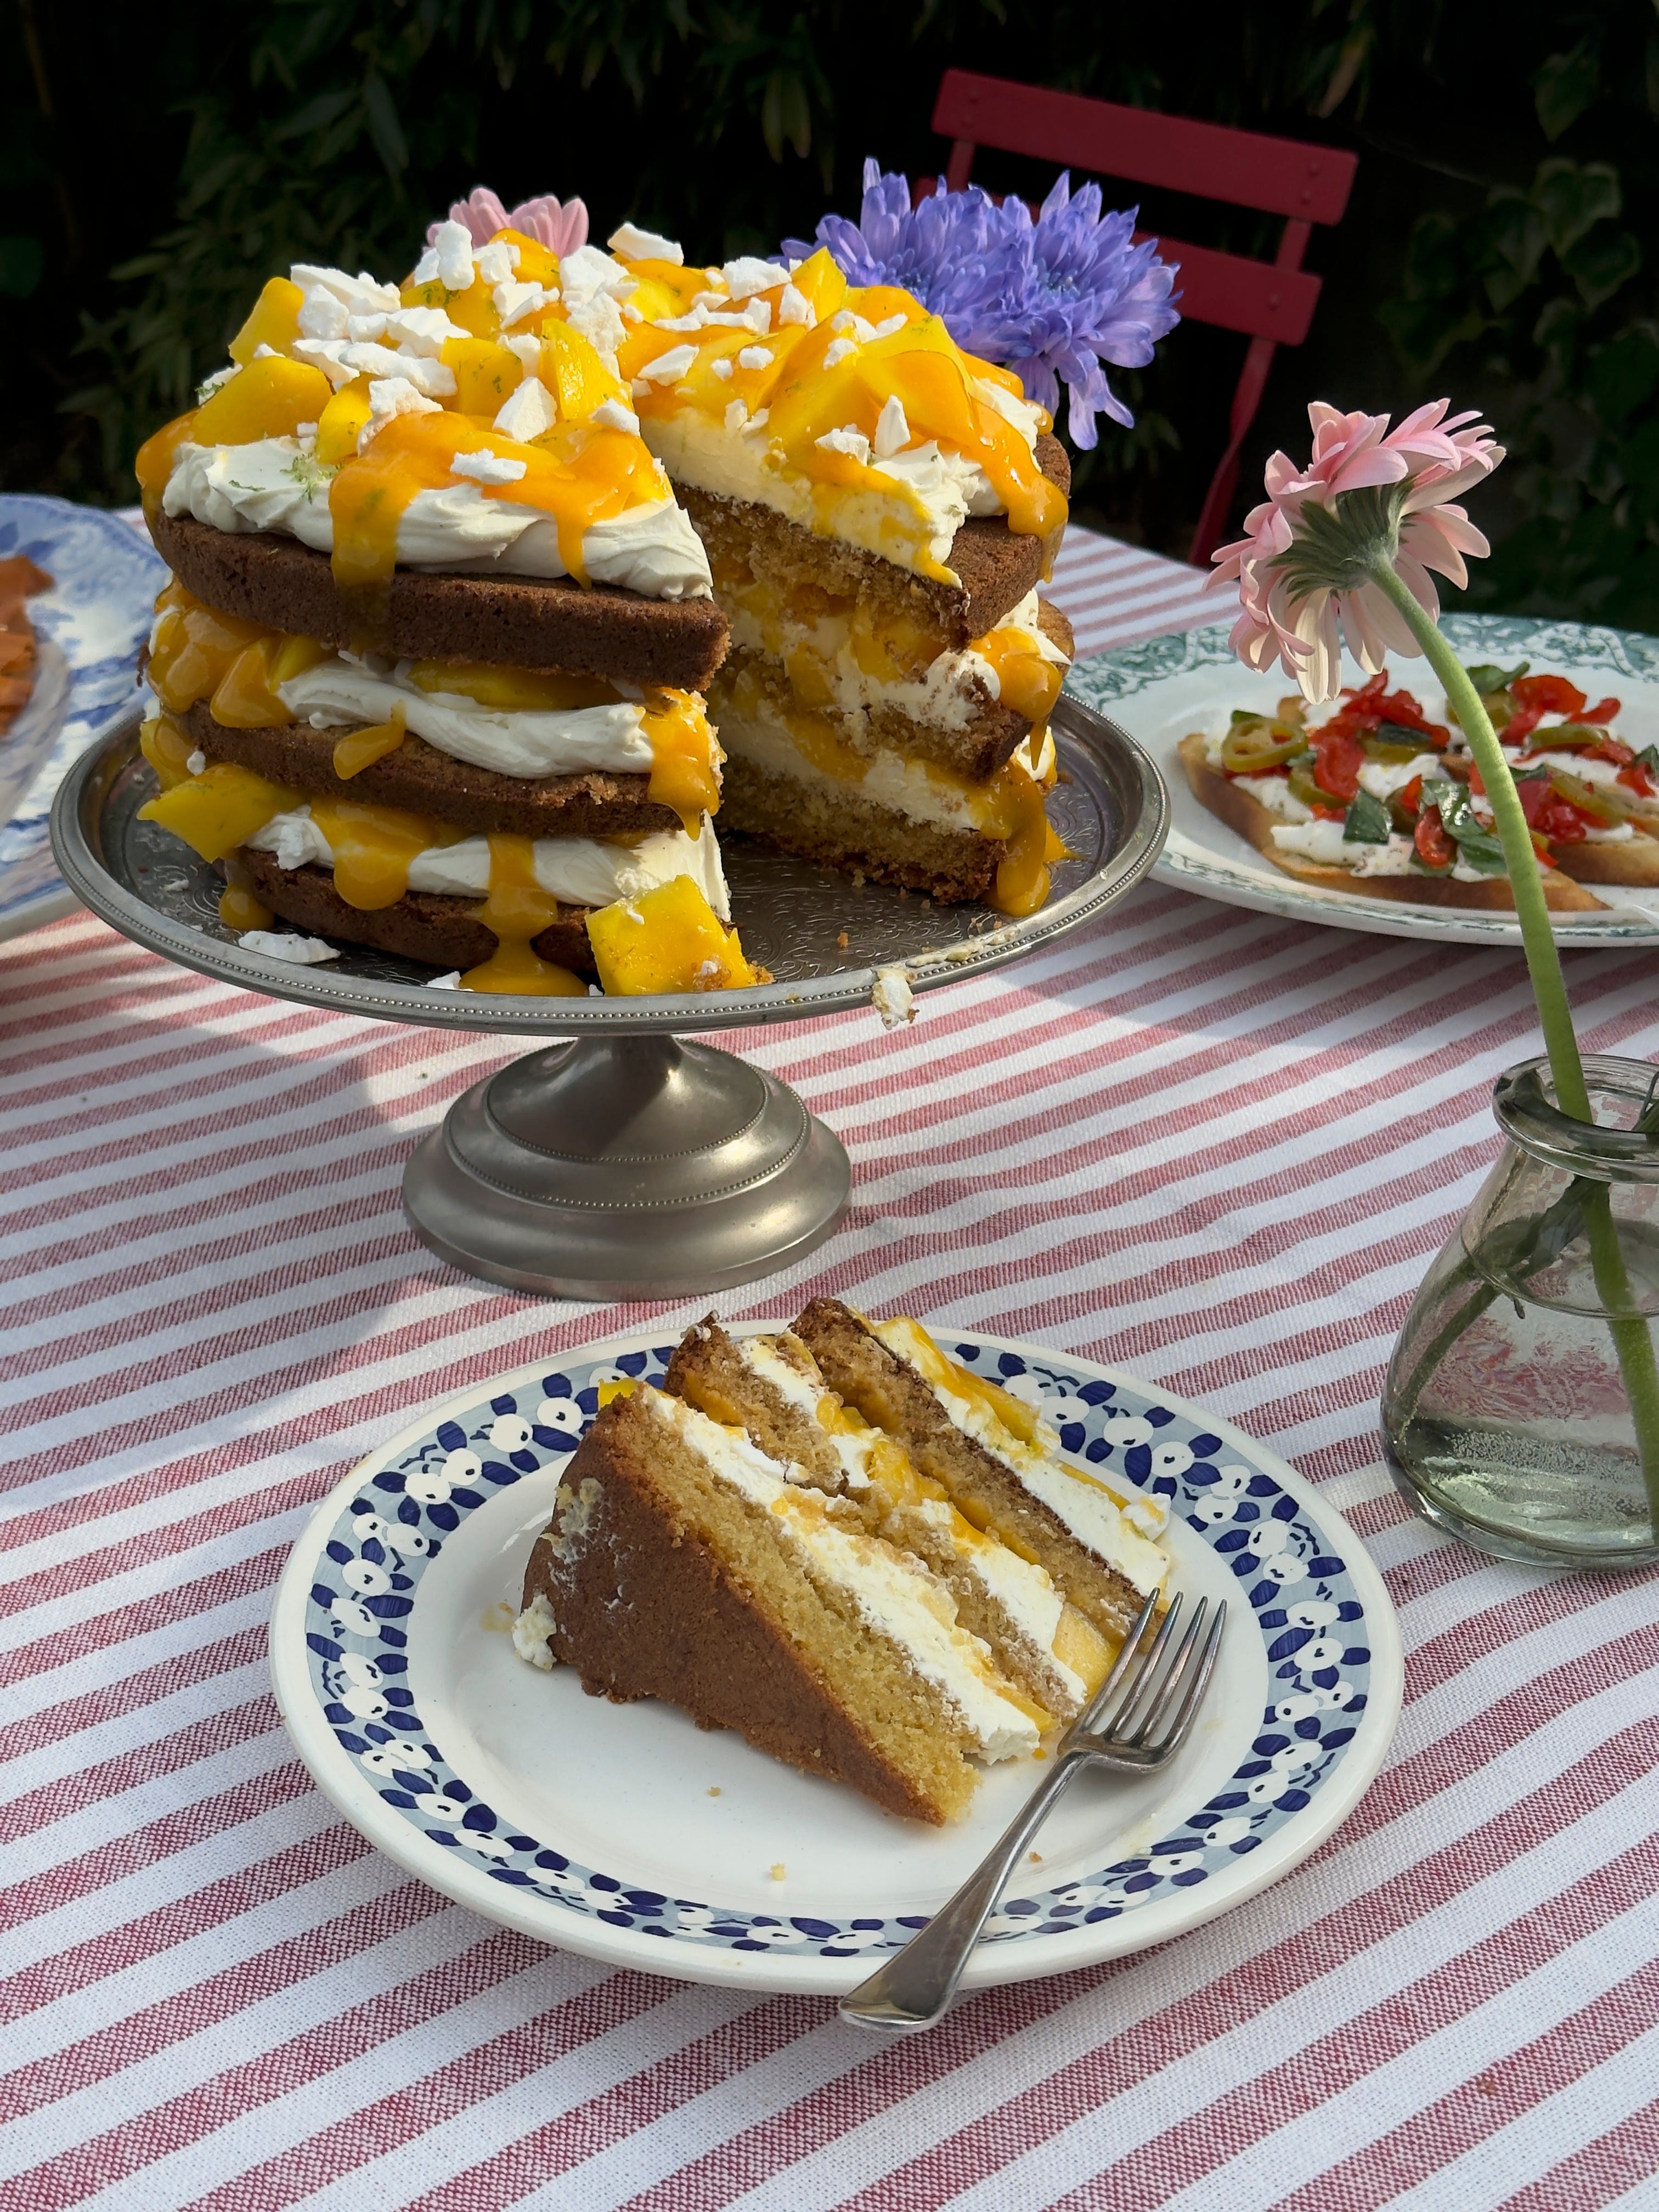
MANGO PAVLOVA CAKE
May always feels like a hugely celebratory month in my house. Not only is it my husband's birthday and the anniversary of our first date but also it’s got 2 Bank Holidays to revel in. Plus, the weather has actually started getting good, and I want everything I do to be sun-drenched and sparkling. It’s time for a bloody party guys.
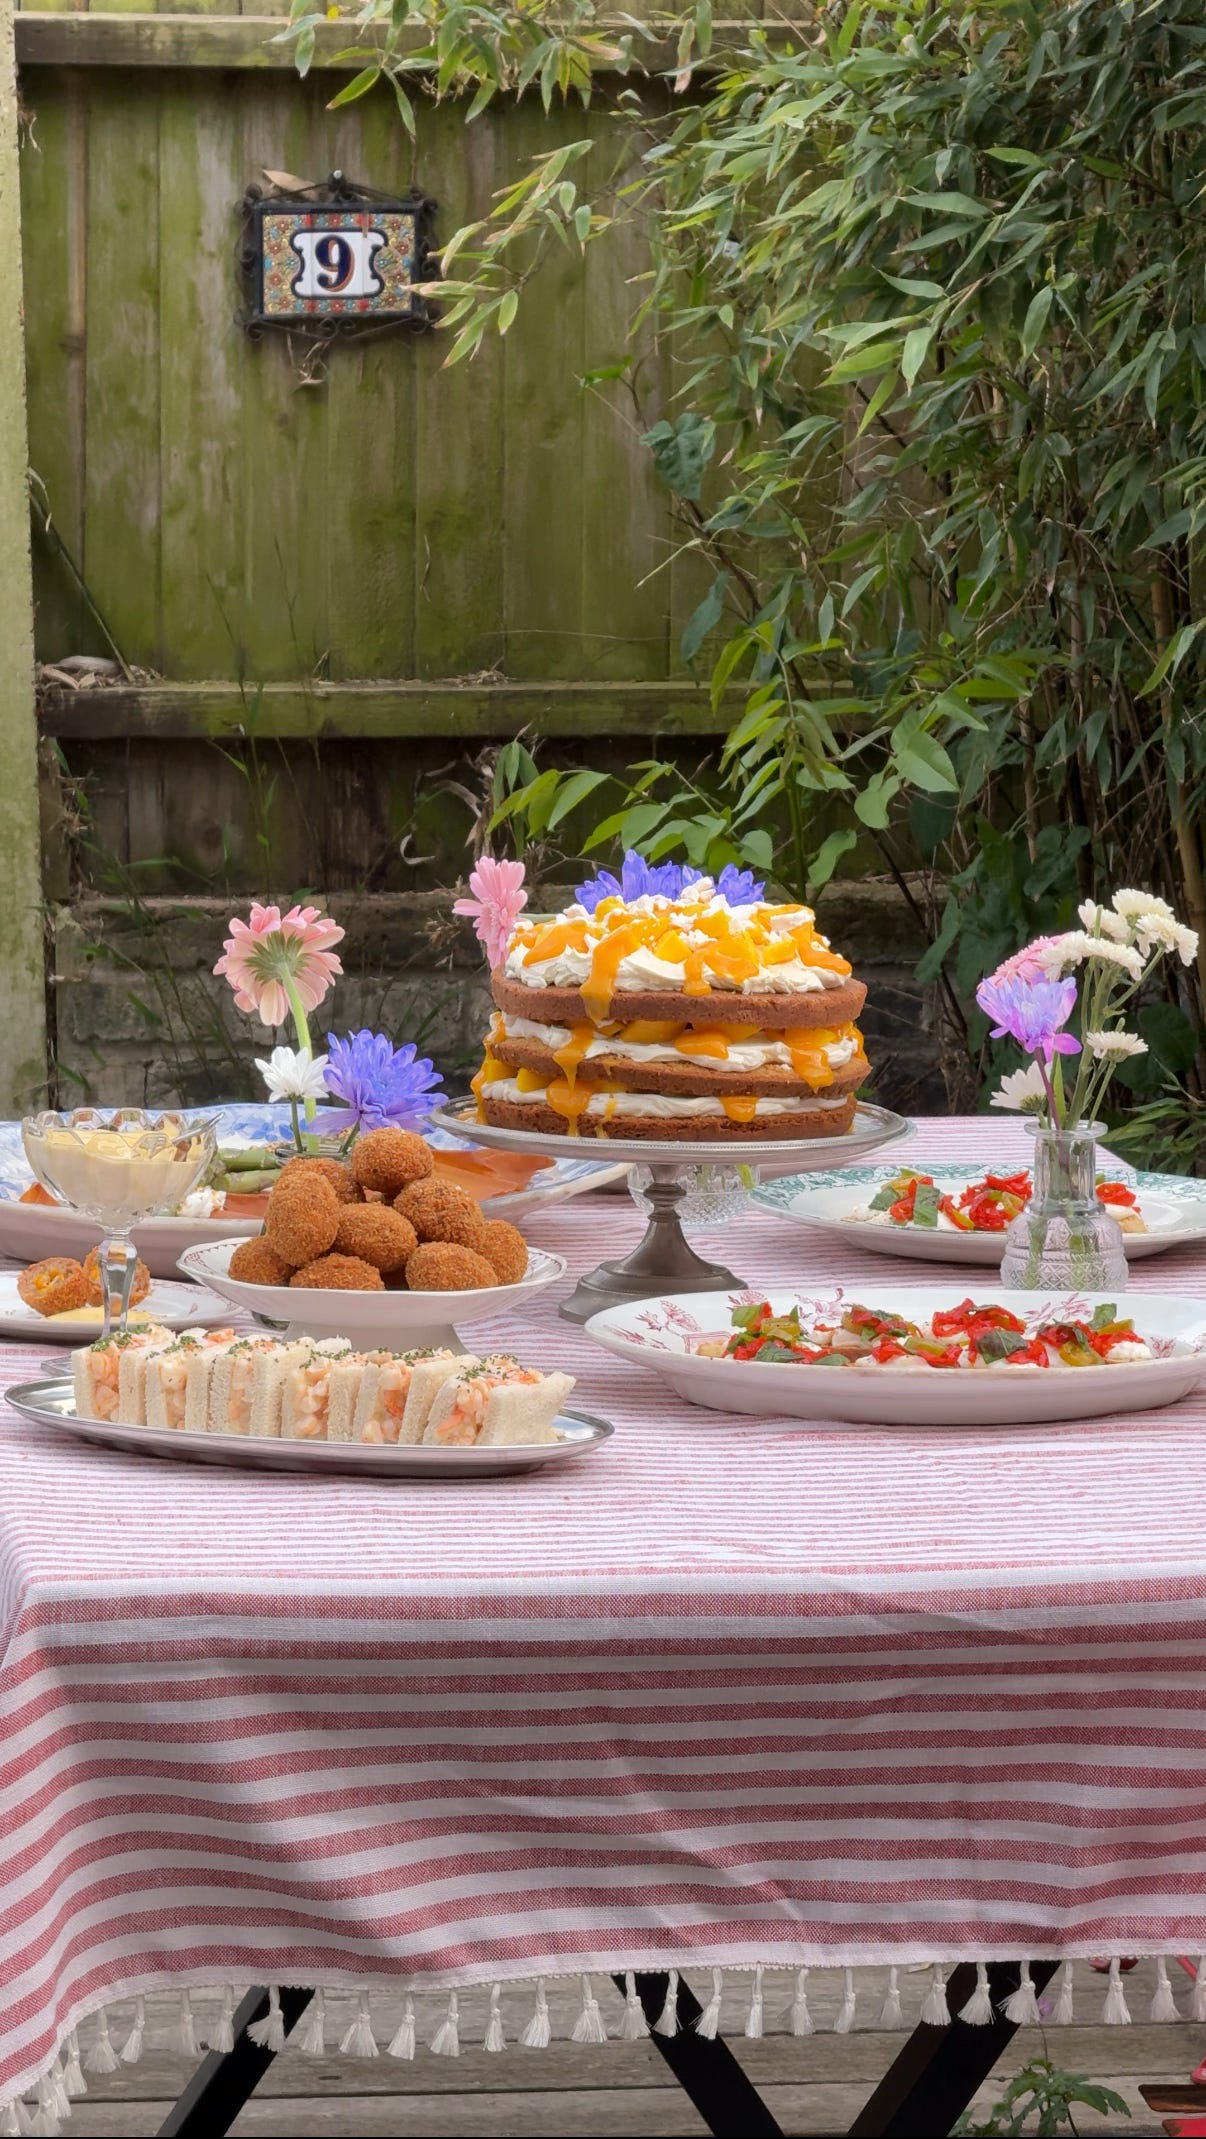
This menu is designed around the idea of a birthday drinks party, a “pre-game” perhaps to a bigger night out perhaps. It’s not a formal sit down meal, more of a snacky, grazing type time with a selection of great canapés followed by an exceptional cake.
Alphonso mangoes are in season again and I am once again spending all my money on them. I made a mango pavlova a few weeks back and it was scrumptious. But, never satisfied, I wondered to myself about how it might taste stuffed into a cake. Well, I can confirm it’s sublime and really worth doing if you have a celebration coming up. Crushing up meringue and shoving it into cake layers is a yes from me.
For our drinking food, I decided to tackle one of my favourite supermarket snacks growing up. They go by many names - Mini Scotch Eggs, Snacking Eggs, Sausage Bites, but in my house they were known as Sausage Eggs. They are the baby version of a Scotch Egg which doesn’t involve wrangling a soft boiled egg. Honestly, I prefer them like this. Scotch Eggs with runny yolks are an example of technical proficiency sure, but are they worth all the hassle? In the case of Sausage Eggs our sausage meat is wrapped around a soft, supple and well seasoned egg mayo which to me is infinitely preferable to a lump of unseasoned and often cold egg. And these are a hell of a lot easier too.
I suppose if our party menu was going to have a slightly bigger snack designed as a sort of main, this would be it. Bundles of blanched asparagus are piled onto garlicky labneh, drizzled in butter and honey and served on crispy filo bows. These are as beautiful as they are delicious and really celebrate everyone's favourite seasonal green of the moment.

I am a huge sucker for a prawn sandwich and wanted to develop a special one to live on this page. I don’t think they need to be over complicated or particularly szhushy, for want of a better word. I do however like the Japanese approach of soft white bread and a “hero” prawn in the centre, a bit like their famously excellent egg sandwiches. These are just cute and delicious little sandos that are absolutely perfect drinking food.
As I have said many times, a bruschetta is a gift to a party menu and this menu is no exception. It’s also a great one for fitting in “ready to eat” products, creating a crowd-pleasing, tummy filling dish with minimal workload. One of my favourite store-cupboard ingredients are those sweet, hot pickled peppers - I’ll use any excuse to get them into a meal. They are great piled on top of creamy burrata, in turn piled on top of garlicky, crunchy bruschetta. So that’s what we are doing and it couldn’t be easier.
Time to get cooking party people.
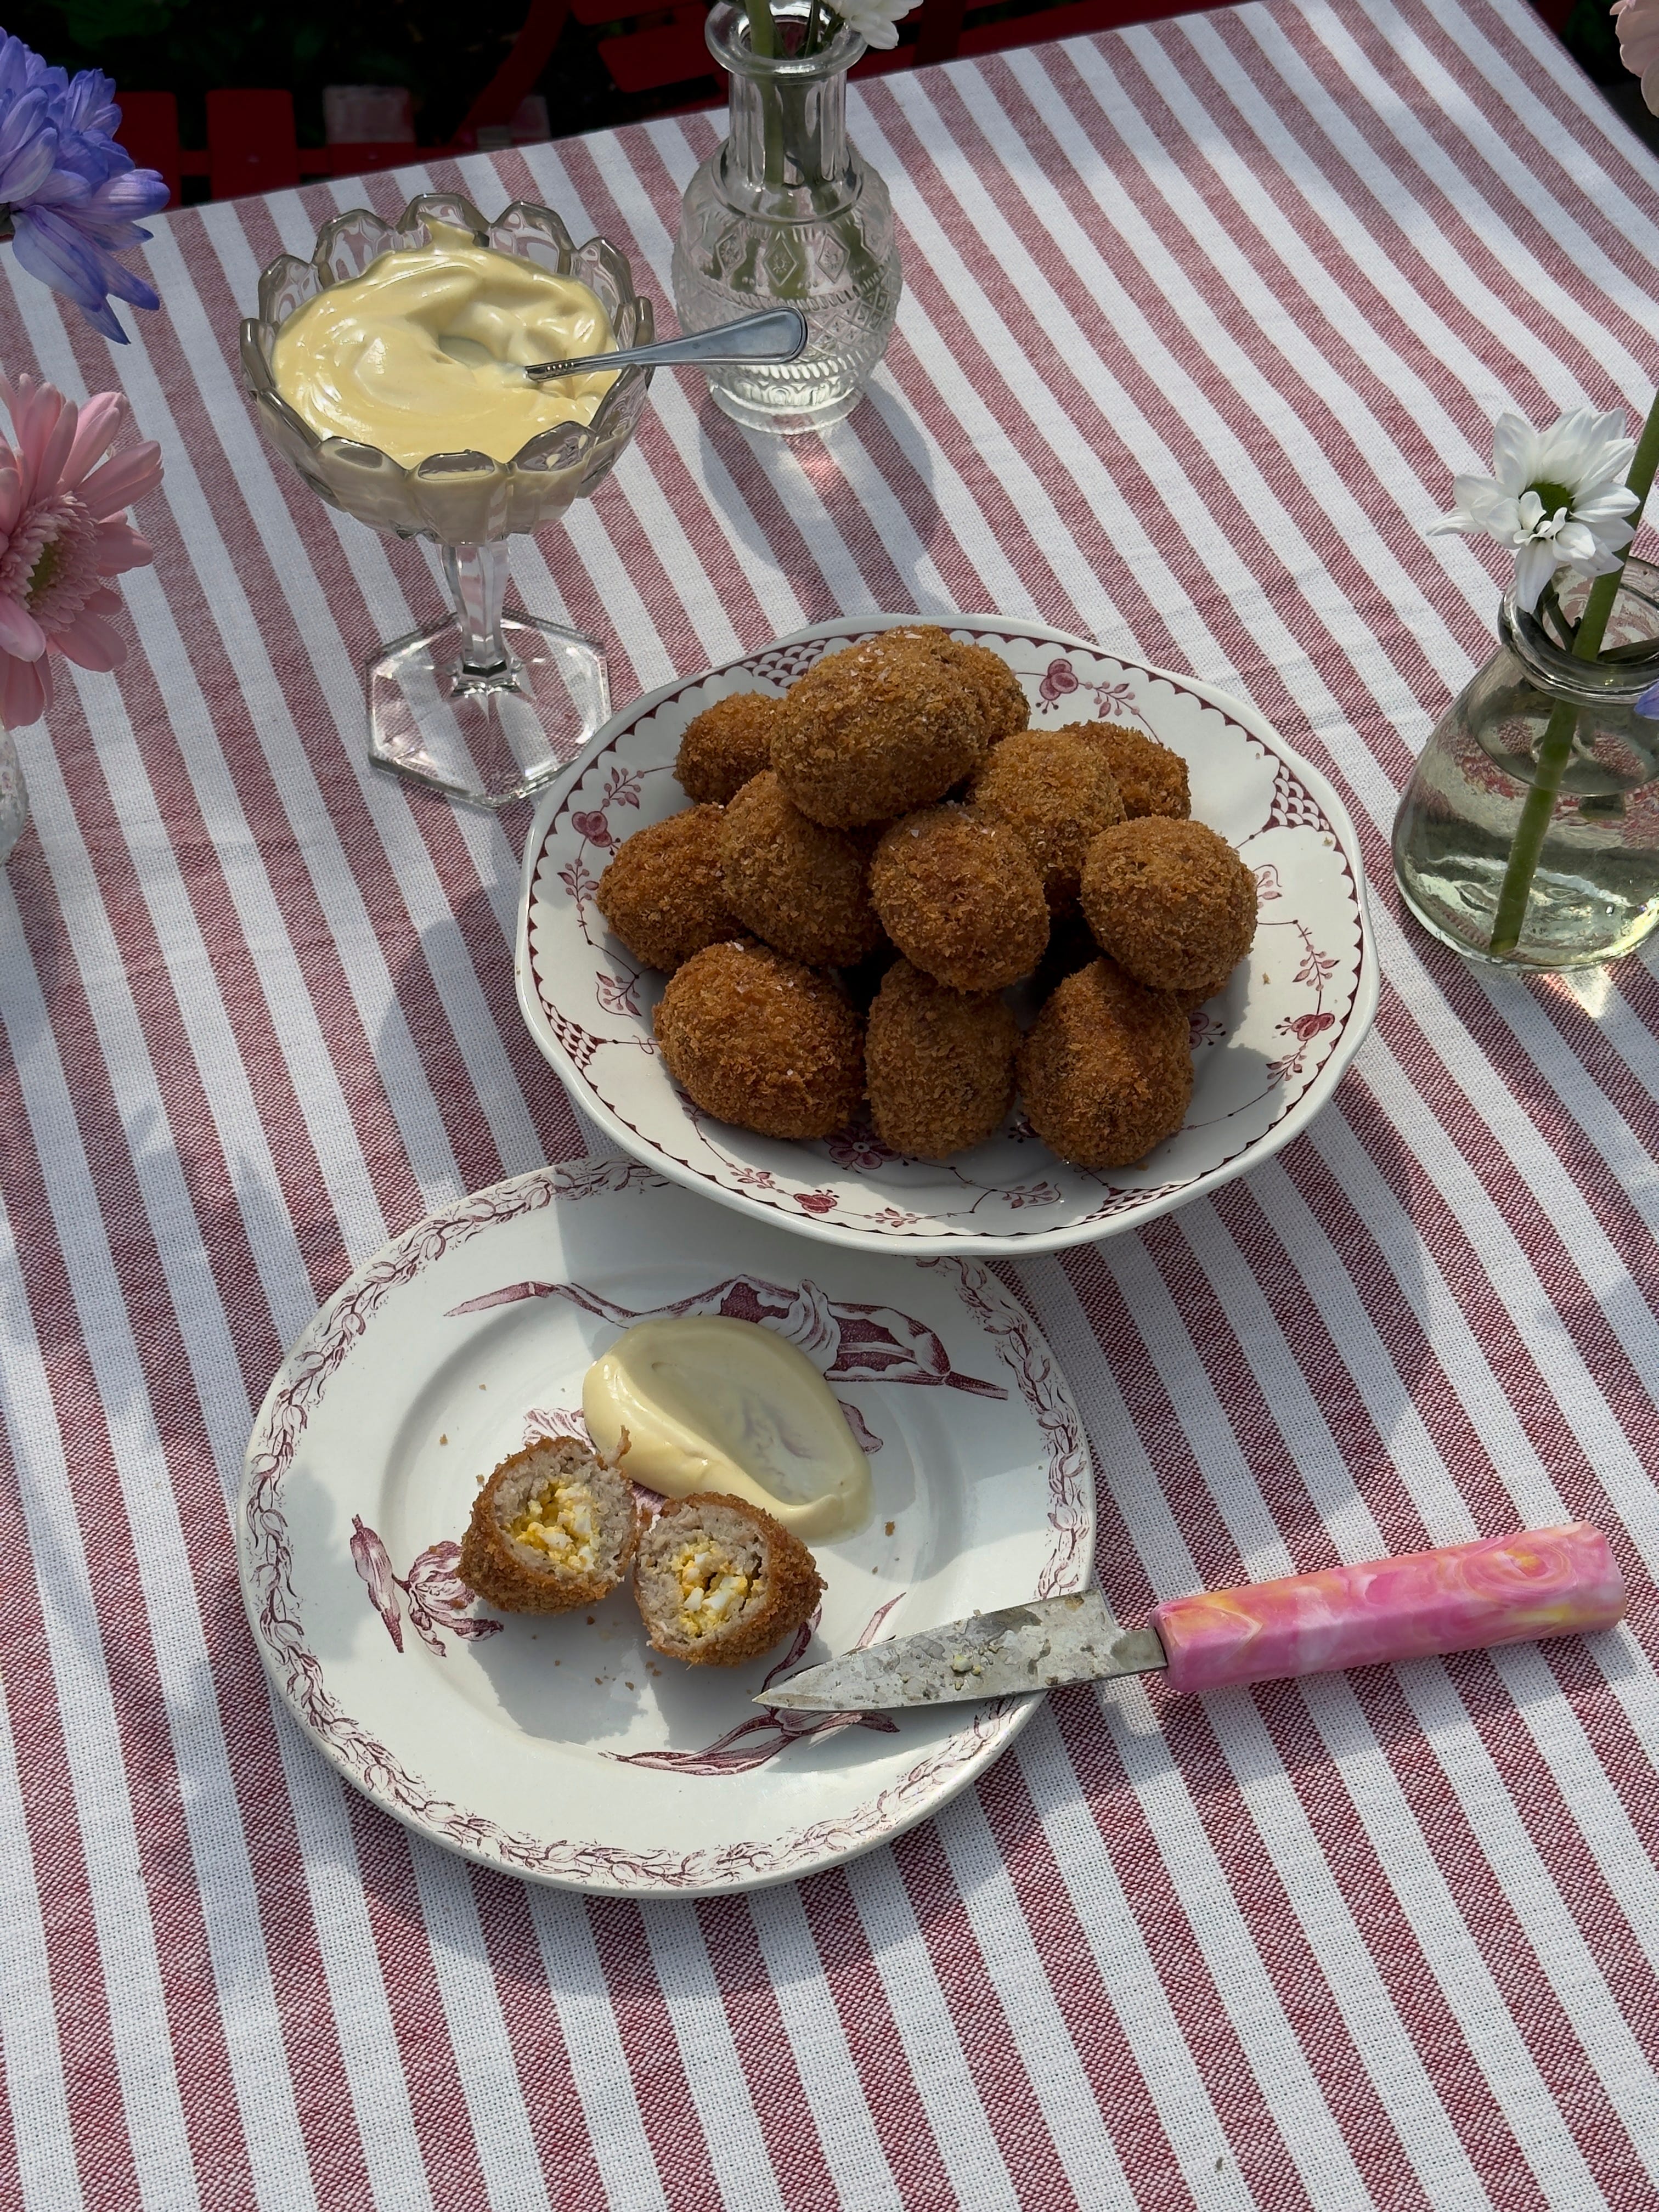
SAUSAGE EGGS
I am really so thrilled to have nailed these, and I fear I will be making them in perpetuity, which is always a good sign. In the years I have spent as a food stylist my number one nemesis has always been a scotch egg. They are just so annoying to make and TOO BIG to eat. These dainty gals are much easier and in my opinion are genuinely tastier. Plus, the absence of a runny egg means you can cook up a load and then reheat in the oven when needed.
Makes 20
For the sausage filling
30g fresh white breadcrumbs
30g whole milk
600g Cumberland sausages, skins removed
1 tsp dried sage
½ tsp garlic granules
Salt and pepper
For the egg mayonnaise
2 large eggs
30g mayonnaise
Salt and pepper
To breadcrumb
100g plain flour
3 eggs, beaten
100g panko breadcrumbs
1l vegetable oil, for frying
Mustard mayo, to serve
Start by making the egg filling. Bring a saucepan of water to a rapid boil and then carefully lower the eggs in. Boil them for 8 minutes, 9 minutes on a cold day, and then immediately cool them in iced water to stop the cooking. Peel the eggs and mash them with a fork until they are a relatively fine crumb. Add in the mayonnaise and season well with salt and pepper - taste it! For ease when assembling, it is best to pop the mix into a piping bag if you can get one. Chill the mayo in the fridge while you take care of the rest.
Mix the breadcrumbs with the milk - you want the breadcrumbs to soften and become wet. Combine them with the Cumberland sausage meat, sage, garlic and a good pinch of salt and pepper. Now I like to weight the entire meat mix out into 30 - 35 g portions. It makes assembly quicker and it also means all your sausage eggs will be the same size. You will have enough meat for 20 balls plus a little leftover.
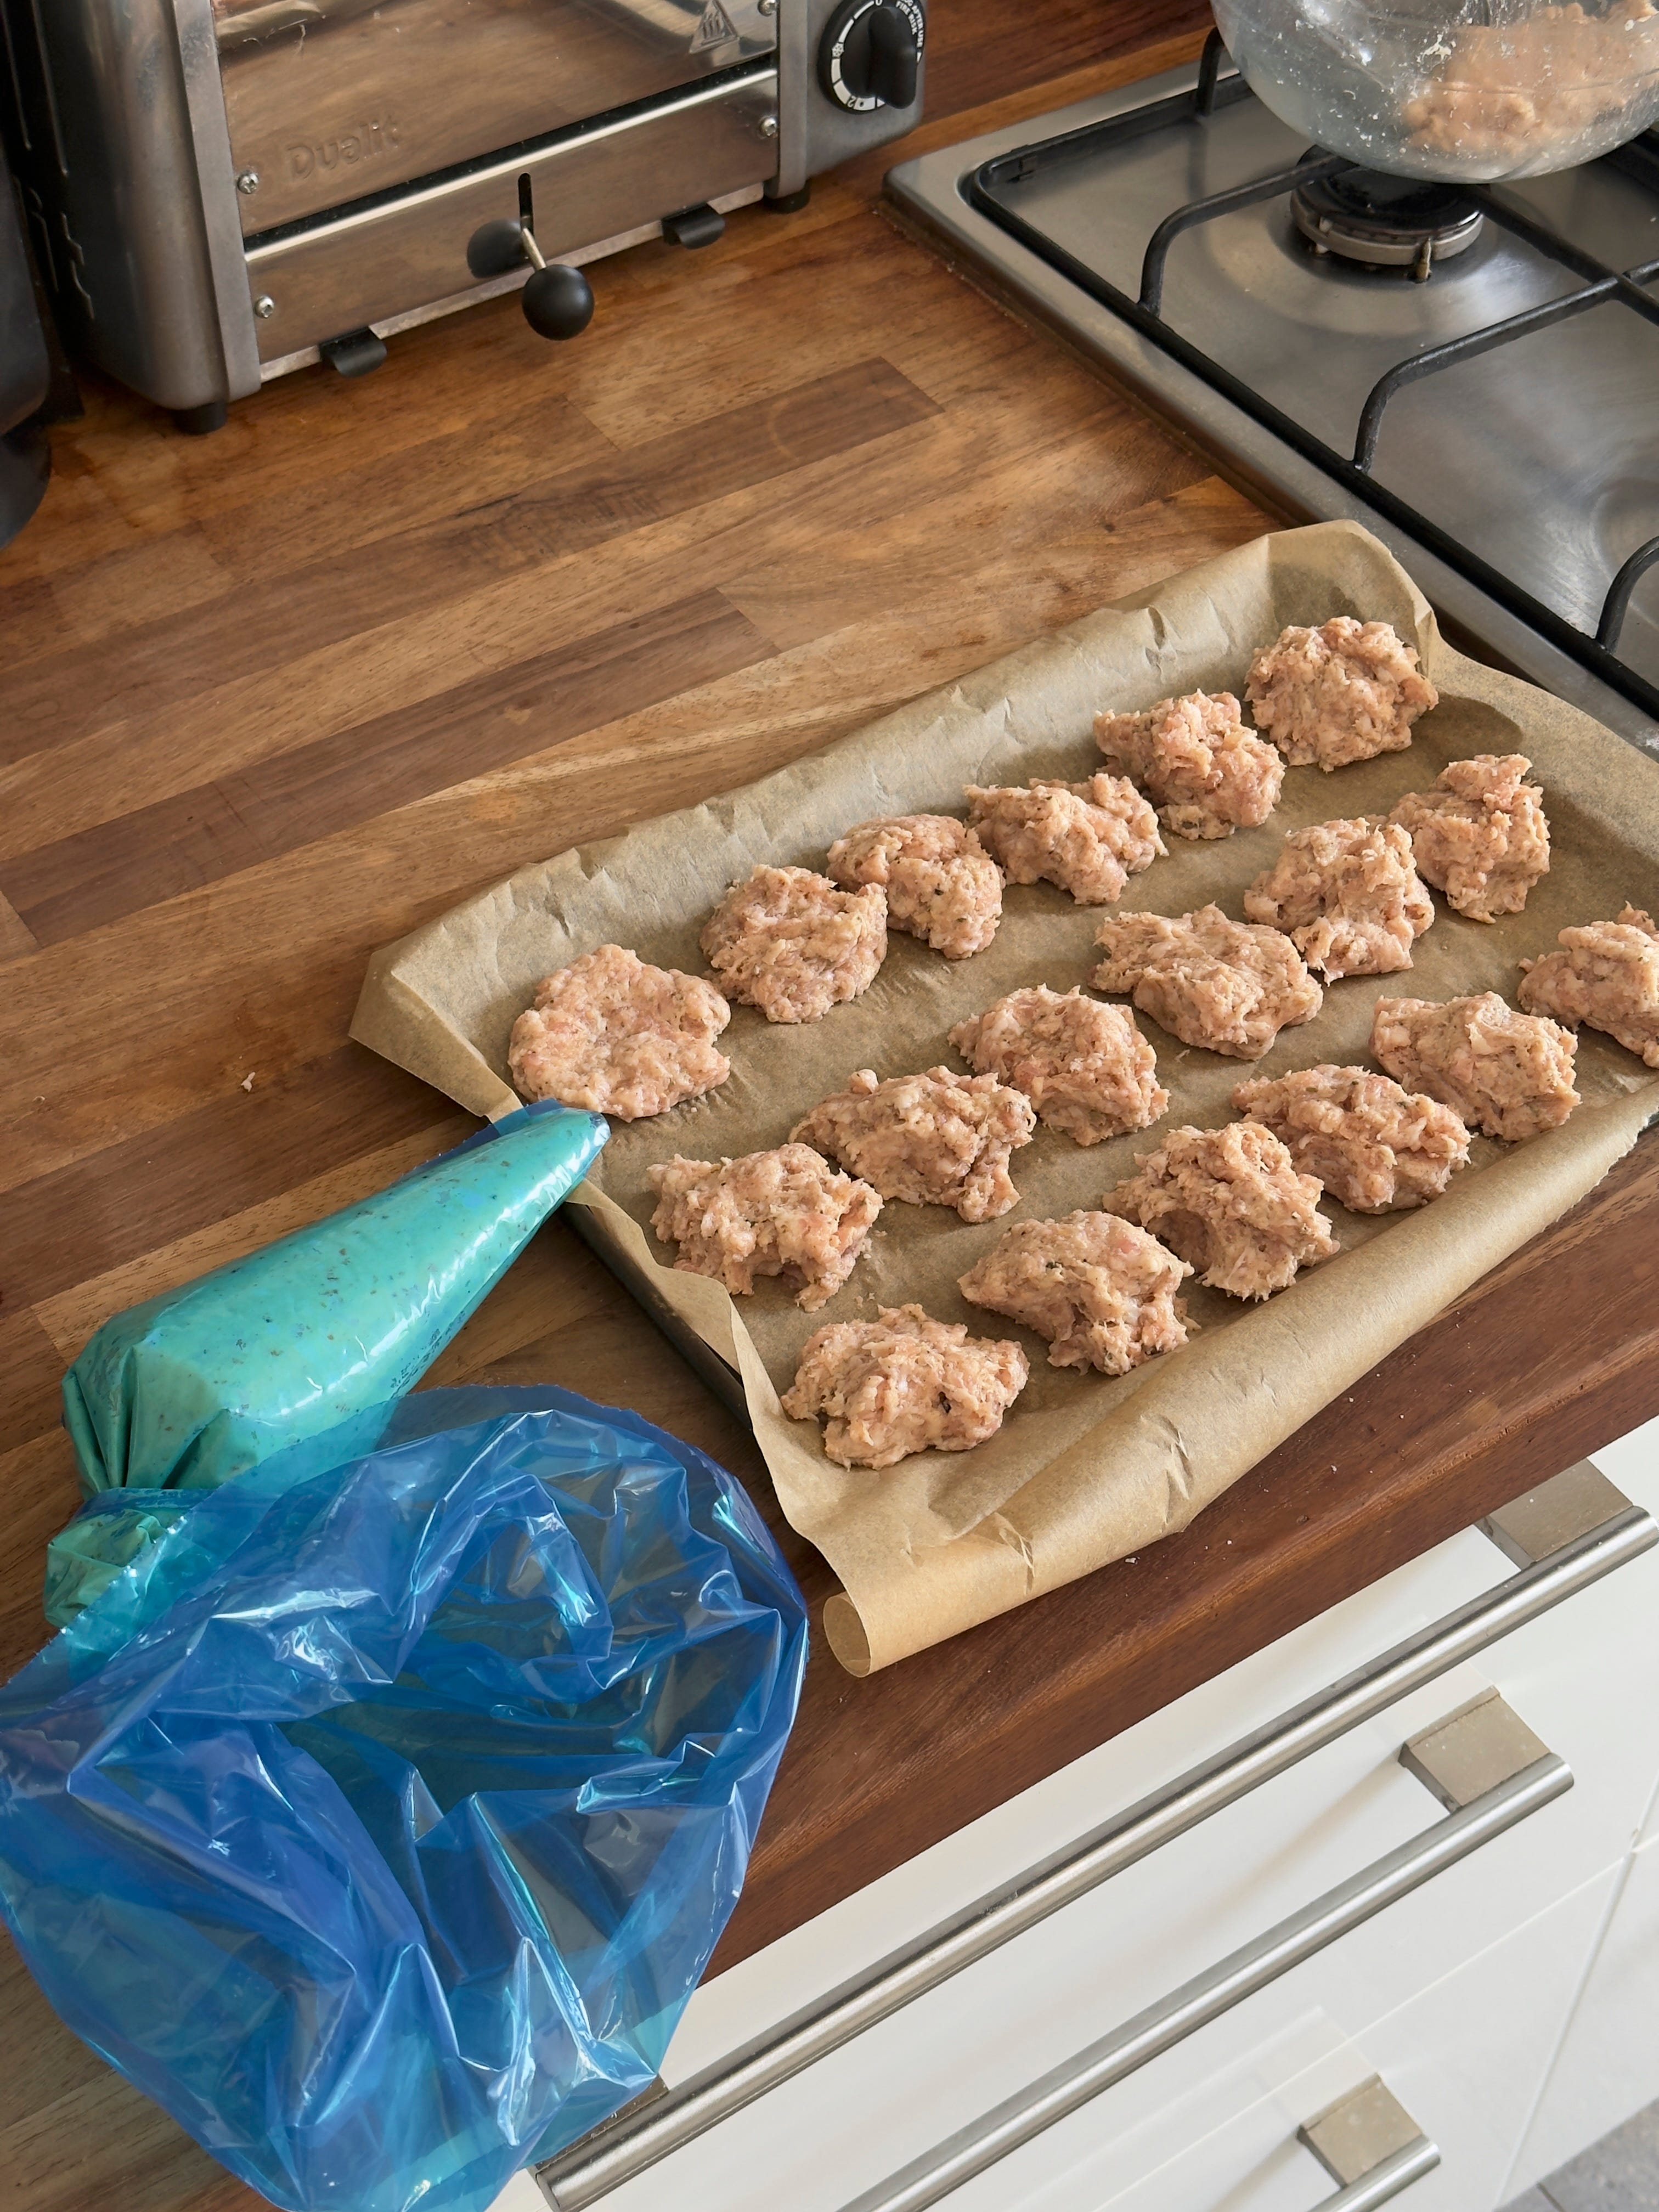
Once the mix is weighed, take a ball and flatten it into the palm of your non-dominant hand - it should roughly cover two thirds of your palm. Take the piping bag of filling and pipe roughly a heaped teaspoon's worth of egg mayo into the centre. Now fold up the sides of the meat mix to cover the egg mayo and smooth them together to seal up the ball. Use a pinch or two of leftover mix to seal any holes. Place the ball on a lined tray and then carry on. Once you have filled and shaped all your balls, pop them in the freezer for 30 minutes to an hour to firm up, this will make them much easier to breadcrumb.
Set up a breadcrumbing station with your flour in one small shallow tray, your eggs in a bowl and the breadcrumbs also in a tray. Have another lined tray on standby for your coated eggs.
Dip each one in the flour first, then the eggs and then the breadcrumbs making sure it is an even and consistent coating. Once crumbed, keep chilled until needed.
Heat the oil in a saucepan to 160 degrees C. Fry the balls in batches of 4 or 5 for around 8- 10 minutes until they are deeply golden. Drain on a rack and leave to cool for 5 minutes before serving - you don’t want anyone burning their mouths on molten mayo! I like to serve this with mayonnaise spiked with dijon mustard but ketchup, brown sauce or even piccalilli will do.
MAKE AHEAD -
Your sausage eggs can be made and fried up to 2 days ahead of time, to be eaten cold or hot. If you wish to reheat them, do so on a rack at 180 degrees for 15 - 20 minutes.
SUBSTITUTIONS -
Use normal sausage meat if you can’t get hold of Cumberland.
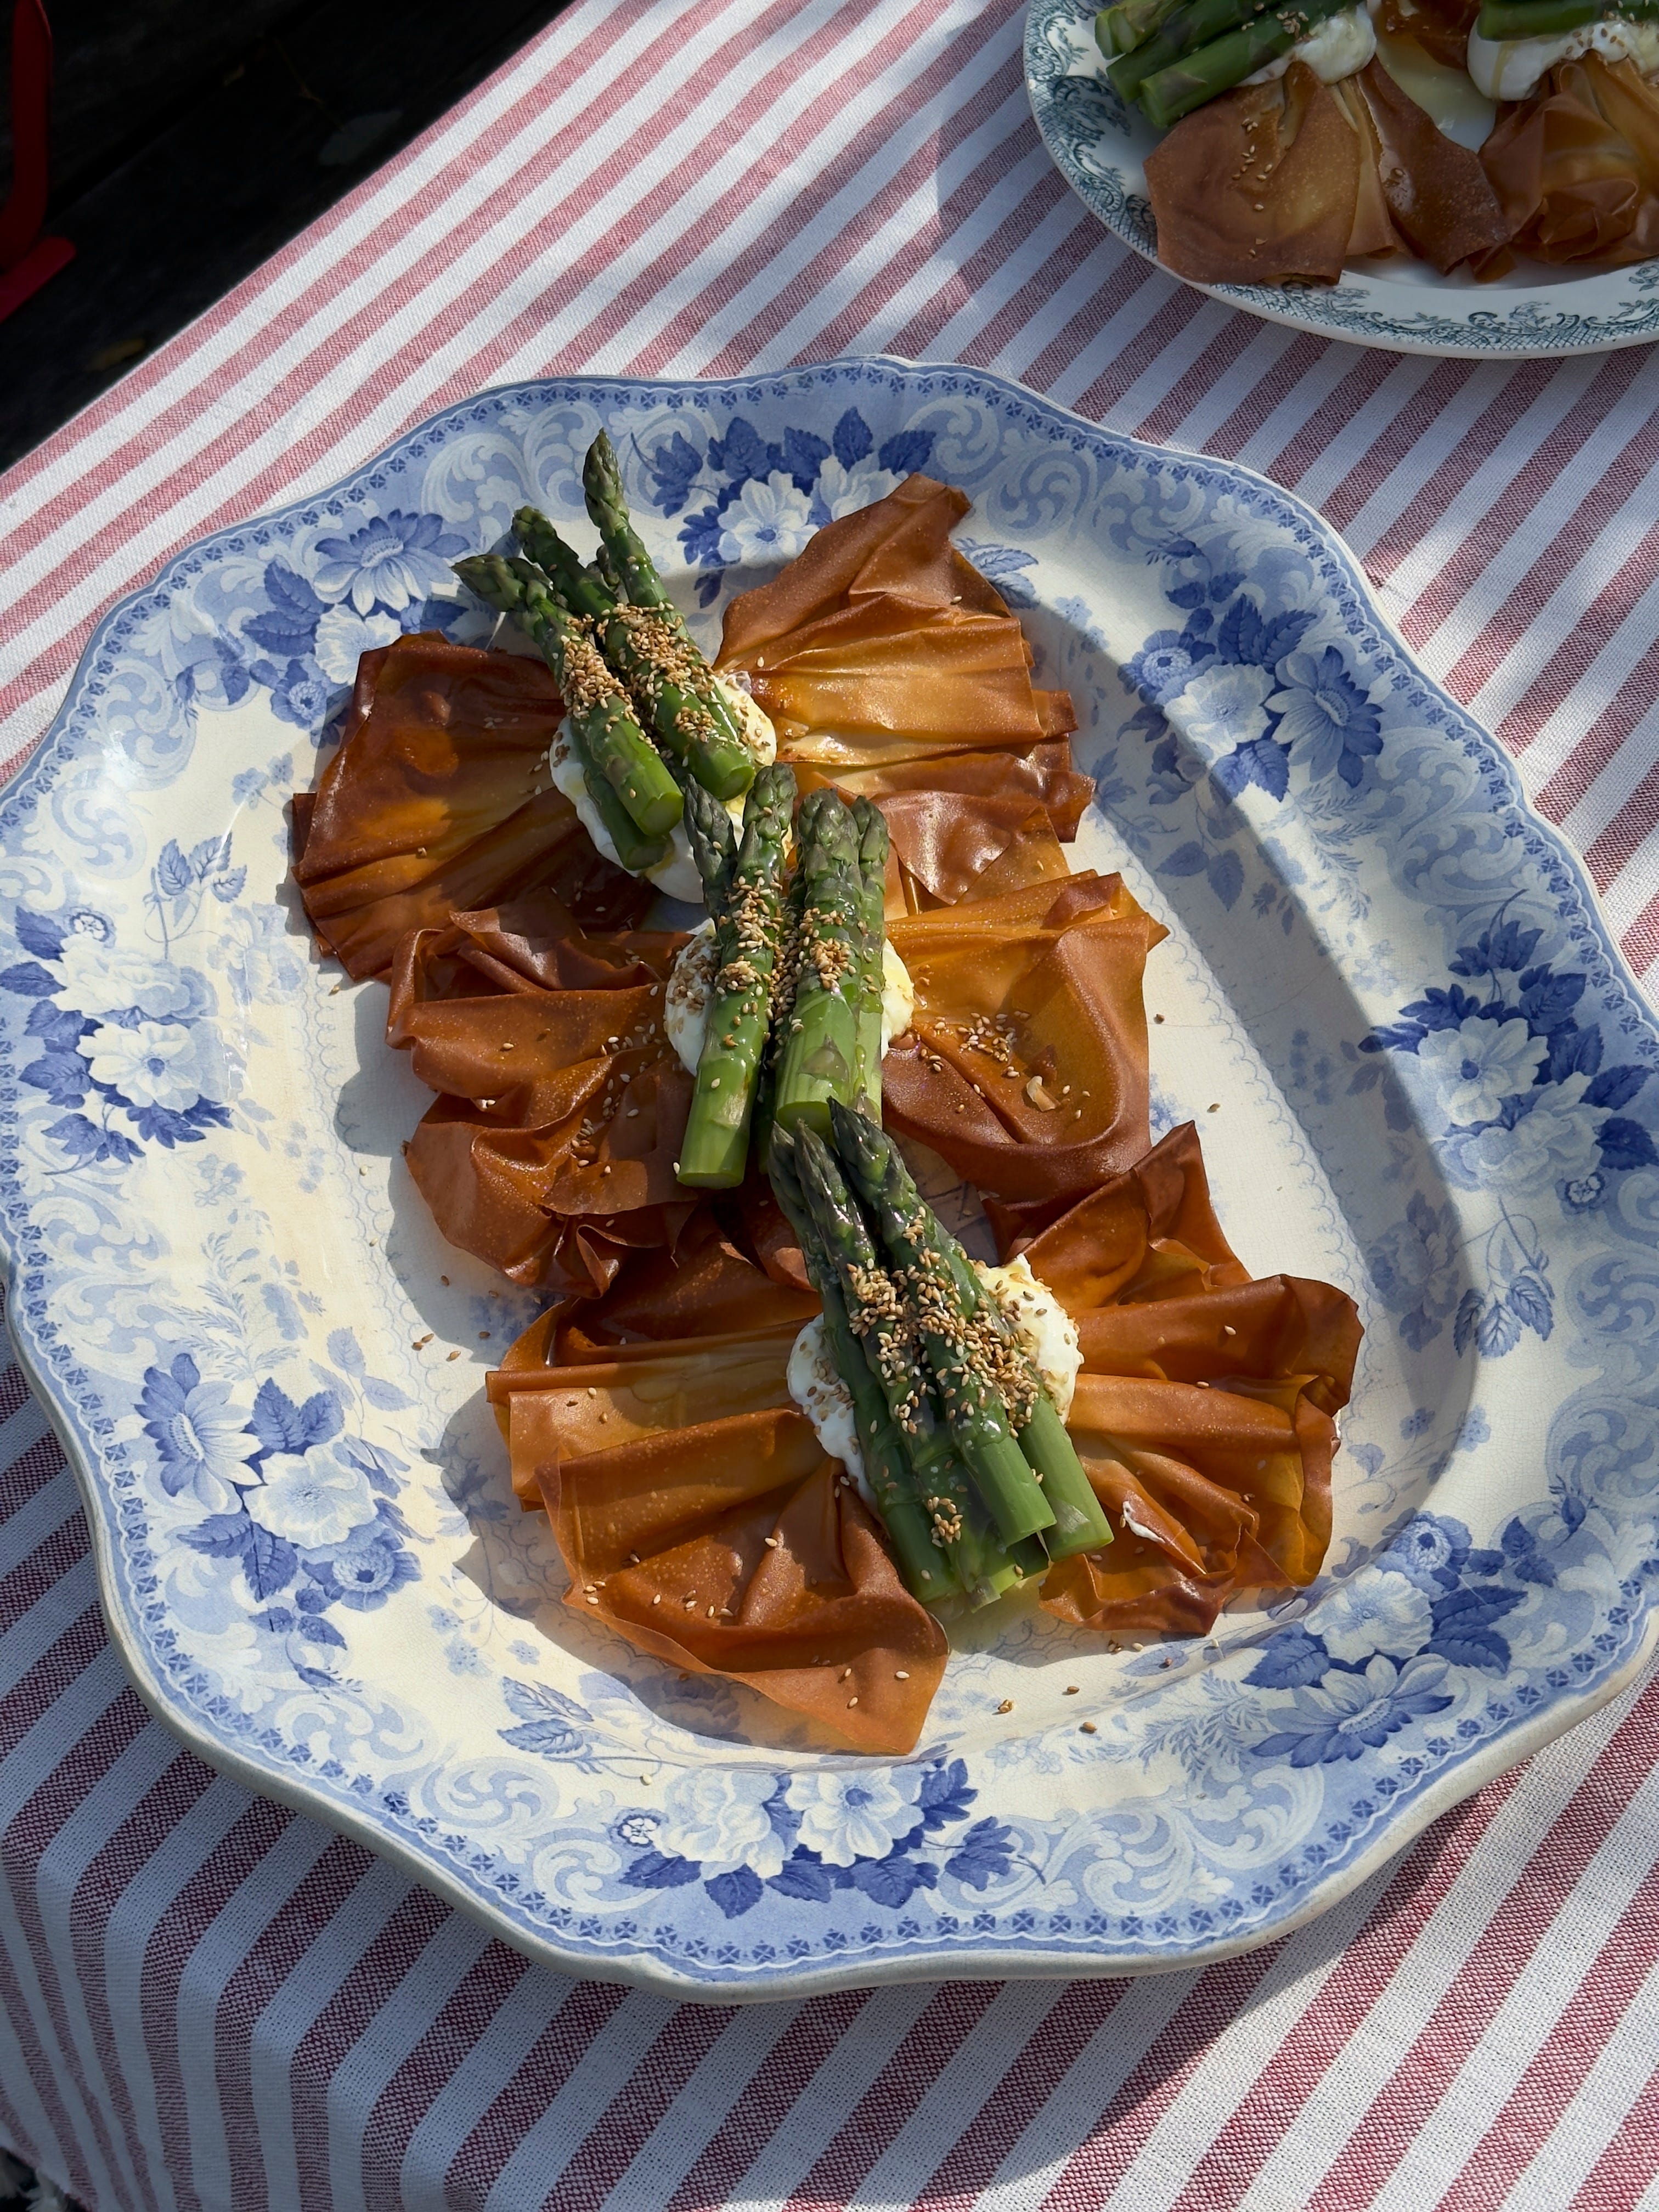
ASPARAGUS WITH FILO, LABNEH AND SESAME
My initial vision for this dish was that the asparagus and filo would be stood upright like a beautiful kind of candlebra situation, but alas without employing non-edible styling tools this wasn’t an option. To be honest, I now actually kind of love how they look lying down and they are certainly easier to make, eat and serve. The filo bows are STUPIDLY chic in fact and I can’t wait to make them and top them with more things!
Makes 7 per pack of pastry
For the labneh
600g thick greek yoghurt
2 tsps flakey sea salt
1 large clove of garlic
For the rest
1 pack of filo pastry - 7 sheets come in a standard Jusrol pack
70ml olive oil
700g asparagus, woody ends trimmed
2 tbsps olive oil
50g butter
3 tbsps toasted sesame seeds
2 tbsps runny honey
Salt and pepper
At least 4 hours before you want to eat, mix the greek yoghurt with the salt. Line a sieve over a bowl with a jay cloth (or muslin if you have it) and fill it with the yoghurt. The yoghurt will thicken and release some of its water content into the bowl below, becoming very thick and creamy the longer it sits. Pop it in the fridge until you need it, you can also start this the night before.
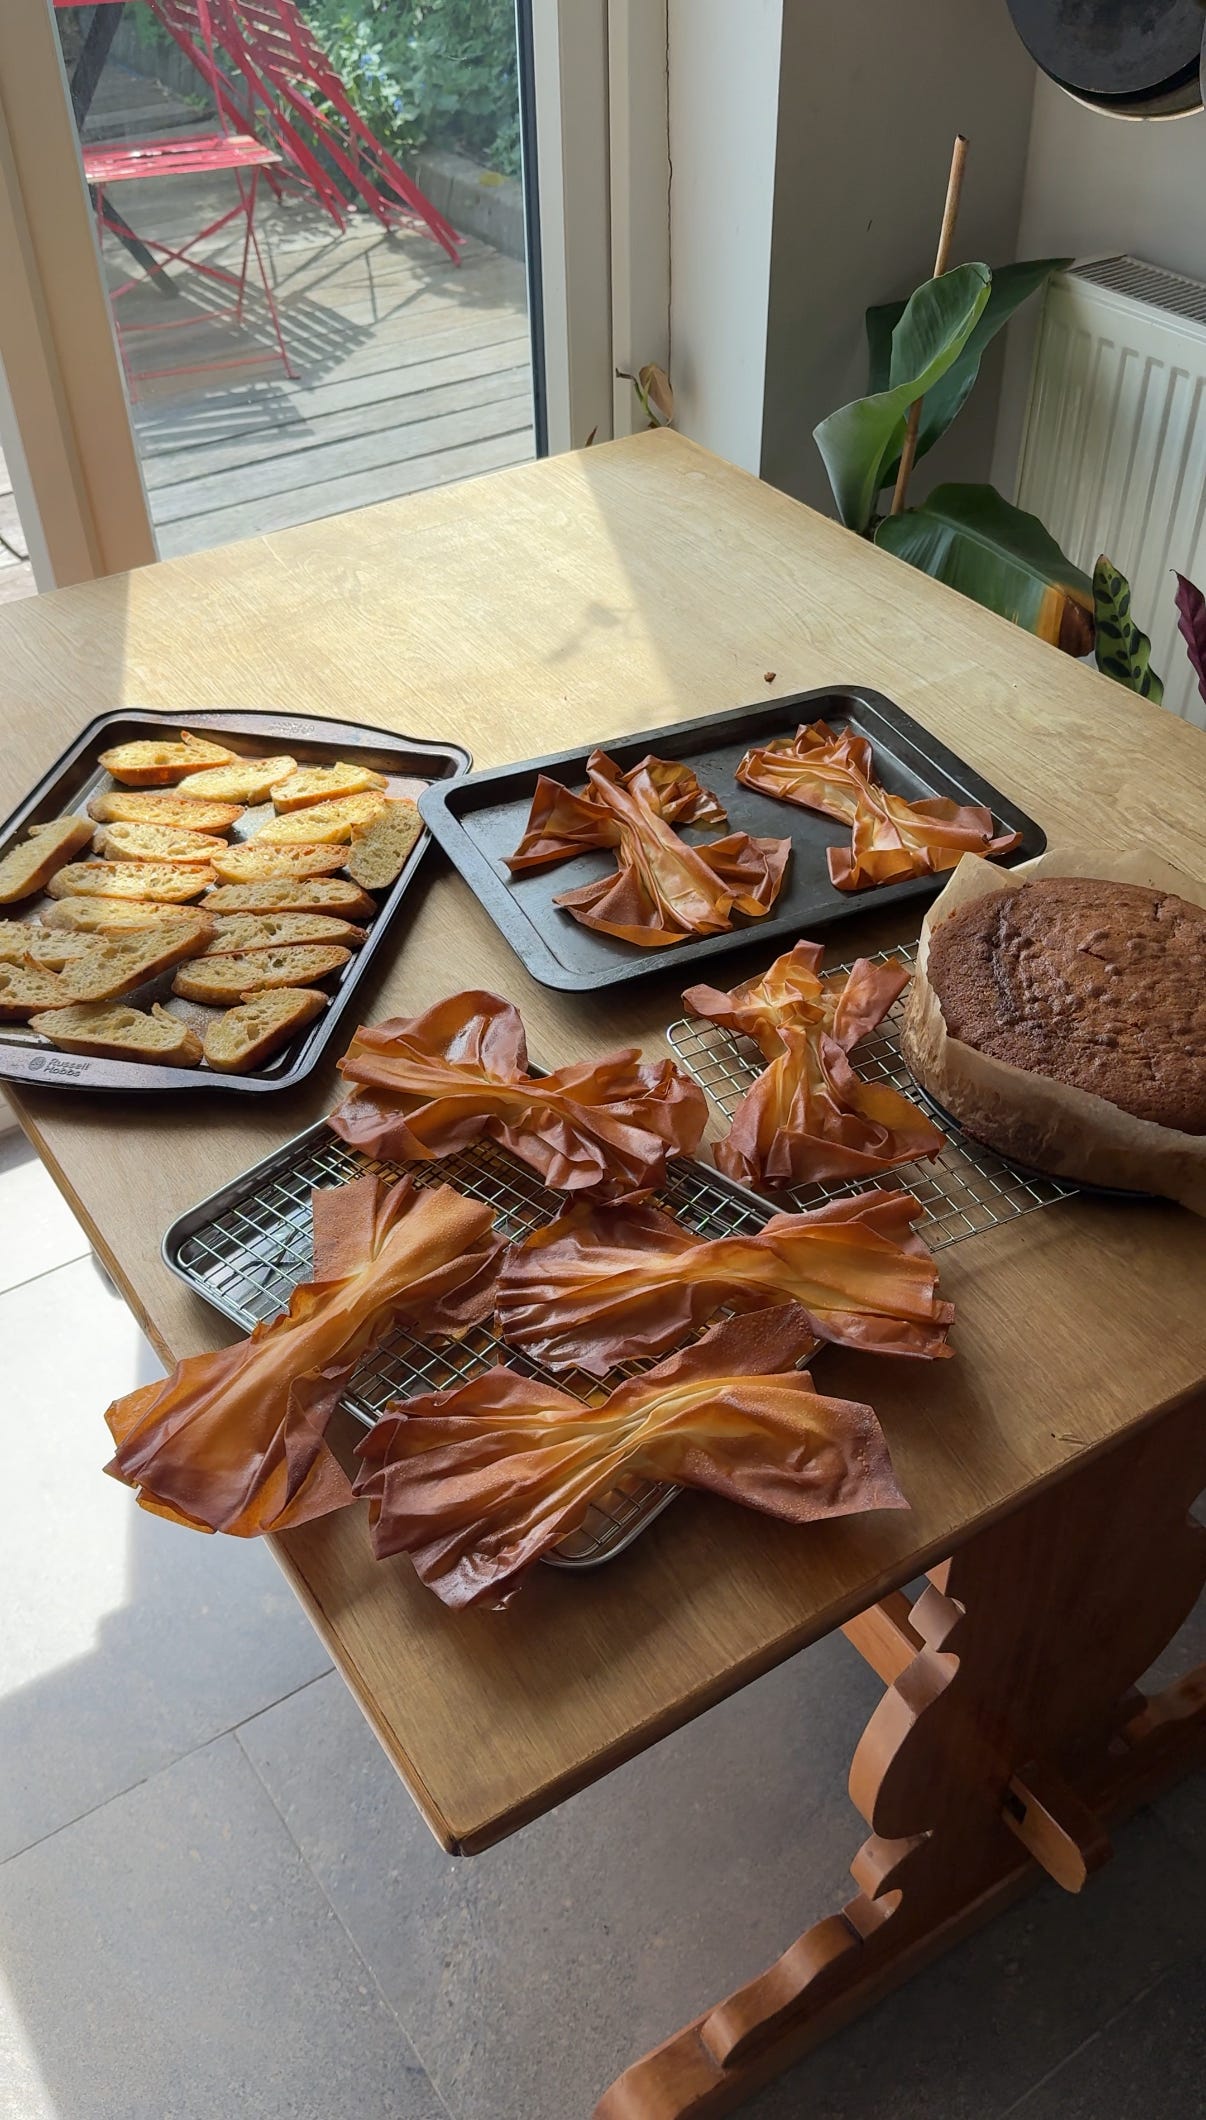
Preheat the oven to 180 fan. Take each sheet of filo and brush it well with the olive oil. To make a bow shape you want to bring the two long ends together in the middle and pinch so that it kind of ruffles out on either side with a thinner bit in the middle. Repeat for the remaining filo sheets and then bake for 10 - 12 minutes until a deep golden. Leave to cool until needed.
To cook the asparagus, bring a large pan of water to a rolling boil and salt it generously. Prepare a bowl of iced water to chill the asparagus. Drop it in the boiling water and cook it for around 90 seconds - 2 minutes, depending on the thickness of the stems. Immediately plunge the asparagus in the iced water to cool, then drain and dry it all off. Drizzle with a little oil and season with salt and pepper.
Once the labneh has thickened you can finish it by mixing in a grated clove of garlic. Melt the butter in a small saucepan and season it with salt and pepper.
Place your filo bows on your chosen serveware. Top each one with a dollop of labneh and then a pile on 4 or 5 asparagus spears. Now drizzle over the melted butter, a bit of honey and then top with the sesame seeds. Serve immediately.
MAKE AHEAD -
The labneh can be made up to 3 days ahead, only add the garlic on the day you serve.
Bake the filo bows up to 6 hours in advance and store at room temperature.
SUBSTITUTIONS -
Drizzle with a spiced or brown butter if you prefer, or even chilli oil.
Add pistachios or pine nuts instead of sesame seeds.
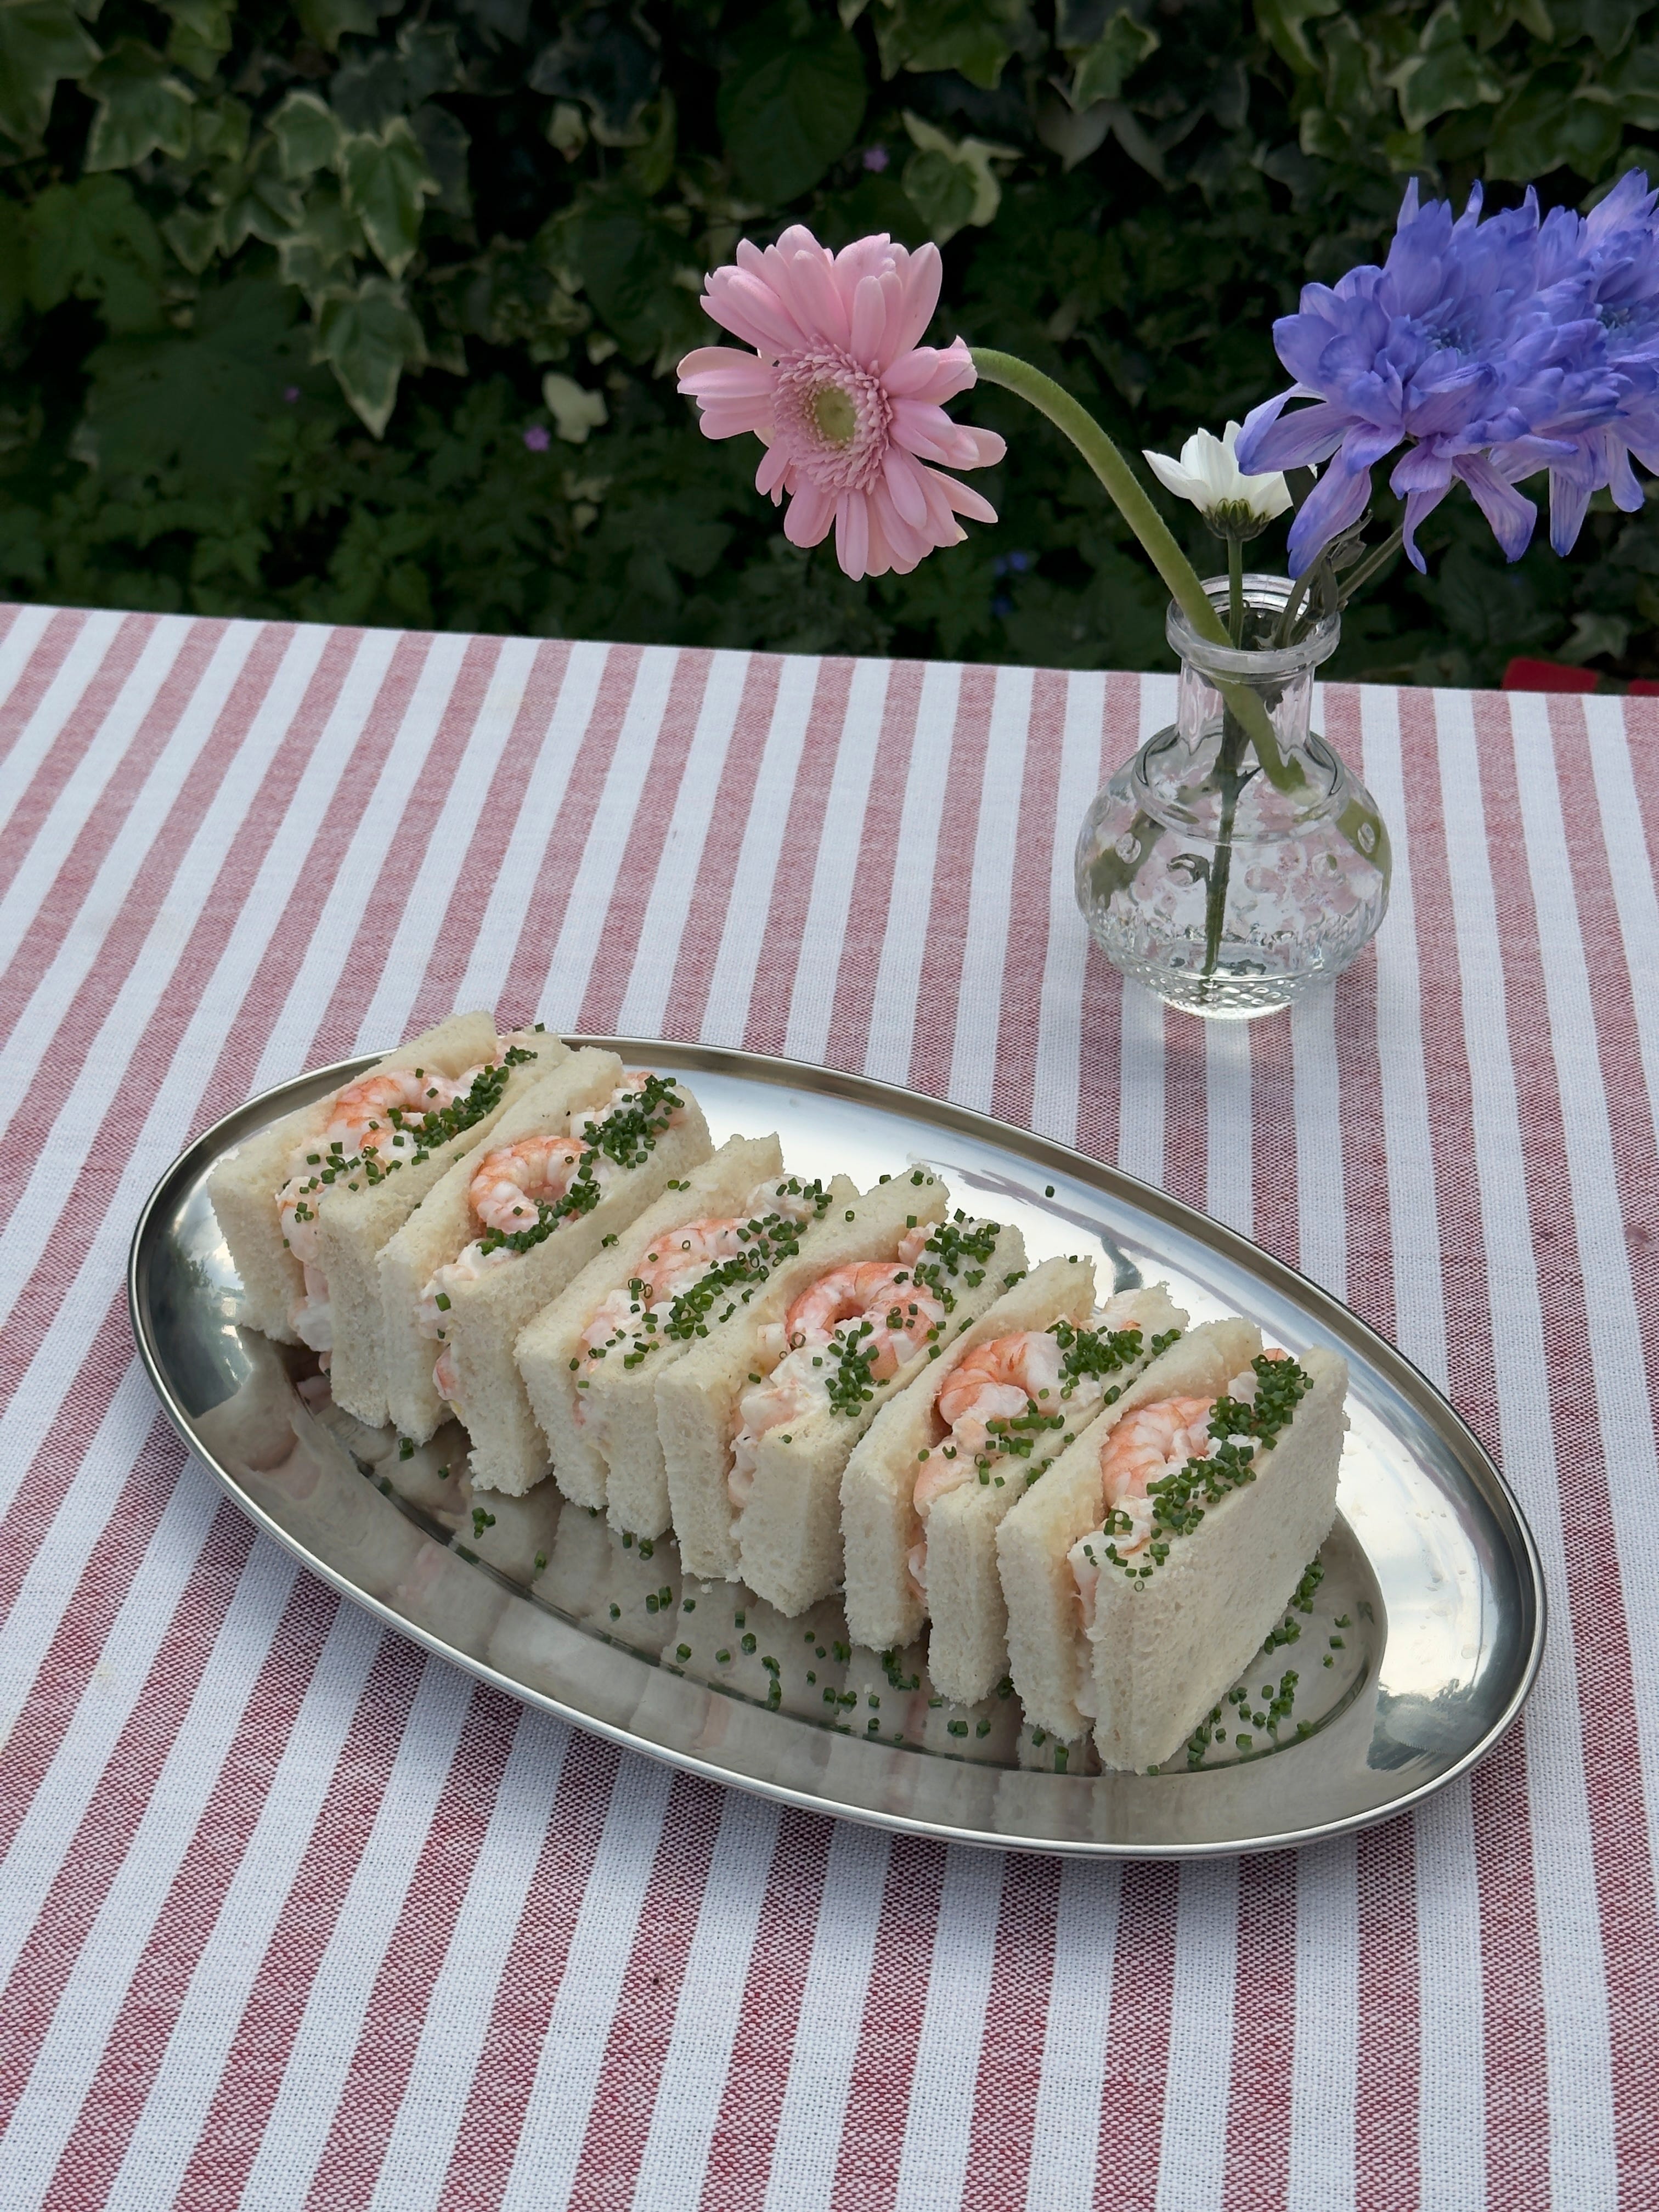
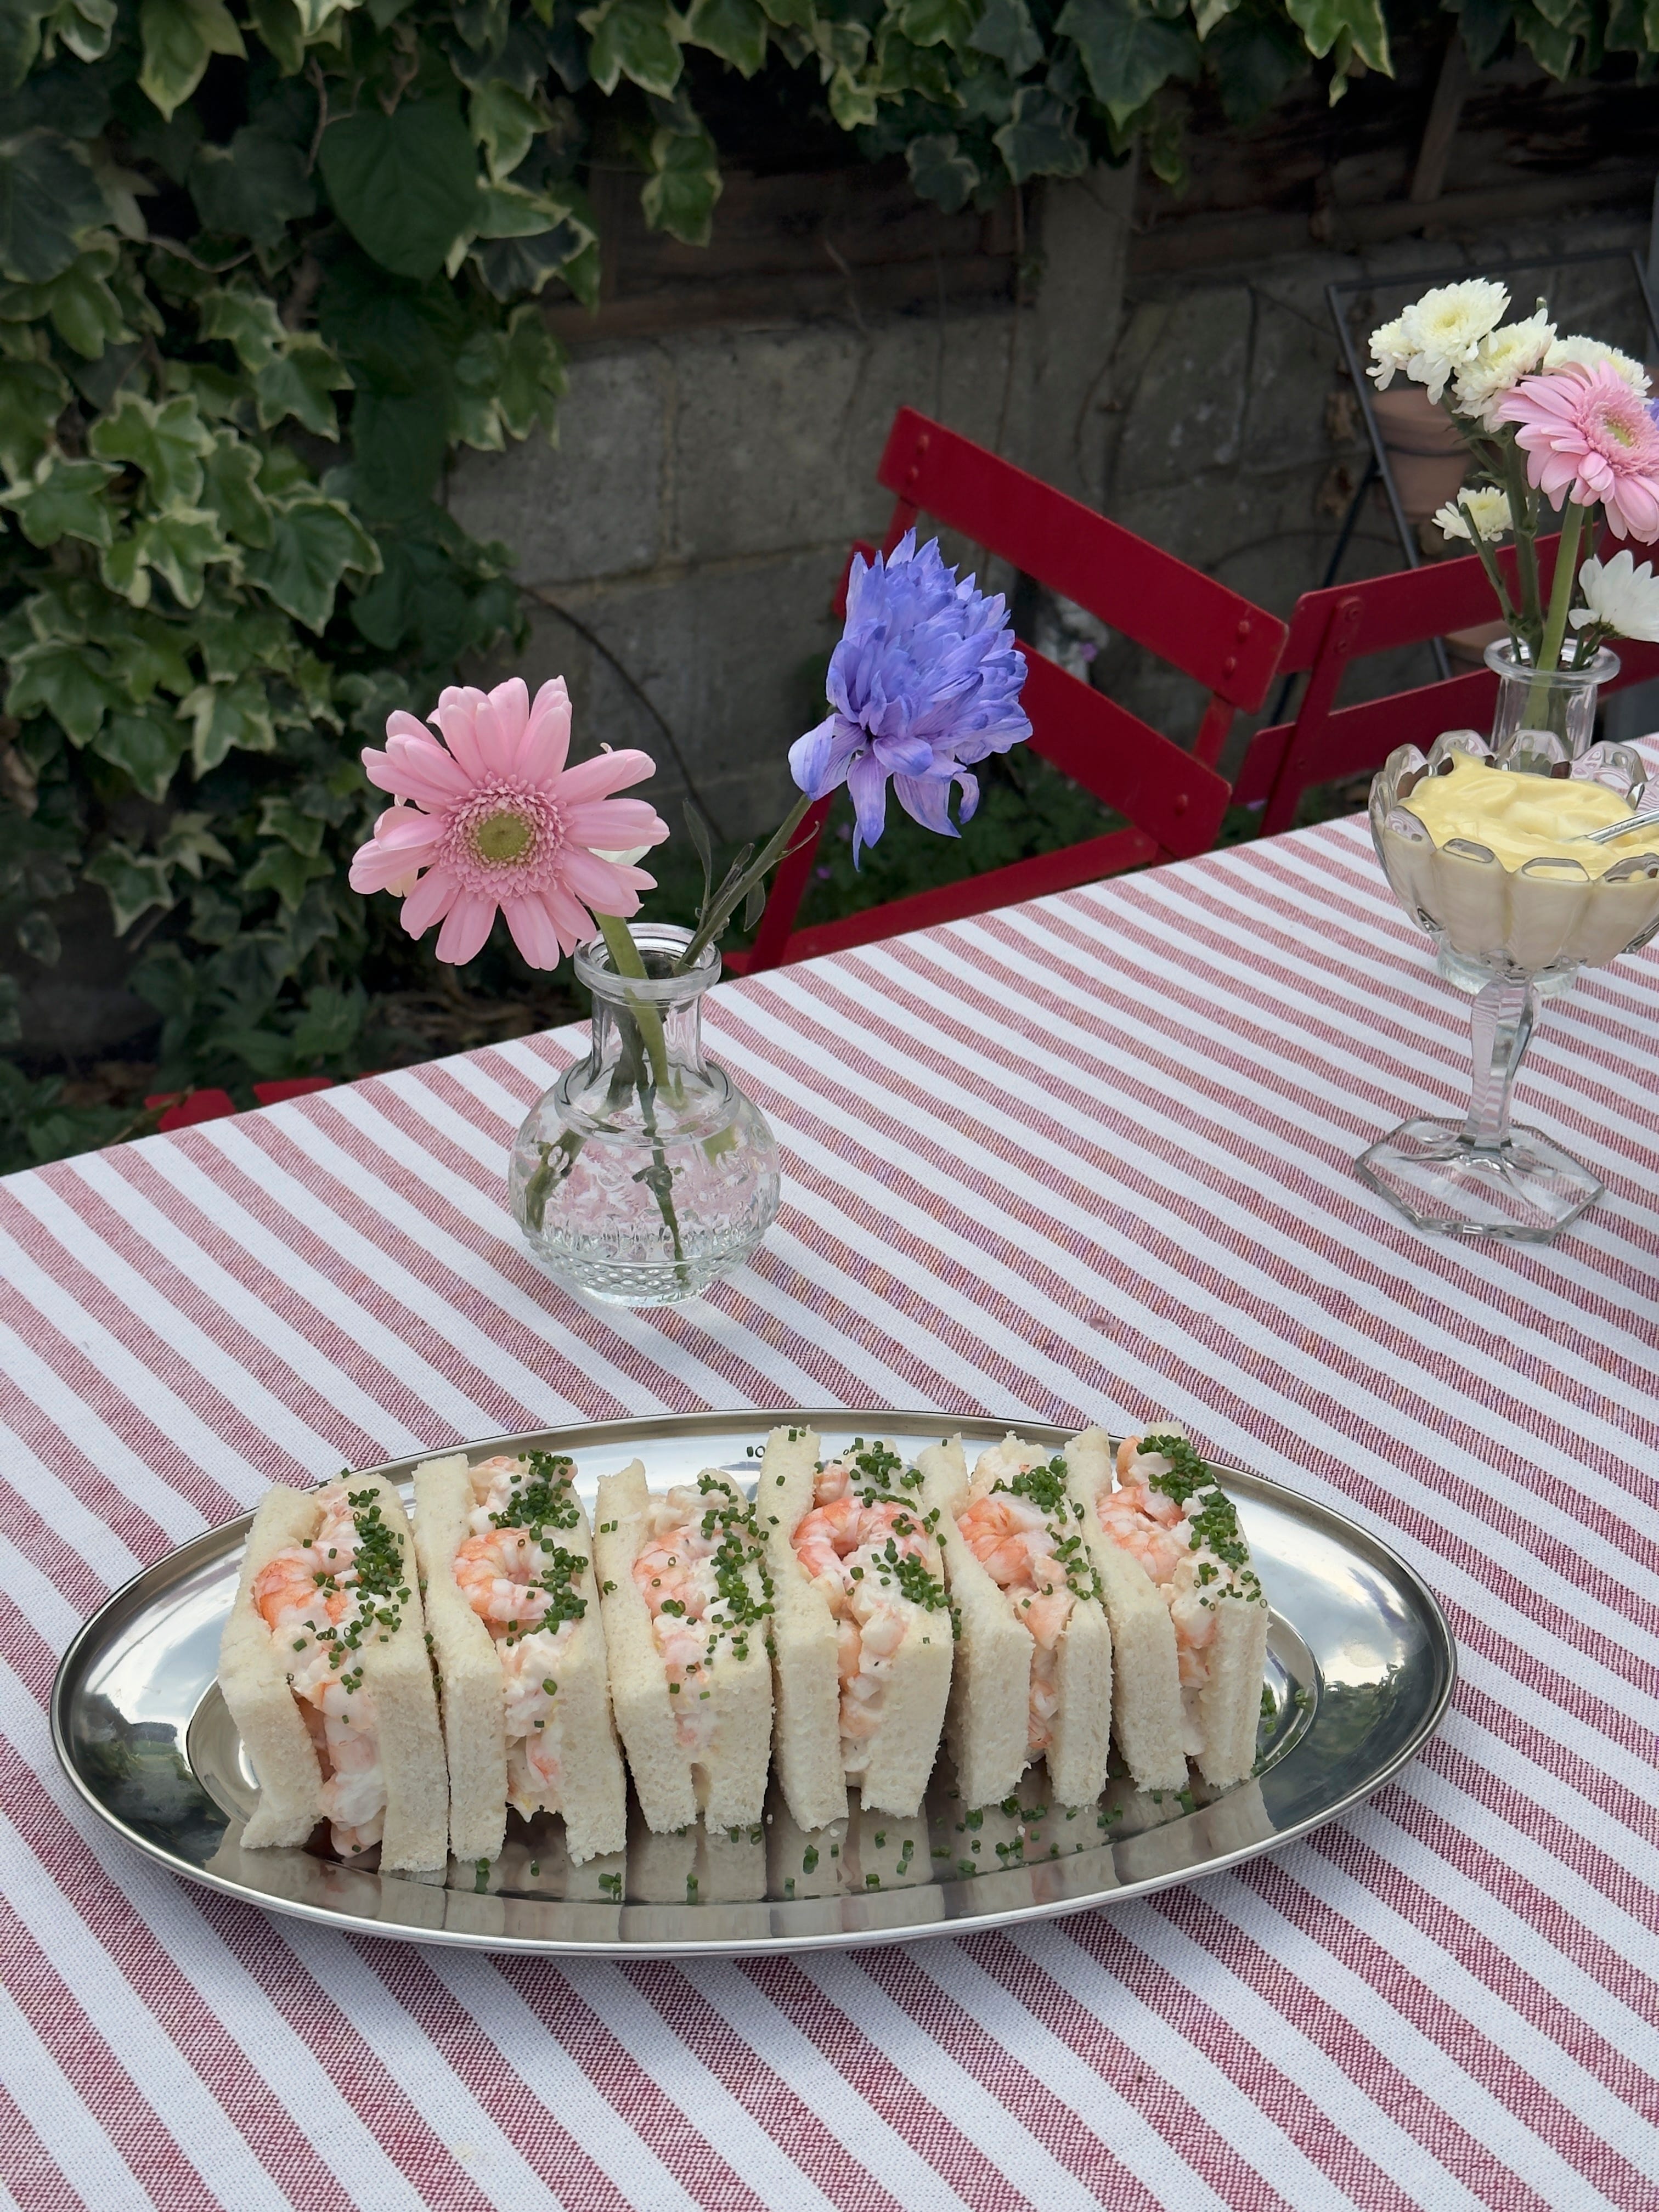
PRAWN SANDWICHES
I am in a serious prawn sandwich phase, and in making these embarked on a kind of quest for the best. For me the ultimate prawn sandwich is packed with tender prawns bound in a rich, fragrant mayonnaise on soft white bread. And that’s it! No further adornment needed, apart from some chives perhaps. I like to cook the prawns myself but it’s not strictly necessary, by all means buy cooked king prawns instead to save time. These are a little slice of heaven - perfect finger food for a summers eve.
MAKES 6 SMALL SANDWICHES
600g raw, peeled king prawns or 500g cooked, peeled king prawns
150g mayonnaise - ideally Japanese Kewpie if you can find it.
Zest + juice of half a lemon
Pinch of garlic granules
A small handful of chives, finely chopped
Salt and pepper to taste
6 slices of soft white bread, crusts removed
If you are cooking the prawns, bring a medium sized saucepan of water to a simmer and season well with salt. Prepare a bowl full of ice to dunk the prawns in after cooking. I prefer to cook the prawns in batches for more control. While the water is barely simmering drop half of the prawns in, then immediately switch off the heat. If your prawns are small they will only need 60 - 90 seconds in the water before being immediately transferred with a kitchen spider to the iced water. For very large prawns it may take up to 3 minutes. Repeat with the remaining prawns, refreshing in the iced water to stop them from cooking. Drain the prawns really well and dry them off with some paper towel. Set aside 6 beautiful prawns - the pinkest are the best. Chop the rest of the prawns - I like them to be in 1 cm pieces. In a bowl combine the prawns with 120g of the mayonnaise, the lemon zest and juice, garlic granules and season with salt and pepper. Taste the mix and adjust the salt and acidity if you would like.
Right before you wish to eat them, assemble the sandwiches. Spread the remaining mayonnaise on one side of each. Pile plenty of prawns into the sandwich, then take two of your hero prawns and place them vertically in the middle of the piece of bread - you’re going to slice the sandwich in half right in between them, so that when you turn the cut side up you see the whole curve of the prawn on the top. Gently press the top slice of bread on and then cut through the middle, right through the gap between the two prawns. If this feels tricky you can always add them on post slicing instead.
Lay the sandwiches on a platter with the hero prawns facing up. Sprinkle the sandwiches with the chopped chives and serve.

MAKE AHEAD -
The prawn mayo can be made up to 2 days in advance.
You can assemble your sandwiches (but do not cut them) up to 2 hours in advance. Cover with a clean, damp tea towel and keep in the fridge until needed - the tea towel will stop the bread from drying and curling.
SUBSTITUTIONS -
You can jazz up the prawn mayo with spring onions, chilli oil or hot sauce, perhaps a little grating of ginger or some chopped fresh herbs.
If you prefer brown bread by all means use it, but do not use bread like sourdough for these. It needs to be soft, sandwich bread.
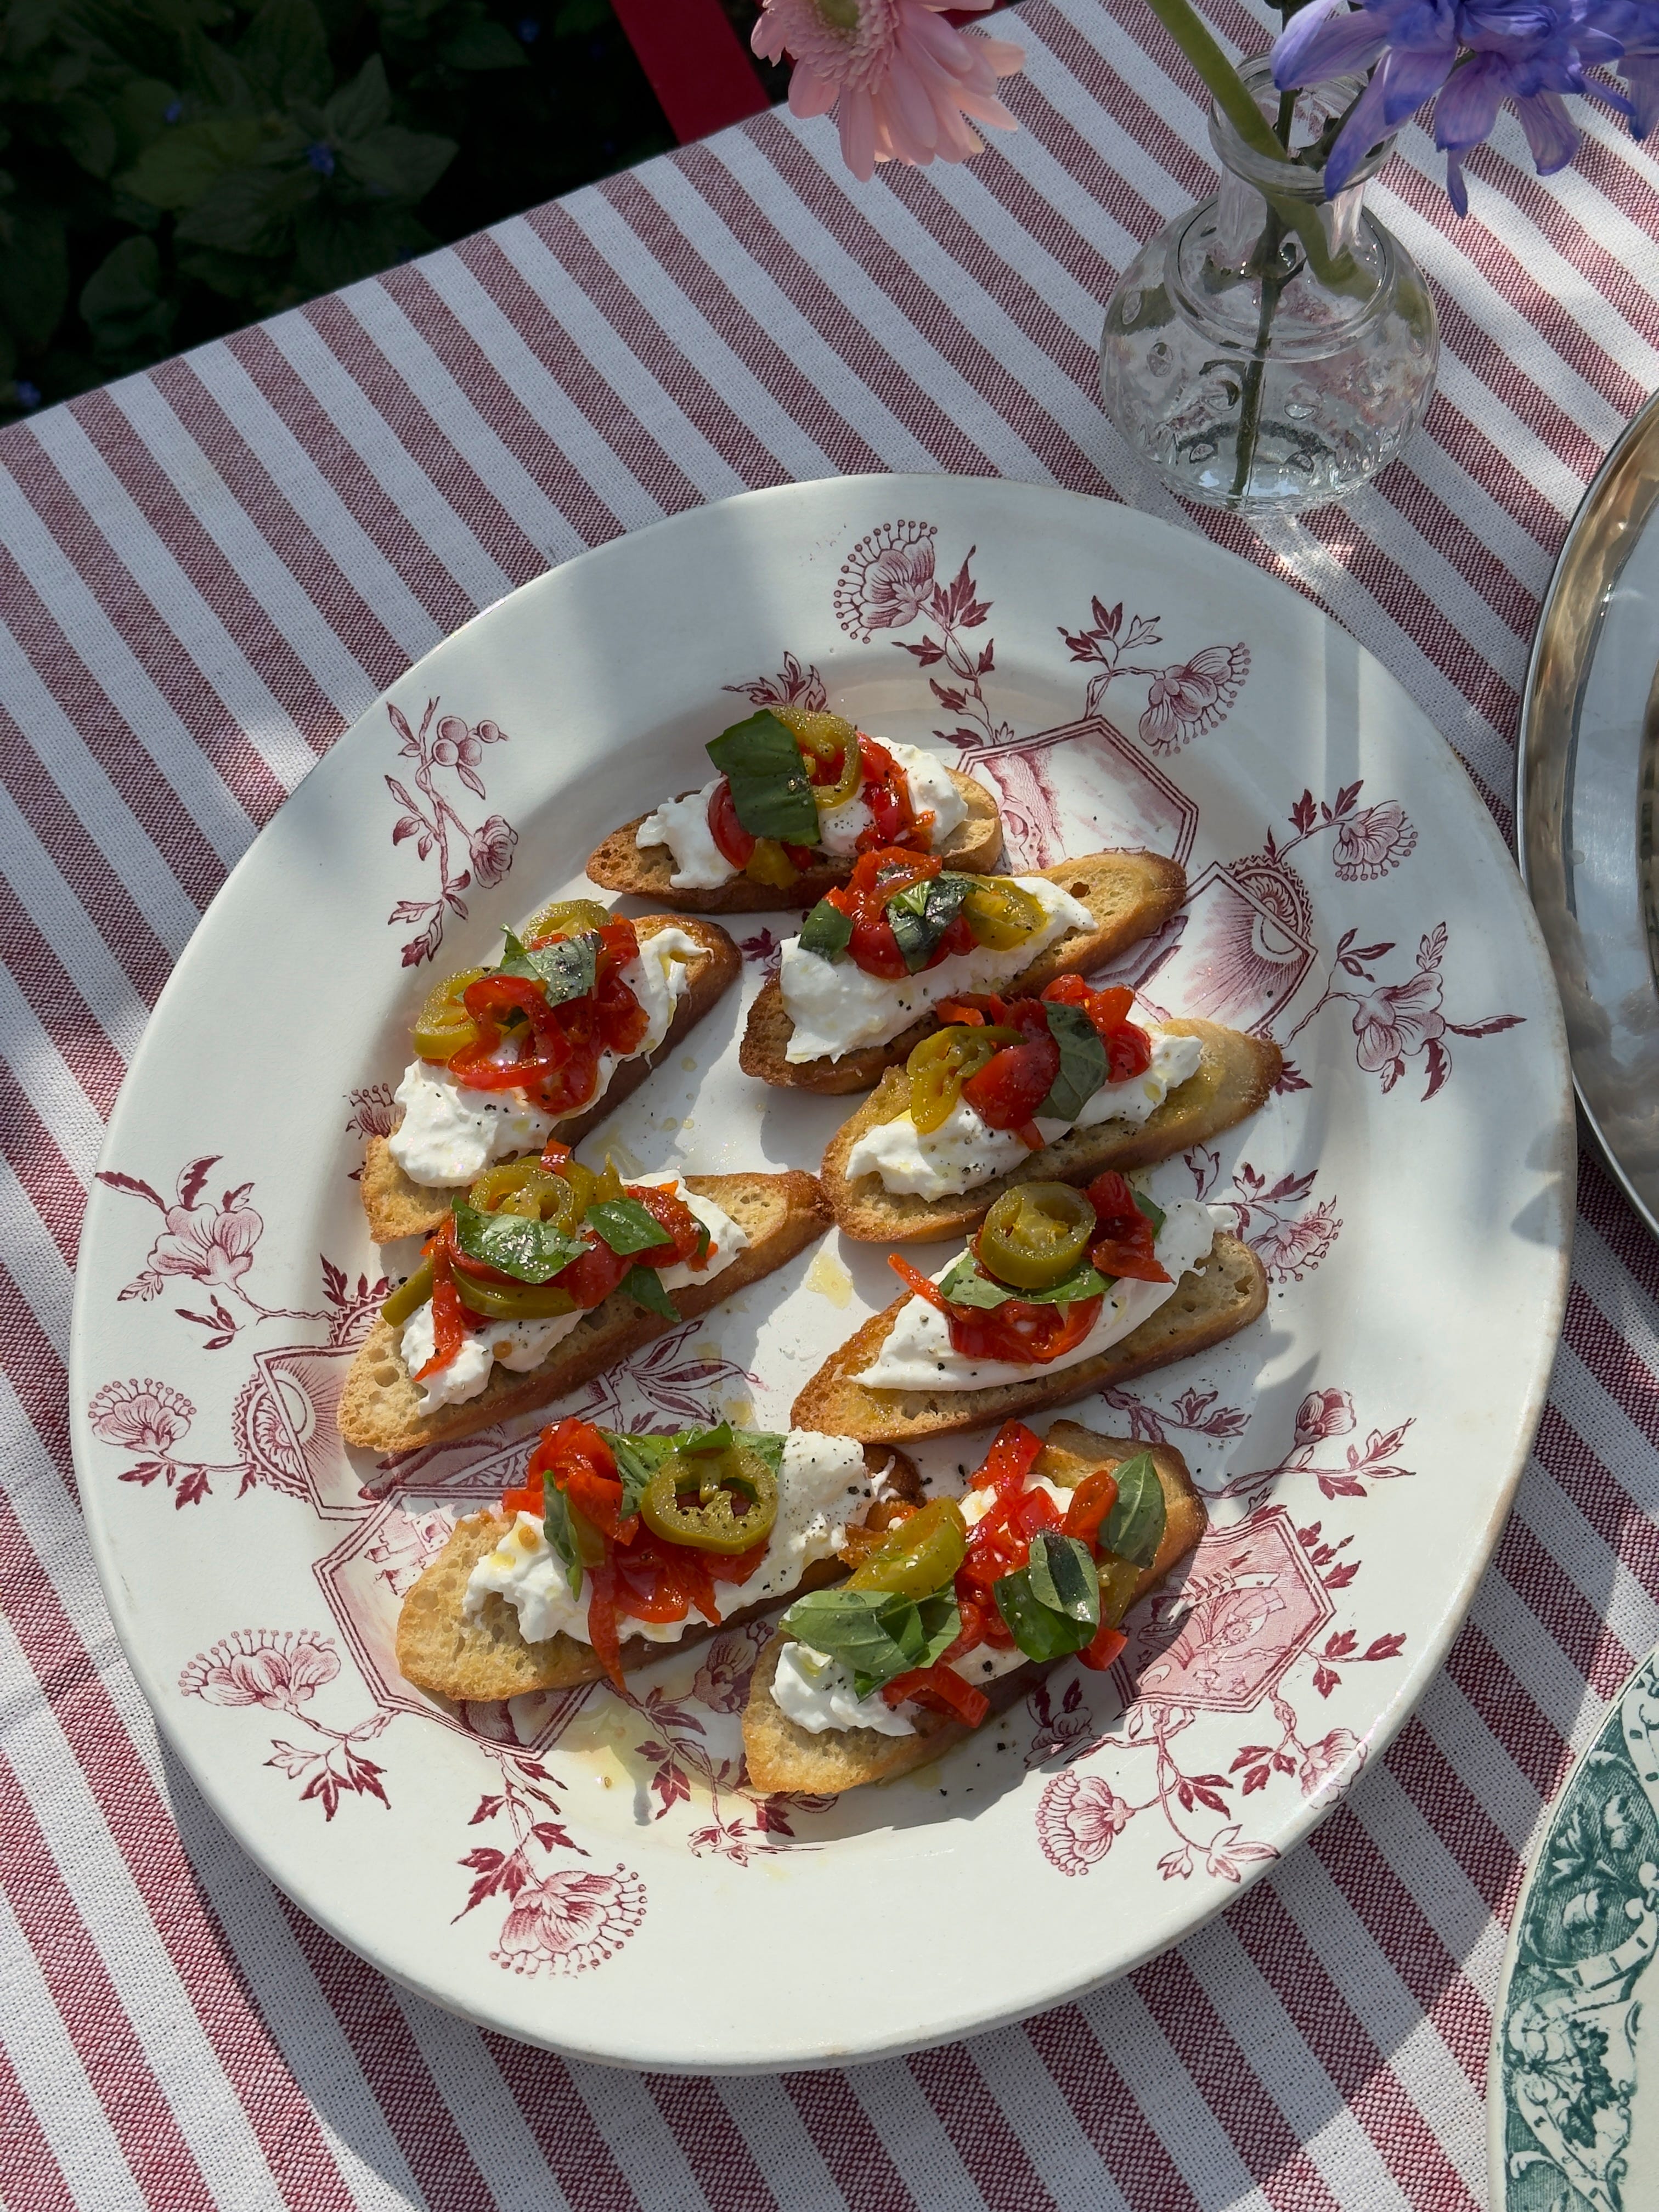
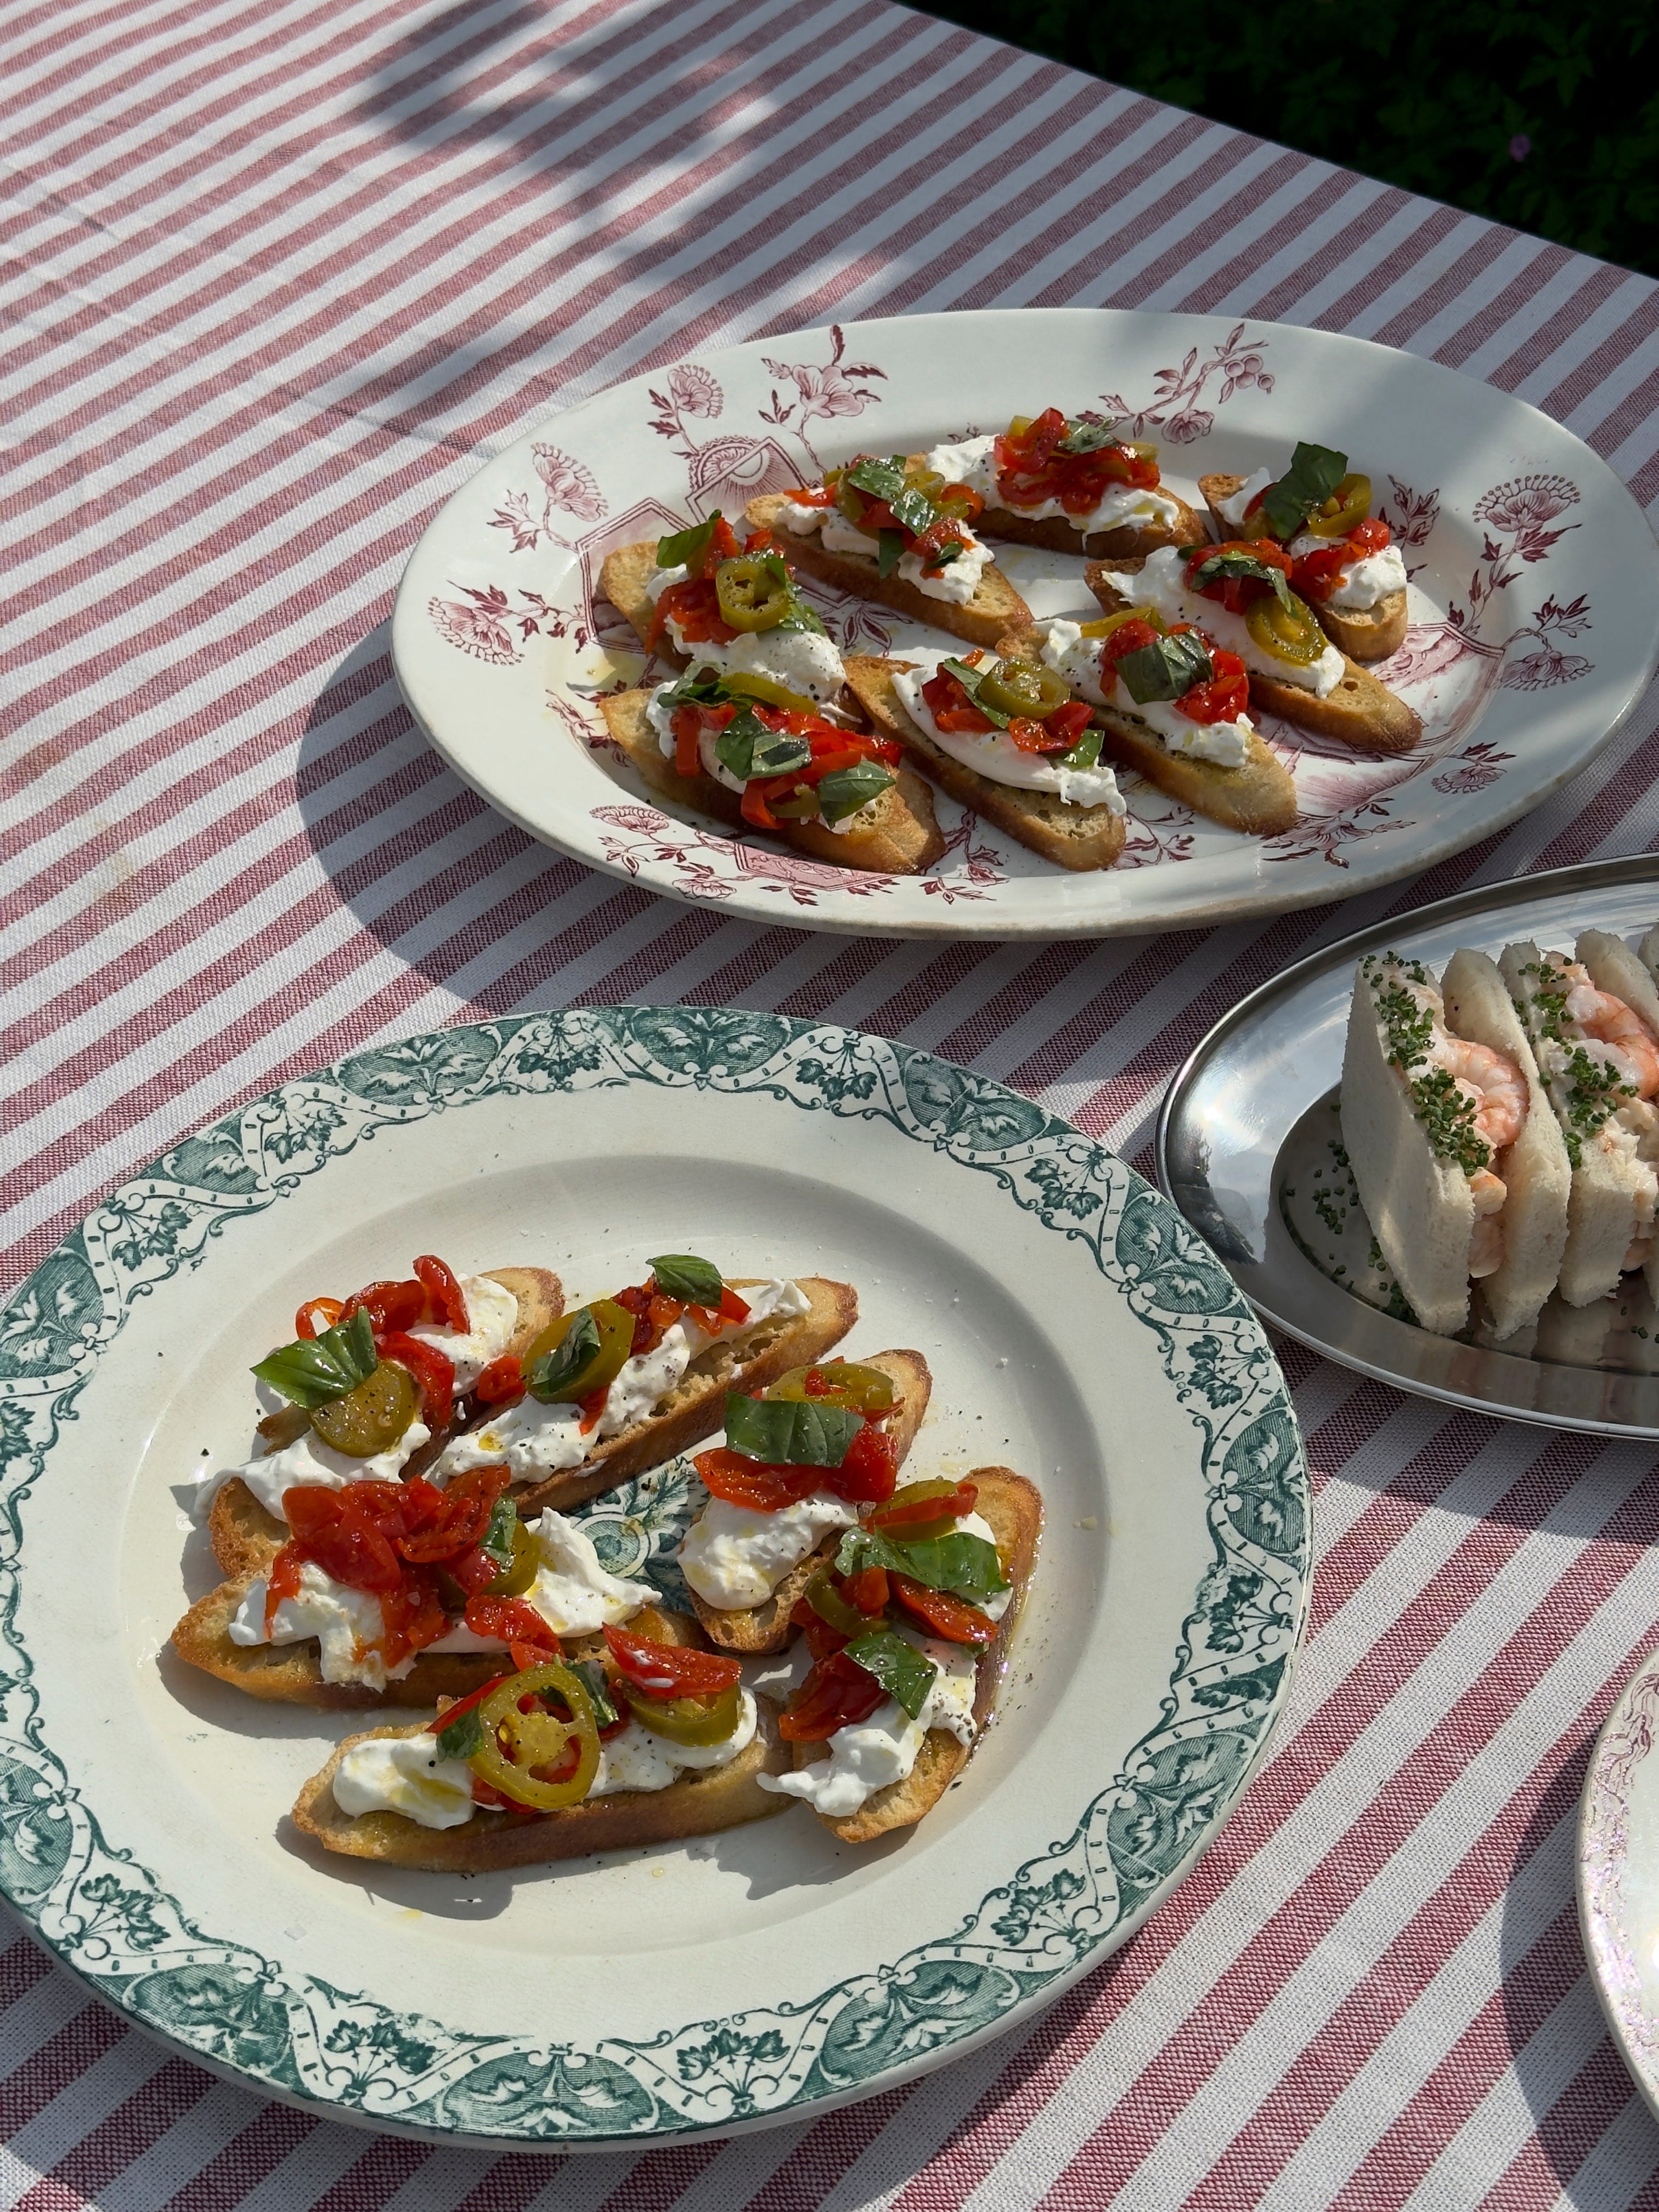
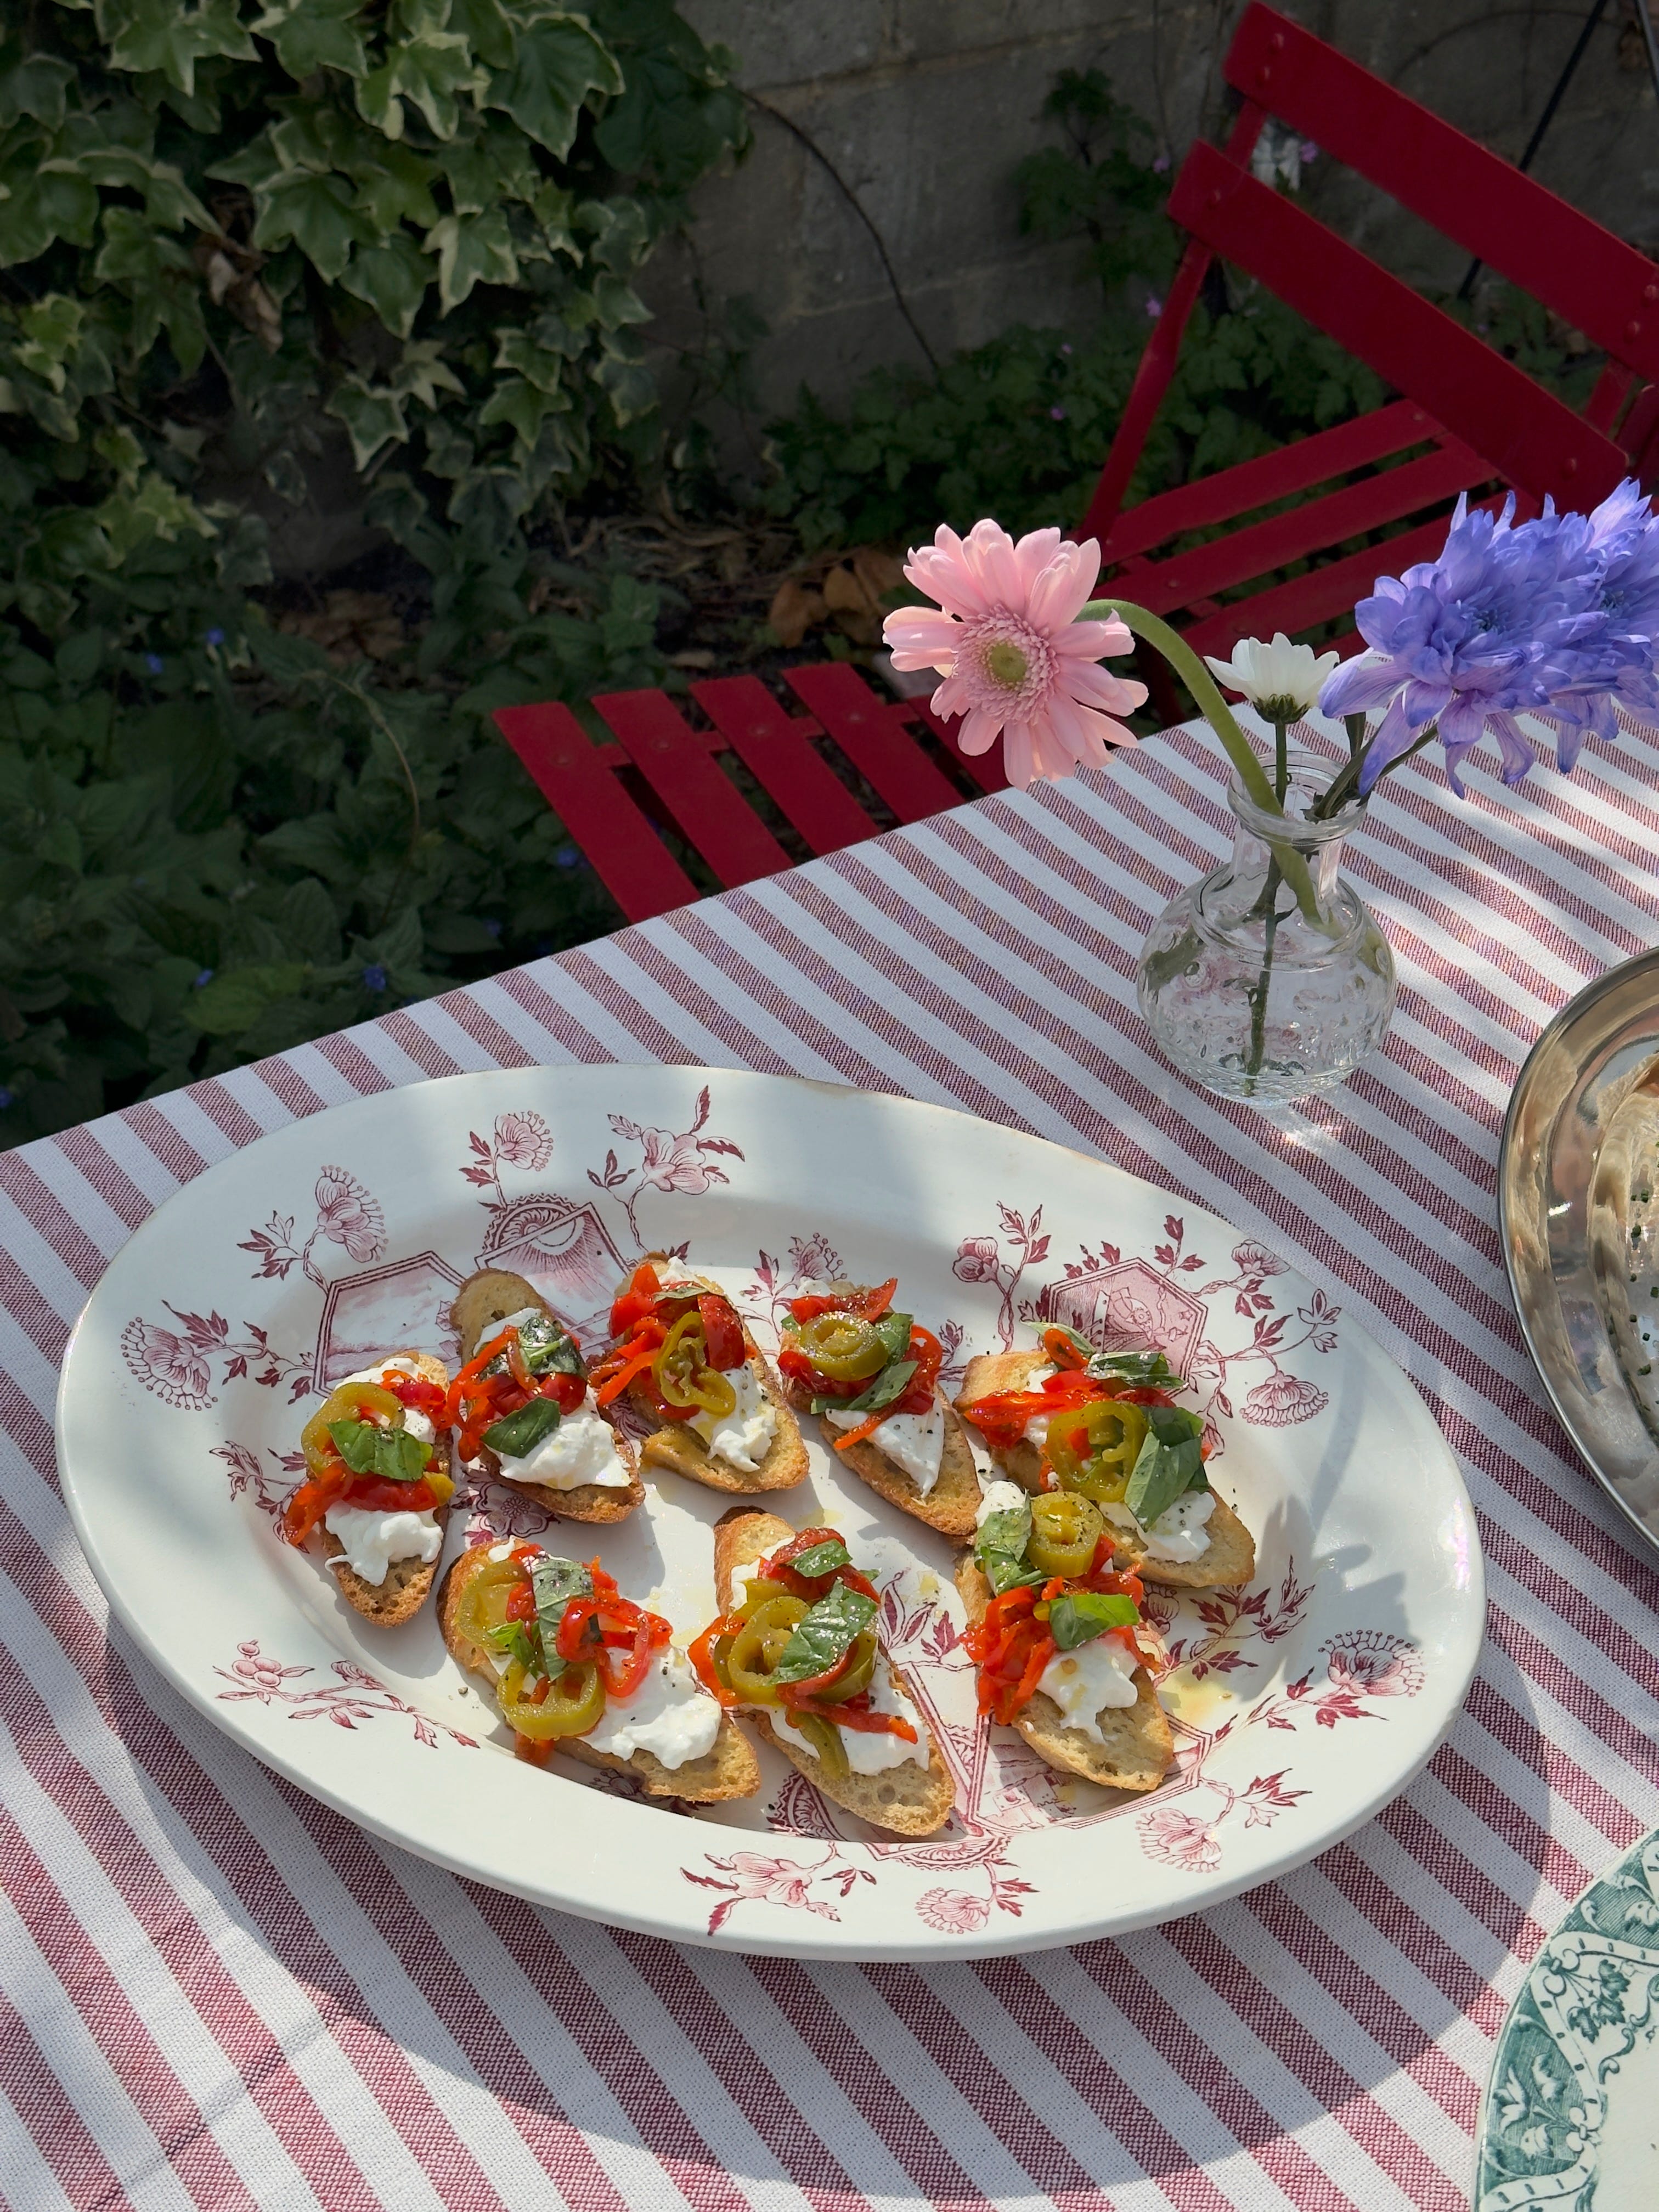
HOT PEPPER AND BURRATA BRUSCHETTE
Look - burrata is a party starter, I don’t make the rules. It’s easy to use, good to eat and a great friend when you need something quick and easy on a menu. These bruschette are just that. The pickled peppers are especially good with the creamy cheese and garlicky toasts, providing a little heat, sharpness and sweetness. I would also say that this would work exceptionally well as a pizza topping or alternatively in a sandwich. Make of that what you will.
MAKES 14 - 16
For the crostini
2 small baguettes, sliced on an angle into 7 or 8 slices
4 tbsps olive oil
1 large clove of garlic, peeled
For the peppers
100g piquant peppadew peppers, drained and roughly sliced
100g pickled jalapenos, drained
50ml extra virgin olive oil
2 tbsps runny honey
20g basil, roughly chopped
2 burratas, 125g each
Salt and pepper
Preheat the oven to 180 fan. Drizzle the sliced bread with the olive oil on either side and place on a baking tray. Bake for 10 - 12 minutes until golden and crisp on both sides, then rub the bruschette with the peeled garlic while it is still hot. Leave to cool.
Combine the pickled peppers, jalapeños, olive oil and honey together in a bowl. Add a couple of spoons of pickle brine if it’s tasting a bit sweet. Right before you plate up stir the basil through the mix.
To serve, tear the burrata into 8 pieces each and then pile onto the toasts. Season the cheese with salt and pepper, then top with a heaped spoonful of the pepper mix and a drizzle of its liquid. Serve immediately.
MAKE AHEAD -
The pepper mix can be made up to 24 hours ahead, just make sure to bring it to room temperature before you serve it and only add the basil right at the end.
The bruschette can be baked up to 3 hours in advance.
SUBSTITUTIONS -
Good quality buffalo mozzarella, ricotta or stracciatella would be lush instead of burrata here.
Use any pickled pepper or chilli you like! Feel free to add even hotter Calabrian chillies too.
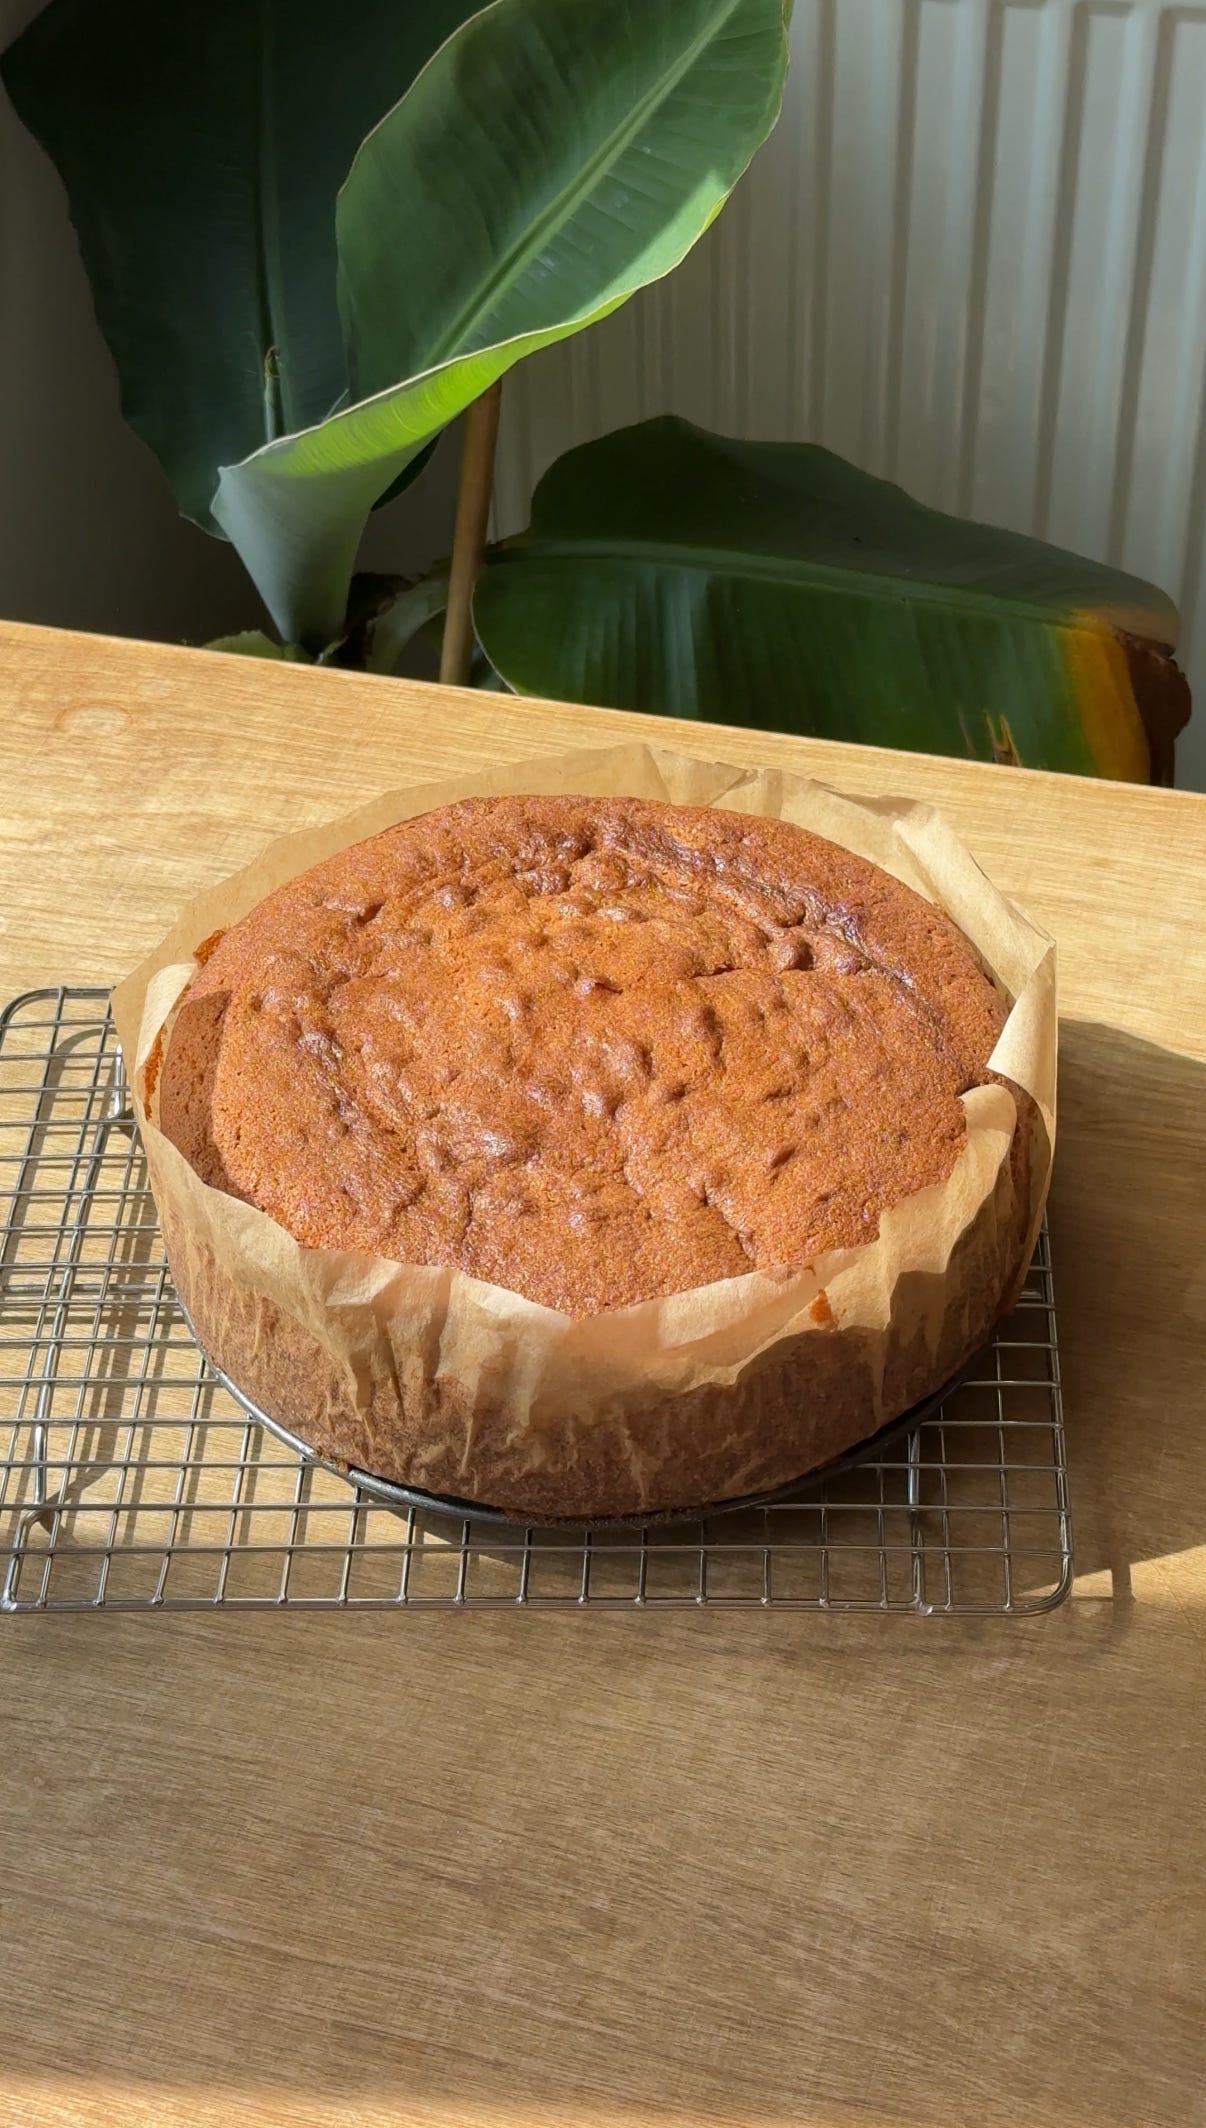
MANGO PAVLOVA CAKE
This is a divine cake to make for someone's birthday if you are one of those kind people who tends to do that for others. The sponge is really easy as is the filling, and it’s beautiful without being fussy to decorate. Buying excellent mangoes of the season is key - find a greengrocer selling Alphonso mangoes from India if you can. Riff on this with different fruit or just turn it into a simple Victoria Sponge if you prefer. I am not going to force you to make your own meringue for this recipe as they just get crushed up anyway, plus supermarket meringues are actually amazing!

SERVES 10 - 12
For the sponge
325g plain flour
2 tsps baking powder
1 tsp bicarbonate of soda
1 tsp fine salt
270g butter, softened to room temperature
300g golden caster sugar
3 large eggs
2 egg yolks
1 tsp vanilla bean paste
200ml sour cream
60ml double cream
2 tbsps whole milk
For the filling
6 alphonso mangoes, or 5 regular ripe supermarket mangoes
1 tbsp icing sugar, sifted
The zest and juice of 1 lime
750g mascarpone
1 tsp vanilla bean paste
70g icing sugar
300ml double cream
A pinch of salt
6 ready-made meringue nests
You will need a 23cm deep springform cake tin
Preheat your oven to 170 fan. Grease and line your tin well. In a bowl sift together the flour, baking powder, bicarbonate of soda and salt. Set aside. Stir the vanilla bean paste into the sour cream, then add the double cream and milk and set aside. Put the soft butter in the bottom of your stand mixer or in another large bowl if you are using electric beaters. Add in the sugar and beat together (using the paddle attachment for a stand mixer) for around 2 - 3 minutes, until slightly paler and more fluffy. Golden caster will not get as pale as regular caster.
One at a time add the eggs into the mix, beating well each time to combine. If the mix splits at all you can add a spoonful of your dry ingredients between each egg. Add the other 2 eggs, mixing in between each time, then add the 2 egg yolks together. Next slowly mix in one third of your dry ingredients - only mix until they are just combined. Then add one half of the sour cream and vanilla mix. Follow with another third of the flour mix, mixing again in between, then the rest of the wet ingredients, and then finish with the last of dry ingredients. The batter should be thick but smooth. Tip it out into your lined tin and spread it out to an even layer. Bake in the oven for 55 - 60 minutes, until a skewer comes out of the middle clean. Leave to cool for 1 hour in the tin, then carefully unwrap it and let it finish cooling uncovered.
Carefully cut into your mangoes, slicing down either side of the central stone to release two large fruit-filled cheeks. Scoop the flesh of the mangoes out, not forgetting to get as much as possible off the side of the stone itself too. Discard the skins. For the mango puree, put the flesh of 2 mangoes into a strong blender; I like to use a nutribullet, along with the icing sugar and half the lime juice and blitz until smooth. Pass the purée through a fine sieve and set aside. Roughly chop the rest of the mangoes. Stir in the zest of half a lime and the remaining lime juice. Keep the puree and fruit in the fridge until needed.
For the mascarpone cream, put all the mascarpone in your mixer (or a bowl) along with the icing sugar and vanilla. Using the paddle attachment again, mix the mascarpone the sugar and vanilla are well combined - it will be a bit looser than straight out of the tub. Pour in the cream and slowly beat it in until the mix thickens to a very soft peak.
To assemble the cake you can either slice it vertically into 2 or 3 layers depending on what feels easier or more achievable. If your cake has domed a lot during cooking definitely only attempt slicing it in half to 2 thicker layers. Slicing a cake without a turntable is hard but doable, youu just need a large, sharp breadknife. Put the cake on a board. Make a mark on the side of the cake where you want the height of the first layer to be, then keeping the knife in that mark, slowly turn the board around 360 degrees, so that you have a mark at that exact height all the way round the cake. Once you are back to where you started you can push the knife in a bit further, starting to slowly and gently cut the cake as you turn the board. Eventually the knife will get all the way through the cake as you turn it, as well as all the way around it. It may take 2 or 3 turns on its axis to get to the centre. Gently release the sponge and carefully lay it down somewhere safe. If cutting 3 layers, repeat for the second layer. If the top of your cake isn’t too domed then it's best used right at the bottom, cut side up. This way it naturally flattens to the base as we fill up the cake, but also it means the original bottom layer becomes the top layer and is always perfectly sharp and flat. So place the top layer as the bottom on your chosen serving plate. Top with one third of the mascarpone cream and spread it out over the surface of the cake. Top with one third of your chopped mango, one third of the mango sauce and then 2 meringue nests, crushed and scattered all over the fruit. Cover with another layer of cake and do the same thing all over again, followed by the final layer. I like to make sure the top has plenty of drizzle and a bit of extra lime zest on top too. Serve your cake with suitable fizzy, sparkly beverages alongside and be proud of this beauty you have created!
MAKE AHEAD -
You can bake the sponge up to 3 days ahead and keep very tightly wrapped in cling film at room temperature - don’t cut it until you’re ready to assemble. I recommend doing it the day before just for ease of time.
The mango sauce will keep for 2 days in a fridge. Be careful though - it will soak up any strong flavours/smells in there so avoid this if you are storing stinky things.
The cake as a whole will keep for 24 hours (in the fridge) but is definitely best eaten on the day it is assembled. It will dry out over time.
SUBSTITUTIONS -
Add pineapple, passionfruit, papaya, kiwi or berries to your fruit combination.
Regular caster sugar is great in the sponge if you can’t find golden caster.
TIMEPLAN
This first plan should help you see what you can get done in advance, so that for each course on the day you have at least 1, maybe 2 major parts of it taken care of. I appreciate that not everyone’s weeks are easily peppered with dinner party prep, but if you’re hosting after work or on a day where you can’t be in the kitchen, getting ahead is going to save your arse.

MISE-EN-PLACE
This is the fancy name we give to the food prep each section in the restaurant needs to do for their dishes. Hopefully breaking down each dish like this will help you feel organised.
Use the hour before your guests arrive to organise your space too- I find it helpful to group ingredients by dish so it is all in the same place. Little ramekins are really useful for this.
