


THE LONG LUNCH ONE
A Christmas menu for people who don't like Christmas food.

MENU TO SERVE 6 PEOPLE
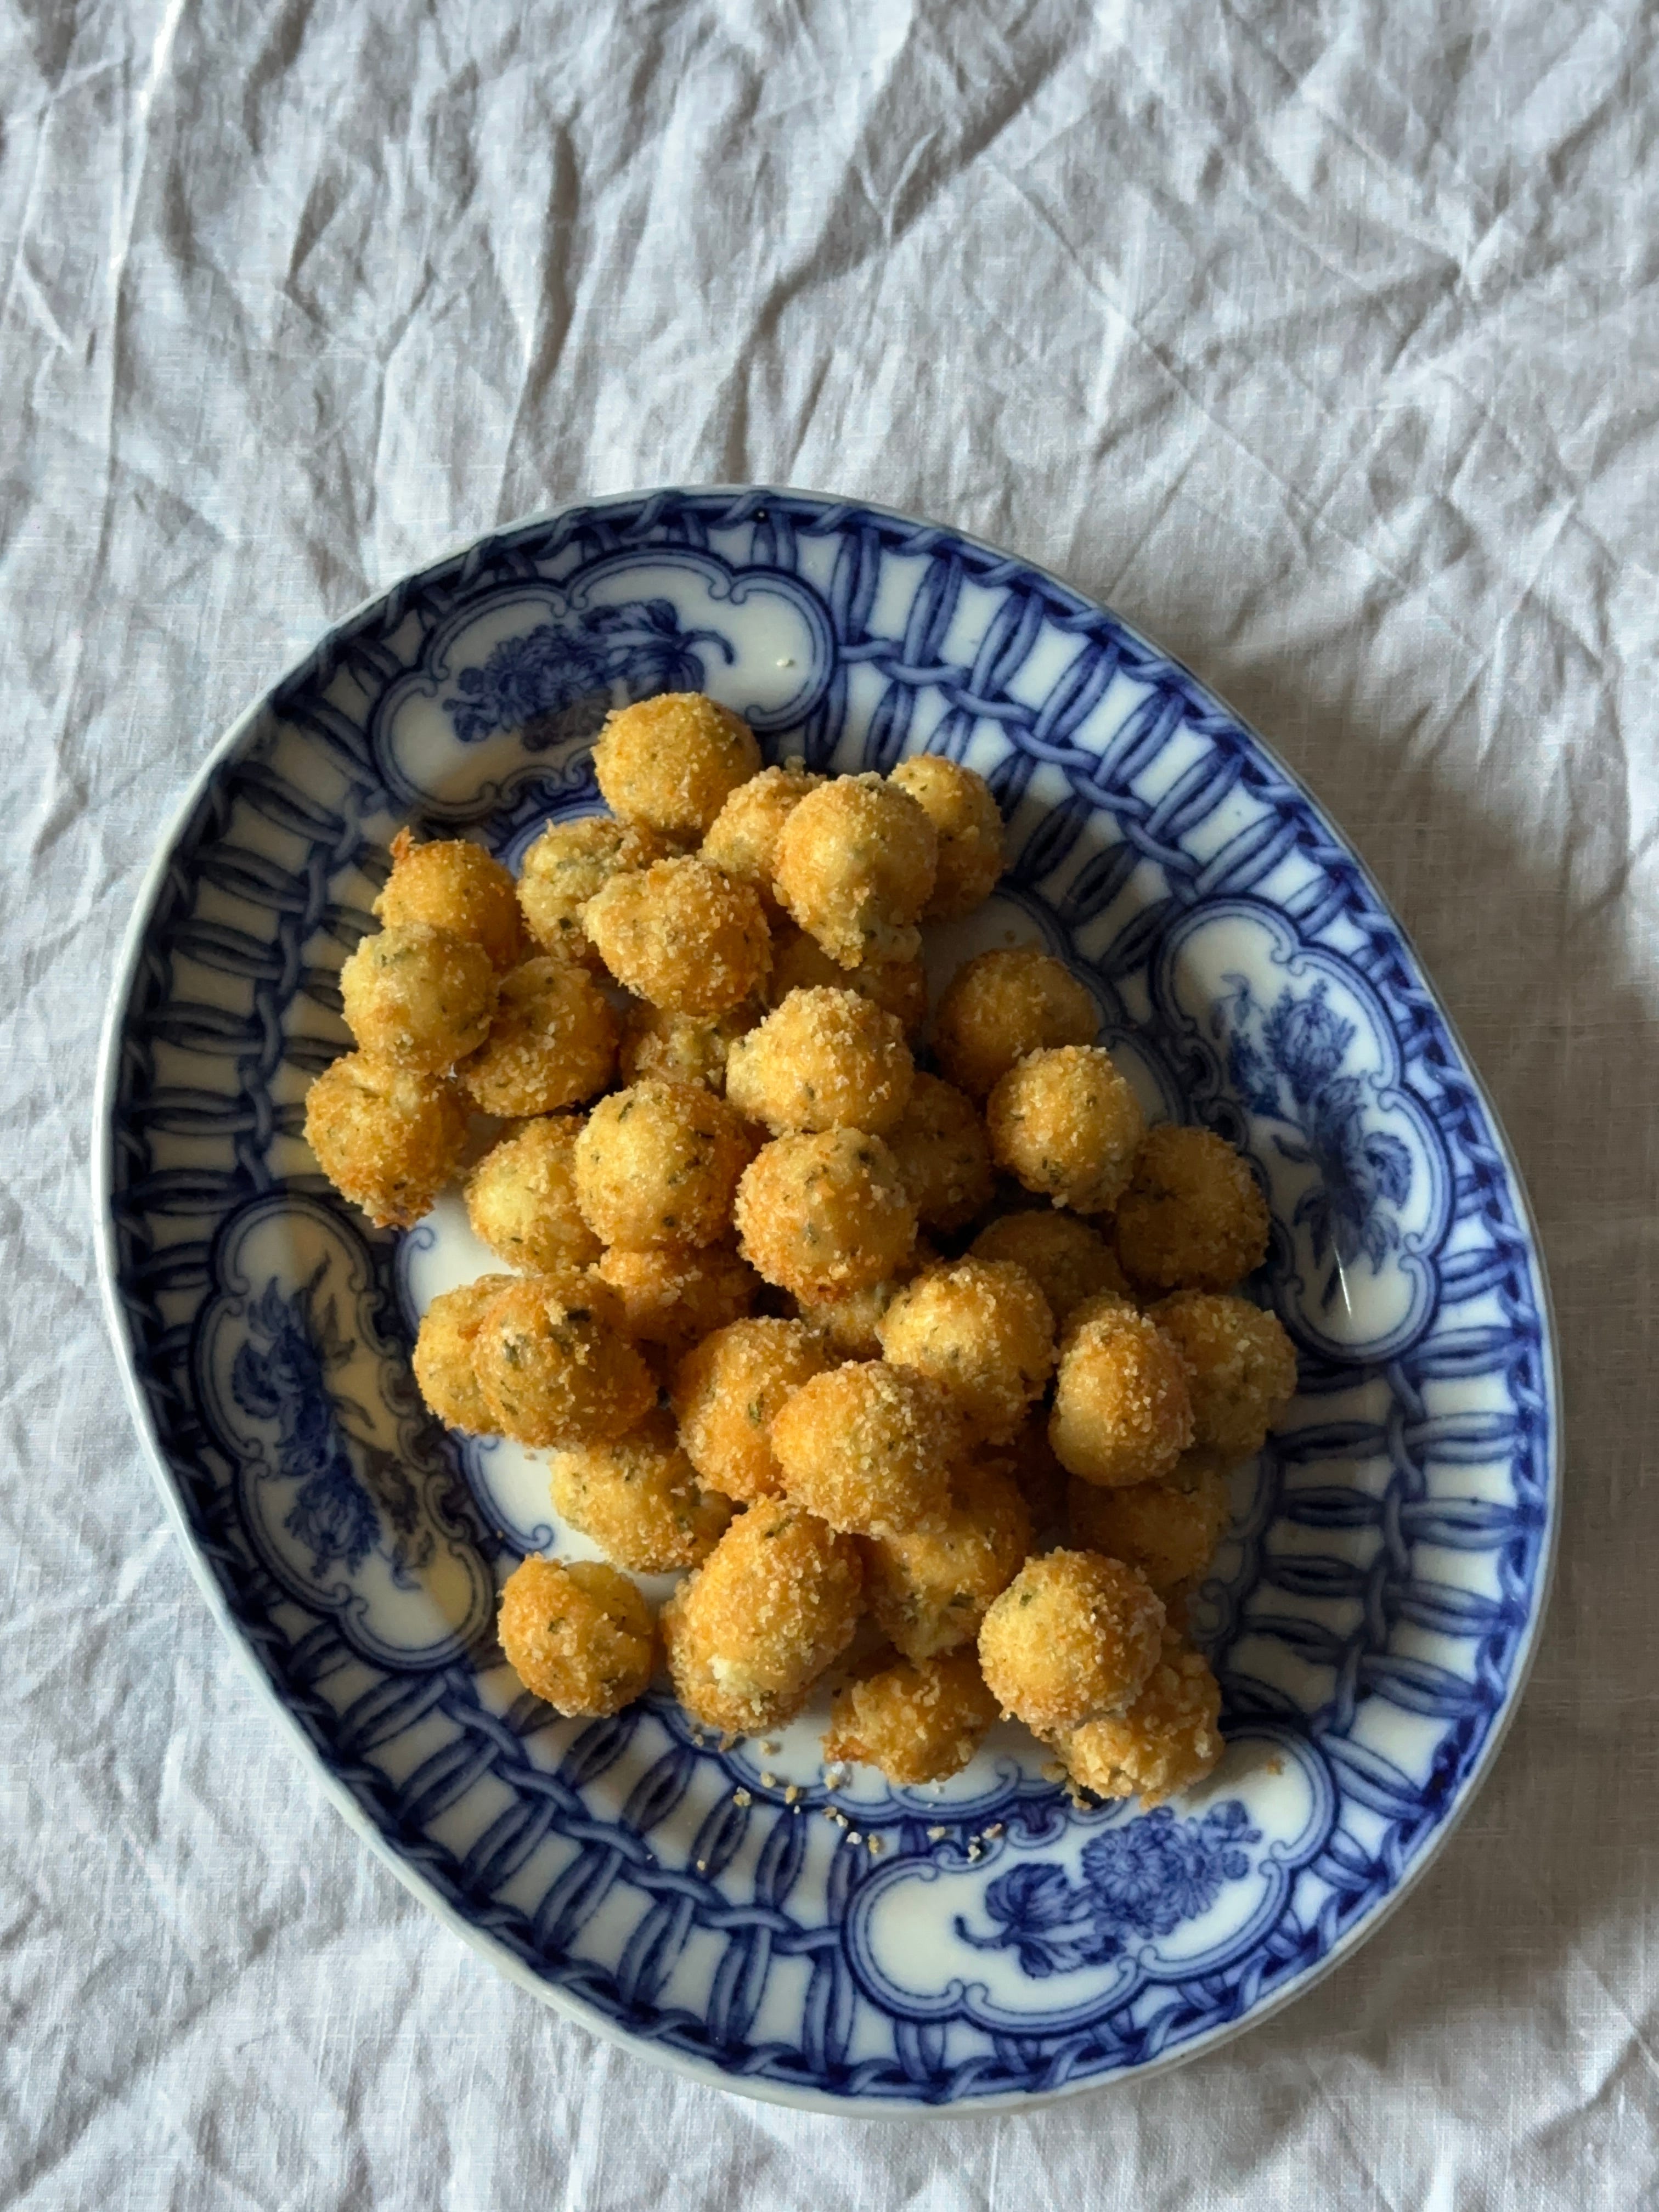
PARMESAN AND SAGE POLPETTE
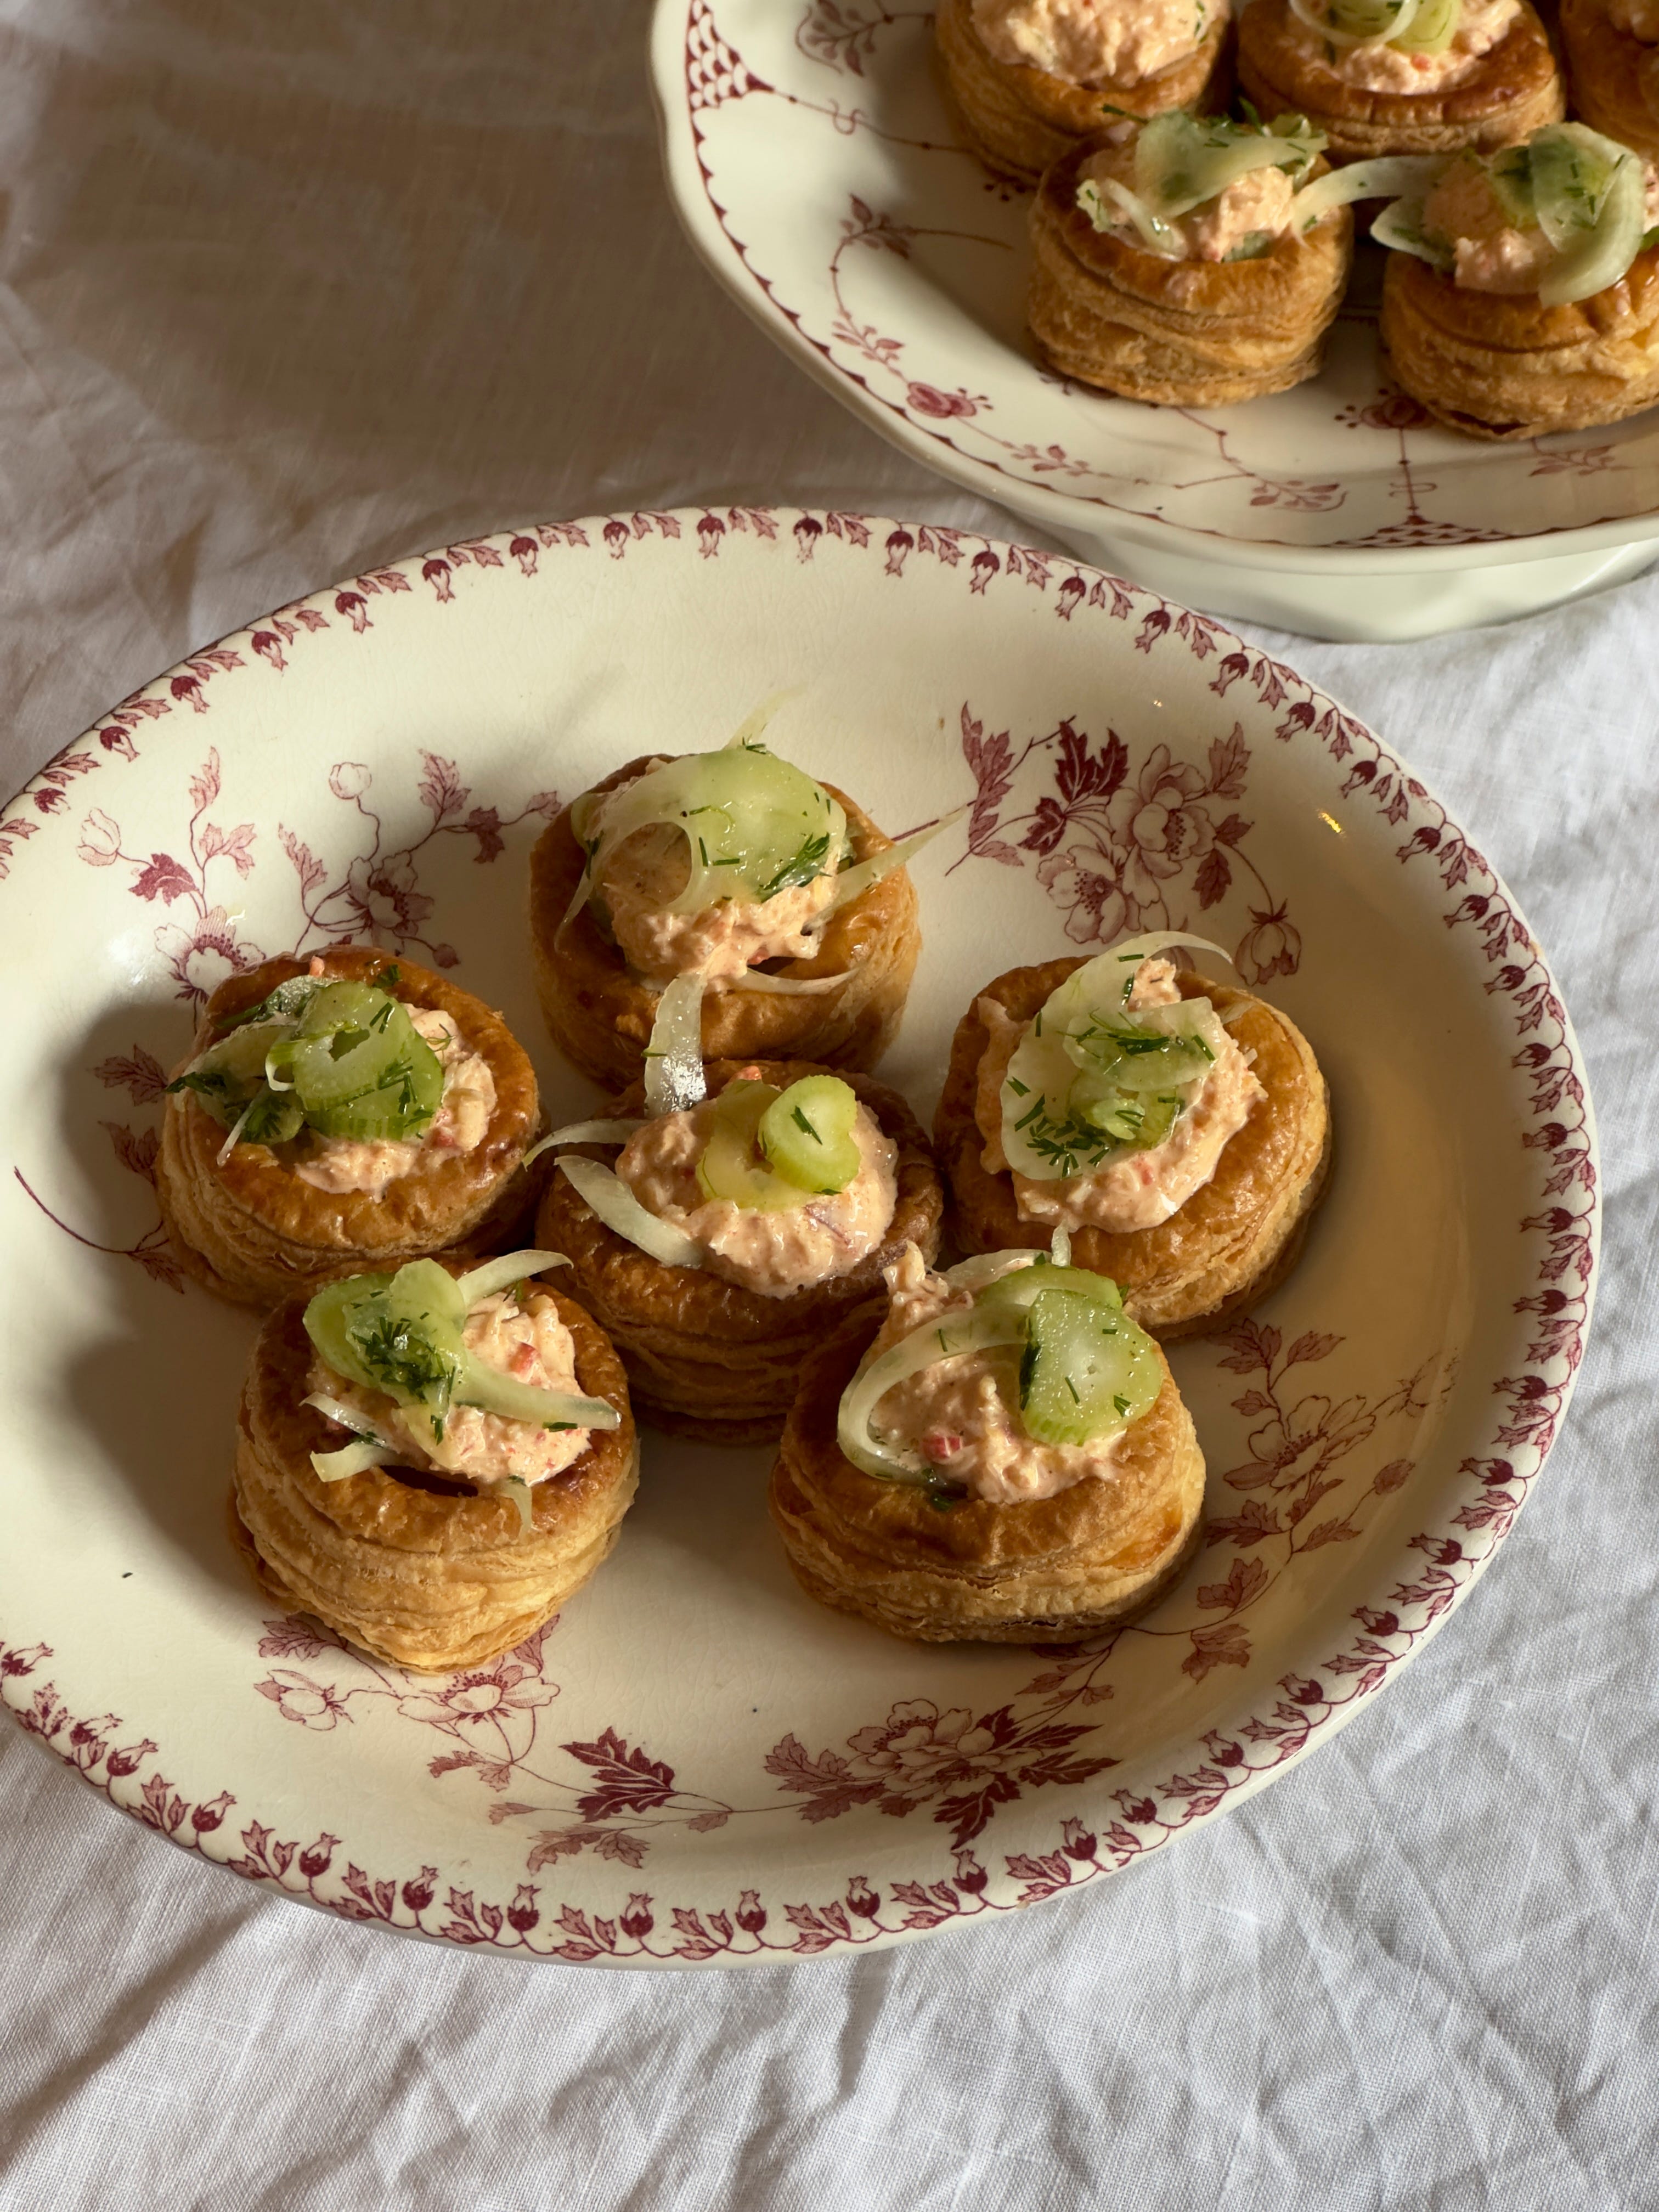
CRAB VOL AU VENTS
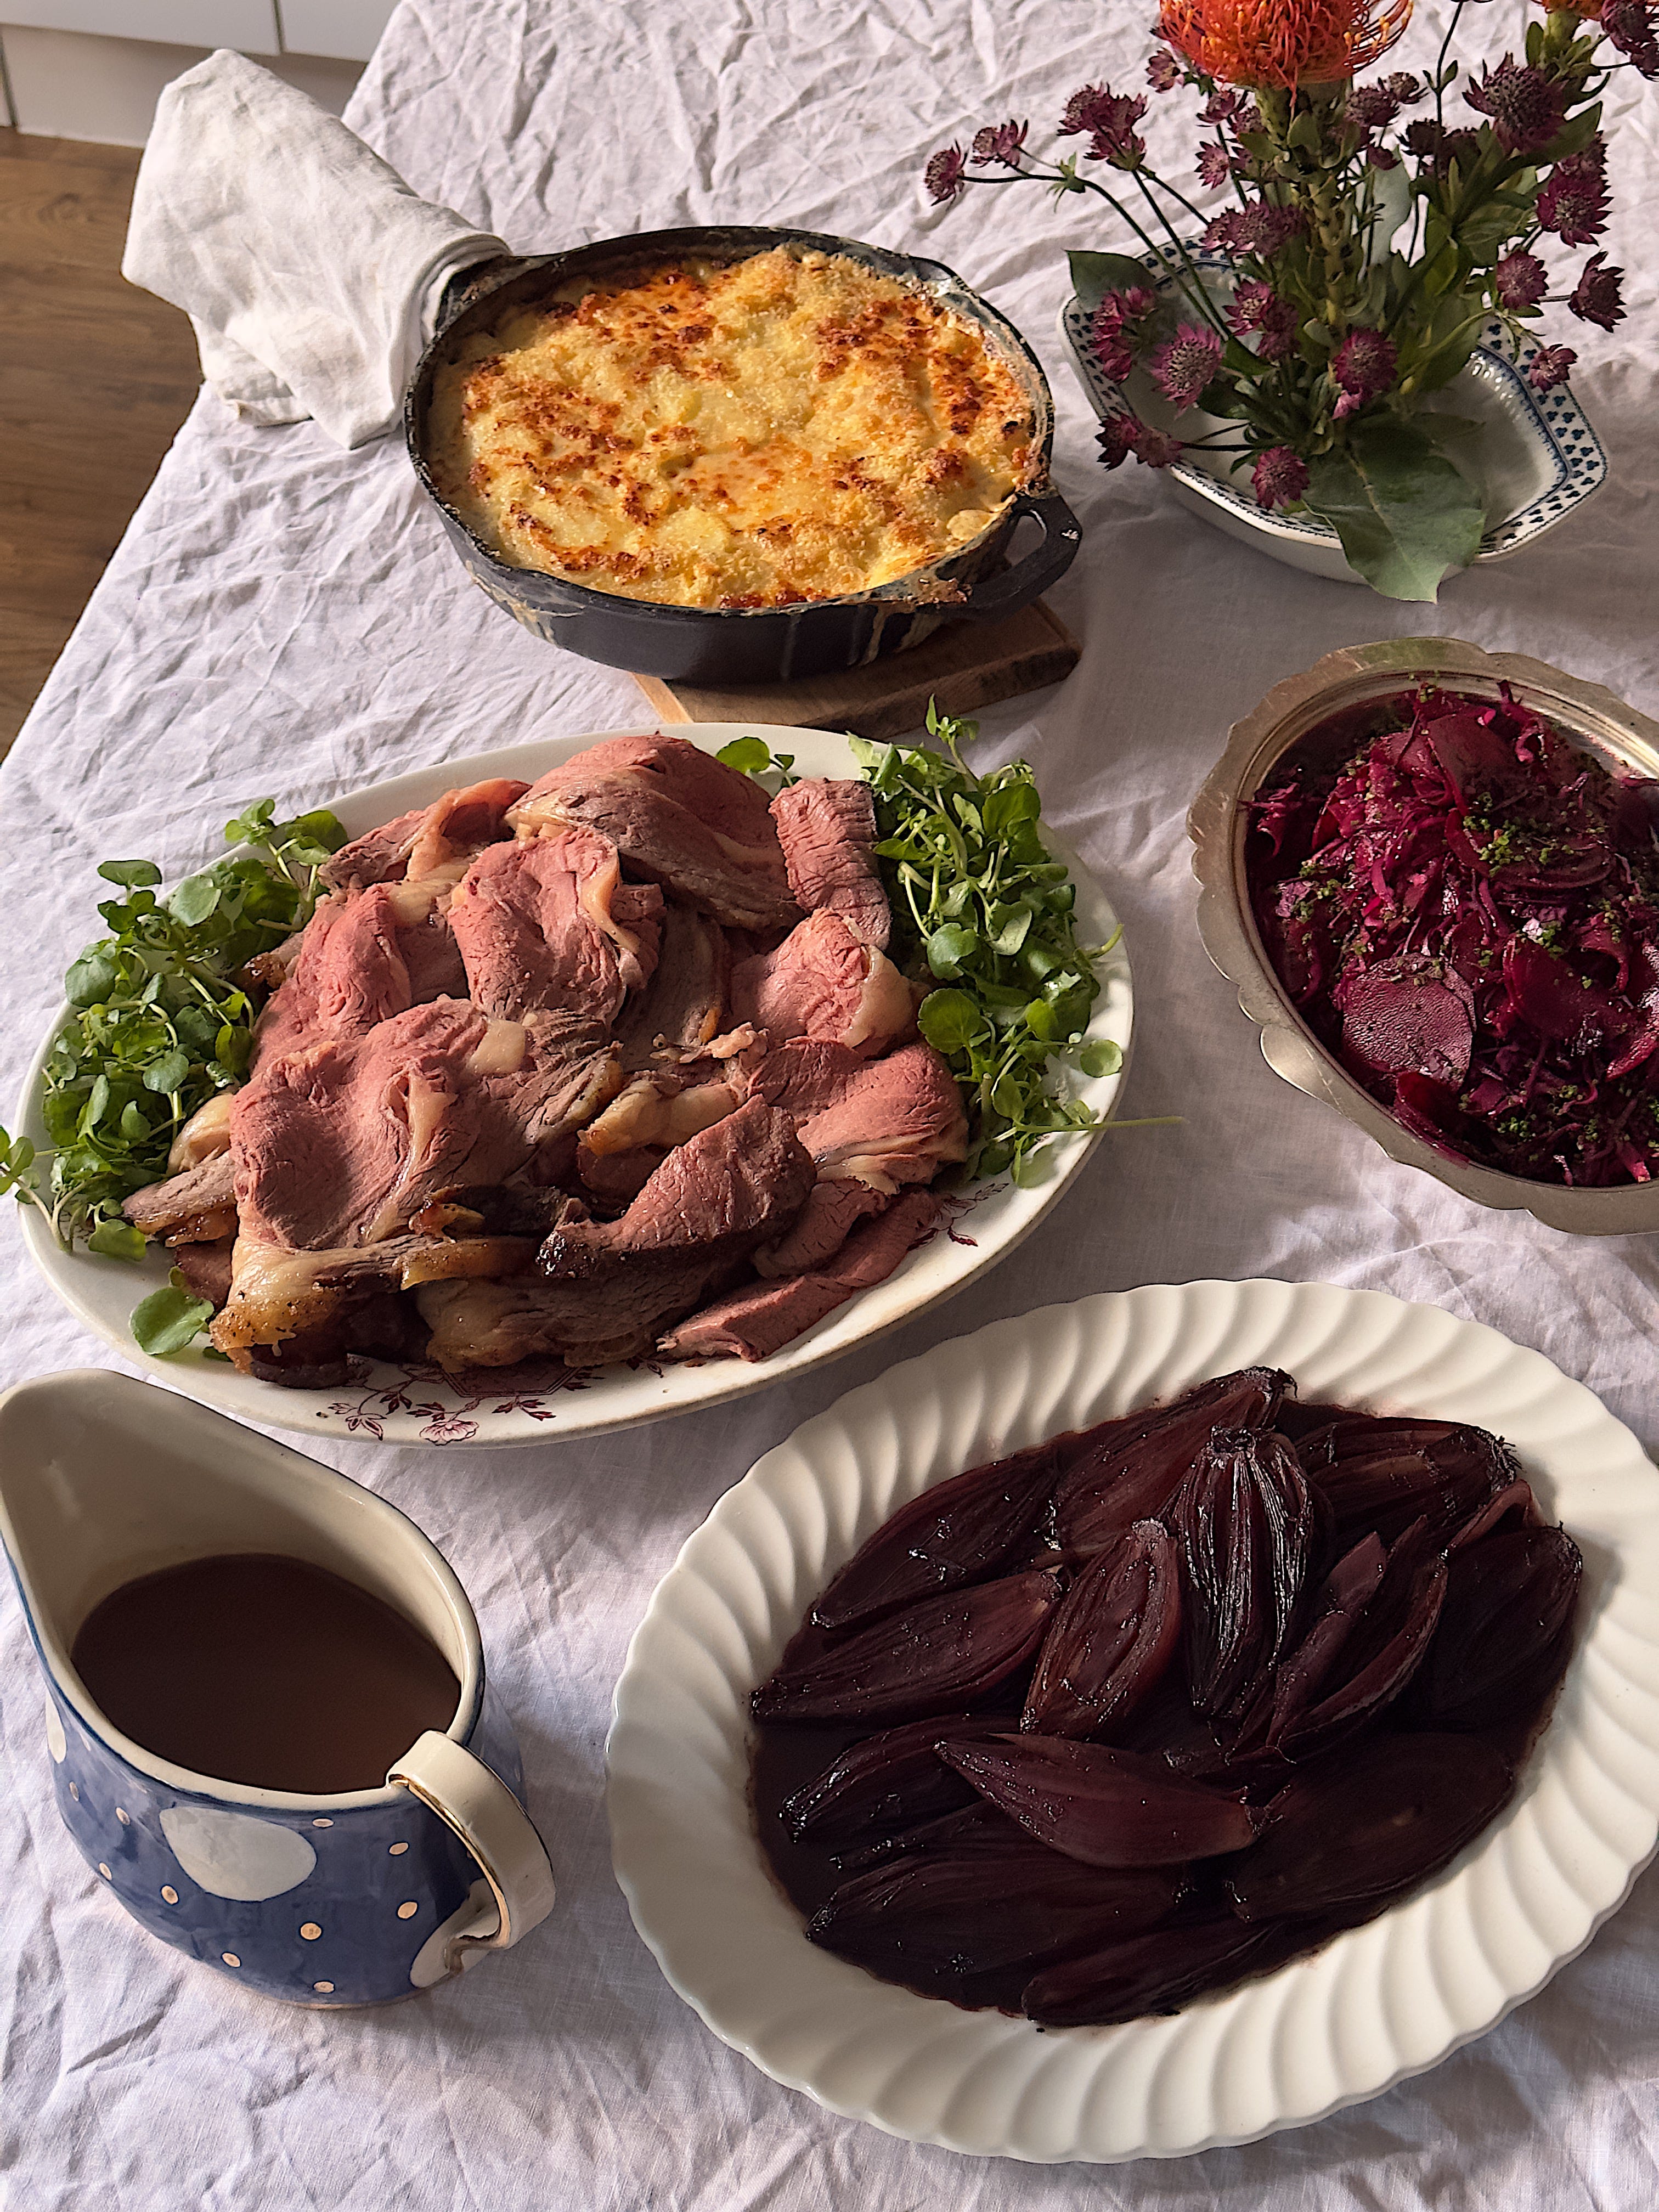
RIB OF BEEF + GRAVY
GRATIN DAUPHINOISE
BRAISED SHALLOTS
RED CABBAGE, BEETROOT AND HORSERADISH
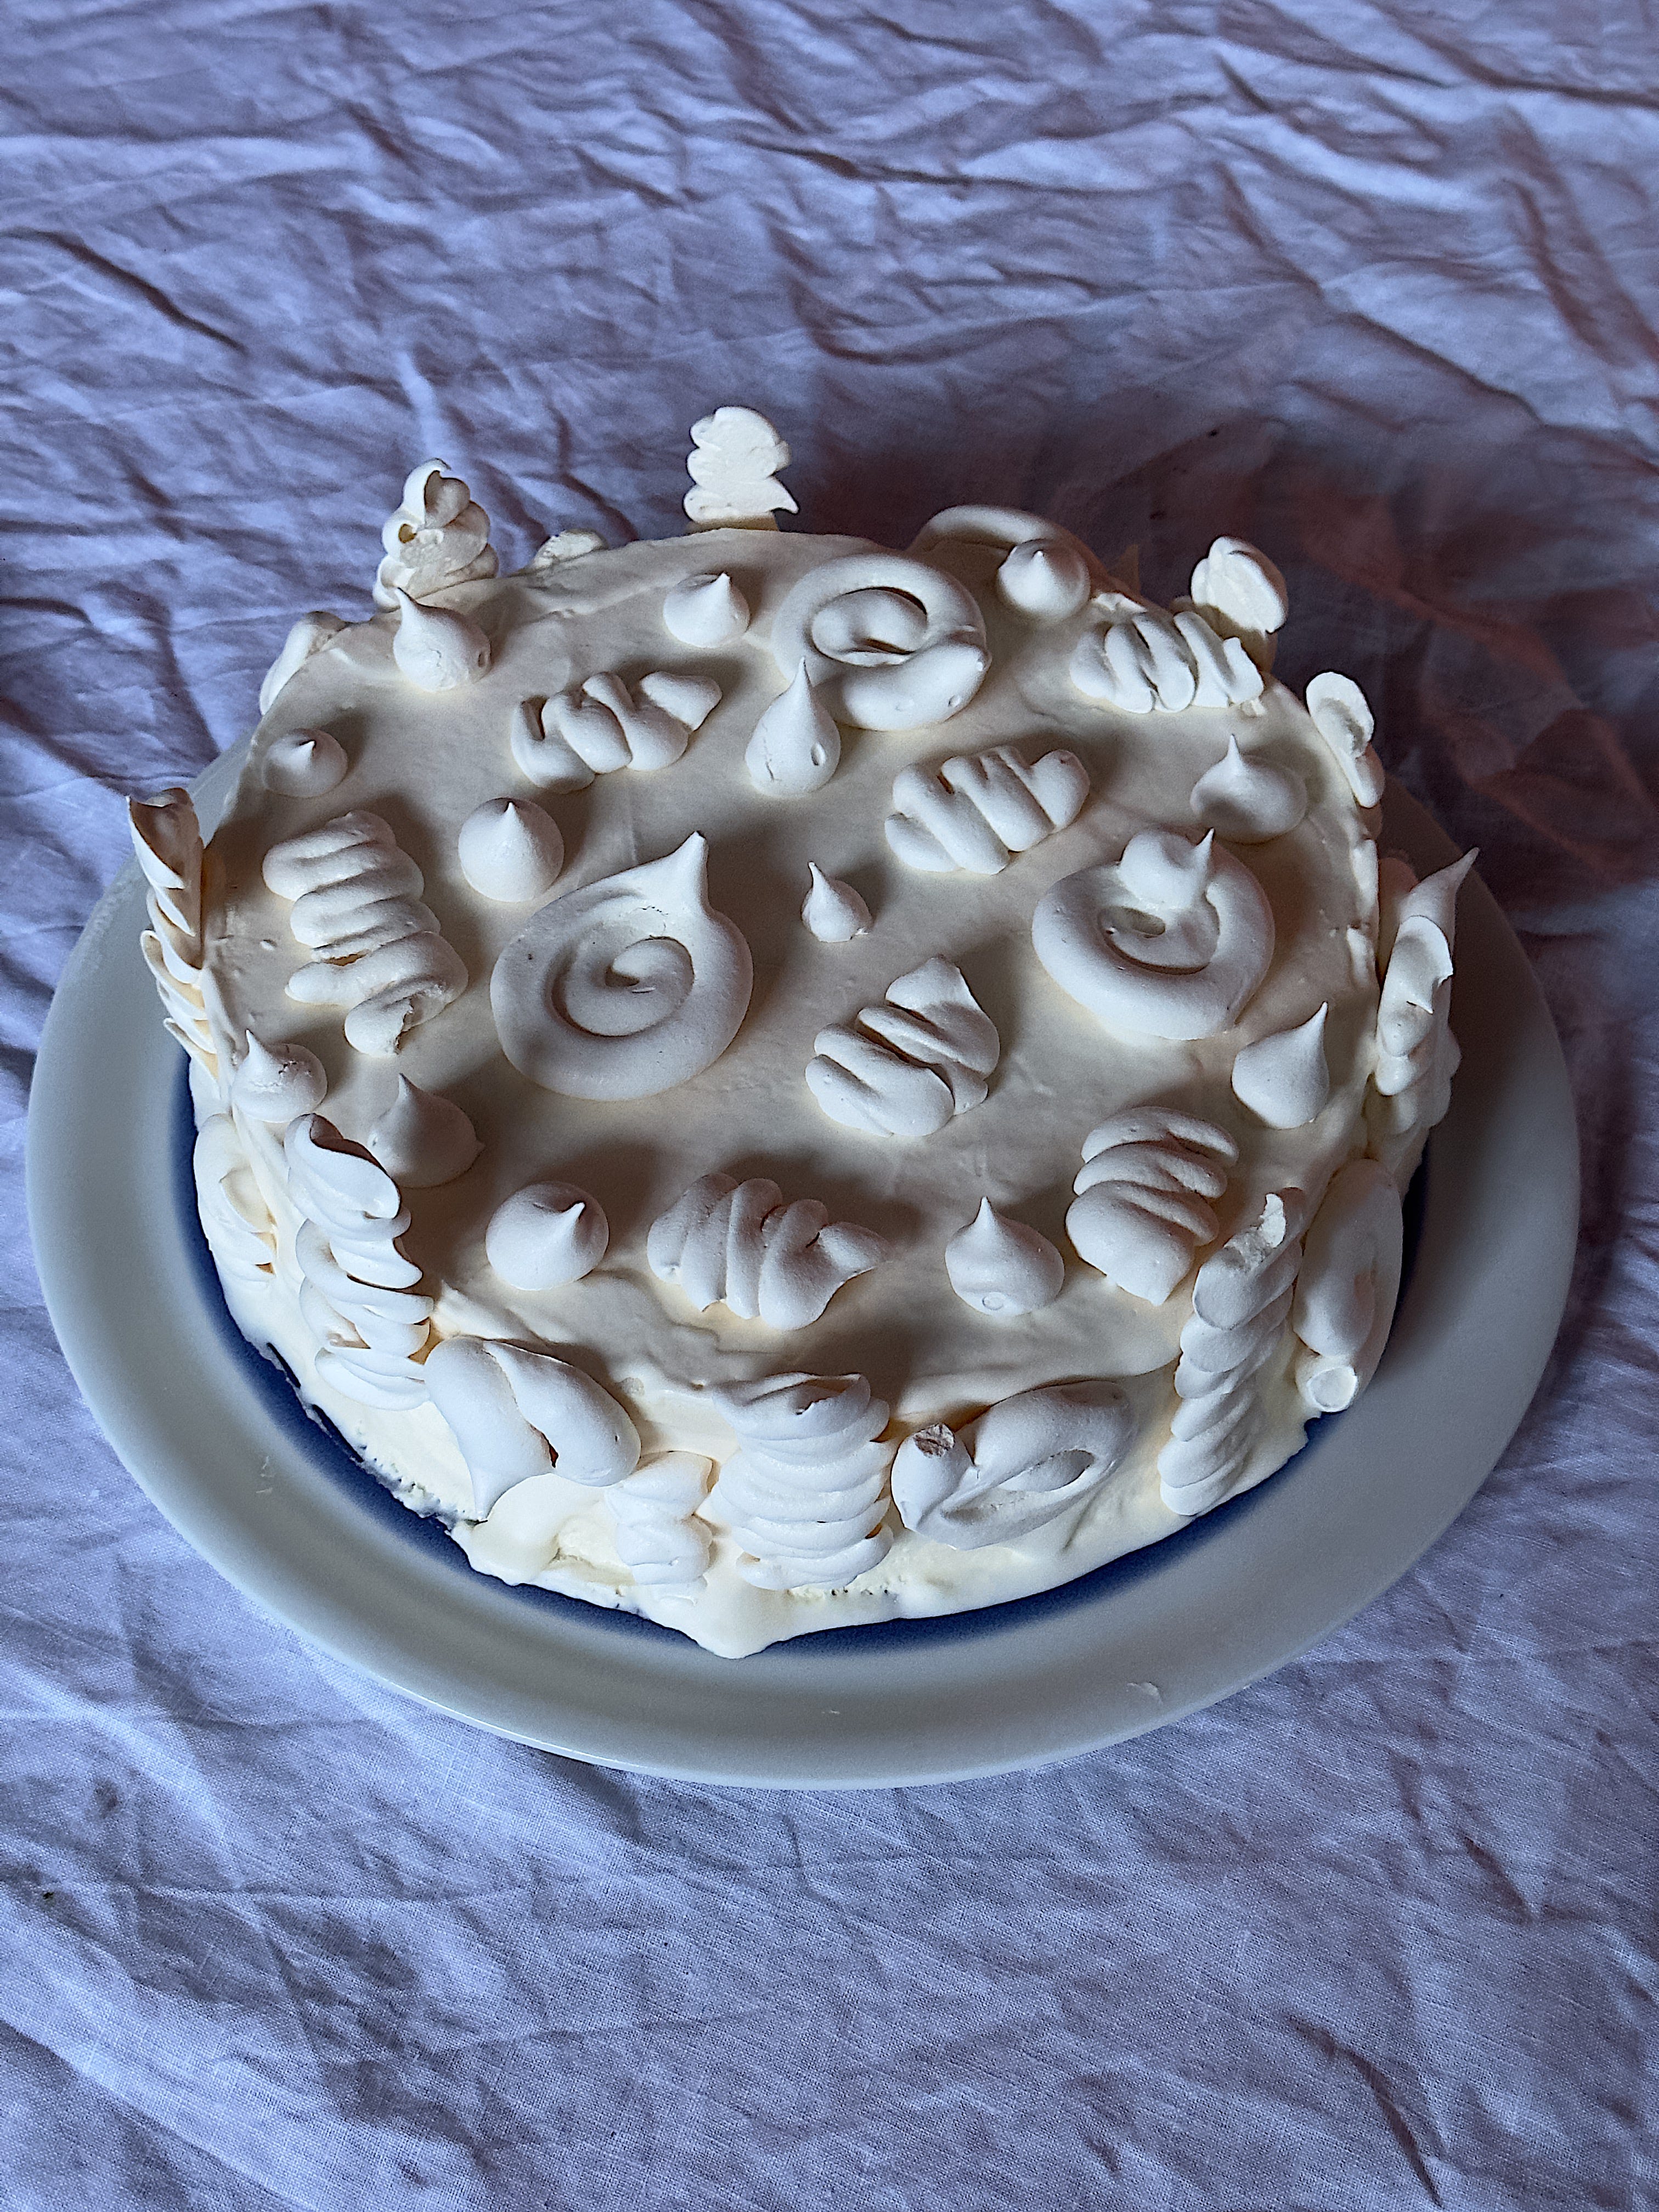
FROZEN MERINGUE CAKE, CHOCOLATE SAUCE
I have definitely mentioned this before so I won’t rant and rave for too long about it, but I am not a massive fan of “traditional” Christmas food. I really love the premise of having a blowout amazing meal where we pull out all the stops but I HATE that we waste that opportunity and serve THE. SAME. THING. EVERY. YEAR. What is the point in that?!? Not to mention the fact that we kill ourselves to make about 18 different dishes, almost all of them in the oven at different temperatures and times. It is just nonsensical to me, very boring, stressful and often highly disappointing. Unfortunately this opinion is, by and large, an unpopular one, including amongst my own family and even more unfortunately for me I won’t let anyone else cook. So each year I bargain, compromise and make concessions where I have to and come up with a menu that feels cohesive, sensible and delicious to me, and Christmassy enough for them.
In this episode I am sharing with you what I consider to be a glorious meal that would be a wonderful, classy, non-stressful but also non-traditional Christmas Dinner, that could also be a nice long lunch on a Sunday instead. I wanted to share this in November, because I know people like time to plan and buy their meat, so I thought this would be helpful to get out of the way now. In December, I will compile a list of more Dinner Party recipes that could also work in your Christmas repertoire.
Firstly, let's start with my strategy for getting around a meal that I don’t particularly like;
As always my biggest recommendation is to get ahead which should come as no surprise because that is what this newsletter is literally all about and also everyone knows that's the best thing to do.
Cocktail hour is a must, and it must actually last for three hours so everything has time to cook and you have time to drink (I recommend a Bloody Rosie).
A couple of easy canapés for cocktail hour are a great way of sneaking more interest and personality into your Christmas menu whilst also filling people up so you don’t have to do a starter.
Only one oven is no problem! Have at least 2 sides that don’t require one.
Avoid turkey at all costs but do commit to the “massive roast lunch” format as it will please the traditionalists in your party.
Make a pudding requires very little work to get it on the table (because you did it in advance), as by that stage in the meal you will be positively catatonic from carbs and port.
You set the timeline for the day. If you are doing the cooking, then everyone and everything can work around you. I personally love a later lunch around 4 - it means you can have a nice chilled breakfast, the all important three hour cocktail hour and then your evening meal can be a big old plate of cheese in front of the telly.
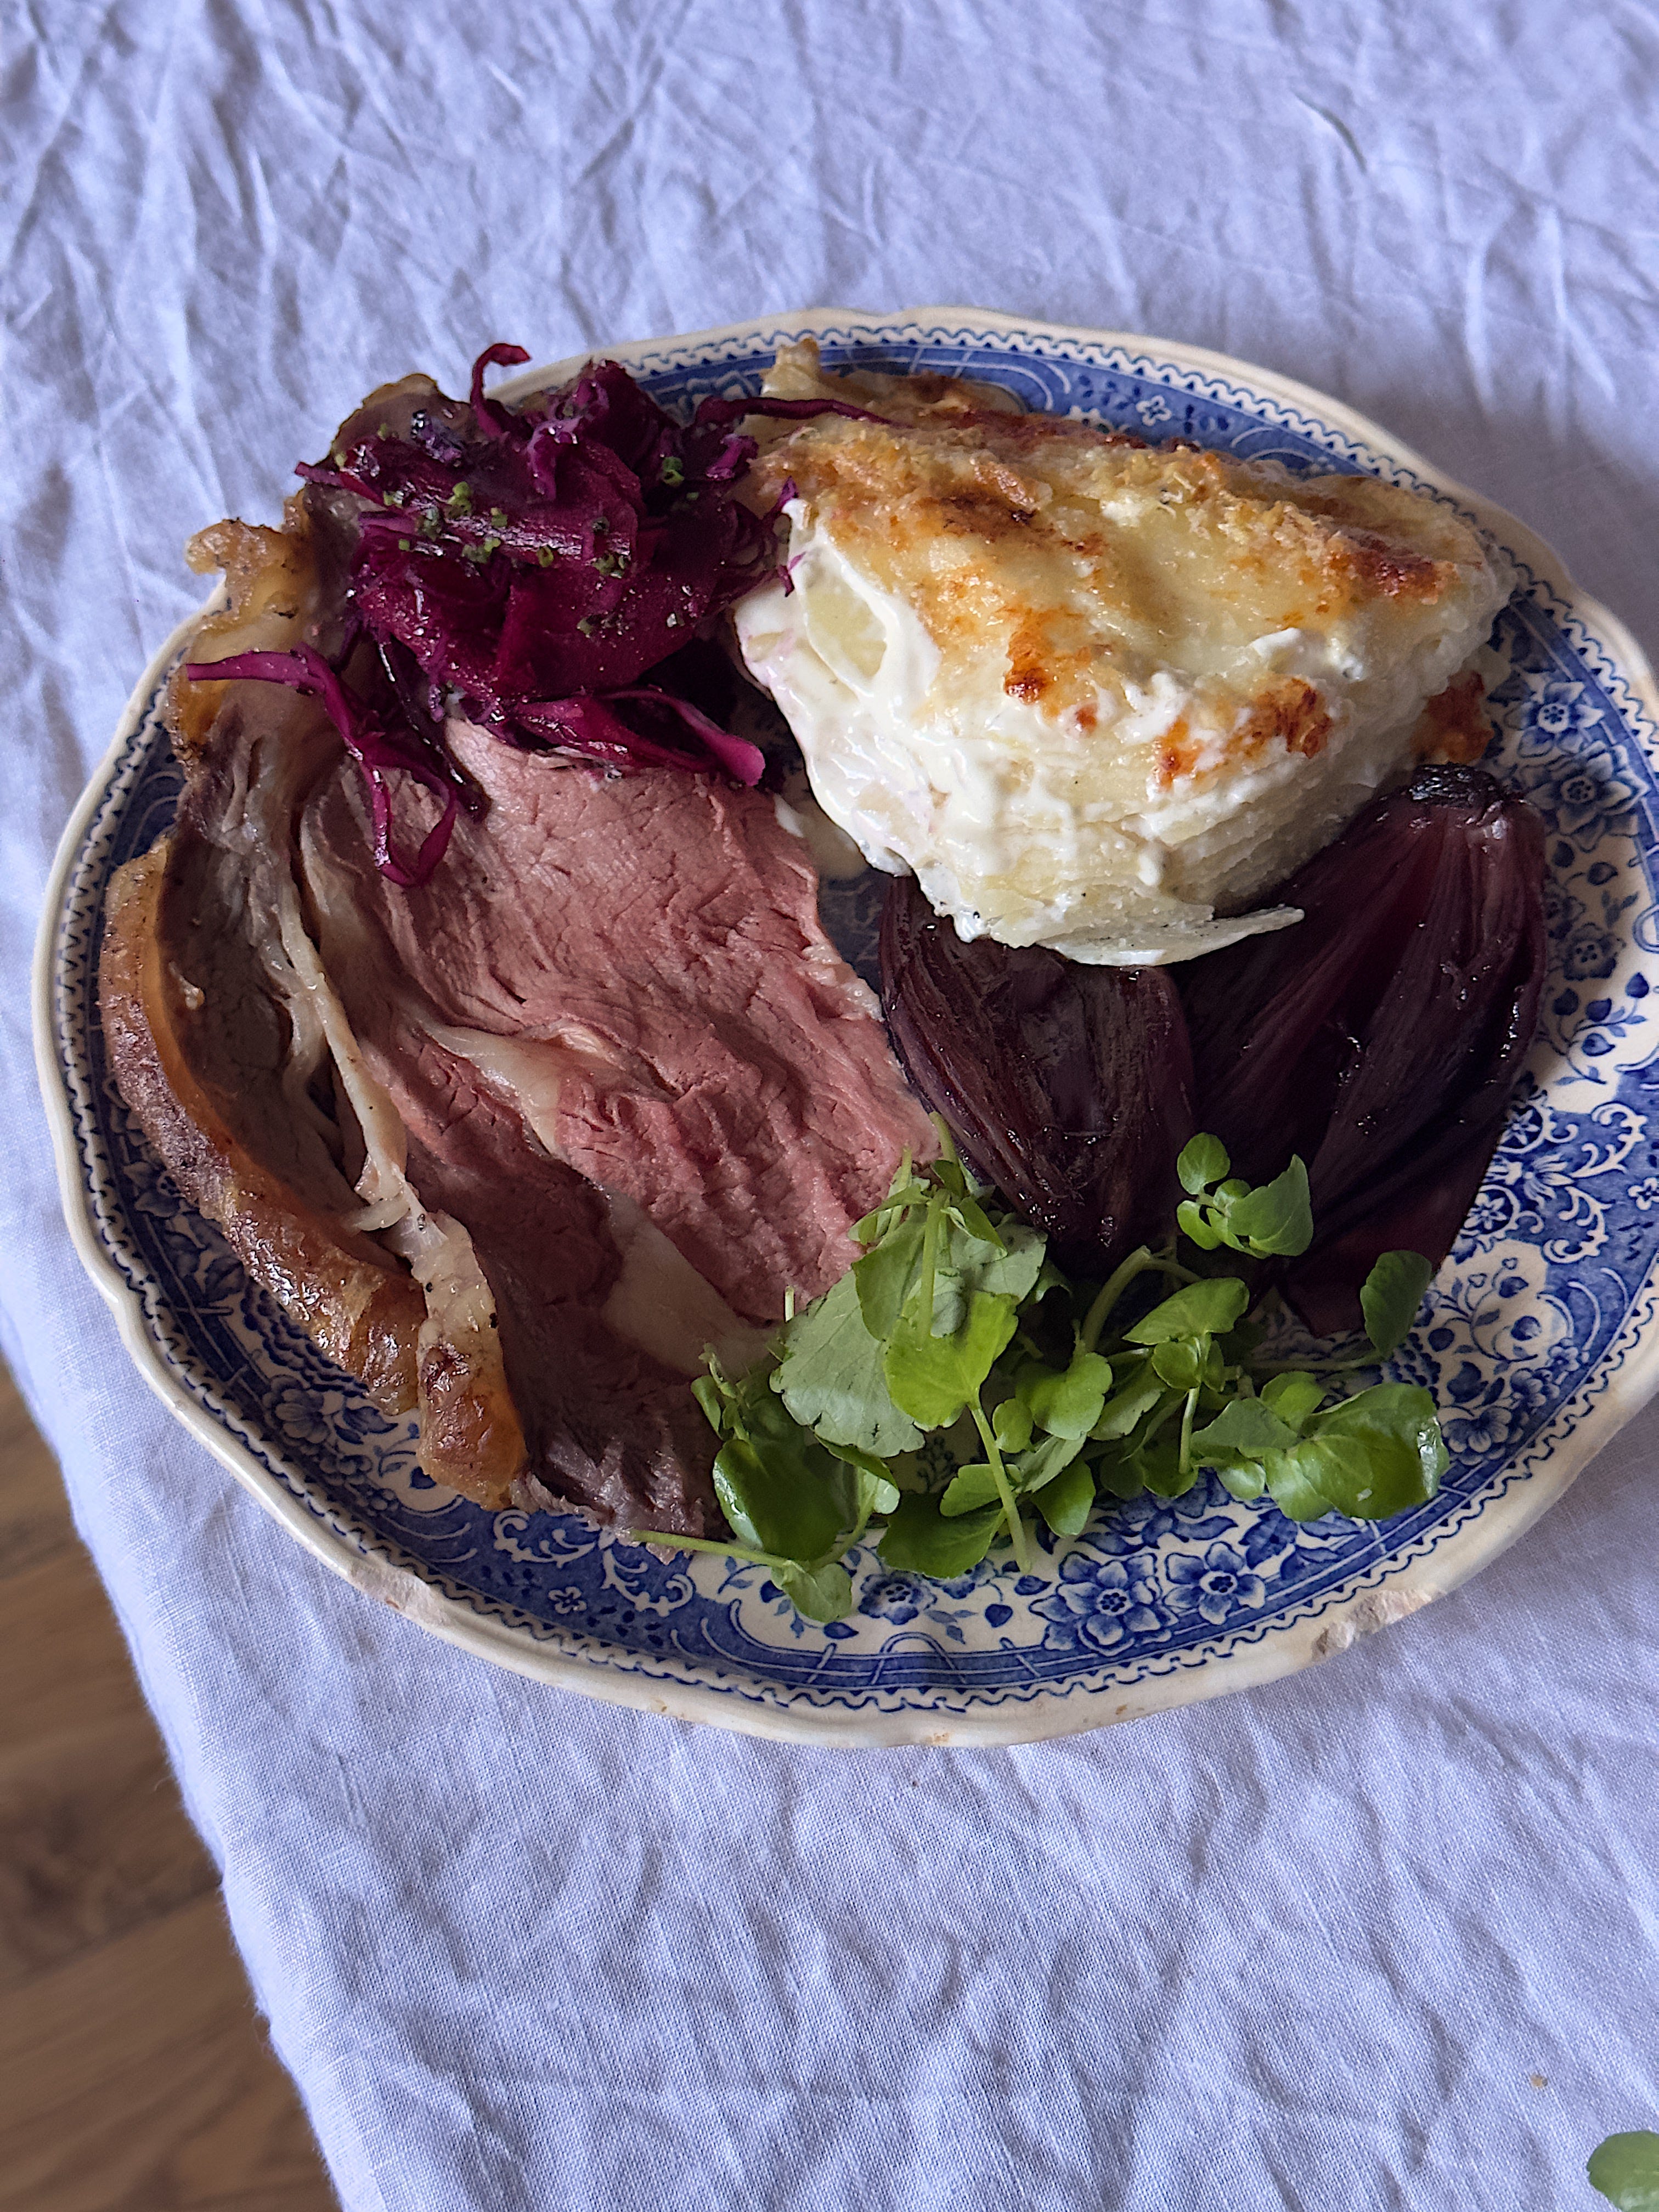
With this in mind, today's menu works for a perfect slow Christmas day. Two canapés - one cold, one hot, that are simple yet chic and exciting. A big roast of beef that is low effort - high reward, with three delicious sides, each bringing something different to the table. And finally a very show-stopping, very scrumptious dessert that you can do the day before. It’s harmonious, easily customisable and so very good. Our time plan and mise - en - place will look a bit different for this episode as I have tweaked them to work around the oven space and also the daytime timings.
PARMESAN AND SAGE POLPETTE
These are a very low maintenance yet delicious cheesy bite. They are quite literally balls of deep fried parmesan - no need to make a béchamel or a batter of any kind. I like to spike mine with finely chopped sage as it works so well with deeply savoury, salty flavours and is of course the most ubiquitous Christmas herb. Wheel these out with your first round of champagnes on the big day and people will go nuts for them. They are best eaten relatively fresh so there will be a little light deep frying involved, but this menu leaves you space for that. This recipe makes roughly 40 small balls.
150g parmesan, finely grated
15 sage leaves, finely chopped
2 egg whites
30g panko breadcrumbs, finely crushed
1l veg oil, to fry
Mix the grated parmesan with the egg whites and sage together in a bowl to form a sort of sticky paste. Roll the mix into small balls - roughly the size of a cherry. Put the panko into a shallow bowl and then take a few balls at a time and toss them in it, lightly rolling them again in your hands so the panko sticks. We aren’t looking for a full thick coating here, just a dusting for a bit of crunch. Set the balls aside on a large tray. These are fine at room temperature for a couple of hours as long as the room is not very hot, otherwise pop them in the fridge. However, in order to fry they shouldn’t be fridge cold - I found these would burst a lot quicker. So if removing them from the fridge, let them come back to room temperature.
Heat the oil in a large, deep saucepan to 180 degrees. If you don’t have a thermometer use a chopstick to check this - just stick it in the middle when you think it’s hot enough. It should immediately sizzle and bubble in the oil when it is the right temperature.
Fry the polpette in the hot oil in batches, I use a spider or slotted spoon to help with this. They will puff slightly and go golden brown. If they burst at all - don’t worry! They will still taste good and parmesan is a solid cheese so they don’t even lose their shape that much. Drain them on kitchen paper and serve with a crisp, dry glass of fizz.
MAKE AHEAD -
These are best made on the day you plan to cook them. You can roll the polpette and pop in the fridge, just remember to bring them back out and let them warm up a bit to room temperature before frying.
SUBSTITUTIONS -
Rosemary, thyme or oregano would be lovely instead of sage here. Don’t swap in a soft herb as they have more liquid in them and are likely to make your mix a bit too wet.
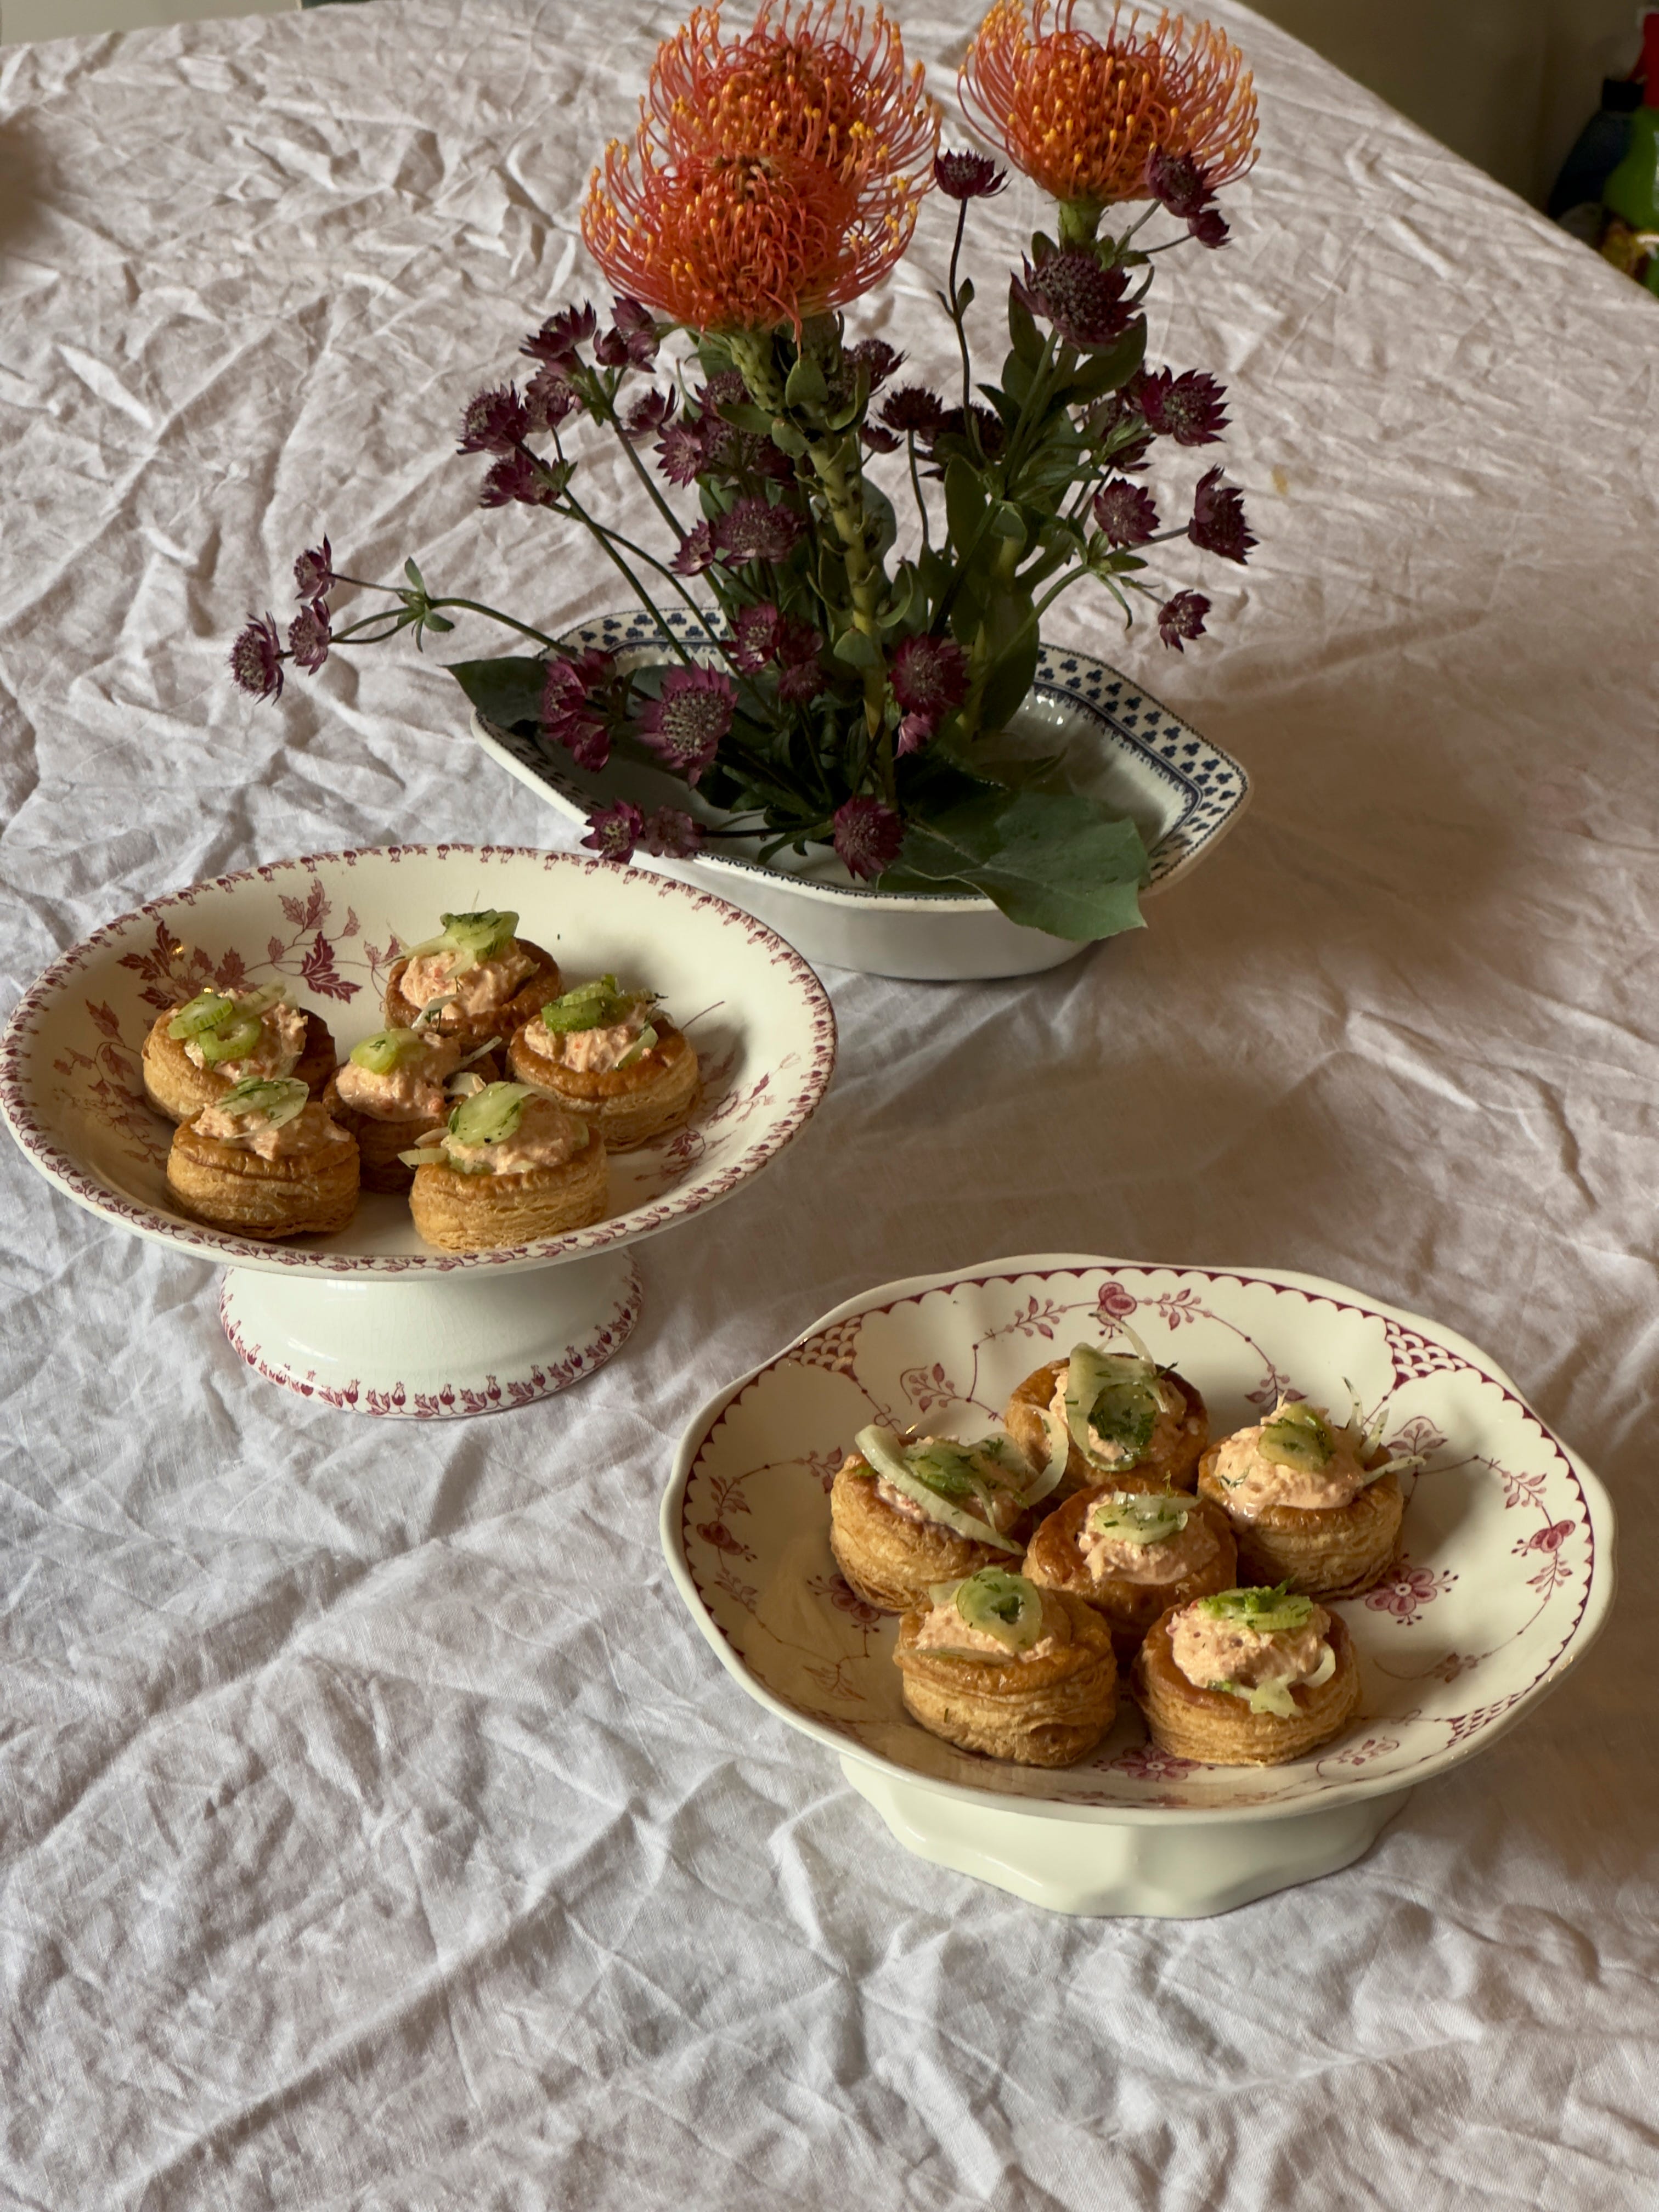
CRAB VOL AU VENTS
Vol au vents are definitely a throwback but what a throwback they are - lean into it! I had such a good time making these; the process is very calming and satisfying and they look just so spectacular. There’s an element of present giving with them, they look like little boxes filled up with treats. How CUTE. The other great thing about the vol au vents is that you can freeze the pastry cases and bake them when you wish. I love crab at Christmas - it’s a luxurious yet light treat that goes well with all the cocktails, but these would be just as nice with brown shrimp, prawns or even smoked trout.
Makes 12 - 14 vol au vents
For the vol au vents
1 sheet ready rolled all butter puff pastry
Flour, for dusting
1 egg, beaten
6cm round pastry cutter
3.5 cm round pastry cutter
For the fennel
¼ of a small fennel bulb - the green ends are great here! Finely sliced (use the rest for stock/salad)
Zest and juice of half a lemon
A handful of dill, finely chopped
1 tbsp olive oil
Salt and pepper
For the crab
1 red chilli, deseeded and finely chopped
100g white crab meat
100g brown crab meat
50g crème fraiche
1 tbsp mayonnaise
Zest and juice of half a lemon
Salt and pepper to taste
Line a flat baking tray with baking paper. Unroll the sheet of puff onto a lightly floured surface. Dust the top of the sheet with a bit more flour, then use a rolling pin to roll it out a bit more - only by about 2cm on all sides. Take the 6cm cutter and cut 24 circles out from the pastry, making sure to not waste any pastry in the process. Try and cut each circle as close to the previous one as possible and as close to the edge of the sheet where applicable, without losing the round shape. You may even be able to get 26 out of it. Place the 12 of the circles onto the baking paper. Brush each of these circles with the beaten egg. Now using the 3.5cm cutter, cut holes out of the remaining 12 circles still on the surface, leaving 12 rings. Pop each ring on top of the glazed circles on the baking tray - this is how you create a case with sides that can be filled. Now use a fork to prick the pastry in the middle of each vol au vent, just so it doesn’t rise as much as the sides will during cooking. Brush the rings with egg too and then place in the fridge for at least 1 hour to chill or even overnight. Alternatively you can freeze the vol au vent cases at this stage, ready to bake when you need them.
To bake the vol au vents, preheat the oven to 200 degrees fan. Bake them in the hot oven for 20 - 25 minutes. They will have risen and gone a deep golden brown and their bottoms will be a deep golden too. Remove them from the oven and set aside for 5 minutes to cool. Then you will notice that the centre of the vol au vent will have risen slightly, although not as much as the sides. I use a teaspoon to push it back down a bit, leaving more space for filling. This is easier to do while they are still hot. Leave the cases to cool completely.
For the fillings mix the sliced fennel with the lemon juice and zest - don’t forget you need zest for the crab mix too so zest into two bowls first before you juice. Add in the olive oil, dill and salt and pepper to taste. It should be zingy and refreshing, perfect with the creamy crab mix. For this, combine the chopped red chilli, white crab meat, brown crab meat, crème fraiche, mayo, lemon juice and zest and season well to taste.
Fill each vol au vent case with a few pieces of fennel, followed by a couple of spoons of the crab mix right up to the top. Then top with some more of the sliced fennel. Serve immediately.
MAKE AHEAD -
You can prep the vol au vent cases up to 24 hours ahead and leave in the fridge, or freeze them for up to 1 year. To bake from frozen simply add 10 minutes to the cooking time above.
You can bake the vol au vents up to 24 hours ahead but ideally bake them on the day you wish to eat them. Store at room temperature.
The crab mix can be made 24 hours ahead. The fennel mix is better made fresh on the day, up to 3 hours ahead.
SUBSTITUTIONS -
Use brown shrimp, Atlantic prawns or even shredded smoked trout instead of crab.
Swap the fennel element with very thinly sliced white onion, cucumber or courgette for a more summery vibe.
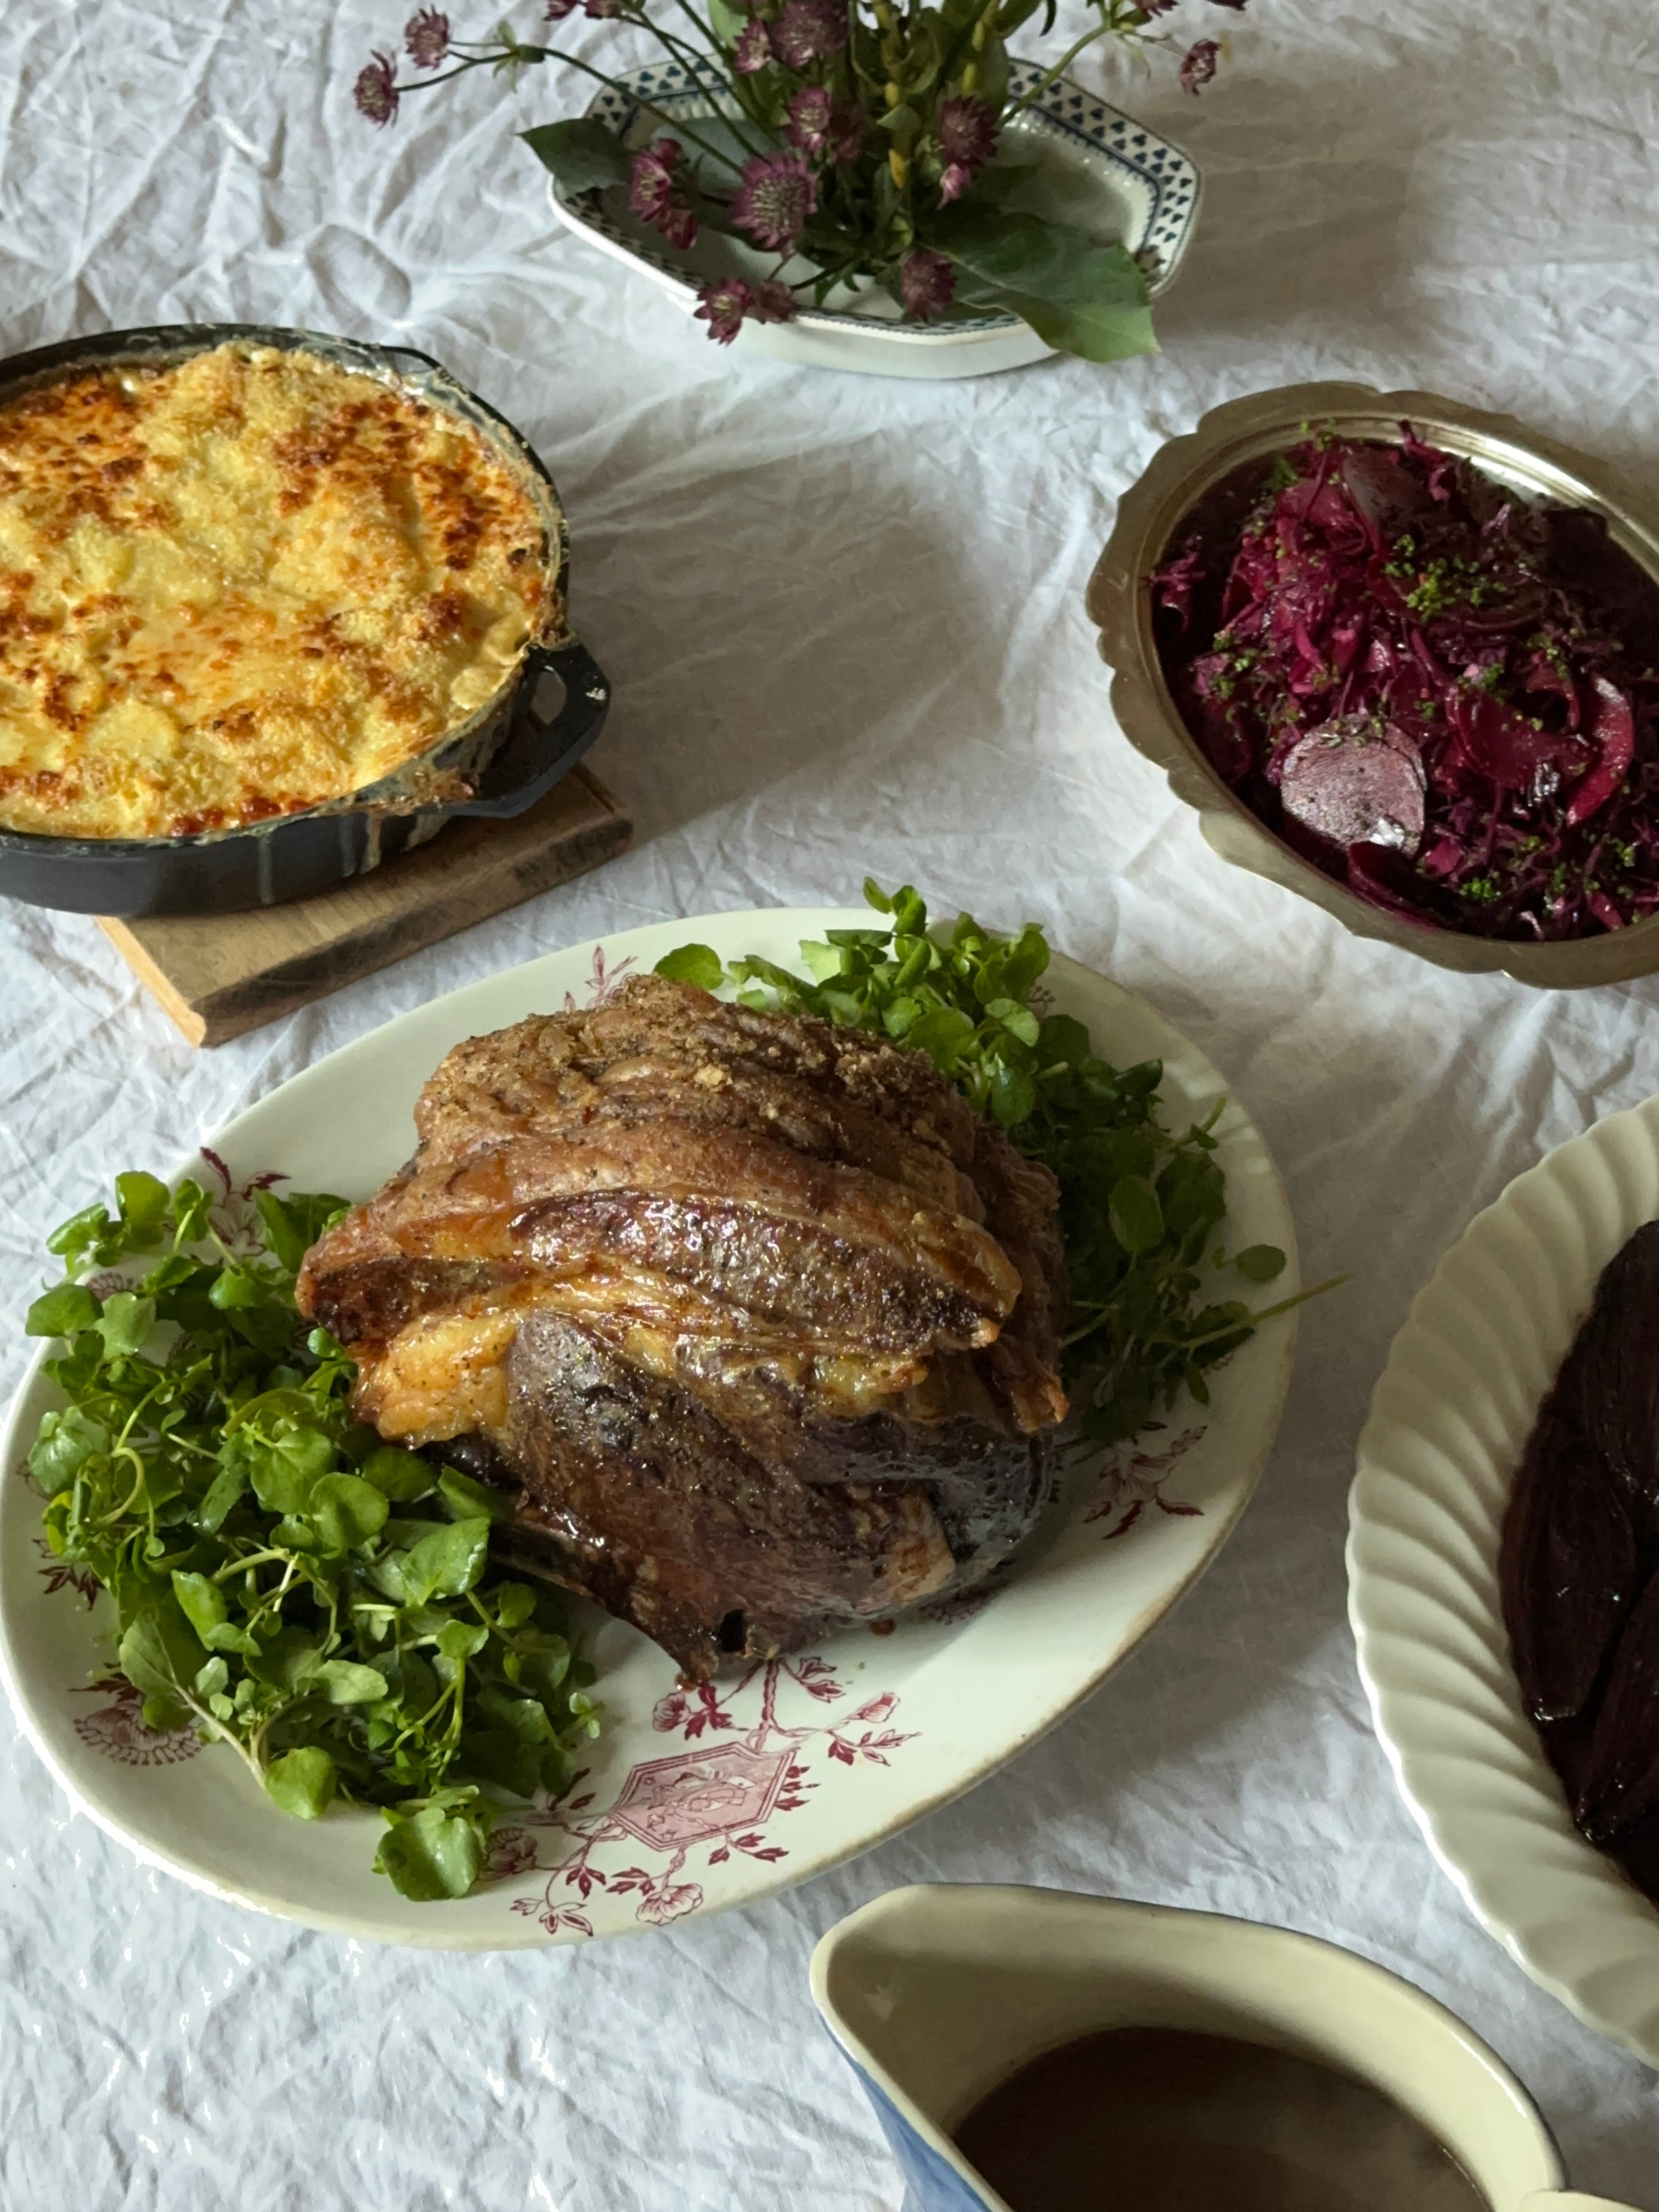
RIB OF BEEF
I think turkey is bang average and absolutely refuse to waste my time on it. For me, a slow roasted big rib of beef, porchetta or even a chicken are much, much more enjoyable to eat and cook on C-Day. I love to do a reverse sear with my beef for more even, accurate cooking which basically means cooking the meat at a really low temperature for a long time, and then quickly blasting it at the end for a bit of caramelisation on the edges. I find it to be a really great way of taking the risk away from a big piece of expensive meat that can feel stressful to cook. It does, however, slightly paralyse your oven at a temperature which is not that helpful for lots of roasted garnishes. But we love a challenge, don’t we! I always try to have sides that don’t just get roasted, partly to avoid the oven juggle and partly to make sure there is some vibrance and variety with my roast dinner. We shouldn’t be beholden to tradition all the time - it’s nice to shake things up AND you give yourself less work in the process. I’ve included a method for a beef gravy here which can be done well in advance, but if you prefer to just buy this more power to you.
For 6 people
3kg rib of beef on the bone - 3 ribs
2 tbsps flakey sea salt
1 tbsp black pepper
3 tbsps olive oil
For the gravy
2 tbsps olive oil
500g bone in beef - 2 small short ribs are great here, and you can keep the braised meat for a bowl of noodles
1 onion, roughly chopped
1 small carrot, peeled and roughly chopped
1 stick of celery, roughly chopped
2 bay leaves
2 sprigs thyme
1 tsp black peppercorns
200ml red wine
1.2l beef stock
30g plain flour
30g unsalted butter
1 tsp worcestershire sauce
Salt and pepper
100g watercress
English mustard and hot horseradish to serve
When you buy your beef, remove any packaging and let it sit uncovered in the fridge. 24 hours before you wish to cook it, rub it all over with the salt and pepper and return it to the fridge.
For the gravy, heat the oil in a large saucepan on a high heat until shimmering. Brown the shortribs on all sides in the oil, roughly 3 - 4 minutes a side before turning. Once the ribs are browned, set aside and add in the chopped vegetables. Caramelise the veg on a medium heat for around 10 minutes or so, until they are golden and starting to soften. Pour in the wine - it will bubble fairly intensely. As soon as the wine is in use a wooden spoon to scrape off any of the beautiful gold from the bottom of the pan - this will give such good flavour to your gravy. Let the wine reduce by half, then pour in the stock and drop in the herbs and peppercorns. Return the ribs to the pan and cover with a lid. Simmer for 3 hours gently on a low heat, until the meat on the ribs is tender and the stock is rich and dark. Remove the short ribs (you can eat these) and strain the stock through a fine sieve. In another saucepan, warm the butter on a medium heat until sizzling. Add in the flour and whisk to make a smooth roux. Cook for 2 to 3 minutes stirring often - the roux will darken in colour and smell toasty. Now start to ladle in your hot beef stock like you would do with milk in a béchamel, whisking each time until smooth. Once all the stock is in, let the gravy simmer for around 5 minutes until thickened and glossy. Season with the Worcestershire sauce and salt and pepper and set aside until needed.
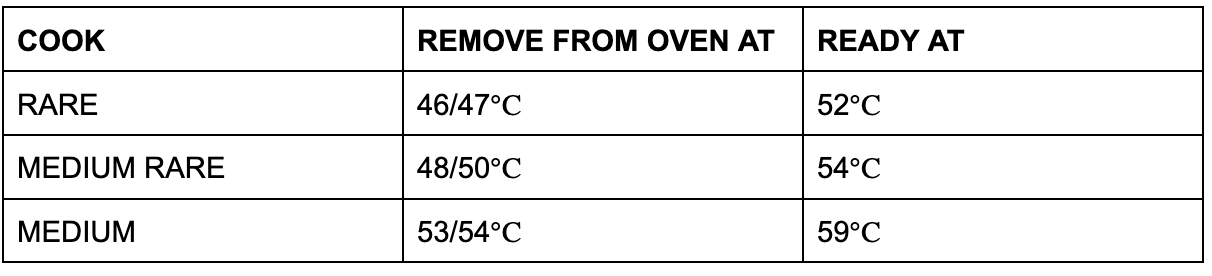
Remove the beef from the fridge at least 1 hour before you wish to cook it and at least 7 hours before you want to eat it, so if this is 4 pm, it needs to be out at 9 am and in the oven by 10 - 10:30. Preheat the oven to 100 degrees fan. Rub the beef all over with the olive oil and put it into a roasting tray, bone side down. Put the beef into the oven and cook for 4 - 5 hours low and slow. No two ovens are the same so it is easier for me to give an approximate timing here, not to mention the exact timing will depend on how well cooked you want it. You should probe your meat regularly with a thermometer to check its progress, once an hour is fine. The internal temperature will continue to rise even after you remove the beef from the oven, although not as much as with beef roasted at a high heat, so it is best to remove it a few degrees before it hits the right spot.
Remove the beef from the oven when it hits the right temperature for you and set it aside to rest for a minimum of 30 minutes. Turn the oven up to 200 fan and use it to cook whatever else you need it for (dauphinoise in our case!). Then to finish off the beef, return it to the oven for 10 minutes to get a little colour around the edges. The beef will still be lovely and hot inside, it holds its temperature really well so don’t worry about that. Reheat the gravy. Serve the beef adorned with the watercress and with its gravy and all your lovely sides.
TO CARVE -
Run a sharp knife against the bones on the base of the rib to separate the main hunk of meat from them. Then use a long, very sharp knife to slice the beef thinly.
MAKE AHEAD -
The gravy can be made up to 3 days ahead and kept in the fridge, or frozen for 3 months.
You can also make the stock and finish the gravy with the roux when you need to.
SUBSTITUTIONS -
None!
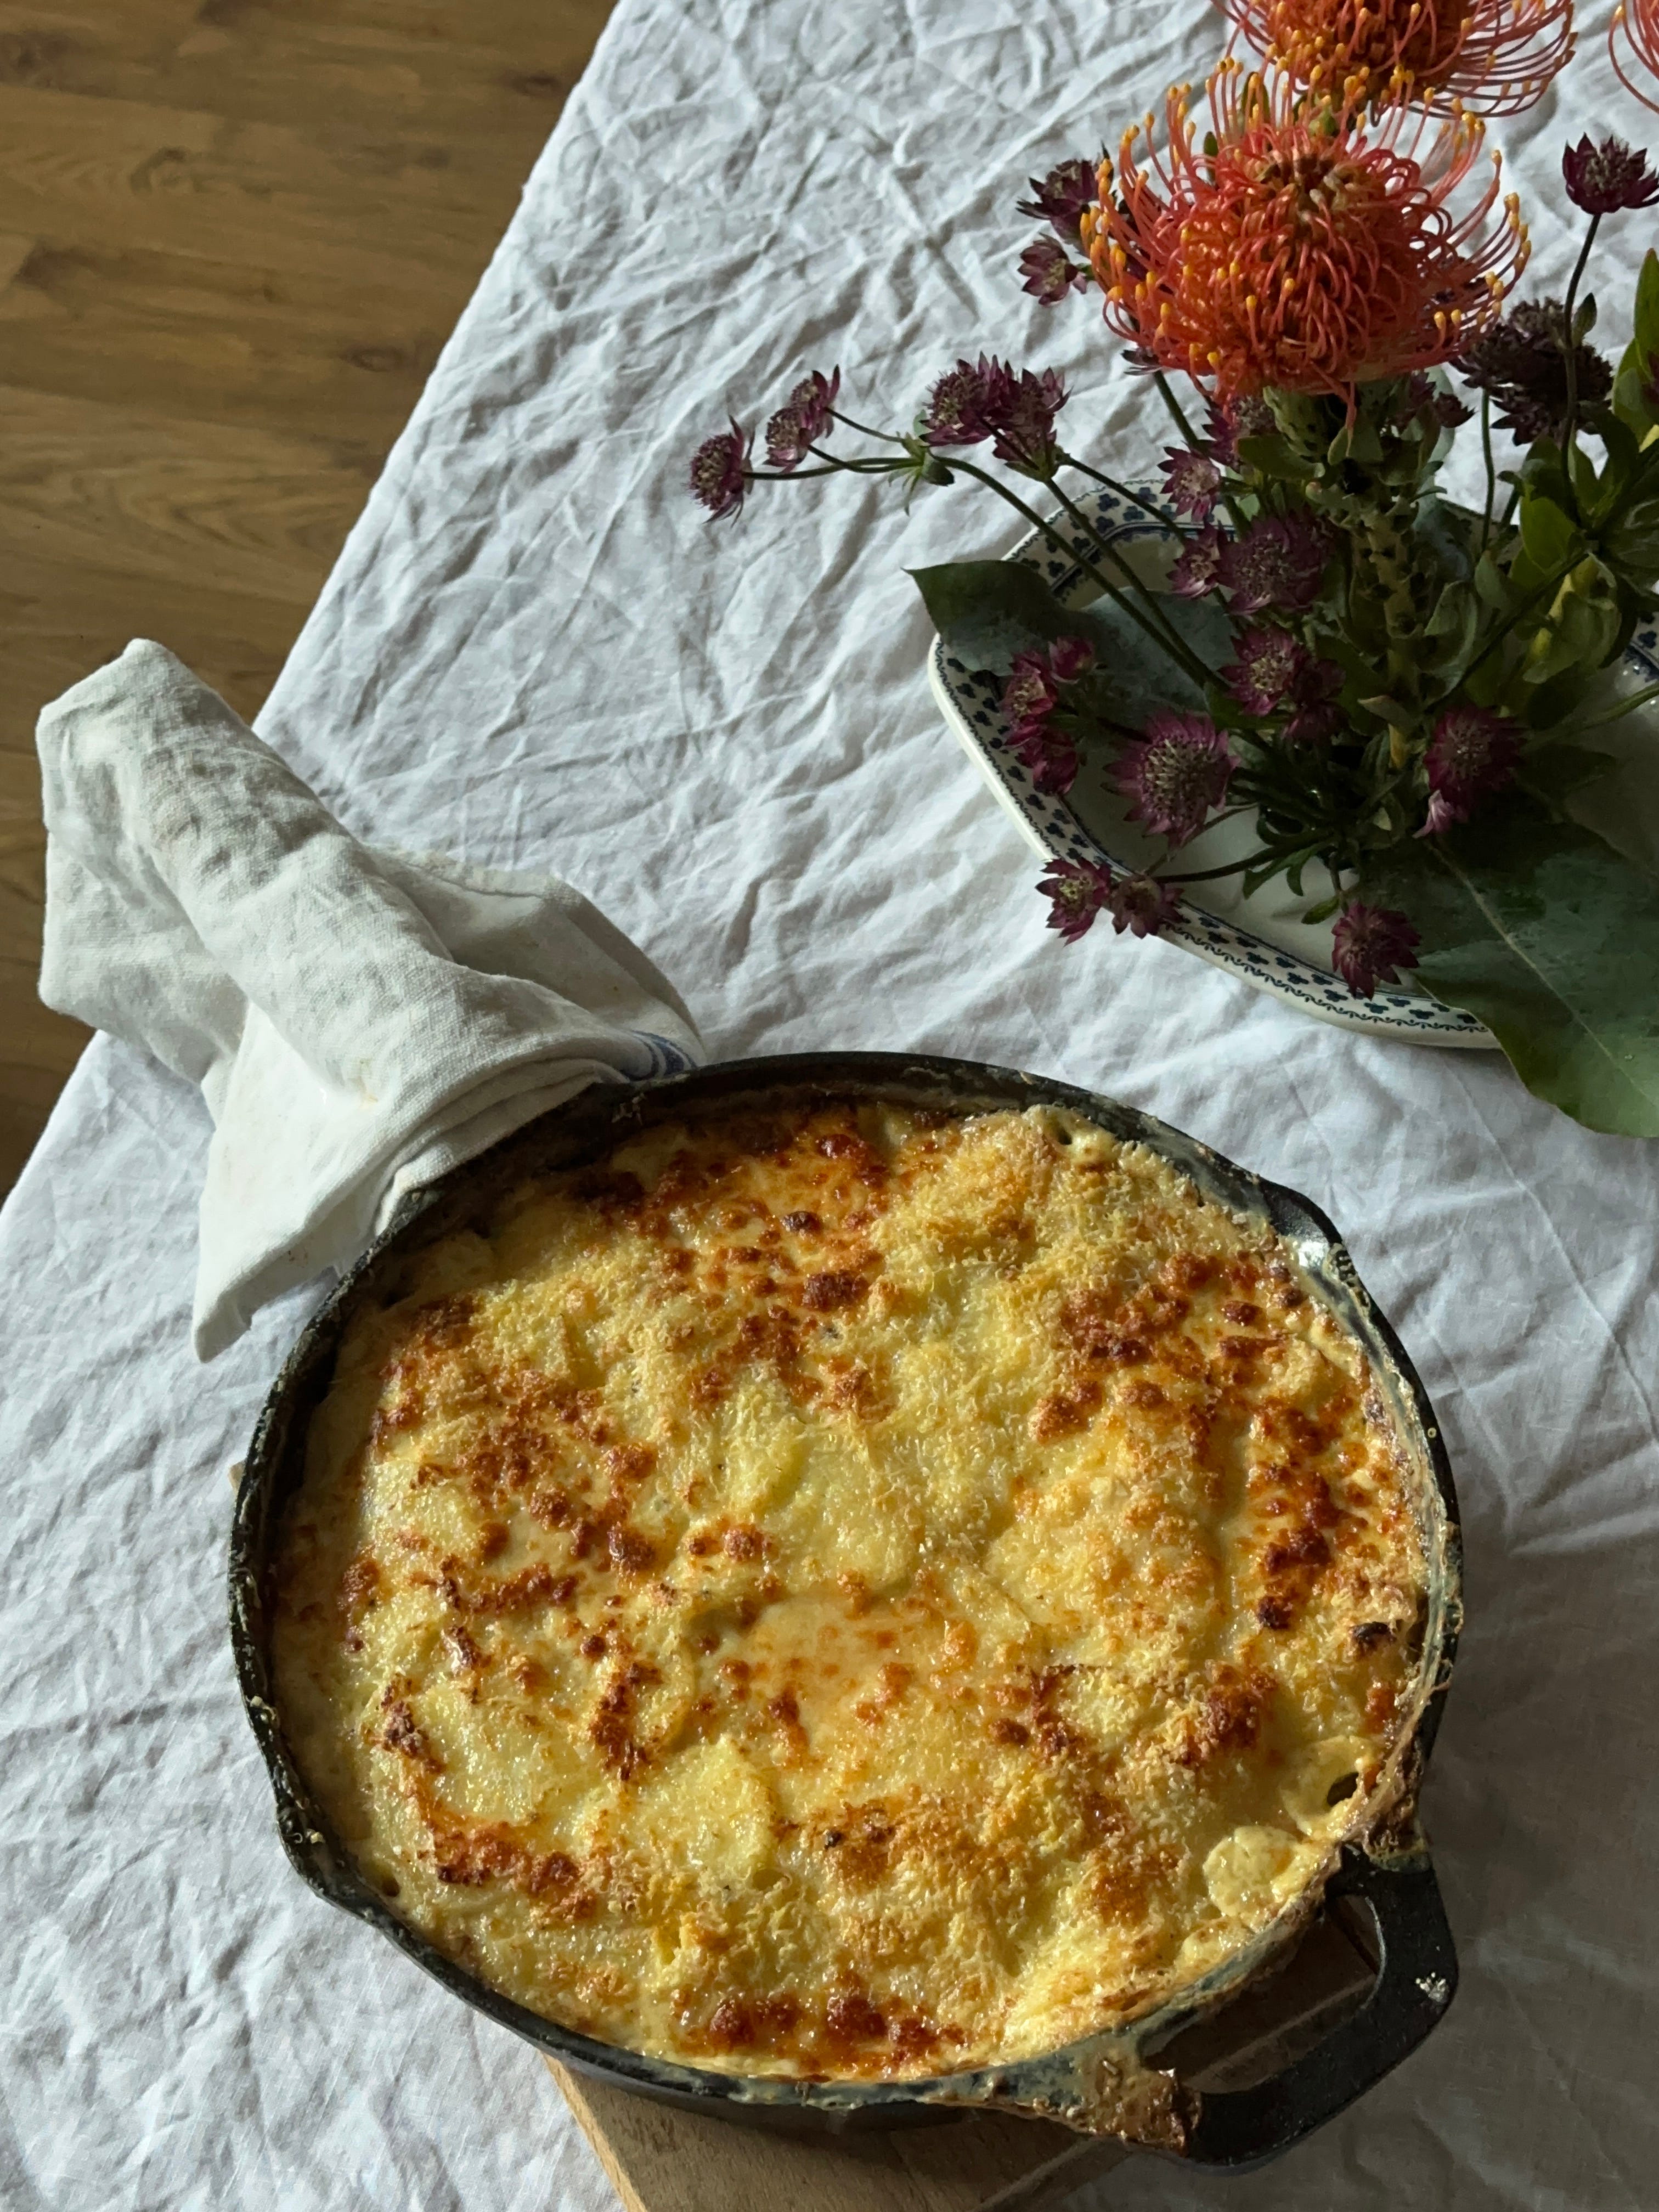
GRATIN DAUPHINOISE
A dauphinoise is a beautiful thing and I consider it to be the best potato dish to serve with roast beef. It’s also a lot lower maintenance than roast potatoes, can be prepped well in advance and can be cooked in two stages - one par-cook before the beef goes in and one after it has cooked to finish it off. Perfect! I also happen to think it makes the most EXCELLENT Christmas sandwich filling too, especially with leftover cheese, ham and some fresh chillies. OMG I am hungry. Ok I digress. The secret to a good dauphinoise is seasoning - each layer needs its own sprinkling of salt and pepper as well as the cream mix itself being seasoned. Starchy potatoes and rich cream soak up tonnes of flavour so they need it, trust me.
A side for 6 people
1kg King Edwarded, peeled and finely sliced, ideally on a mandolin for ease
Plenty of flakey sea salt and black pepper
800ml double cream
150ml whole milk
3 cloves of garlic, grated
A decent grating of nutmeg
1 tsp flakey sea salt
½ tsp black pepper
40g parmesan, finely grated
A knob of butter, for greasing
A medium sized baking dish or cast iron pan
Slice your peeled potatoes finely on a mandolin - they should be no more than 2mm - 3mm thick. Keep them in a bowl of cold water while you work to stop them discolouring.
Mix the cream, milk, garlic, salt, pepper and nutmeg together in a jug. Grease your chosen dish with the butter and then arrange a layer of potatoes on the bottom. They don’t need to be in any kind of pattern and can certainly overlap each other. Sprinkle the layer with salt and pepper and pour over some of the cream mix. Continue in this manner; layering, seasoning, pouring, until you have filled the dish with all the potatoes and all of their cream. Cover the dish tightly with foil and set aside.
To cook the dauphinoise, preheat the oven to 180 fan. Bake the dauphinoise, covered for 50 minutes. You might want to put it on a tray while in the oven in case some of its mix bubbles up. If you are making this for with the slow roast beef, then after 50 minutes you can remove it and set it aside, covered. Turn your oven down for the beef and let that do its thing. When the beef is cooked to your liking, remove it and whack the oven back up to 200. Uncover the dauphinoise and sprinkle the parmesan on top. Bake in the oven for 30 minutes until golden and bubbling hot. Now it is ready to serve with the beef. If you don’t have to roast a beef joint in between, then after 50 minutes covered, turn the oven up to 200 and uncover the dauphinoise. Sprinkle it with the parmesan and bake for another 20 minutes. Serve immediately.
MAKE AHEAD -
You can prep the dauphinoise and leave it in the fridge for up to 24 hours before cooking. Just be sure to let it sit for an hour at room temperature before cooking.
You can also pre-cook the dauphinoise the day before to the end of the 50 minutes covered stage if you prefer. Chill overnight, bring back to room temperature and bake for 30 - 40 minutes uncovered at 200 (don’t forget to add the parmesan to the top)!
SUBSTITUTIONS -
A thinly sliced onion and a tin of finely chopped anchovies are amazing in dauphinoise.
A tsp of finely chopped thyme or rosemary would be lovely in this too.
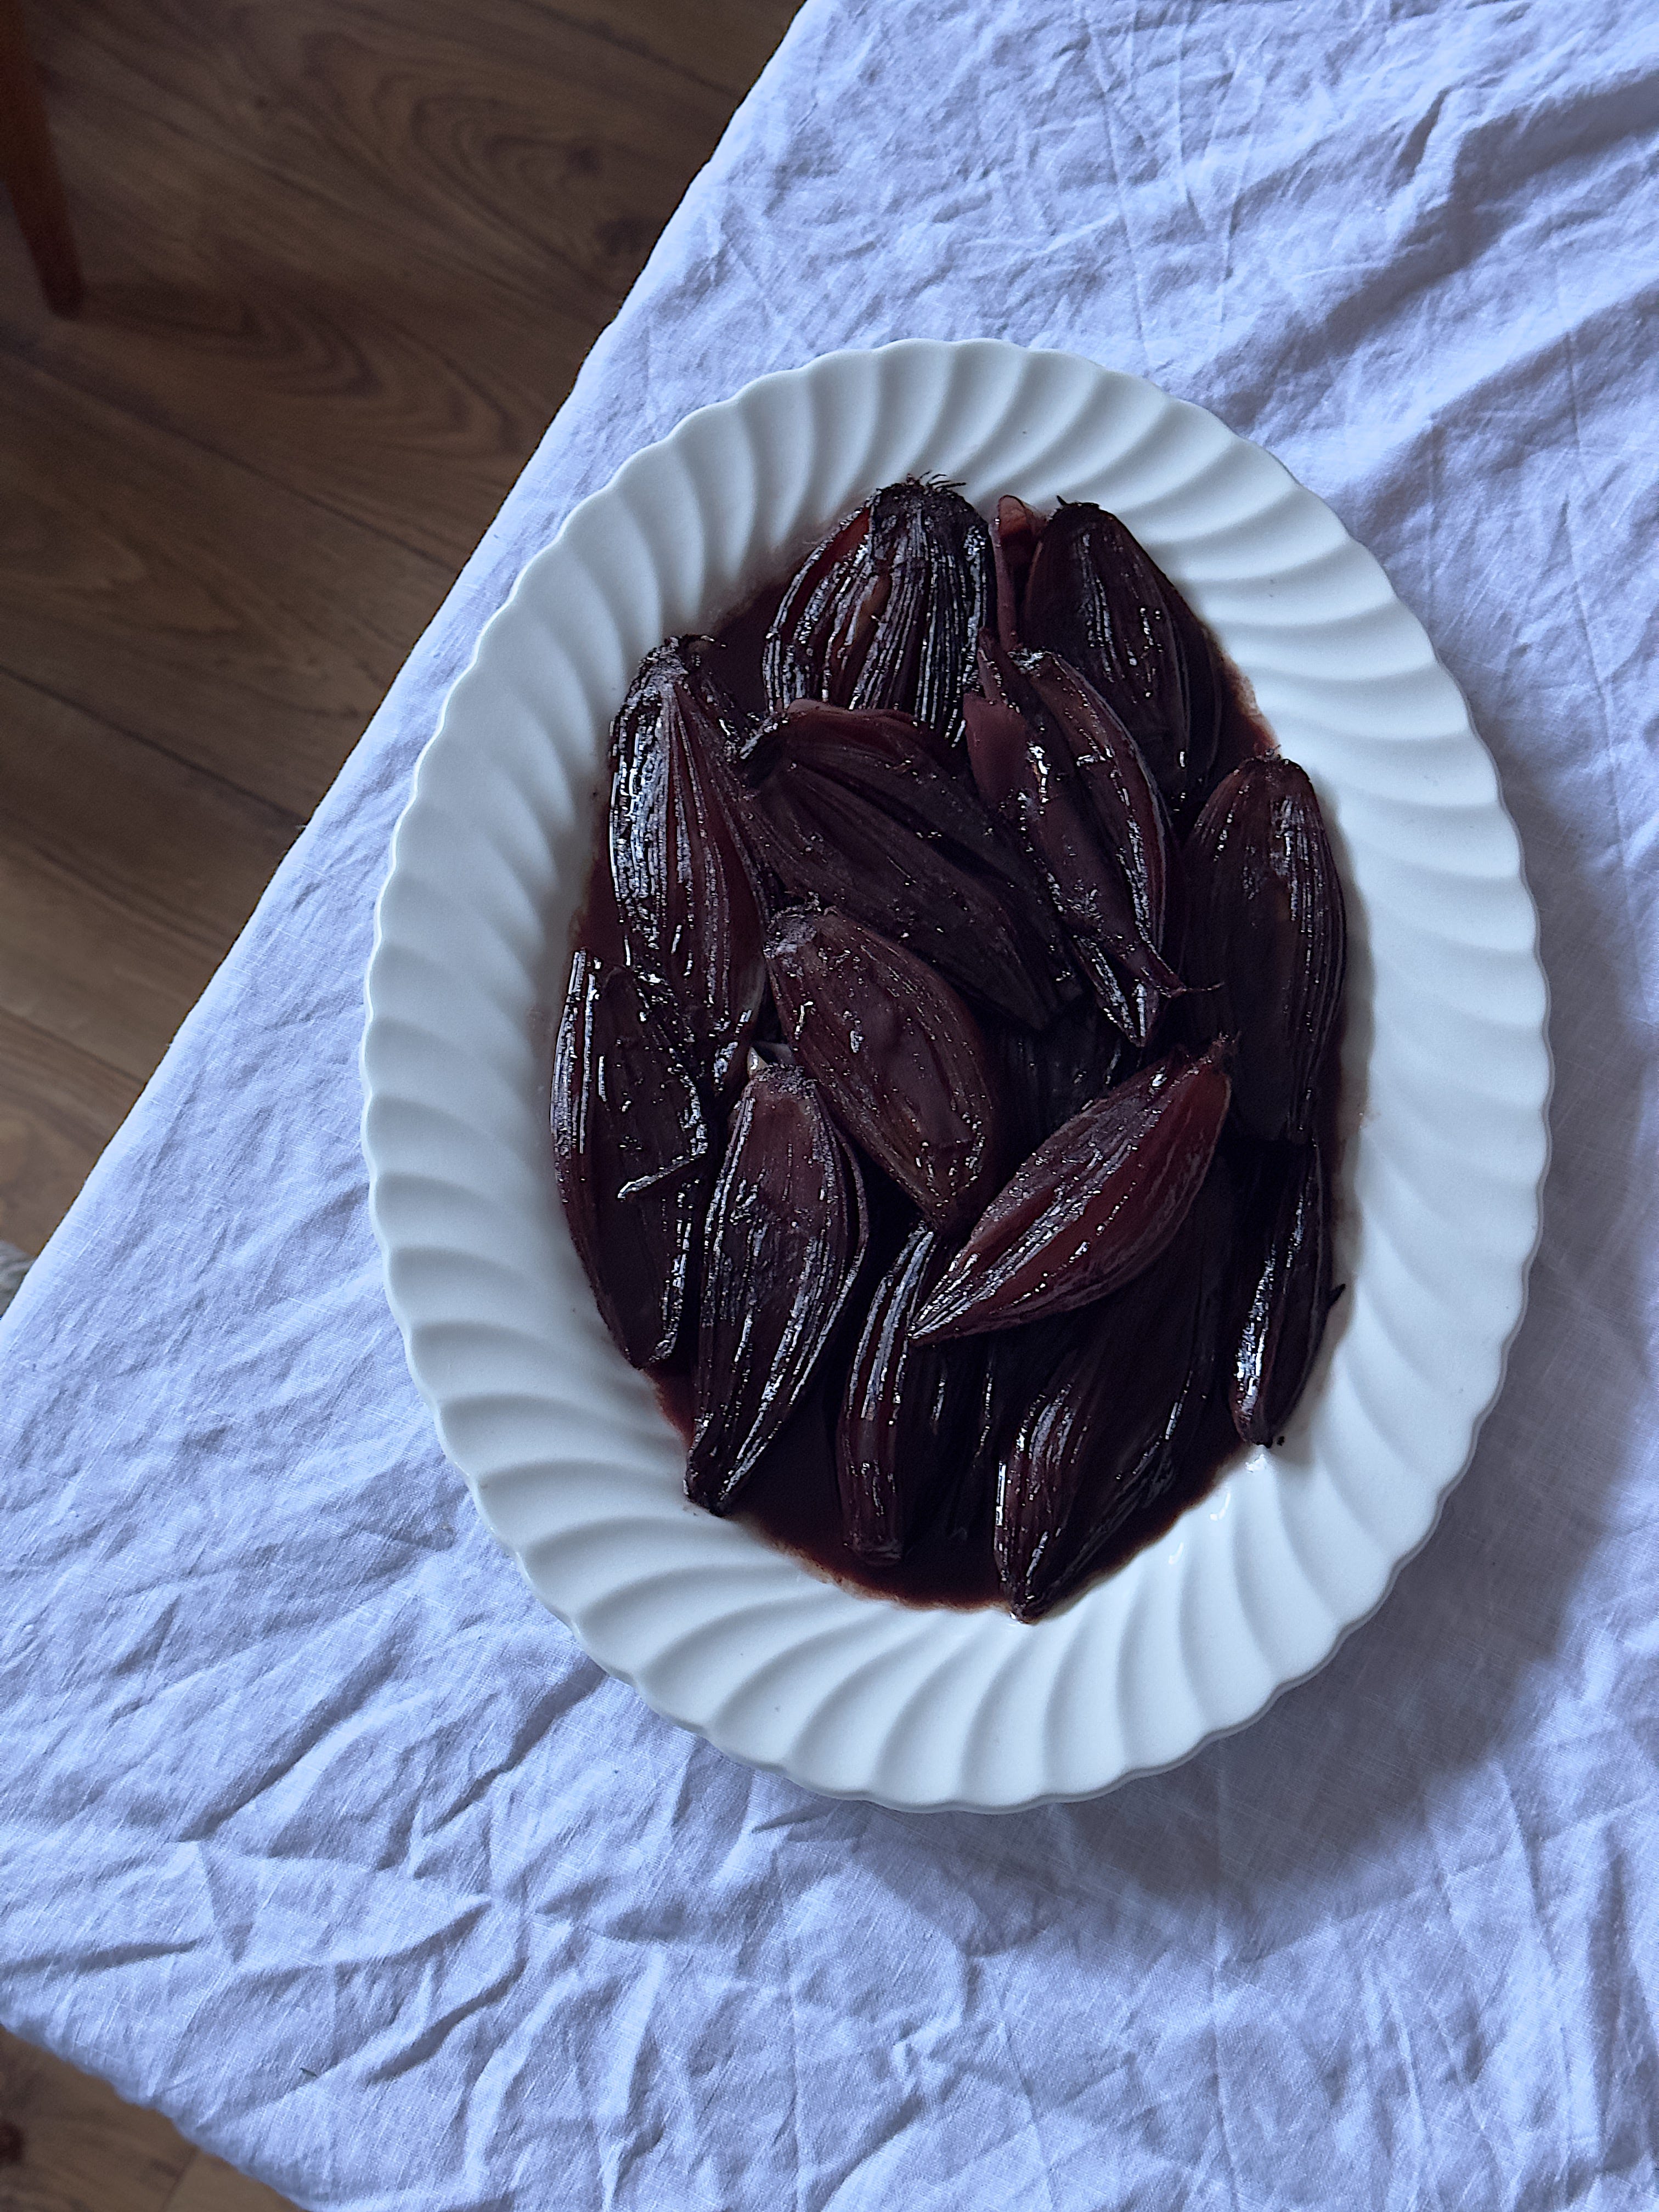
BRAISED SHALLOTS
I have always loved shallots as an ingredient but I find, like onions, they are often playing a supporting role rather than getting a main part. Well not anymore! These are the most delicious side dish for a roast - they are stovetop only so no need to crowd the oven and you can leaving them ticking away while you do other things. Similar to the dauphinoise they are also ICONIC in a Christmas sandwich with lots of CHEESE. They are also great on top of risotto, like I’ve done here.
6-8 large echalion shallots, peeled sliced in half lengthways with the root still on
3 tbsps olive oil
45g unsalted butter
6 sprigs rosemary, chopped
400ml red wine
200ml water
2 tbsps caster sugar
A good pinch of flakey sea salt
1 tbsp red wine vinegar
In a large, hot casserole or saucepan, sear the shallots cut side down first in the oil until a deep golden (around 6 minutes) and then turn and repeat on the other side. Add the butter and the rosemary, let the butter sizzle and start to foam in the pan for a minute or so. Then pour in the red wine, sugar, water and season well with a big pinch of salt. Bring to a simmer, turn the shallots again so their cut side is down and then cover the pan with a lid. Turn the heat to medium and simmer gently for 30 - 40 minutes, turning the shallots a couple more times during the cooking. They should be a dark purple and super soft and tender and the sauce will have thickened slightly. Remove the lid and simmer for another 5 minutes or so, so that the sauce reduces even more. Serve immediately or leave covered and reheat when needed.
MAKE AHEAD -
The shallots can be braised up to 2 days ahead. Simply reheat gently in a pan to serve.
SUBSTITUTIONS -
Little baby shallots or small red onions would work really well here too.
Swap rosemary for bay leaves or oregano.
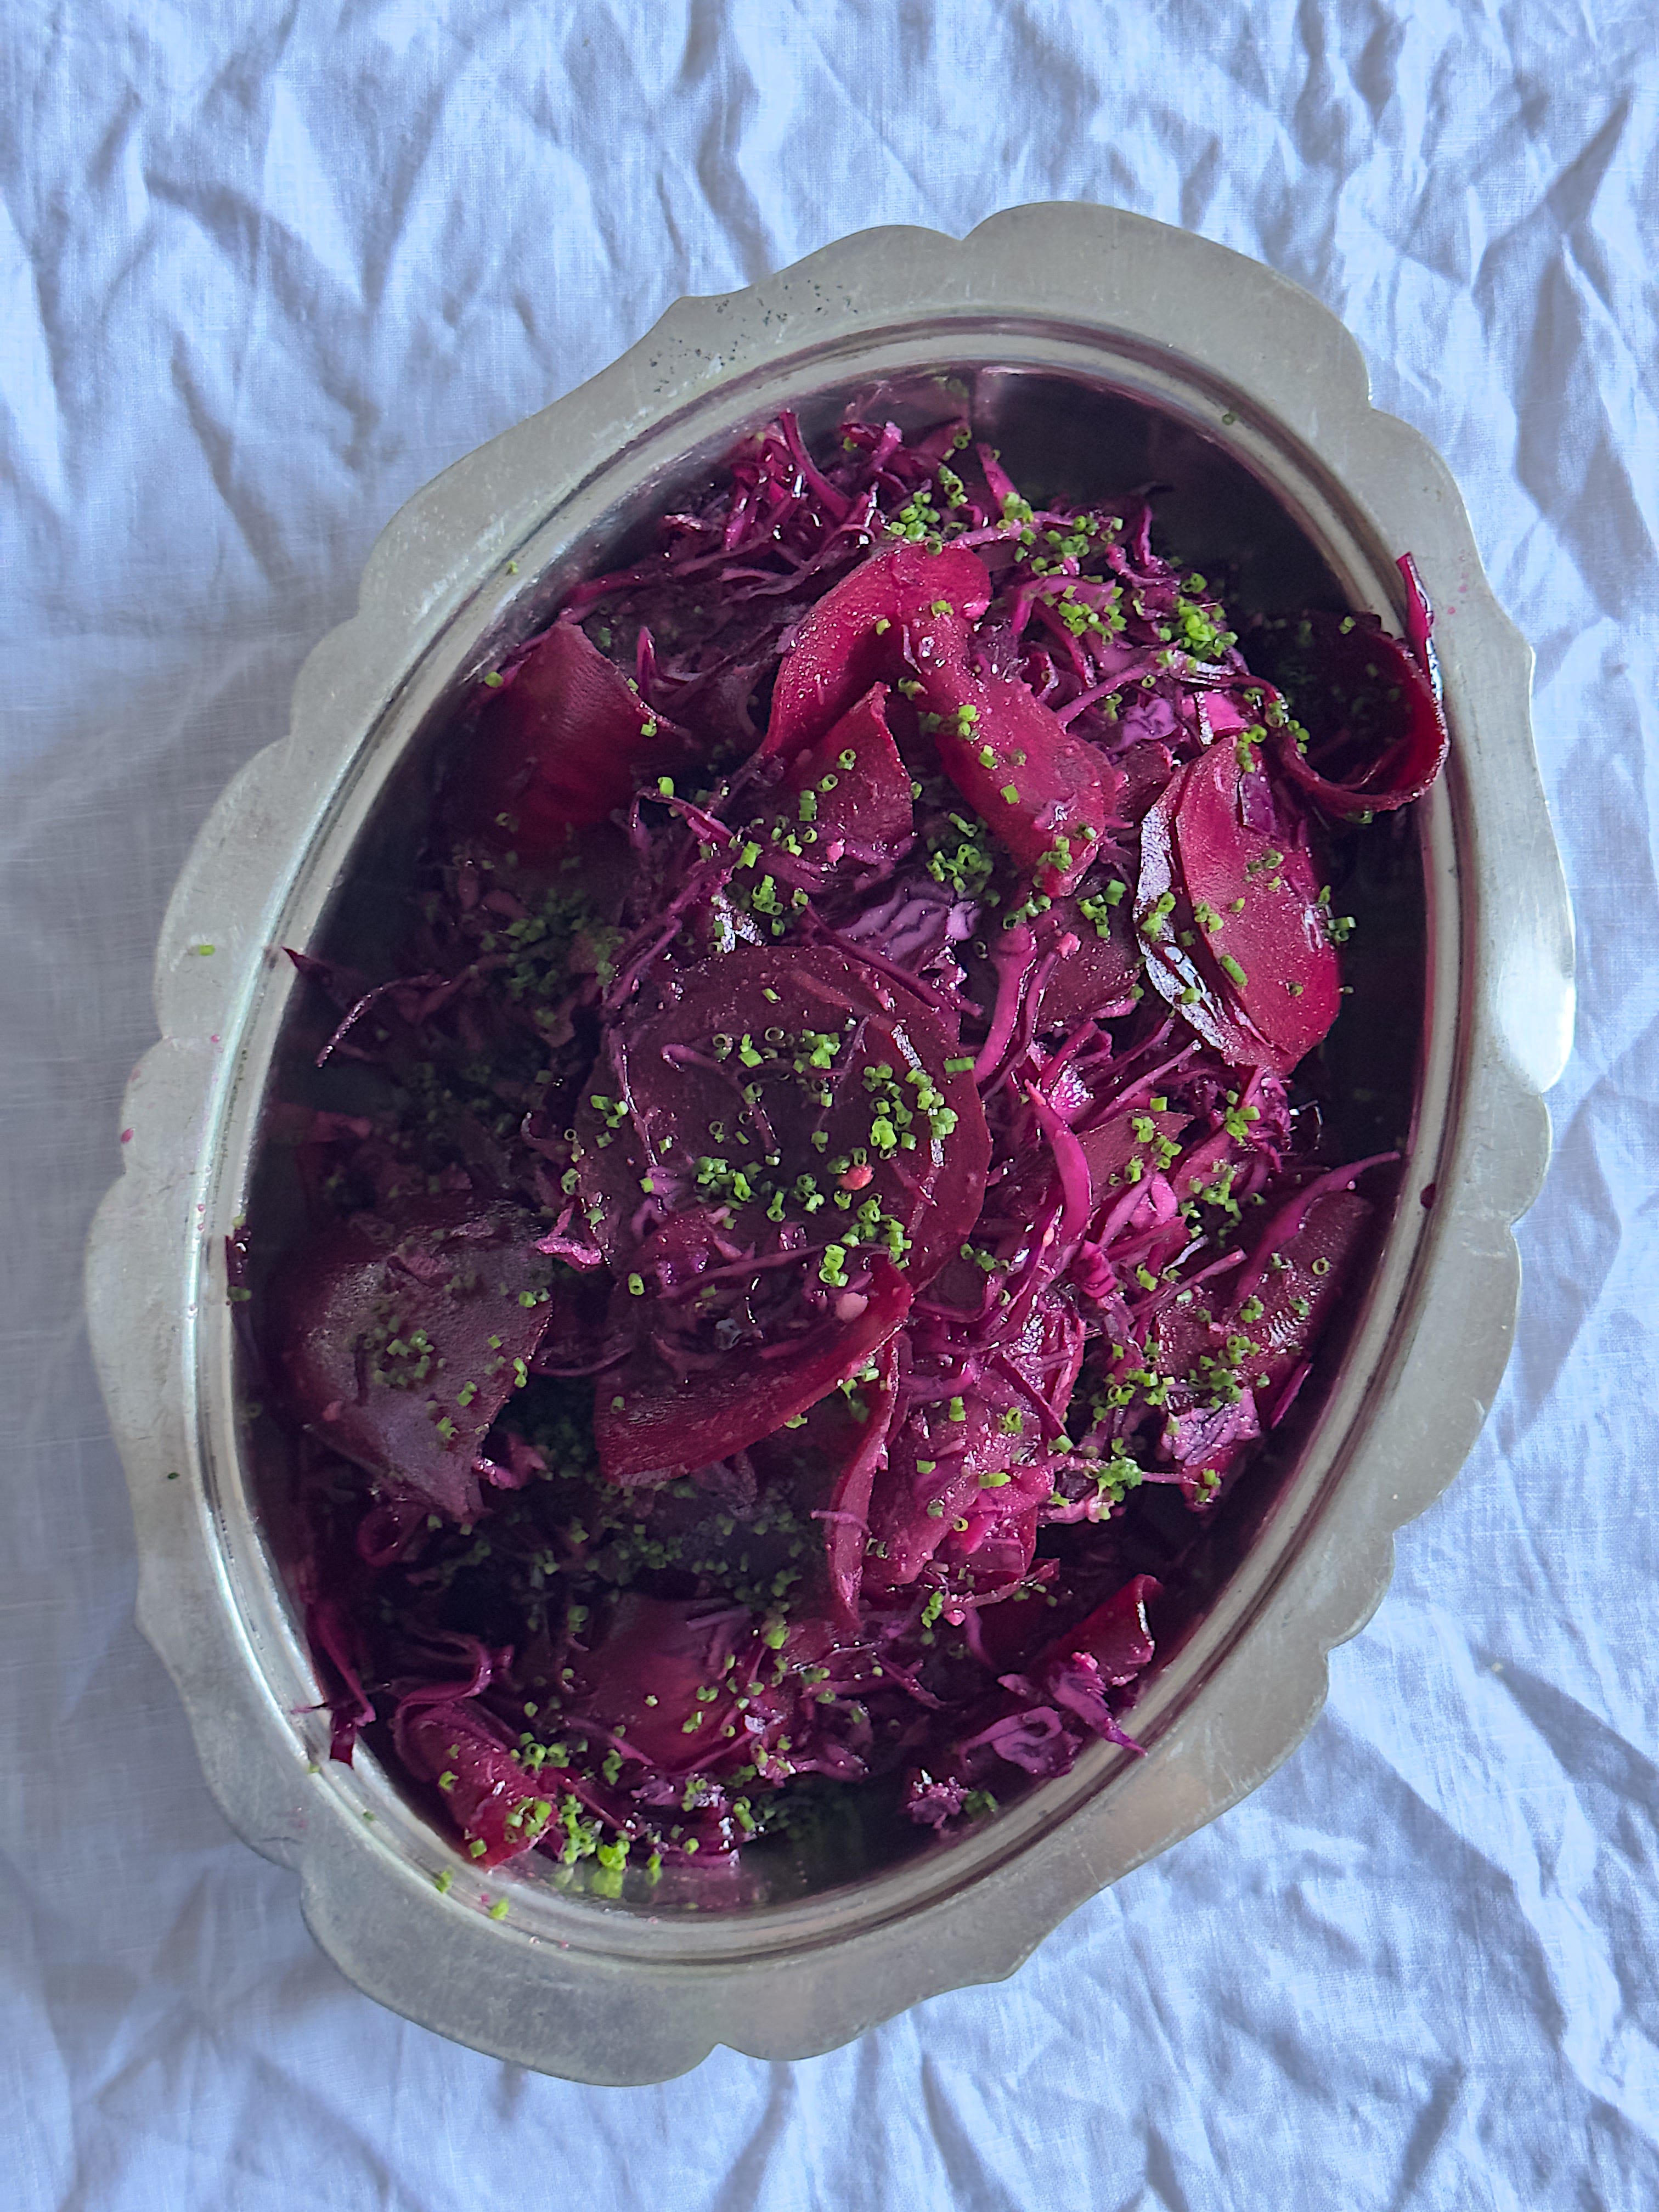
RED CABBAGE, BEETROOT AND HORSERADISH
Ok, I won’t lie, this is a salad. But it is a good salad with roast beef, in fact it is the most delicious salad for any roast. Red cabbage is a classic at christmas and don’t get me wrong I love the spiced, softly cooked stuff but in the interest of minimising stove/oven time and also getting ahead this is a really amazing alternative. I would definitely make this 24 hours in advance so as to let all the flavours mingle and intensify. If you are not a beetroot fan, I hear you as I am not the world's biggest myself, you can leave it out in favour of more cabbage but I will say I really love their sweetness and crunch here. In fact this is beetroot's first outing on The Dinner Party so that's nice! Horseradish is a must with beef and combined with the vinegar and crunchy veg this salad is almost like a hot little pickle for the plate and it balances perfectly with the sweet shallots, creamy potatoes and meaty beef.
½ a medium red cabbage, finely sliced (by hand, by mandolin or by food processor - your choice!)
2 medium beetroots, peeled and thinly sliced (mandolin is best for this) * Don’t forget to rub oil over your hands and the surface of your board before prep beetroot to avoid it staining!
1 heaped tbsp flakey salt
4 tbsps red wine vinegar
3 tbsps hot horseradish - this is the hottest and best I have found
1 tbsp caster sugar
2 tbsps olive oil
Plenty of black pepper
Handful of chives, finely chopped
Mix the salt, vinegar, horseradish, sugar, olive oil and black pepper together in a small bowl. In a large bowl combine the cabbage and beetroot and then pour over the dressing. Stir it really well to make sure it is very evenly mixed. Set aside for a minimum of 3 hours in the fridge or ideally overnight.
To serve, bring the salad to room temperature. Pile onto a plate and top with the finely chopped chives.
MAKE AHEAD -
This is best after 24 hours in the fridge so definitely get ahead here.
SUBSTITUTIONS -
Swap beetroot for carrots, radishes or simply more red cabbage.
If you like you can stir some crème fraiche through this for a more creamy, indulgent version.
Fresh horseradish would be lovely here too but it’s hard to come by in small quantities.
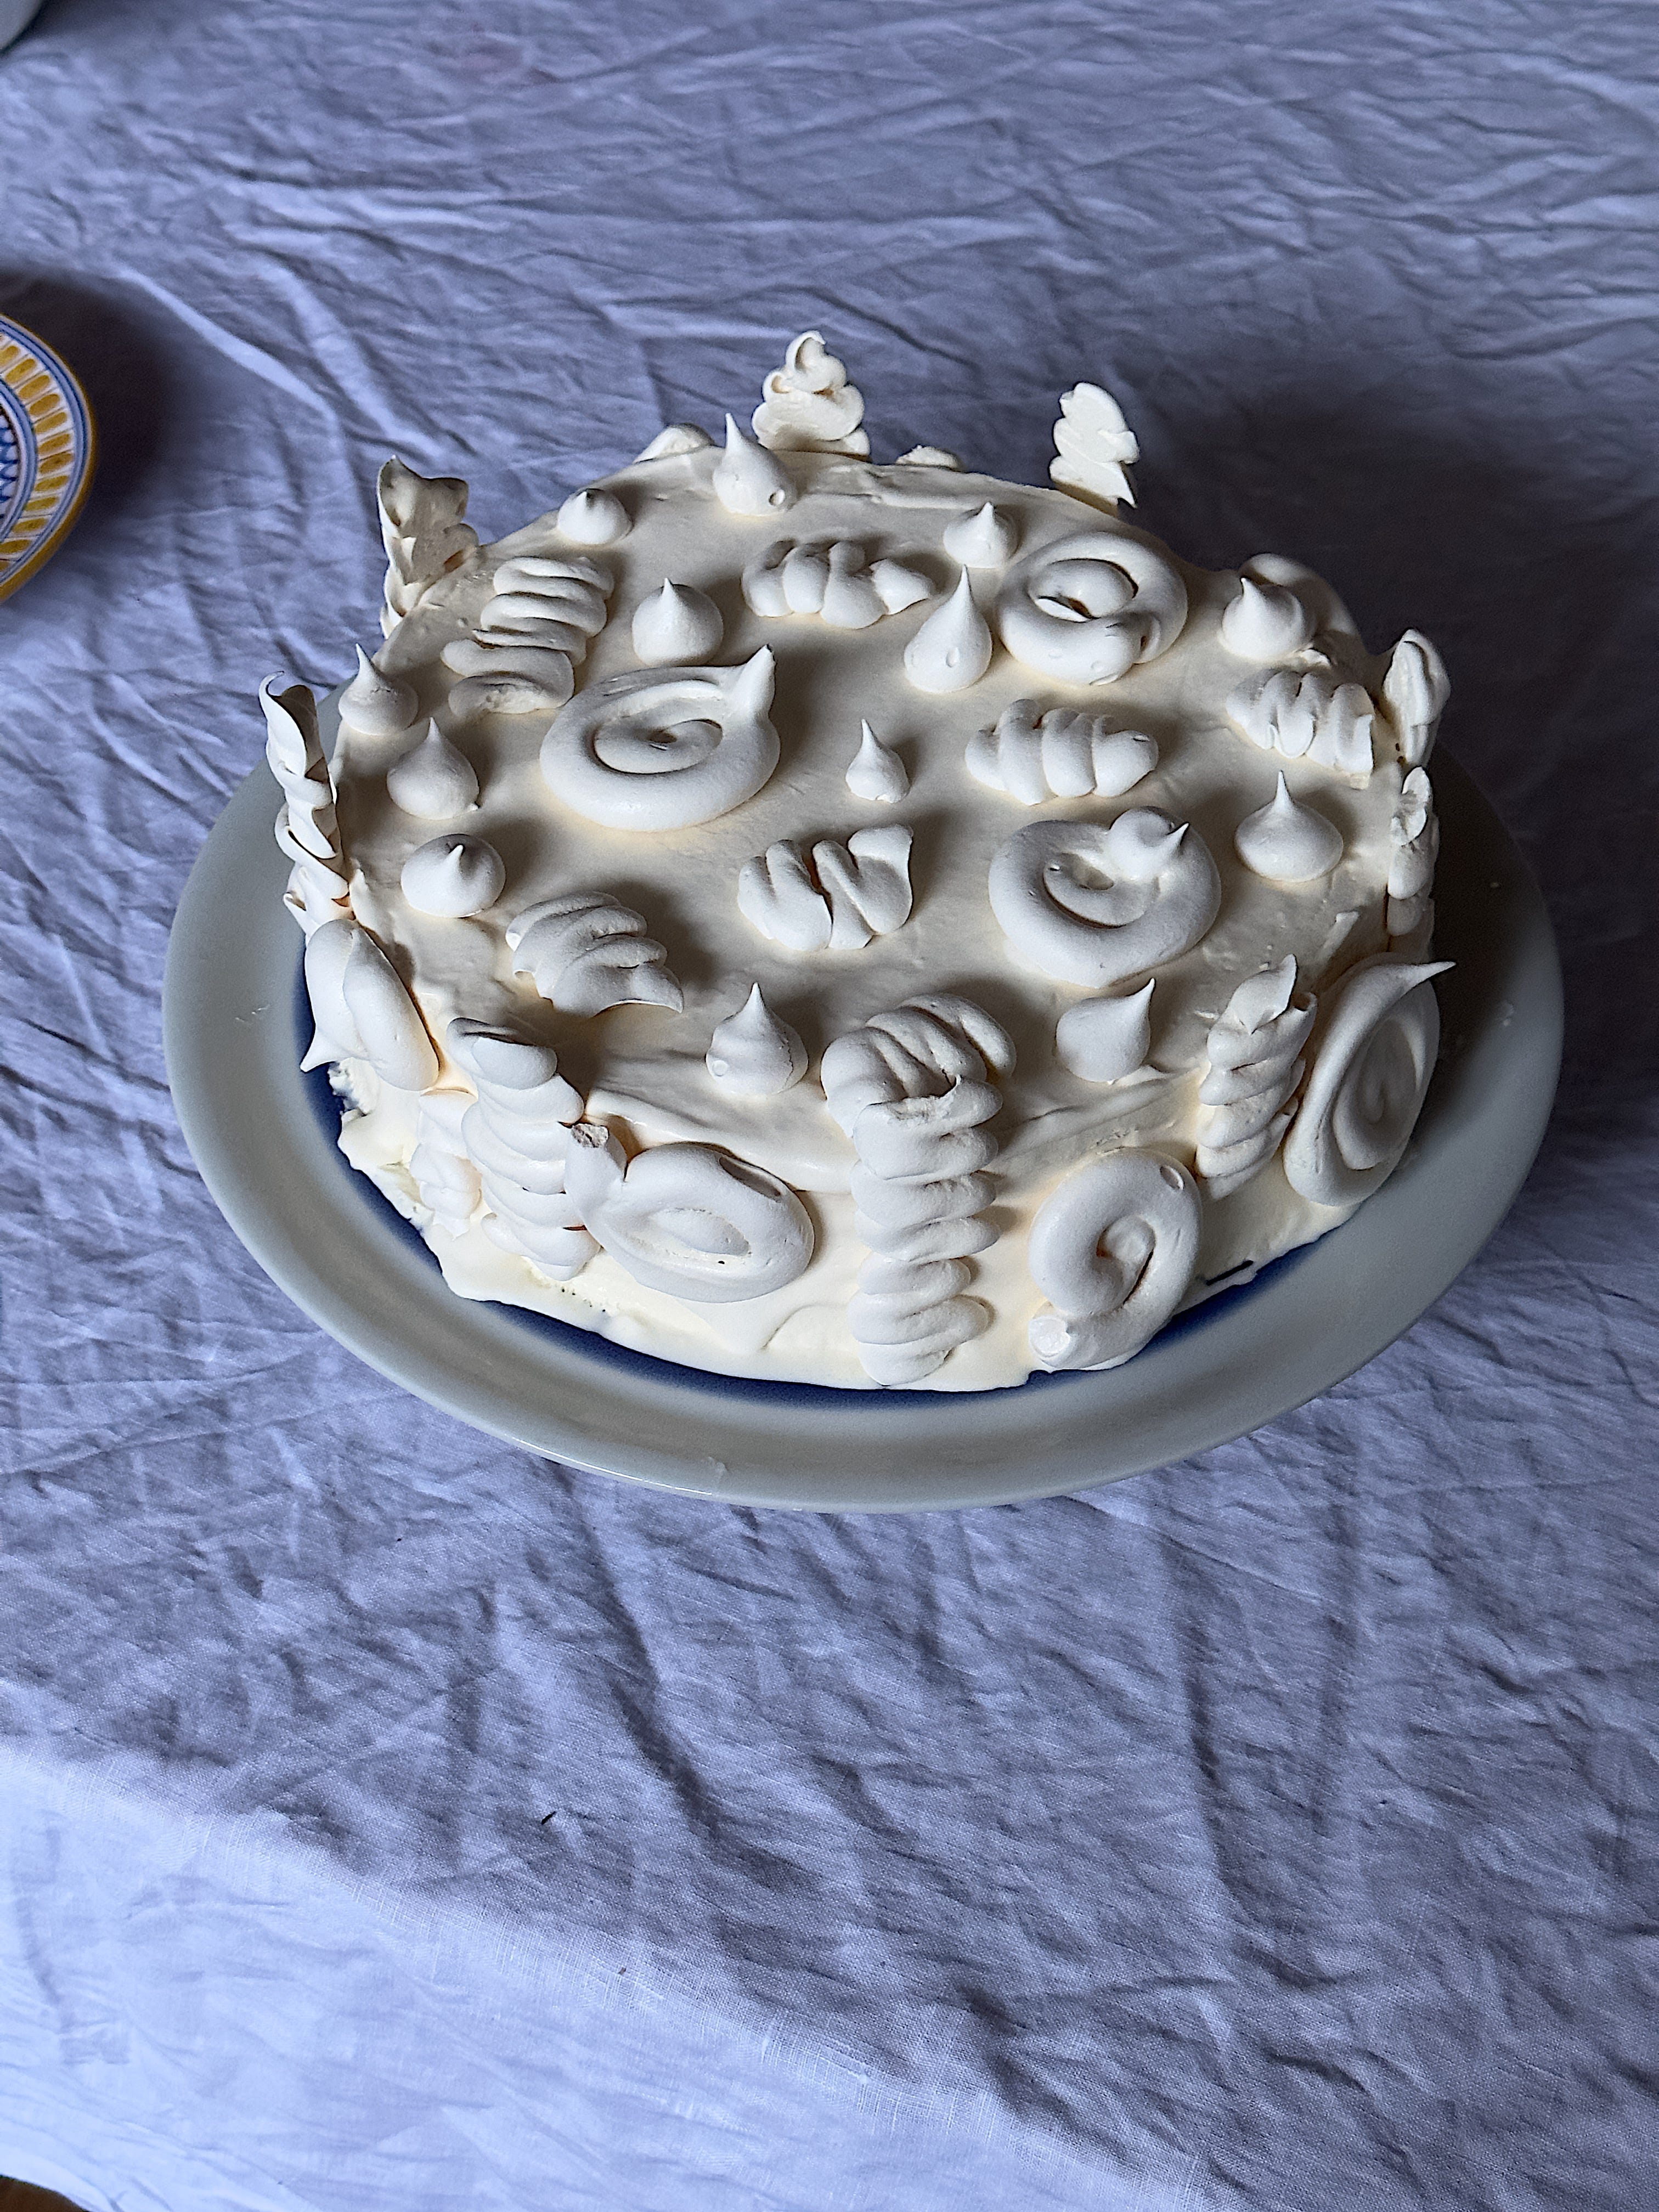
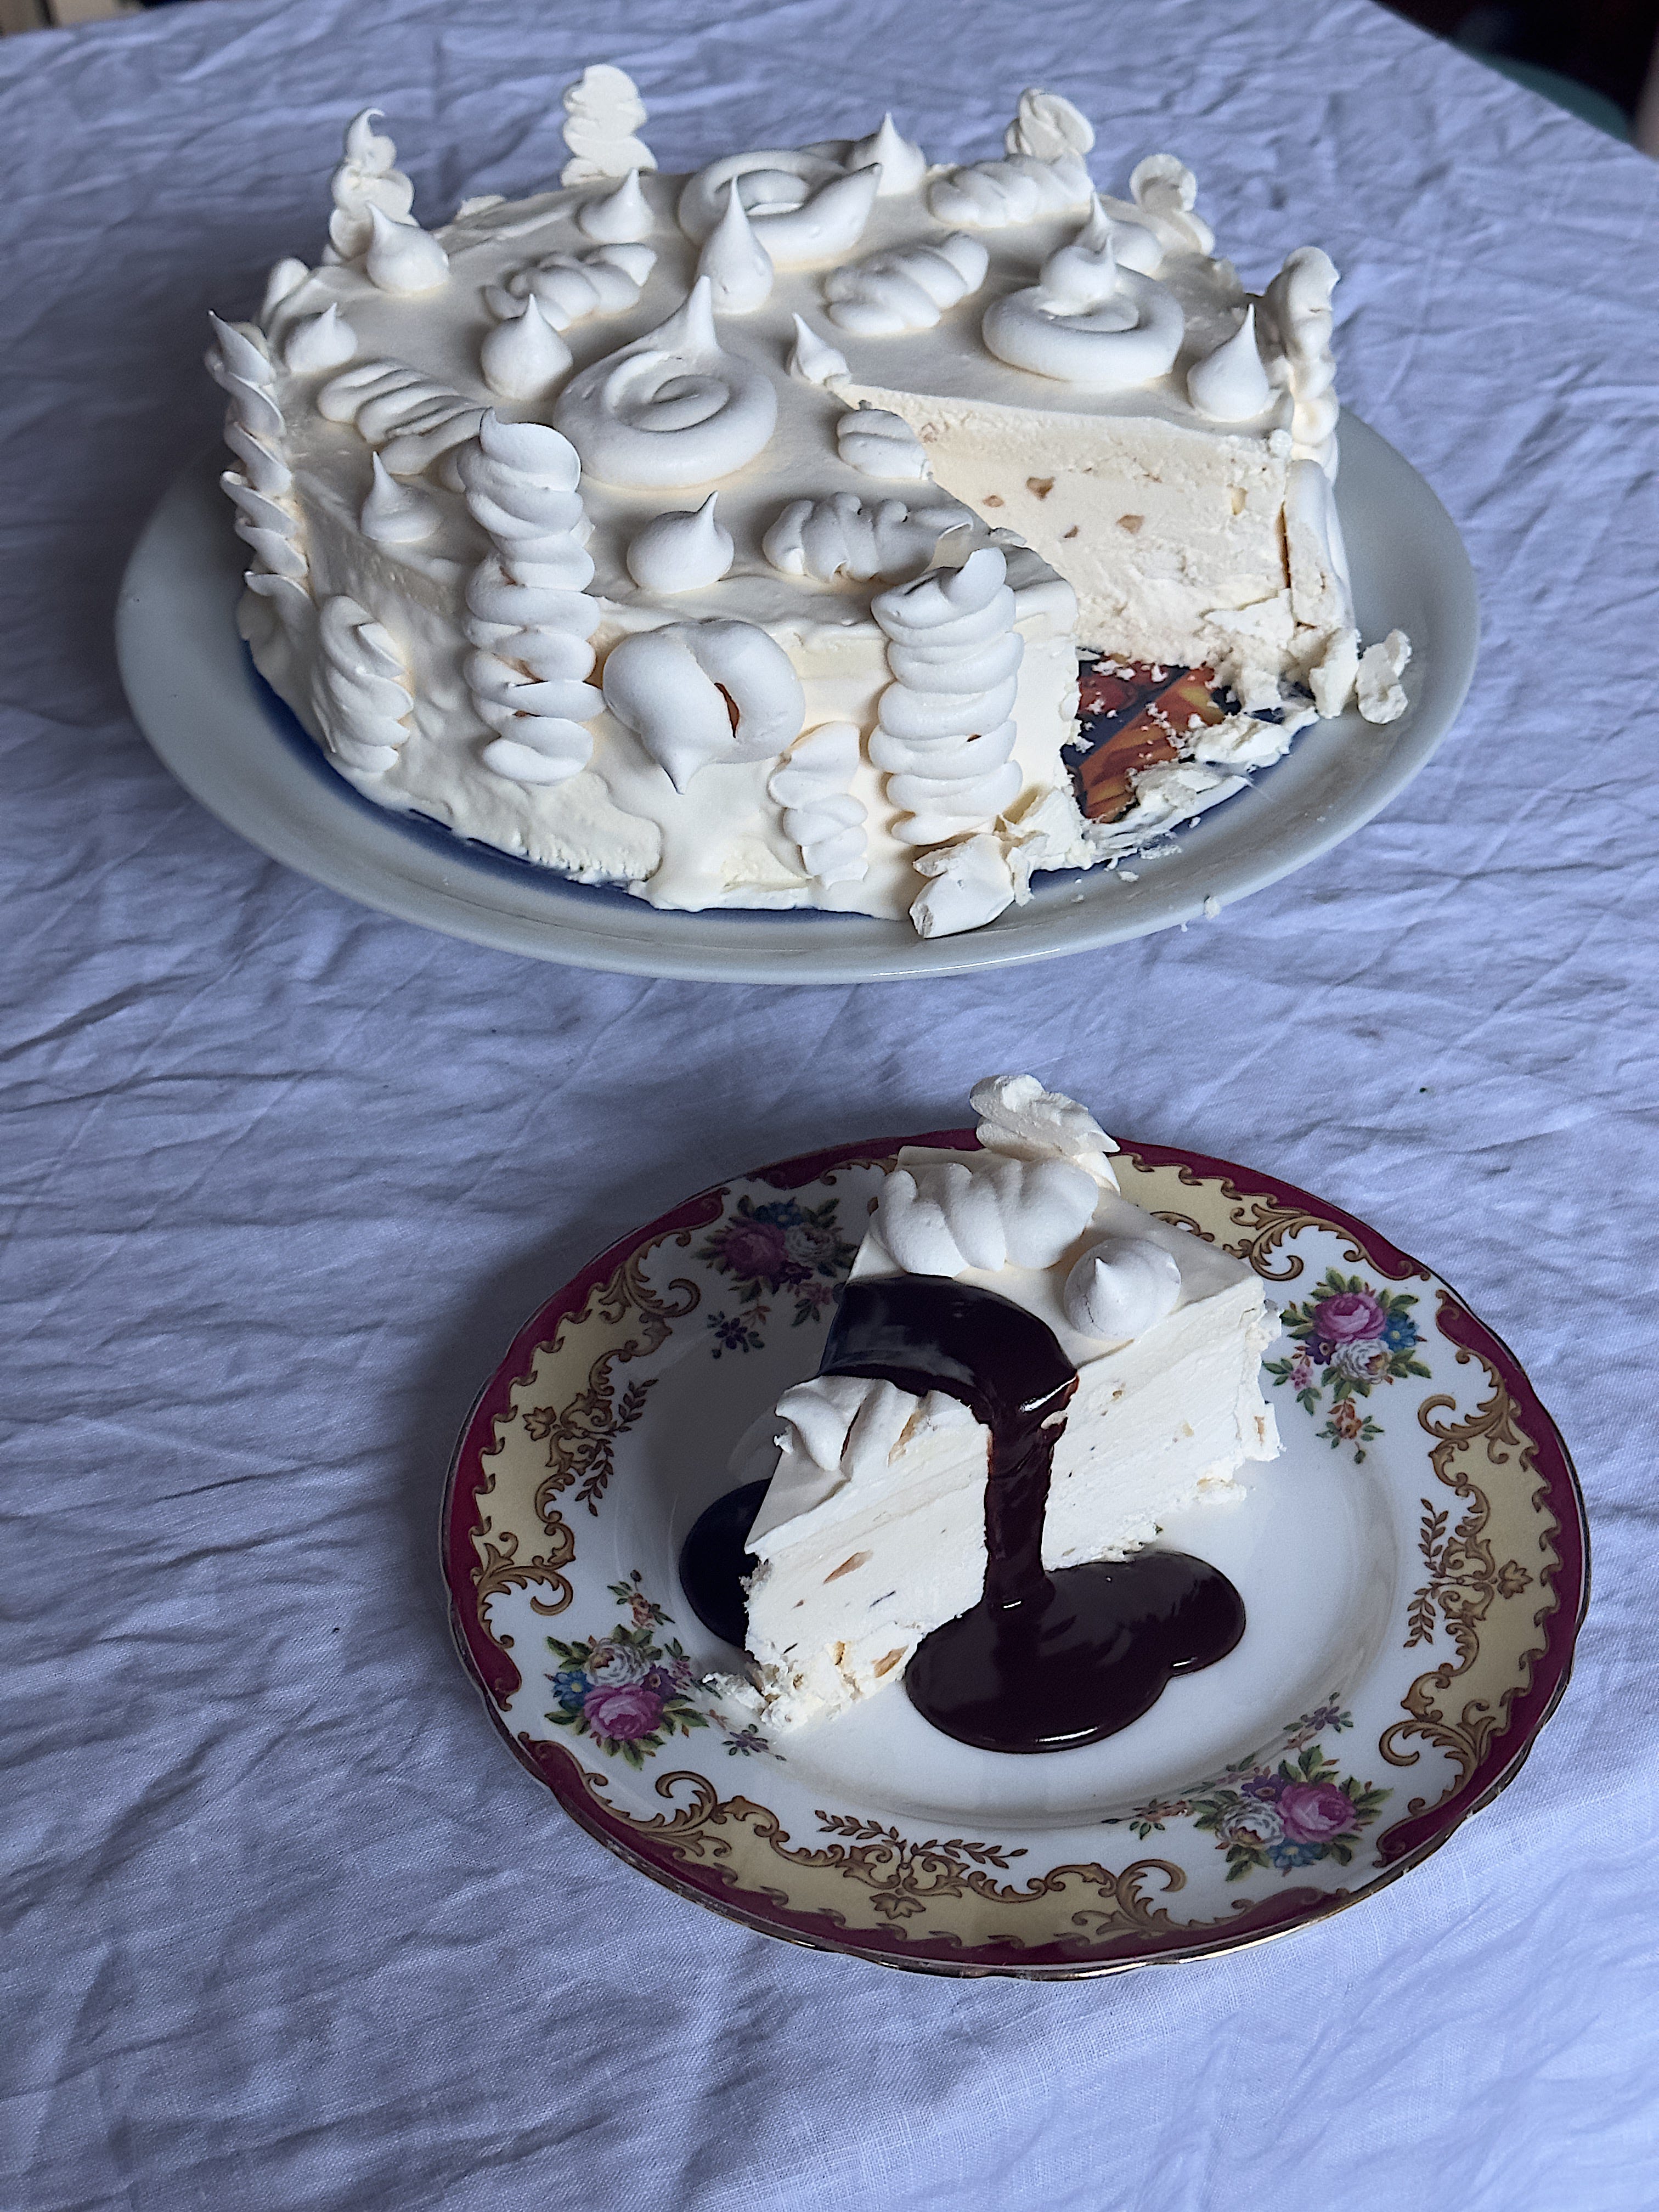
FROZEN MERINGUE CAKE, HOT CHOCOLATE SAUCE
I know Christmas day is Hot Pudding territory but trust me on this one. This recipe is based on a cake I have eaten a few times now at one of my favourite restaurants in Bologna (guide here). It’s an ice cream cake really, where a layer of super quick and easy ice cream is stuffed between two discs of crisp meringue. Did you know meringue freezes brilliantly? Well it does. It’s then coated in a bit more cream and decorated with more meringue and kept in the freezer until you need it. Paired with a dreamy hot chocolate sauce it is so gorgeous and a really amazing showstopper for your Christmas table / dinner party. It’s principally a frozen pavlova so can be customised any which way you like - I’ve kept mine simple but see below for ways to jazz it up. It goes without saying that being a frozen cake this needs to be made at least 24 hours in advance.
For the meringue - you need double the weight of the egg whites in caster sugar
4 egg whites (120g roughly) - room temperature
240g / 250g caster sugar
For the filling
600ml double cream
250g mascarpone
100g runny honey
50g hazelnuts, toasted and roughly chopped
To cover
300g double cream
1 tbsp icing sugar
For the chocolate sauce
200g dark chocolate, chopped
100ml double cream
100ml whole milk
40g runny honey
65g golden caster sugar
Generous pinch of sea salt
Preheat your oven to 100 degrees fan. Put the egg whites in the bottom of a very clean and dry stand mixer. Whisk the whites on a medium to high speed until they are foamy, soft peaks. Turn the mixer to a medium speed and start to slowly add the sugar a spoonful at a time. Continue adding the sugar slowly until it is all in (around 2 minutes) and then turn the speed back up to medium high and leave to continue to whisk for 15 minutes. Your meringue will be stiff and sleek and gorgeous. While your meringue whisks prepare your trays. You need three baking trays lined with parchment. On two of the trays use the base of a 20cm cake tin to draw an outline of a circle in pencil. Flip the piece of paper over so the pencil doesn’t stain your meringue. These will be for your meringue bases. When your meringue is ready pop it into a piping bag with a large round nozzle. First pipe the meringue into the two bases you traced onto the piece of paper. Pipe it in a circular motion from the outside in - it doesn’t need to be perfect. Then take a palette knife and smooth it out to make an even flat surface, again this doesn’t need to be perfect. You are looking for an overall thickness of around 2.5cm - 3cm. Repeat for the second disc. Then on the third tray (and in the space around your meringue discs if you feel like it) use the remaining meringue to pipe lots of little shapes - spirals and drops look great. I used another piping nozzle in a different bag to pipe some little squiggles too. If you’re not confident about piping then you can just spread the meringue out too and bake it off in large thin shards, we can still use that to decorate too. This is something to have fun with and not take too seriously. Put the three trays of meringue in the oven and bake for 2 hours, then turn off the oven (don’t open the door!) and leave to cool inside it completely (around 4 more hours or so). You can put your meringue shapes once cooled in airtight containers for decorating the next day, but the discs will be used in the next stage.
Before starting the assembly make sure you have a good roomy space in your freeze for the cake to sit in and that there is nothing stinky in there. To make the ice cream filling use an electric hand whisk to whisk together the cream, mascarpone, and honey - you want this mix to be thick, just slightly stiff peaks. Stir in the toasted hazelnuts. Find a plate that is the right size for your meringue base. Pop a couple of teaspoons of the ice cream on the plate first before laying down the first meringue disc - this will stop it sliding around too much. Now take large spoonfuls of the cream mix and spread it on top of the meringue, making sure it goes right to the edges on all sides and has a relatively flat top - a palette knife is good for this. Leave one large spoon of the mix in the bowl for the end.Put the other meringue base on top, I like to invert it so that the flattest side is facing up. Press down super gently yet firmly so that it is well sealed against the ice cream mix below. Use the remaining mix to smooth out the sides of the cake, filling in any gaps or indents and making sure the meringue bases run smoothly into the ice cream. Pop the plate with the cake into the freezer (on a level surface) and leave to freeze for a minimum of 8 hours, ideally overnight.
The next day (this could be Christmas morning) whip the remaining 300ml of double cream and icing sugar together to stiff peaks. Take the cake out of the freezer and use a palette knife to spread the cream on top and all around the sides of the cake. Then stick the meringue shapes you made onto the cream layer in a fun arrangement of your choosing. Alternatively you can use meringue shards to decorate it, or even crushed meringue pieces.
Pop the cake back in the freezer for another 4 hours minimum, or until needed.
To make the chocolate sauce, combine all the ingredients in a small saucepan and heat very gently until you have a smooth, glossy sauce. Take care to do this slowly, mixing often. Set aside until needed.
To serve, make sure your chocolate sauce is hot. Take the cake from the freezer and leave to stand for 5 minutes or so, before slicing up with a sharp knife. Serve pieces of the cake drizzled with the hot chocolate sauce and a few raspberries or amarena cherries if you like.
MAKE AHEAD -
I suggest you make the meringues and assemble the cake either the day before or 2 days before you intend to serve it. You can decorate it the morning after you have frozen it.
The hot chocolate sauce can be made up to 3 days ahead. Simply reheat gently to serve.
SUBSTITUTIONS -
There are SO many ways to customise this cake! You can make it totally your own - here are a few of my favourite ideas.
The ice cream could be shop bought and slightly melted if you don’t feel like making your own and any flavour will work.
Or jazz up the base ice cream recipe with - salted peanuts or peanut butter, chopped chocolate and mint extract, tahini, crushed raspberries or raspberry sauce, honeycomb, dulce de leche, desiccated coconut, candied peel, rum and raisin, chopped cherries in syrup, passionfruit.
Serve with a different sauce (raspberry, rhubarb compote, plum compote) or just lots of fresh fruit - mango and pineapple, strawberries. Amarena cherries in syrup are also lovely here.
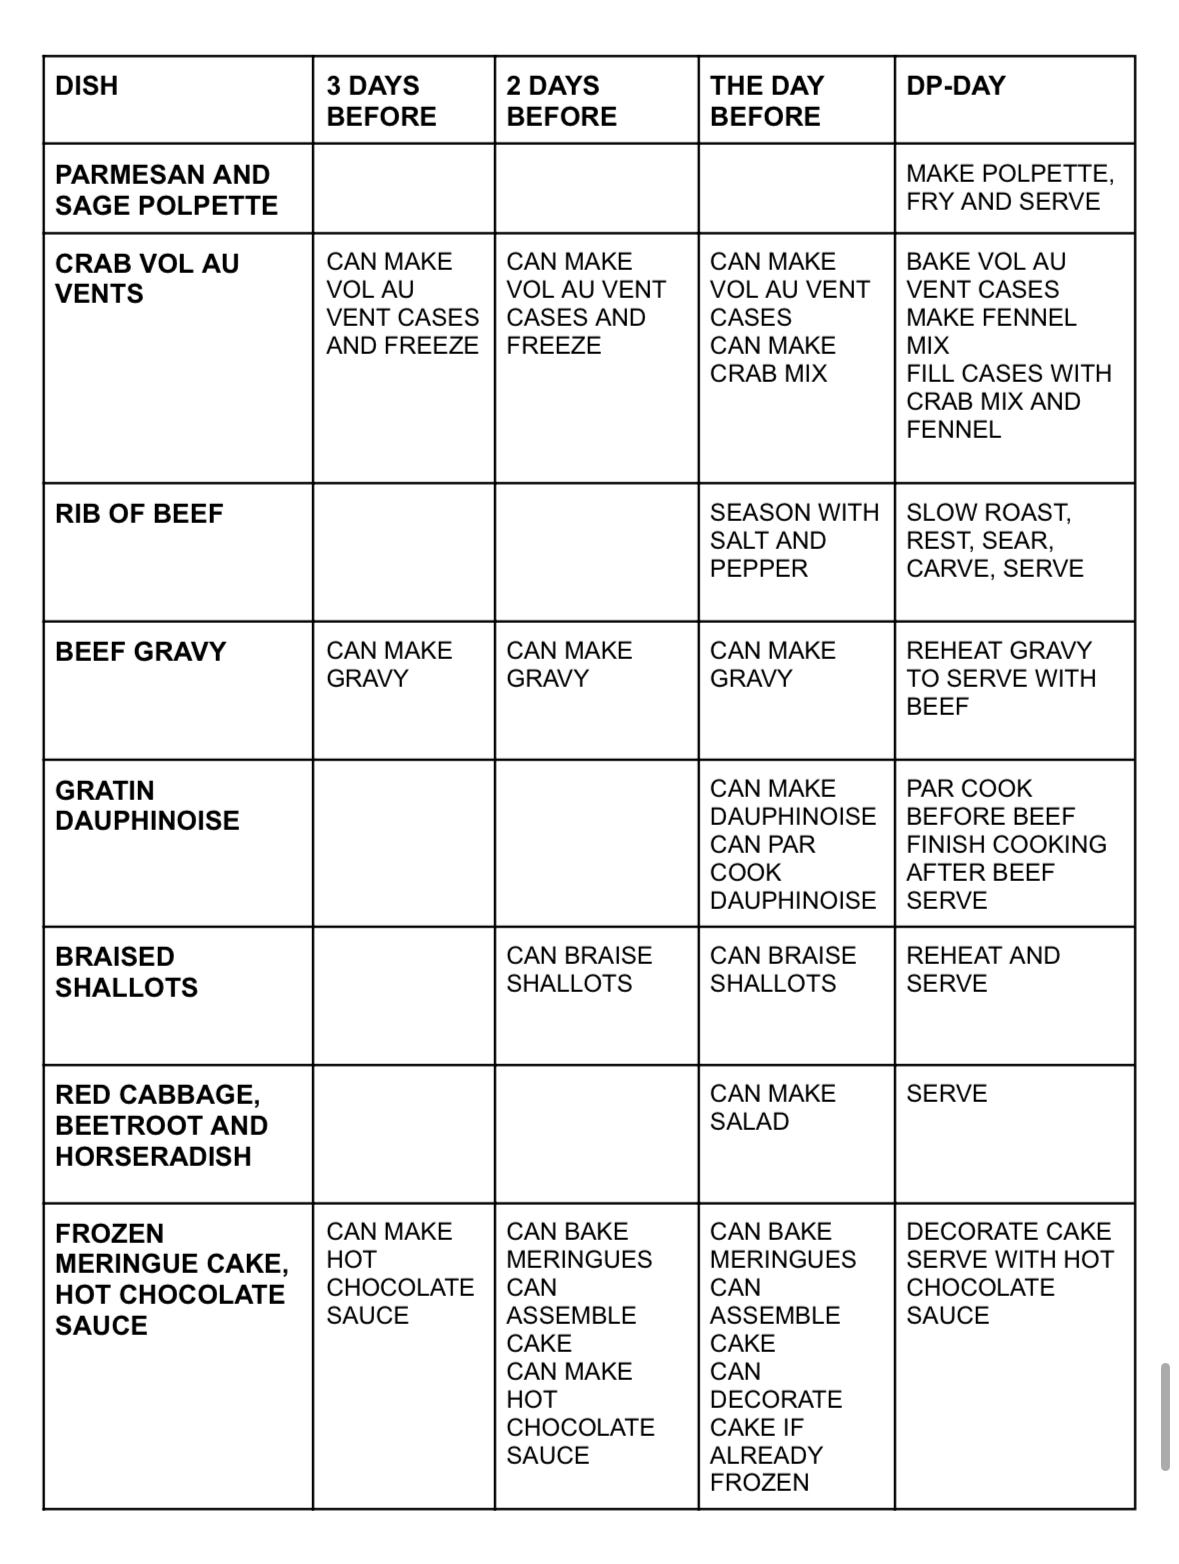
TIMEPLAN
This first plan should help you see what you can get done in advance, so that for each course on the day you have at least 1, maybe 2 major parts of it taken care of. I appreciate that not everyone’s weeks are easily peppered with dinner party prep, but if you’re hosting after work or on a day where you can’t be in the kitchen, getting ahead is going to save your arse.
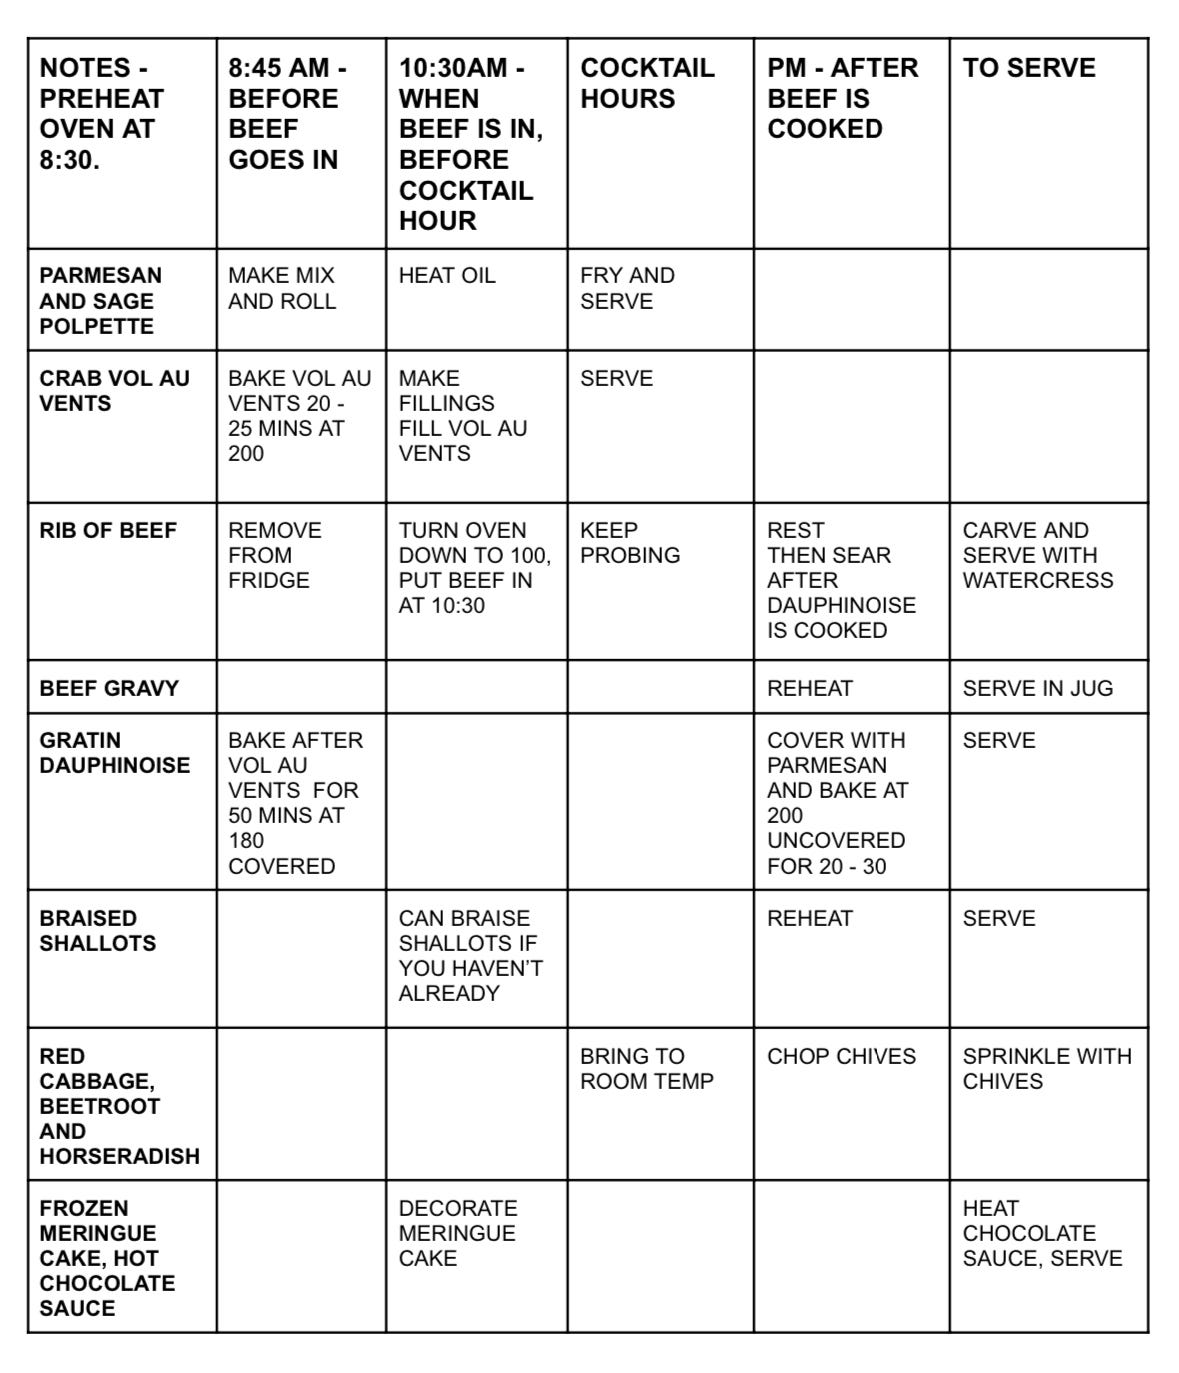
Now for todays episode we have a special M-E-P list which tells you how to breakdown your time on the day with this menu. It does assume a certain amount has been done ahead, so don’t forget to squeeze in some prep in the days before. I hop this is helpful!!
THE CHRISTMAS DAY M-E-P LIST - DON’T FORGET TO DRINK THE WHOLE TIME
STYLING GUIDE
Obviously crackers are a must on Christmas, for the hats and the jokes if nothing else. I really like these cute eco ones from Nancy and Betty. The table is often so laden that it is hard to fit flowers on, in which case go for beautiful candles instead - I have been a long time fan of these candles from Painted Flame. Otherwise keep it simple on the tablescaping, the food will do the work.
COCKTAIL HOUR
Serve your polpette and your vol au vents on FAB retro china with your best glasses for drinks. I love plates with feet and also building height on a table, so it’s worth finding a couple for your collection if you don’t have them already. These are canapés to share so make sure you avoid giving your dishwasher extra work and only use a couple of different plates here - no need for individual serves.
THE MAIN EVENT
I like to serve the beef sliced as it makes it so much easier for people to help themselves and looks so beautiful piled onto a plate and adorned with watercress. While you are carving get everyone else to help by putting the rest of the food out. The salad can be piled into a lovely dish - metal looks great if you have it, and the shallots can go on a platter or large plate with their sauce spooned over. The dauphinoise is ready to go as is. Make sure you warm a jug for gravy too while your beef rests, nothing worse than pouring a hot thing into a cold jug and it getting cold!
PUDDING
This one styles itself really doesn’t it! I definitely love having a jug of hot chocolate sauce for the table though so people can help themselves / overdo it.
Gorgeous, thanks Rosie! Also, dauphinoise sandwich is going straight on my Christmas list.. x
What a beautiful menu, Rosie. I've always toyed with the rib of beef idea for Christmas Day, but am always met with a resounding 'noooo' by the family (namely my mum, who likes to do rib of beef for NYD), and I do actually bloody love a good turkey. But this all makes me drool. And those vol-au-vents! Always a yes to a vol au vent.