THE LONG LUNCH ONE, VOLUME 2
The antidote to boring seasonal cooking

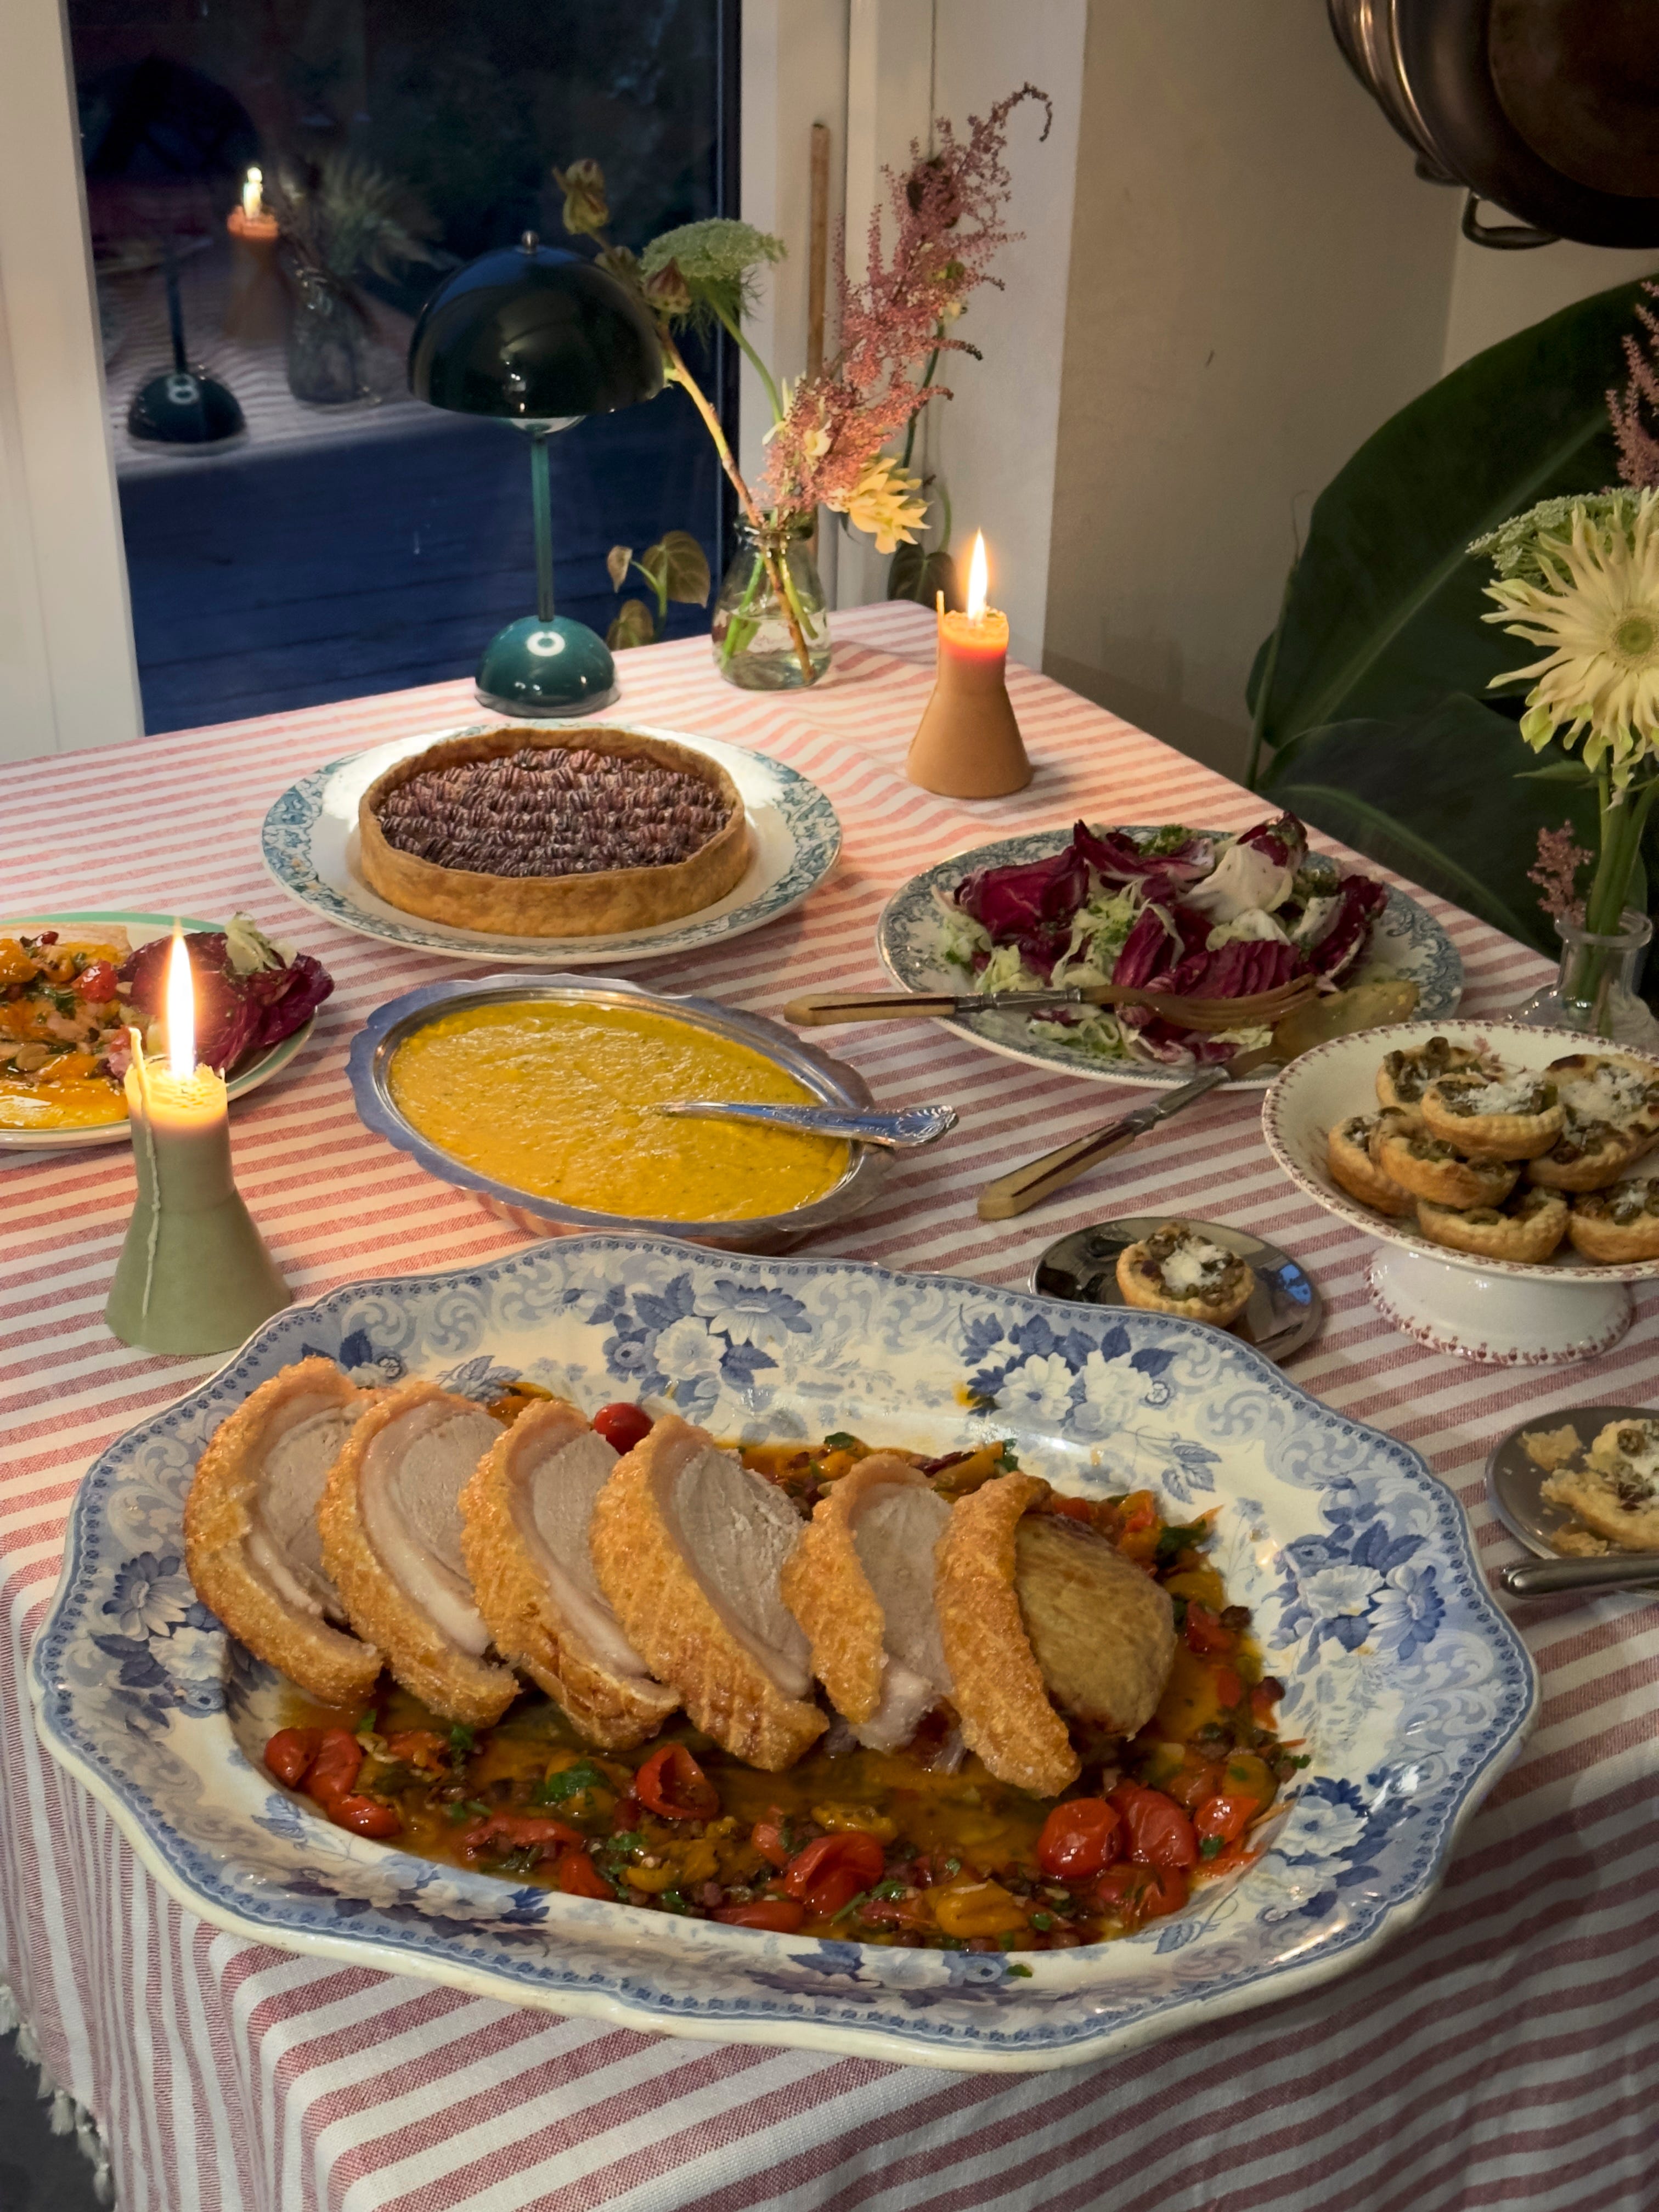
MENU TO SERVE 6 PEOPLE
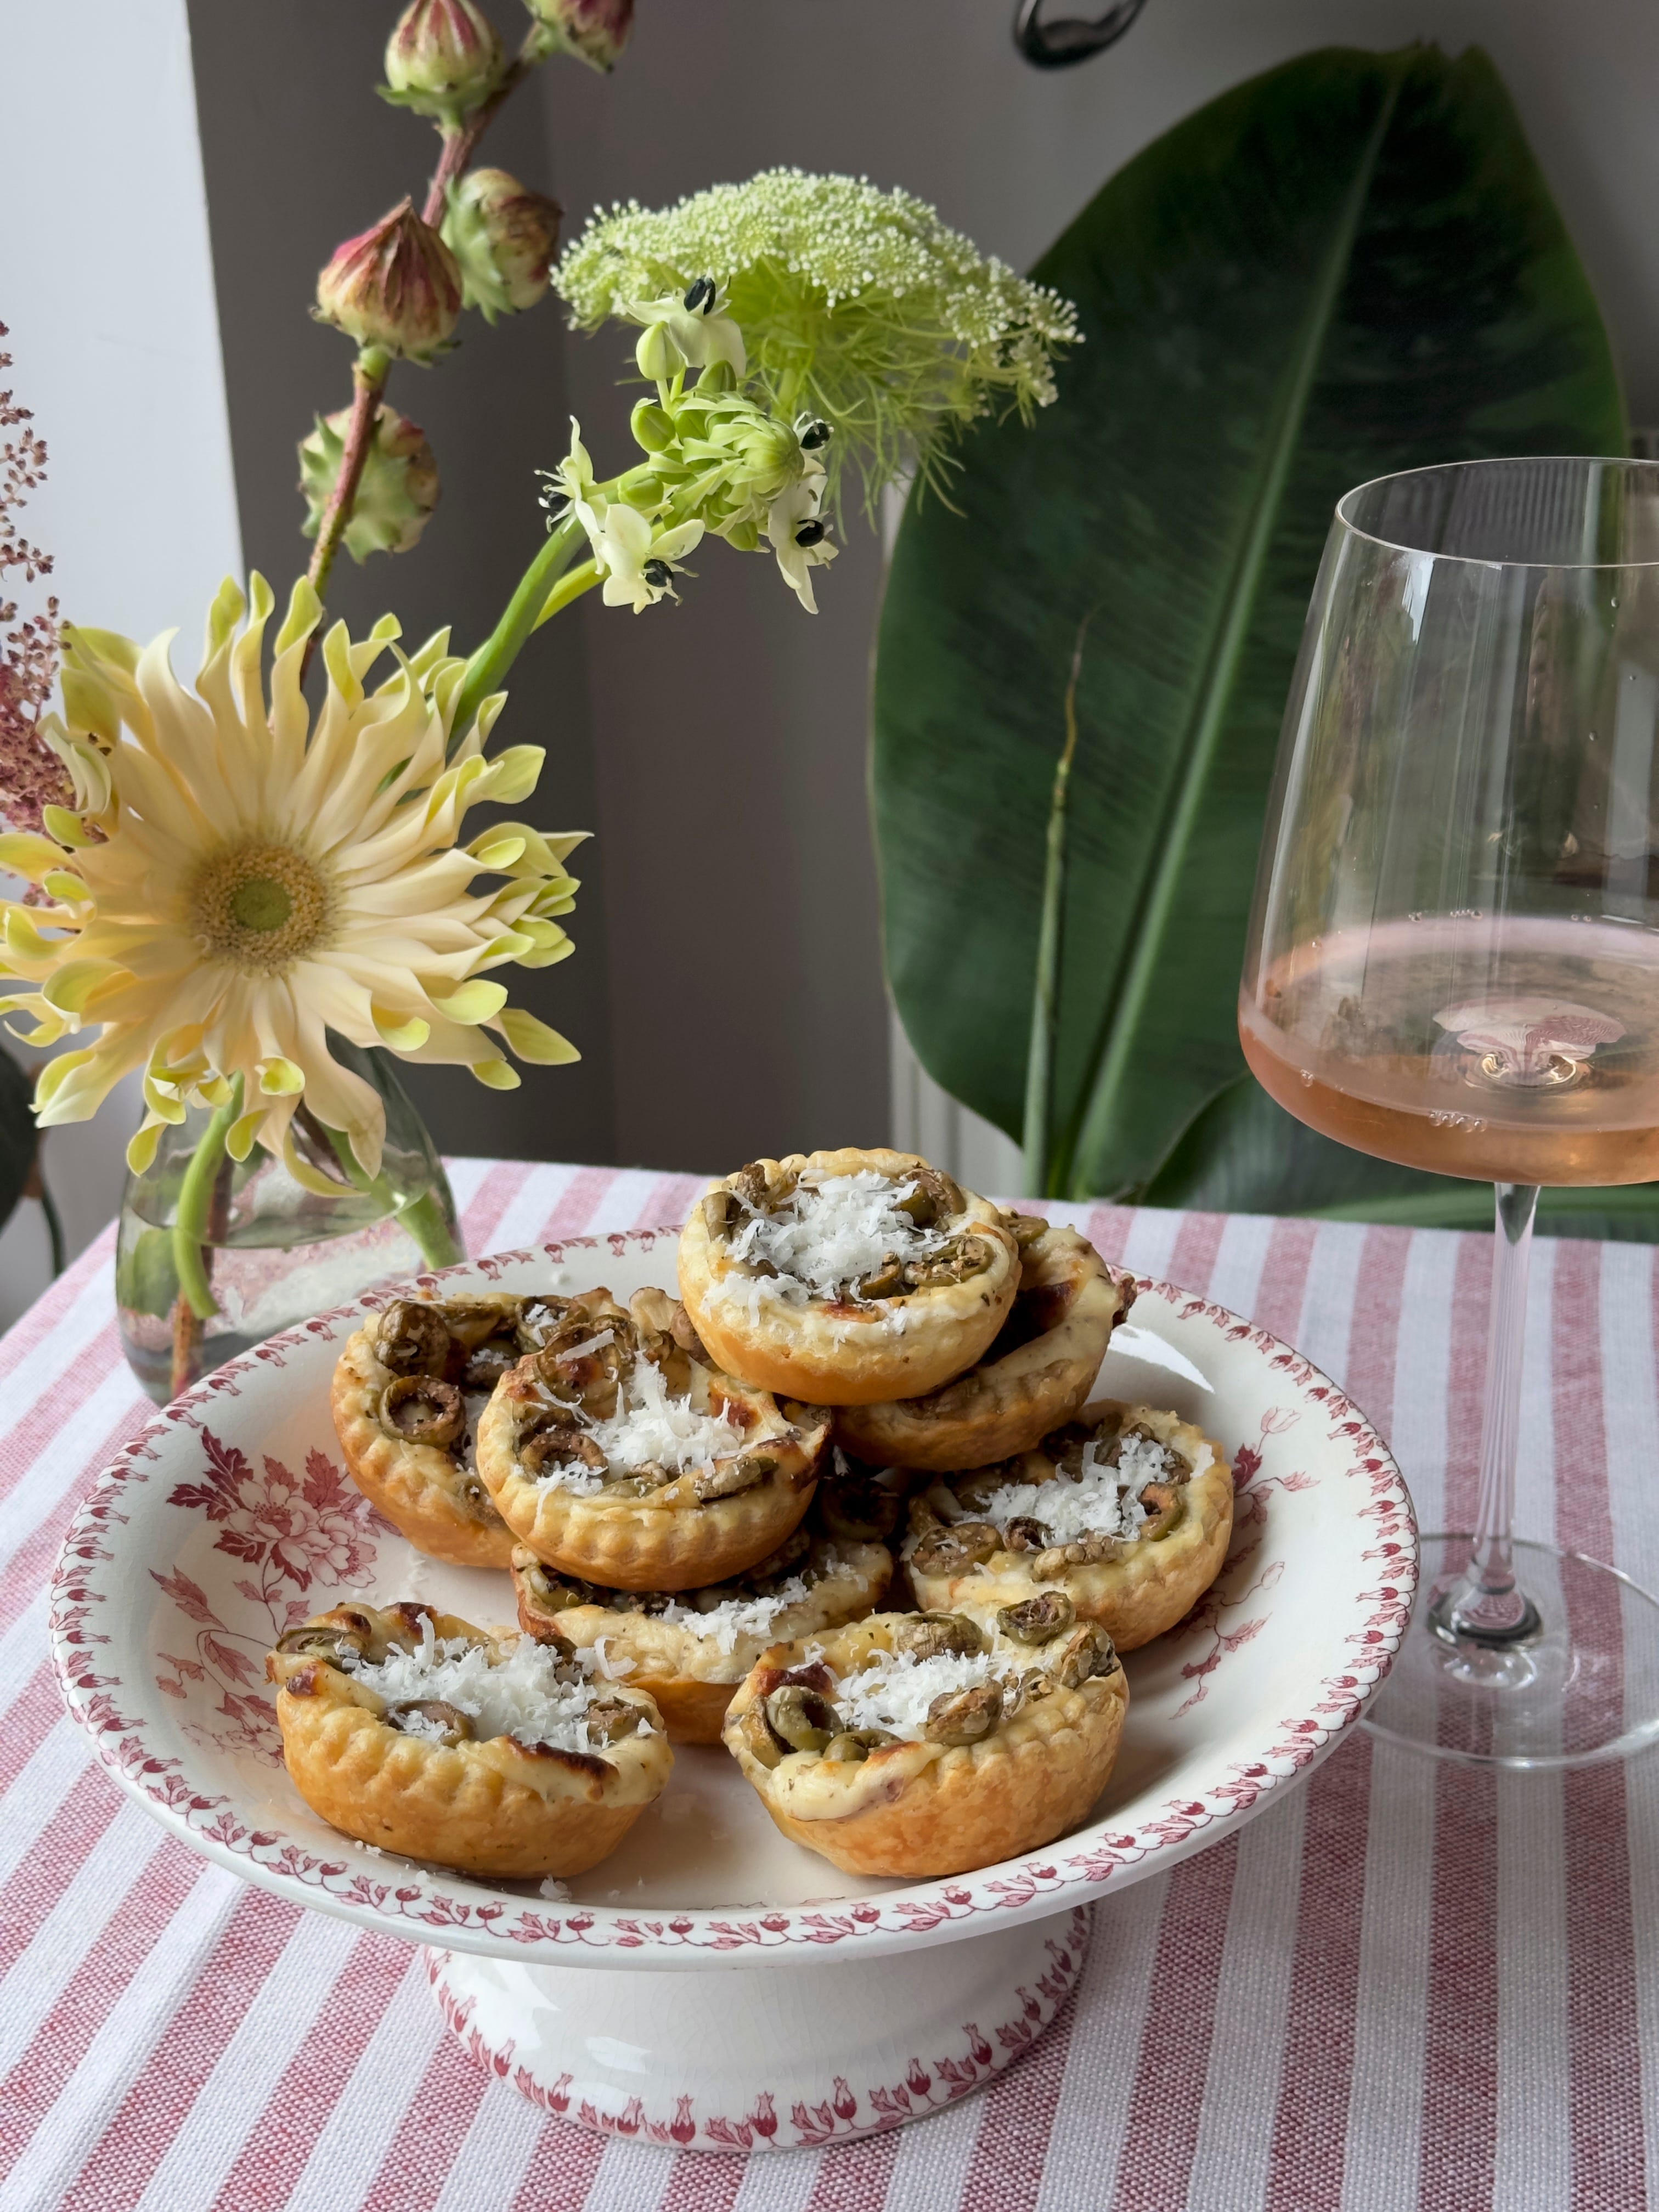
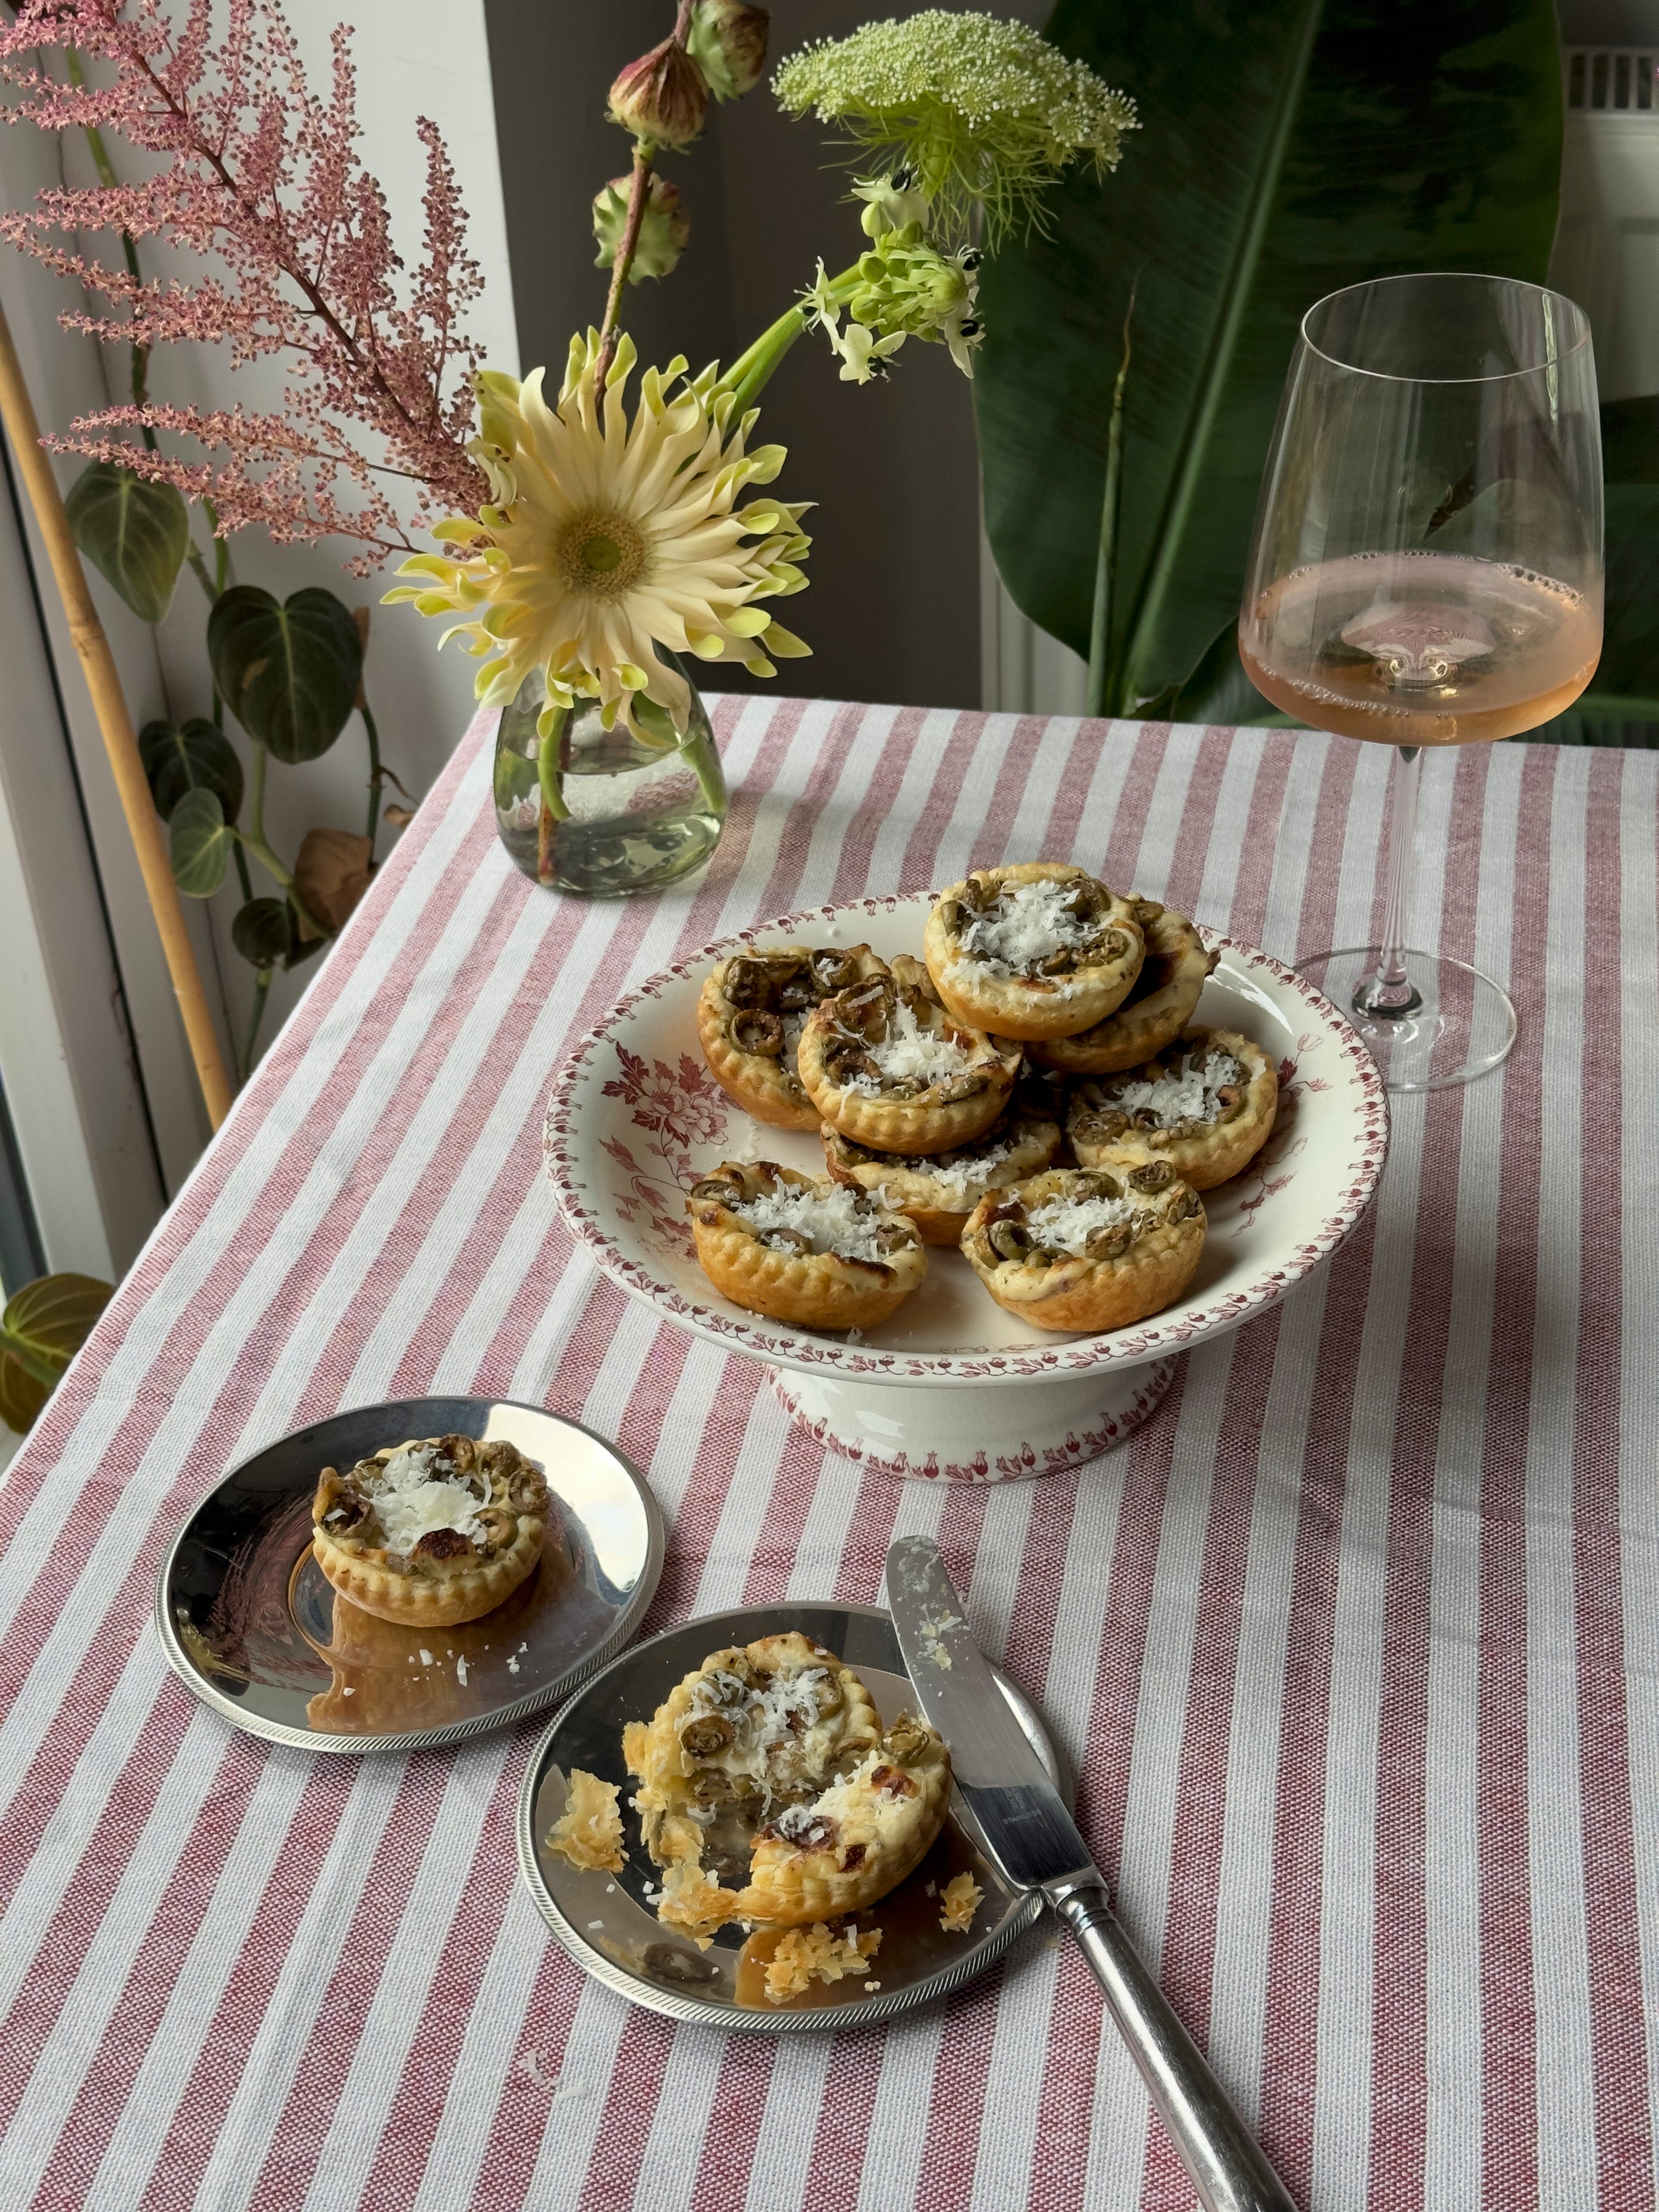
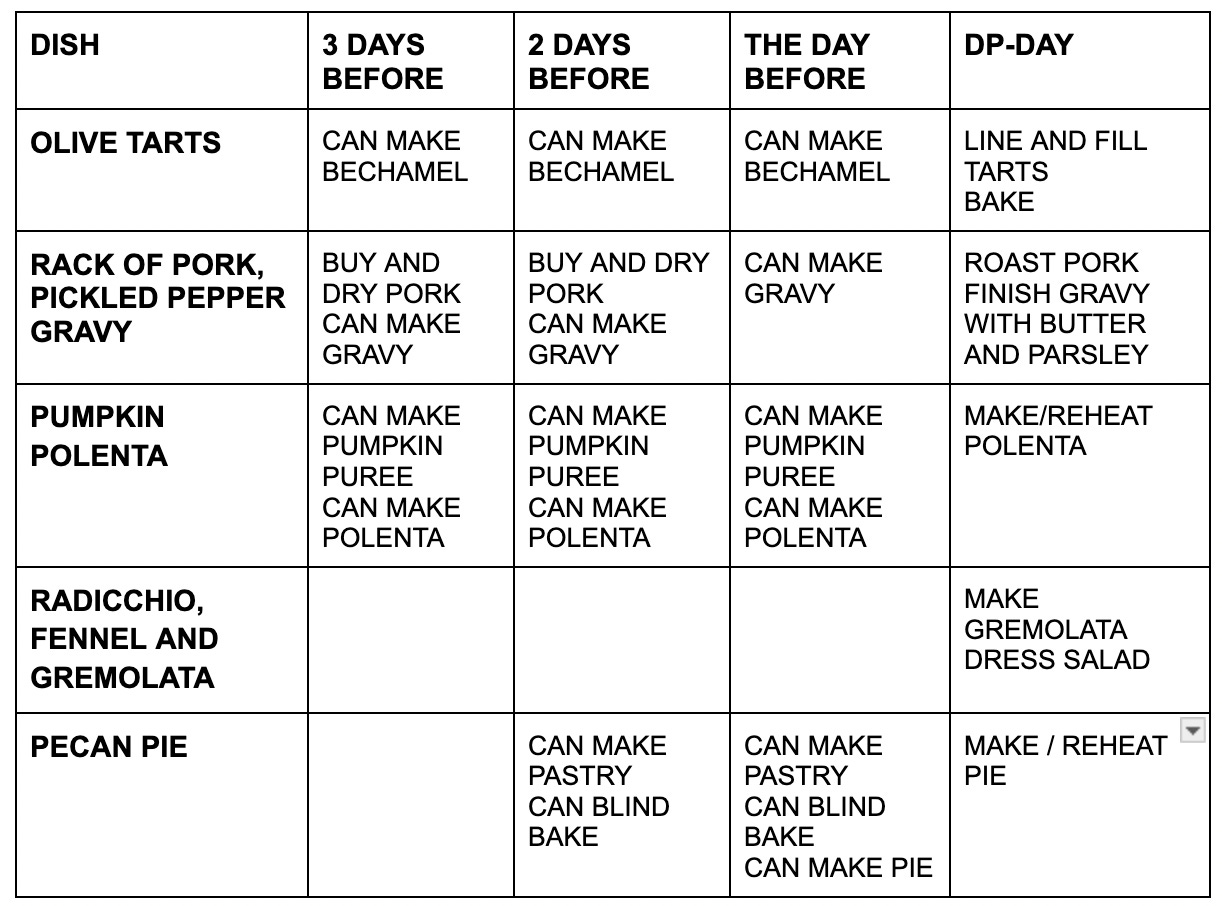
OLIVE TARTS
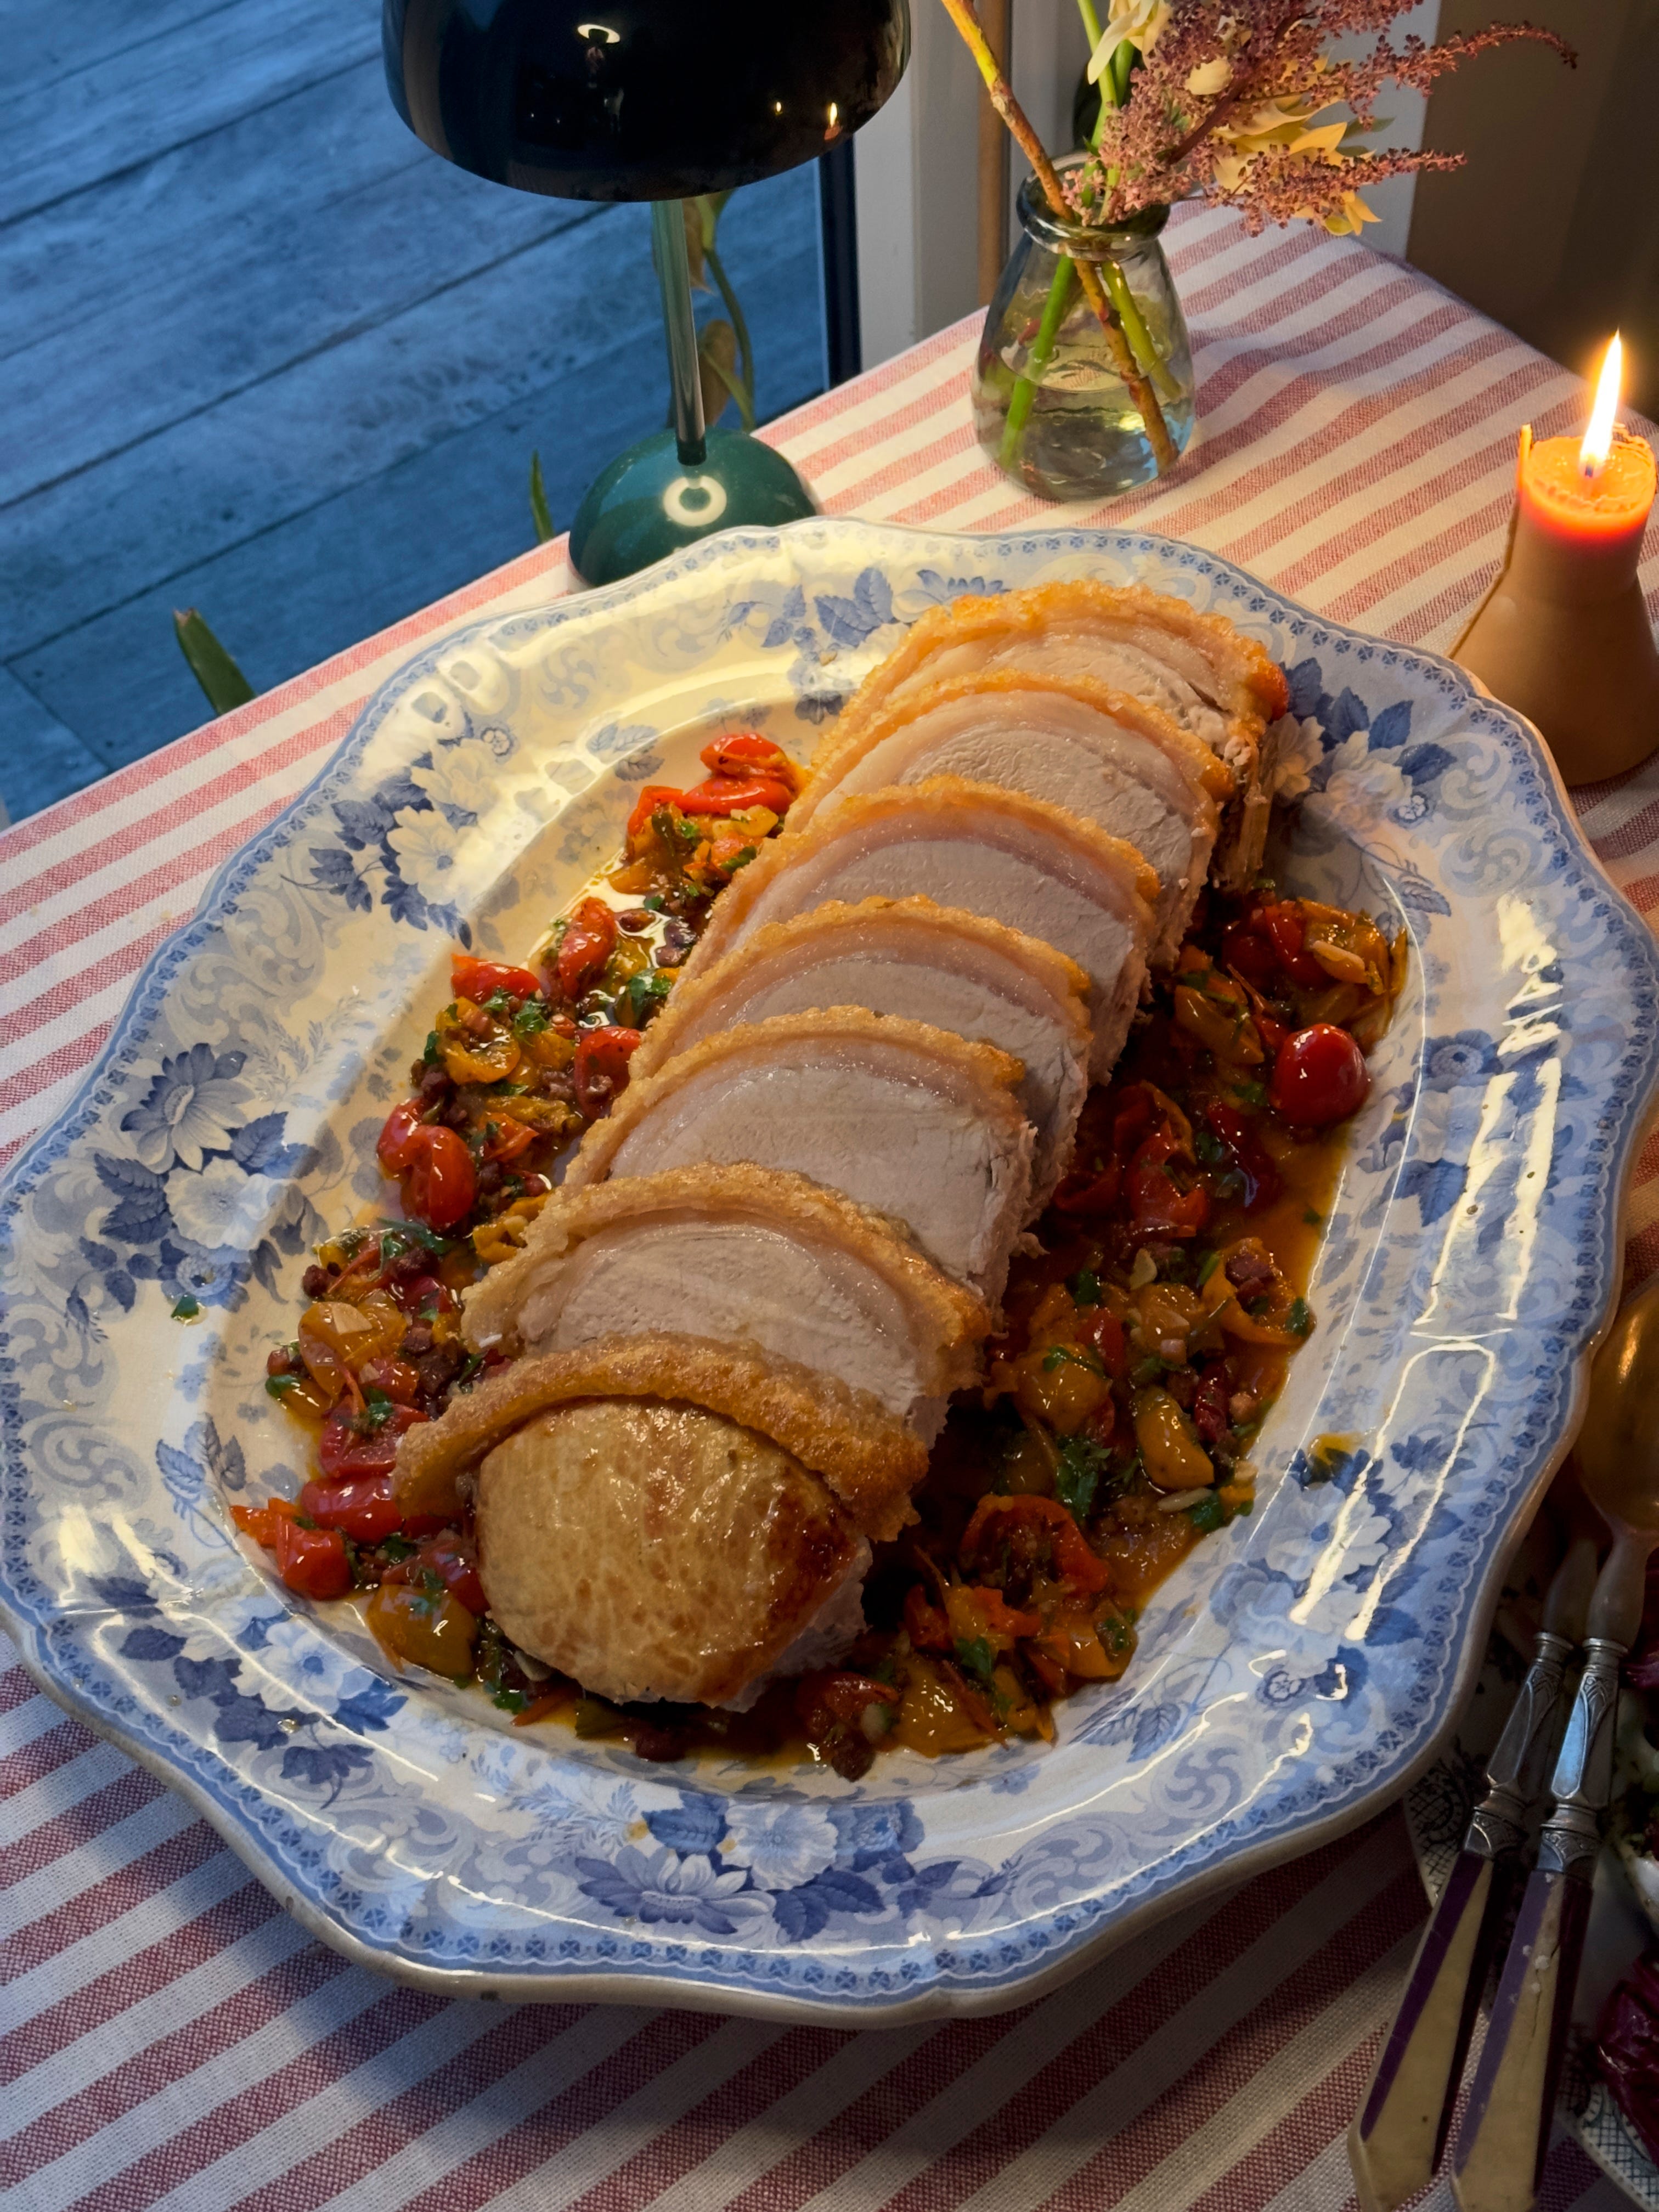
RACK OF PORK, PICKLED PEPPER GRAVY
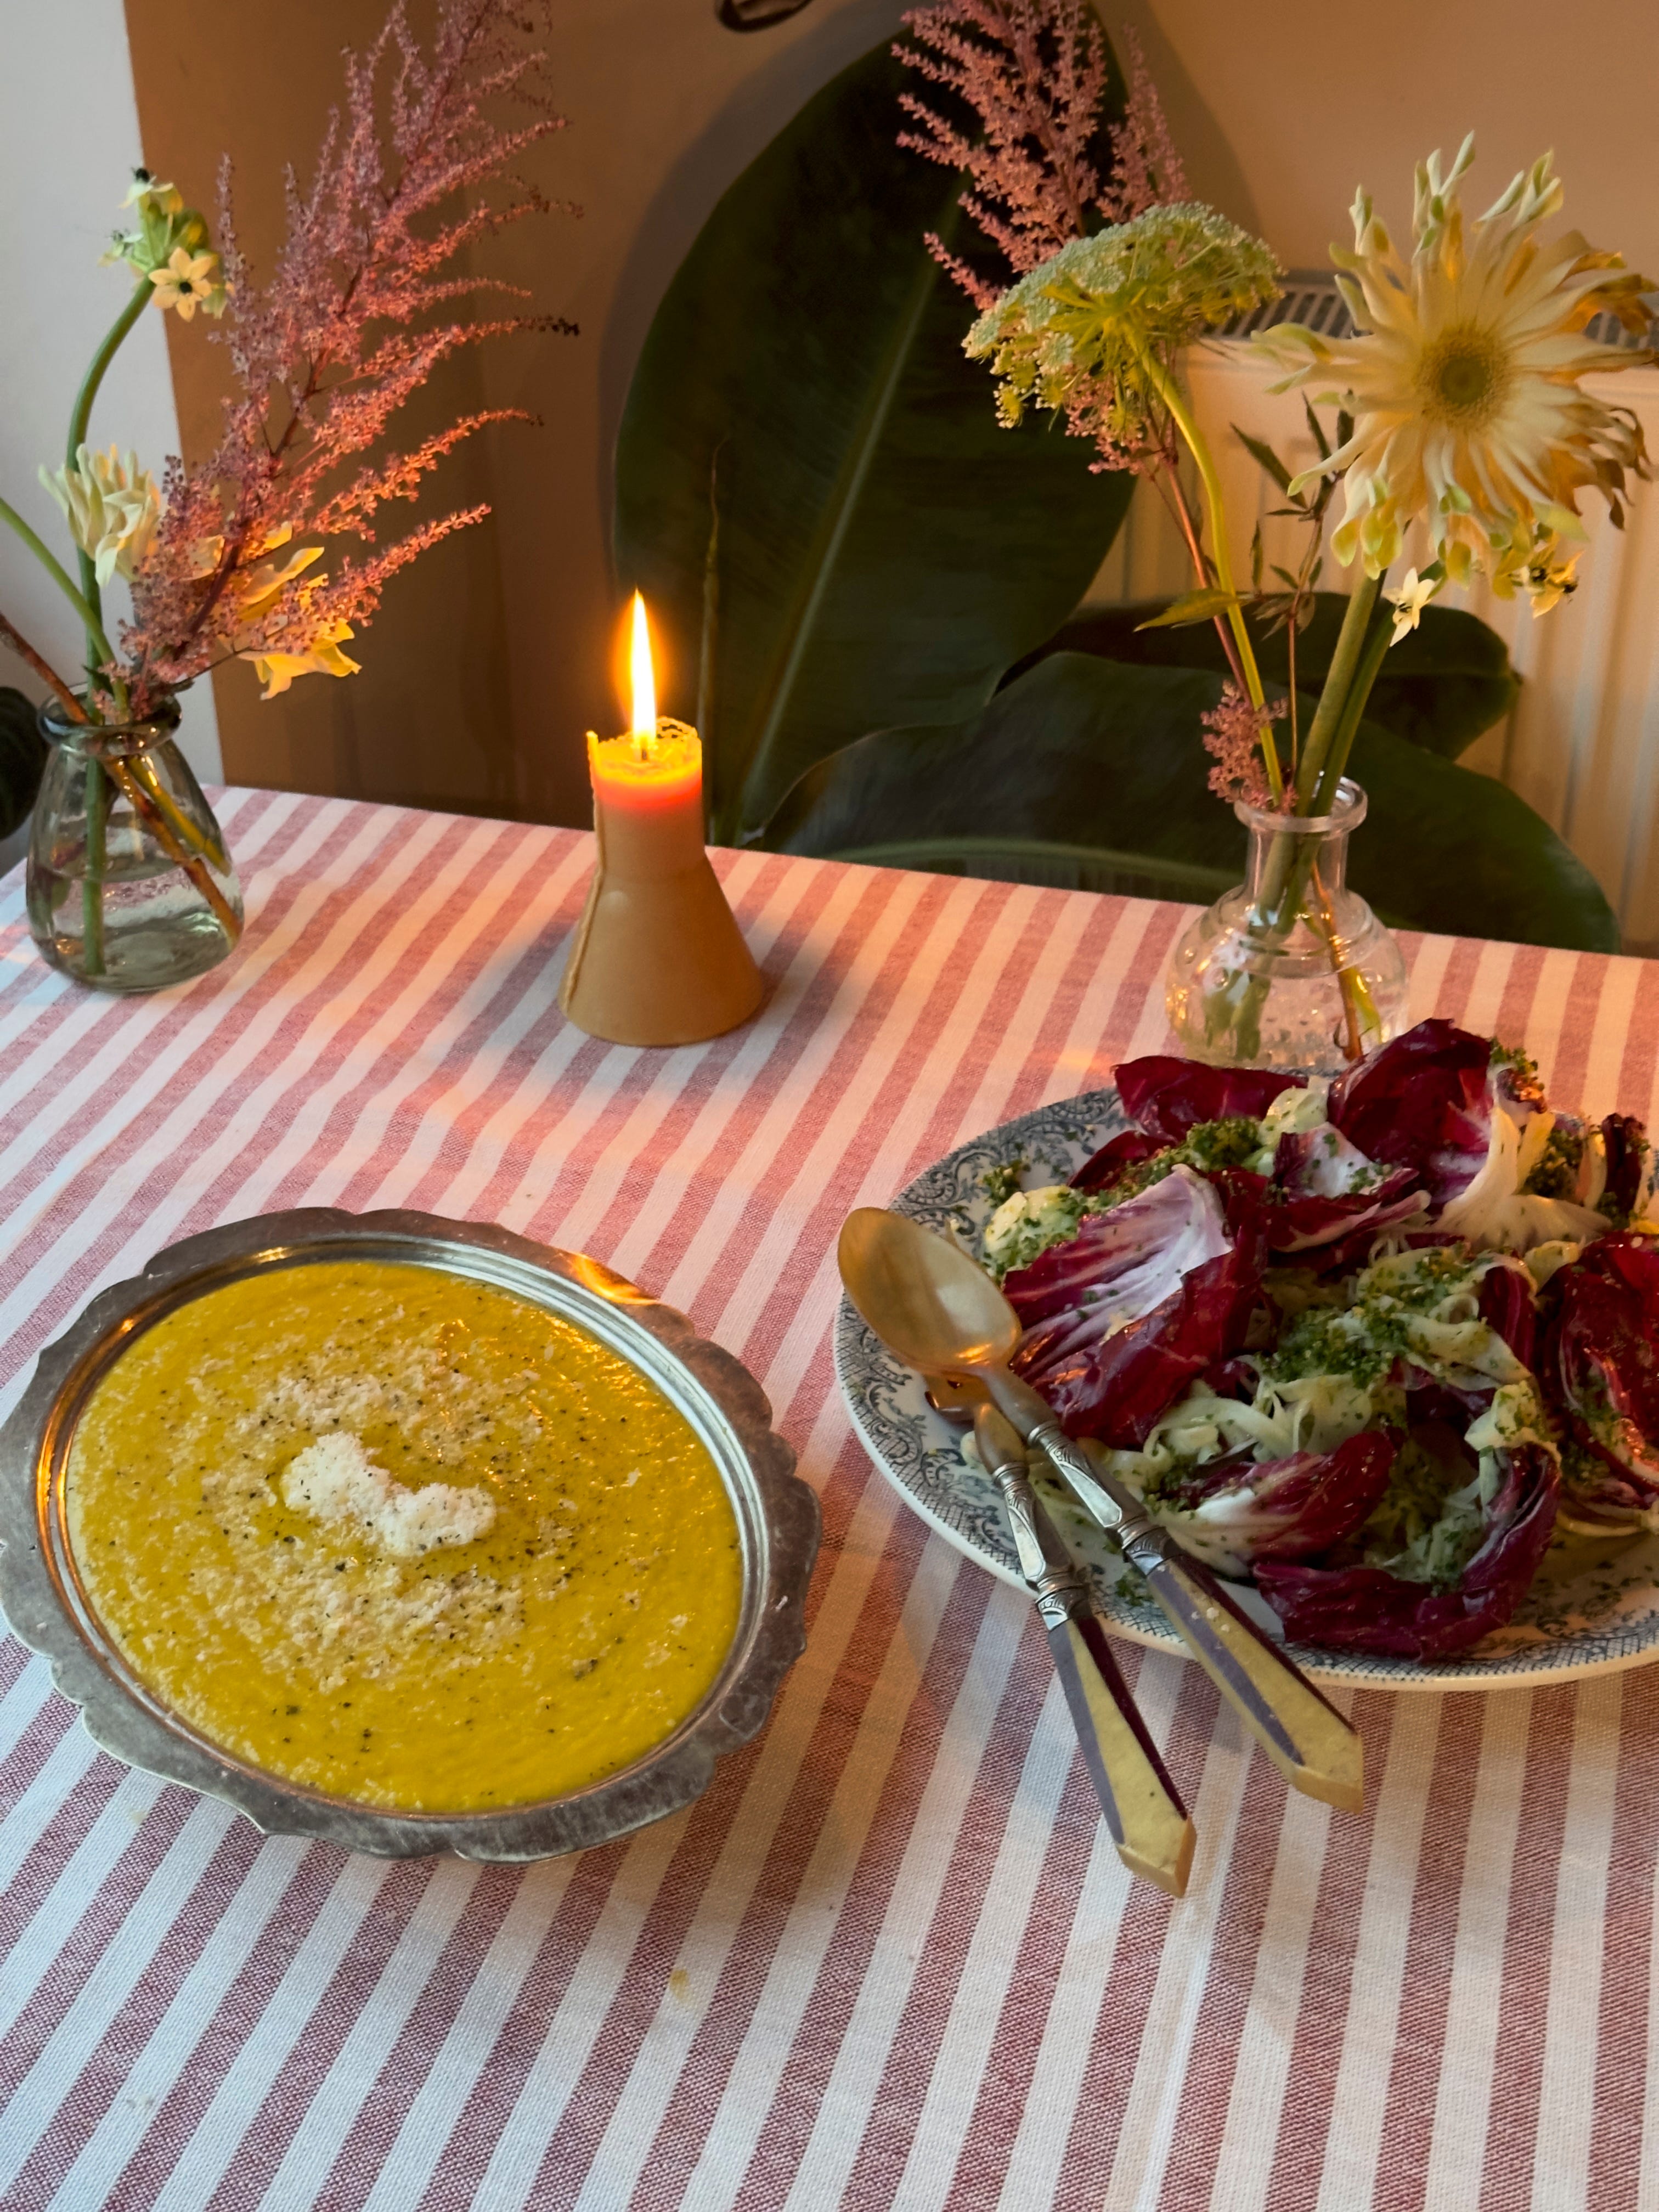
PUMPKIN POLENTA
RADICCHIO, FENNEL AND GREMOLATA
PECAN PIE
Hello everyone! I am back and raring to go!! After 3 magical weeks honeymooning in Japan and Korea I have returned refreshed and inspired, and feel so lucky I was able to take this break and leave The Dinner Party in the capable hands of others.


I will be sharing a detailed run-down of our trip (including maps) in More Please this week and next week, so do look out for that if you are thinking of heading that way. I can’t recommend it highly enough.
Right then - it is now the time of year where we are getting stuck into the entertaining season, so we have some serious business to attend to. Last year in November and December I shared two dinner parties that I felt were good solutions to what I consider to be the big problems with seasonal cooking - it’s boring, tired and unnecessarily overcomplicated. I won’t go into too much detail about why I really hate traditional Christmas fare because I might never stop ranting, but for any new subscribers out there let me tell you this - I have only cooked a turkey voluntarily once in my life and I don’t intend to ever again. This is not the place for conventional Christmas cooking.
Anyway, back to last year - I really liked how the two posts worked and I felt like they were very useful, so I am doing it again. This month we have a “Long Lunch” which is a bit more of a sit-down, cracker-hats-on vibe - perhaps for Thanksgiving, Christmas Day or even NYE/NYD. And next month will be a “Wintry Buffet” - for when you are hosting more of an informal period of grazing - perhaps Christmas Eve, Boxing Day, or indeed NYE/NYD again. Having a few blinding Side Dishes up your sleeve at this time of year is crucial as they often need to cover many different dietary bases, so I have also got 3 excellent ones coming to you in More Please, plus a next week I will round-up of all the best in the archive too.
So without further ado, I bring you The Long Lunch One, Volume 2.
One of the most delicious bites of my Japan trip was, would you believe it, an Olive Pastry. So I have recreated it as our little canapé today in the form of Olive Tarts. Puff pastry is stuffed with a pepper and parmesan bechamel laced with green olives. They are kind of Pizza-Expressy in the best way.
For the main event we have a Rack of Pork with exceptionally good crackling and a luscious Pickled Pepper Gravy. The fatty pork is perfect with the piquant sauce, which was inspired by another recipe on here - my Chicken Scarpariello.
Keeping the sides simple and sexy this year (words to live by), we have Pumpkin Polenta which is also based on another thing I ate in Japan. It’s sweet and cheesy and lush and a great foil for the other flavours on the table. Then we have Radicchio, Fennel and Gremolata - a salad for all intents and purposes. I am a big believer in a salad with a roast - the sharpness of the dressing always cuts the richness of everything else and this one is a blinder.
Finally our pudding is probably the most traditional thing on the table - Pecan Pie. I ADORE Pecan Pie but it’s not something I eat enough of and I am so glad I have decided to change that. This one is very lightly spiced, gooey and fudgy and oh so good. Plus it’s actually really easy to make.
Ok friends, HAPPY COOKING!
OLIVE TARTS
I visited a brilliant, tiny bakery in Tokyo who made an olive pastry that blew my mind and I knew I needed to try and recreate it when I got back. It’s pretty simple and great with cocktails, plus a good one for kids to help you with too if you have some of those lying around. I use shop-bought puff pastry for this and the cheapest, least fancy green olives - they should taste like pizza olives and happy memories.
Makes 12
For the bechamel
350ml whole milk, warmed
30g butter
30g flour
25g parmesan, plus extra for the top
Salt to taste
1 tsp freshly ground black pepper
For the rest
150g green olives in brine, drained and sliced
½ tsp dried oregano
½ tsp freshly ground black pepper
1 sheet of ready-rolled all butter Puff Pastry
A standard 12 hole muffin tin
Start by making the bechamel - it needs to cool before you make the tarts. Heat the butter until sizzling in a large saucepan. Whisk in the flour to make a roux and cook for 1 minute. 1 ladle at a time, start whisking in the warm milk. The sauce will be very thick and gluey to start, but keep whisking and slowly adding the milk. Once it is liquid enough to boil, only add more milk when it starts bubbling again. When all the milk is added let the bechamel simmer gently for a further 5 minutes before removing from the heat. It will be the consistency of thick double cream. Off the heat, whisk in the parmesan, pepper and season to taste. Decant to a bowl and cover the surface of the sauce with cling film so it doesn’t form a skin as it cools. Leave to cool completely.
Preheat your oven to 180 fan.
Unroll the pastry sheet and use a cutter to cut 12 circles out of your pastry. The circle size will slightly depend on the size of the holes in your muffin tin, but for me I used an 8cm cutter. Pop the circles into the holes - they will only go around half-way up but that is fine. Use your fingers to gently press the pastry into the tin and bring it further up the sides of the holes. This way we get a thinner, crunchier pastry and cover more ground. Once all the holes are filled, chill for 30 minutes.
Mix the sliced olives with the oregano and pepper. Pop a teaspoon of the olives in the bottom of each tart case, then top with 2 tablespoons of bechamel. Top with a tablespoon of the olives, use them all up to cover the top. Pop them into the oven and bake for 20 minutes at 180, then turn the oven up to 200 and bake for a further 10 minutes until golden.
Once the tarts are baked, let them cool for 5 minutes before fishing them out of their tin. Serve warm with a little bit of extra parmesan on top and a stiff drink.
MAKE AHEAD
You can make the bechamel up to 3 days ahead and keep in the fridge until needed.
Fill the tarts up to 6 hours ahead and bake off when required.
SUBSTITUTIONS
You can use black olives too or a mix if you prefer - just make sure they aren’t fancy!
Swap parmesan for gruyère or cheddar.
You can use plant based alternatives for everything here and make these vegan!
RACK OF PORK, PICKLED PEPPER GRAVY
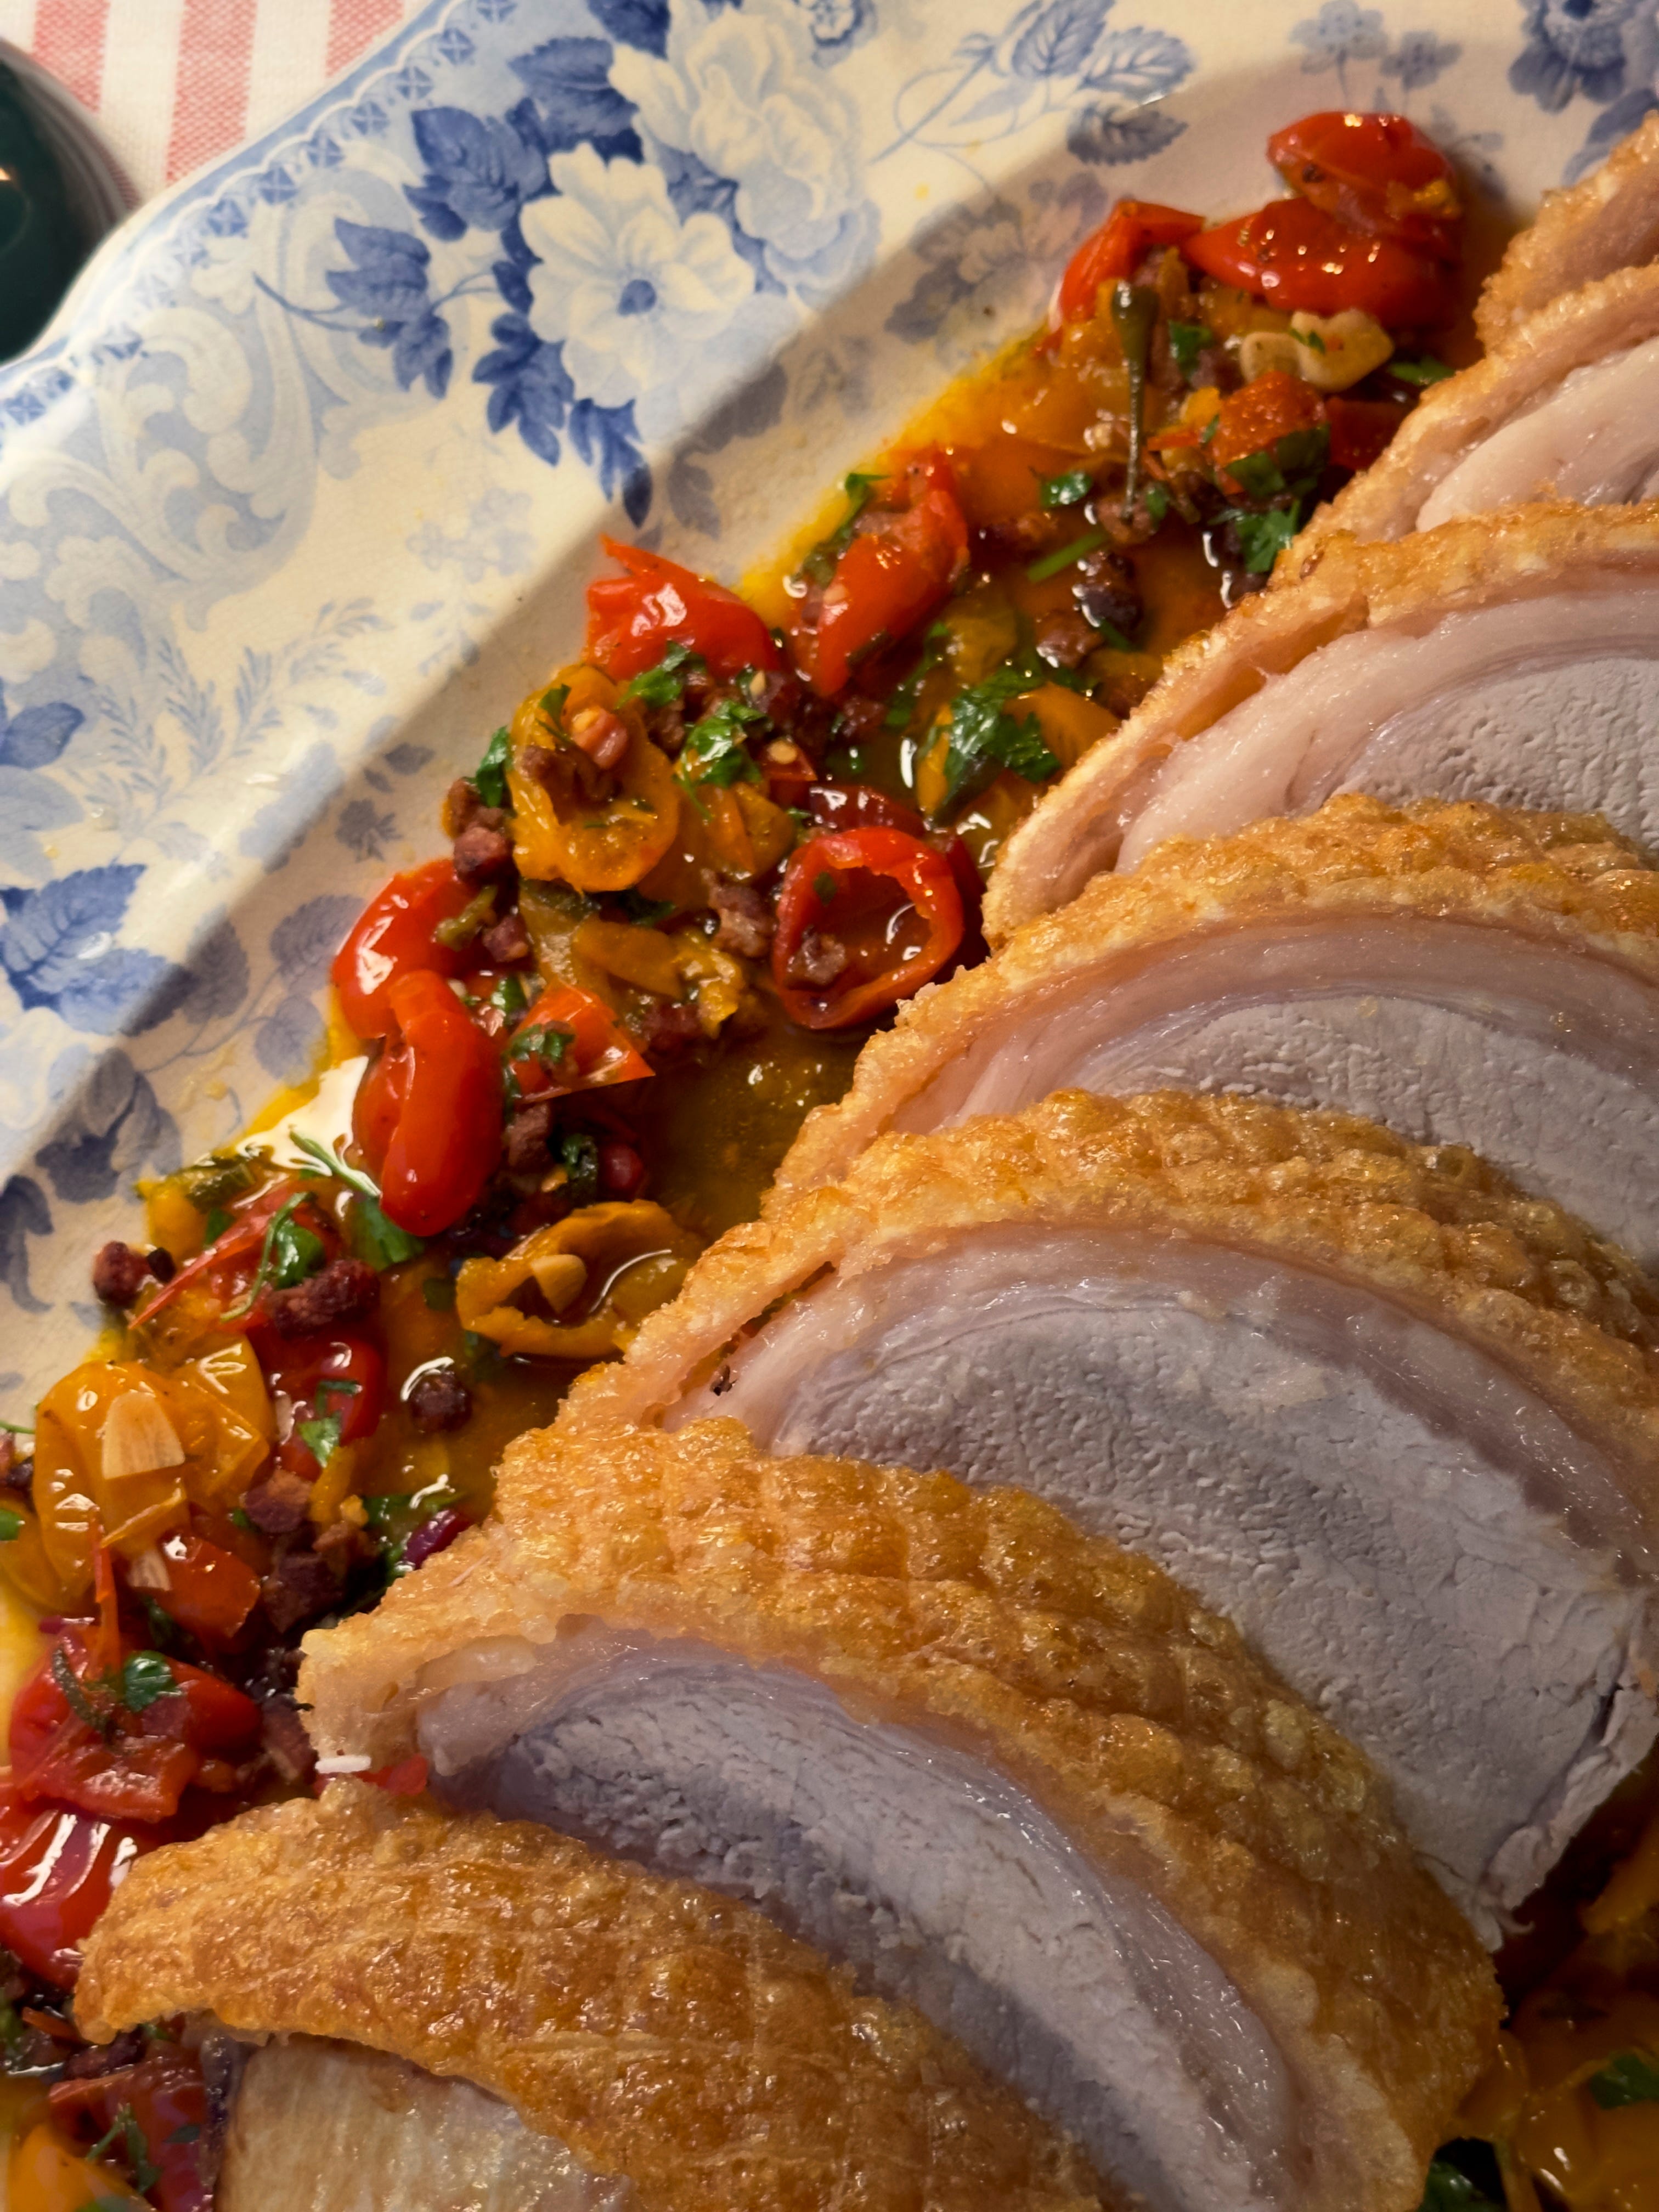
There is only one way to guarantee good crackling I am afraid, and that is good pork. Do not buy it from the supermarket. Find a butcher who sells locally reared, high welfare pork. If you can get it dry aged, even better, but it is not essential. I got mine from Flock and Herd in Peckham and it was excellent. The Pickled Pepper Gravy is something that has been on my mind for a while, as it is similar to one of my favourite dishes, Chicken Scarpariello. Using the spicy, vinegary peppers and their brine with herbs, pancetta, garlic and white wine and finishing it with butter creates this incredibly rich yet refreshingly bright sauce. It’s an absolute wonder with fatty, creamy pork and all the other sides, and like all good seasonal recipes - it can be made ahead. I can’t wait for you to try it.
Serves 6 to 8
3.5kg Rack of Pork - 6 bones for 6 people (it will serve 6-8 in reality) - chine bone removed.
2 tbsps neutral oil
8 tbsps flakey sea salt
1 tbsp cracked black pepper
For the gravy
1 tbsp olive oil
300g pancetta, diced
6 garlic cloves, sliced
6 leaves of sage, finely chopped
400ml chicken or pork/ham stock if you have it
150ml white wine
2 jars of pickled peppers - 280g drained weight, chopped. I like to use a mix of red and yellow
150ml pickle brine from the peppers
60g butter to finish
A large handful of fresh parsley, finely chopped
Make sure you pick up your pork at least 2 - 3 days before you intend to serve it. Let it sit uncovered in your fridge, skin side up and completely exposed until d-day, this will ensure it dries out properly. You can ask your butcher to score it, but make sure they don’t go too deep in the skin - if they penetrate the flesh below the juices will seep out in cooking and ruin the crackling. I like to do it myself using a craft knife, cross - hatching all over the skin on the day I cook it.
Remove the pork from the fridge 1 hour before cooking it and score it if you’re doing it yourself. Then season the underside of the pork, ie. the bone side, with 1 tbsp of salt and the pepper. Take real care to avoid getting pepper on the skin as it will burn in cooking. Turn the pork back over and rub the skin all over with 1 tbsp of oil, and then cover it with 5 tablespoons of salt. It’s a lot but you are basically creating a salt lid for the next hour to draw out any excess moisture from the skin. Let it sit for an hour like this at room temperature. Preheat your oven to 235 fan.
After an hour, wipe off the excess salt and oil from the skin. Rub in another tbsp of oil and 1 tsp of flakey salt - this is to season the skin. Now put the pork onto a rack in a large oven tray and into the oven for 25 minutes. This initial blast will crackle the skin and make it crispy.
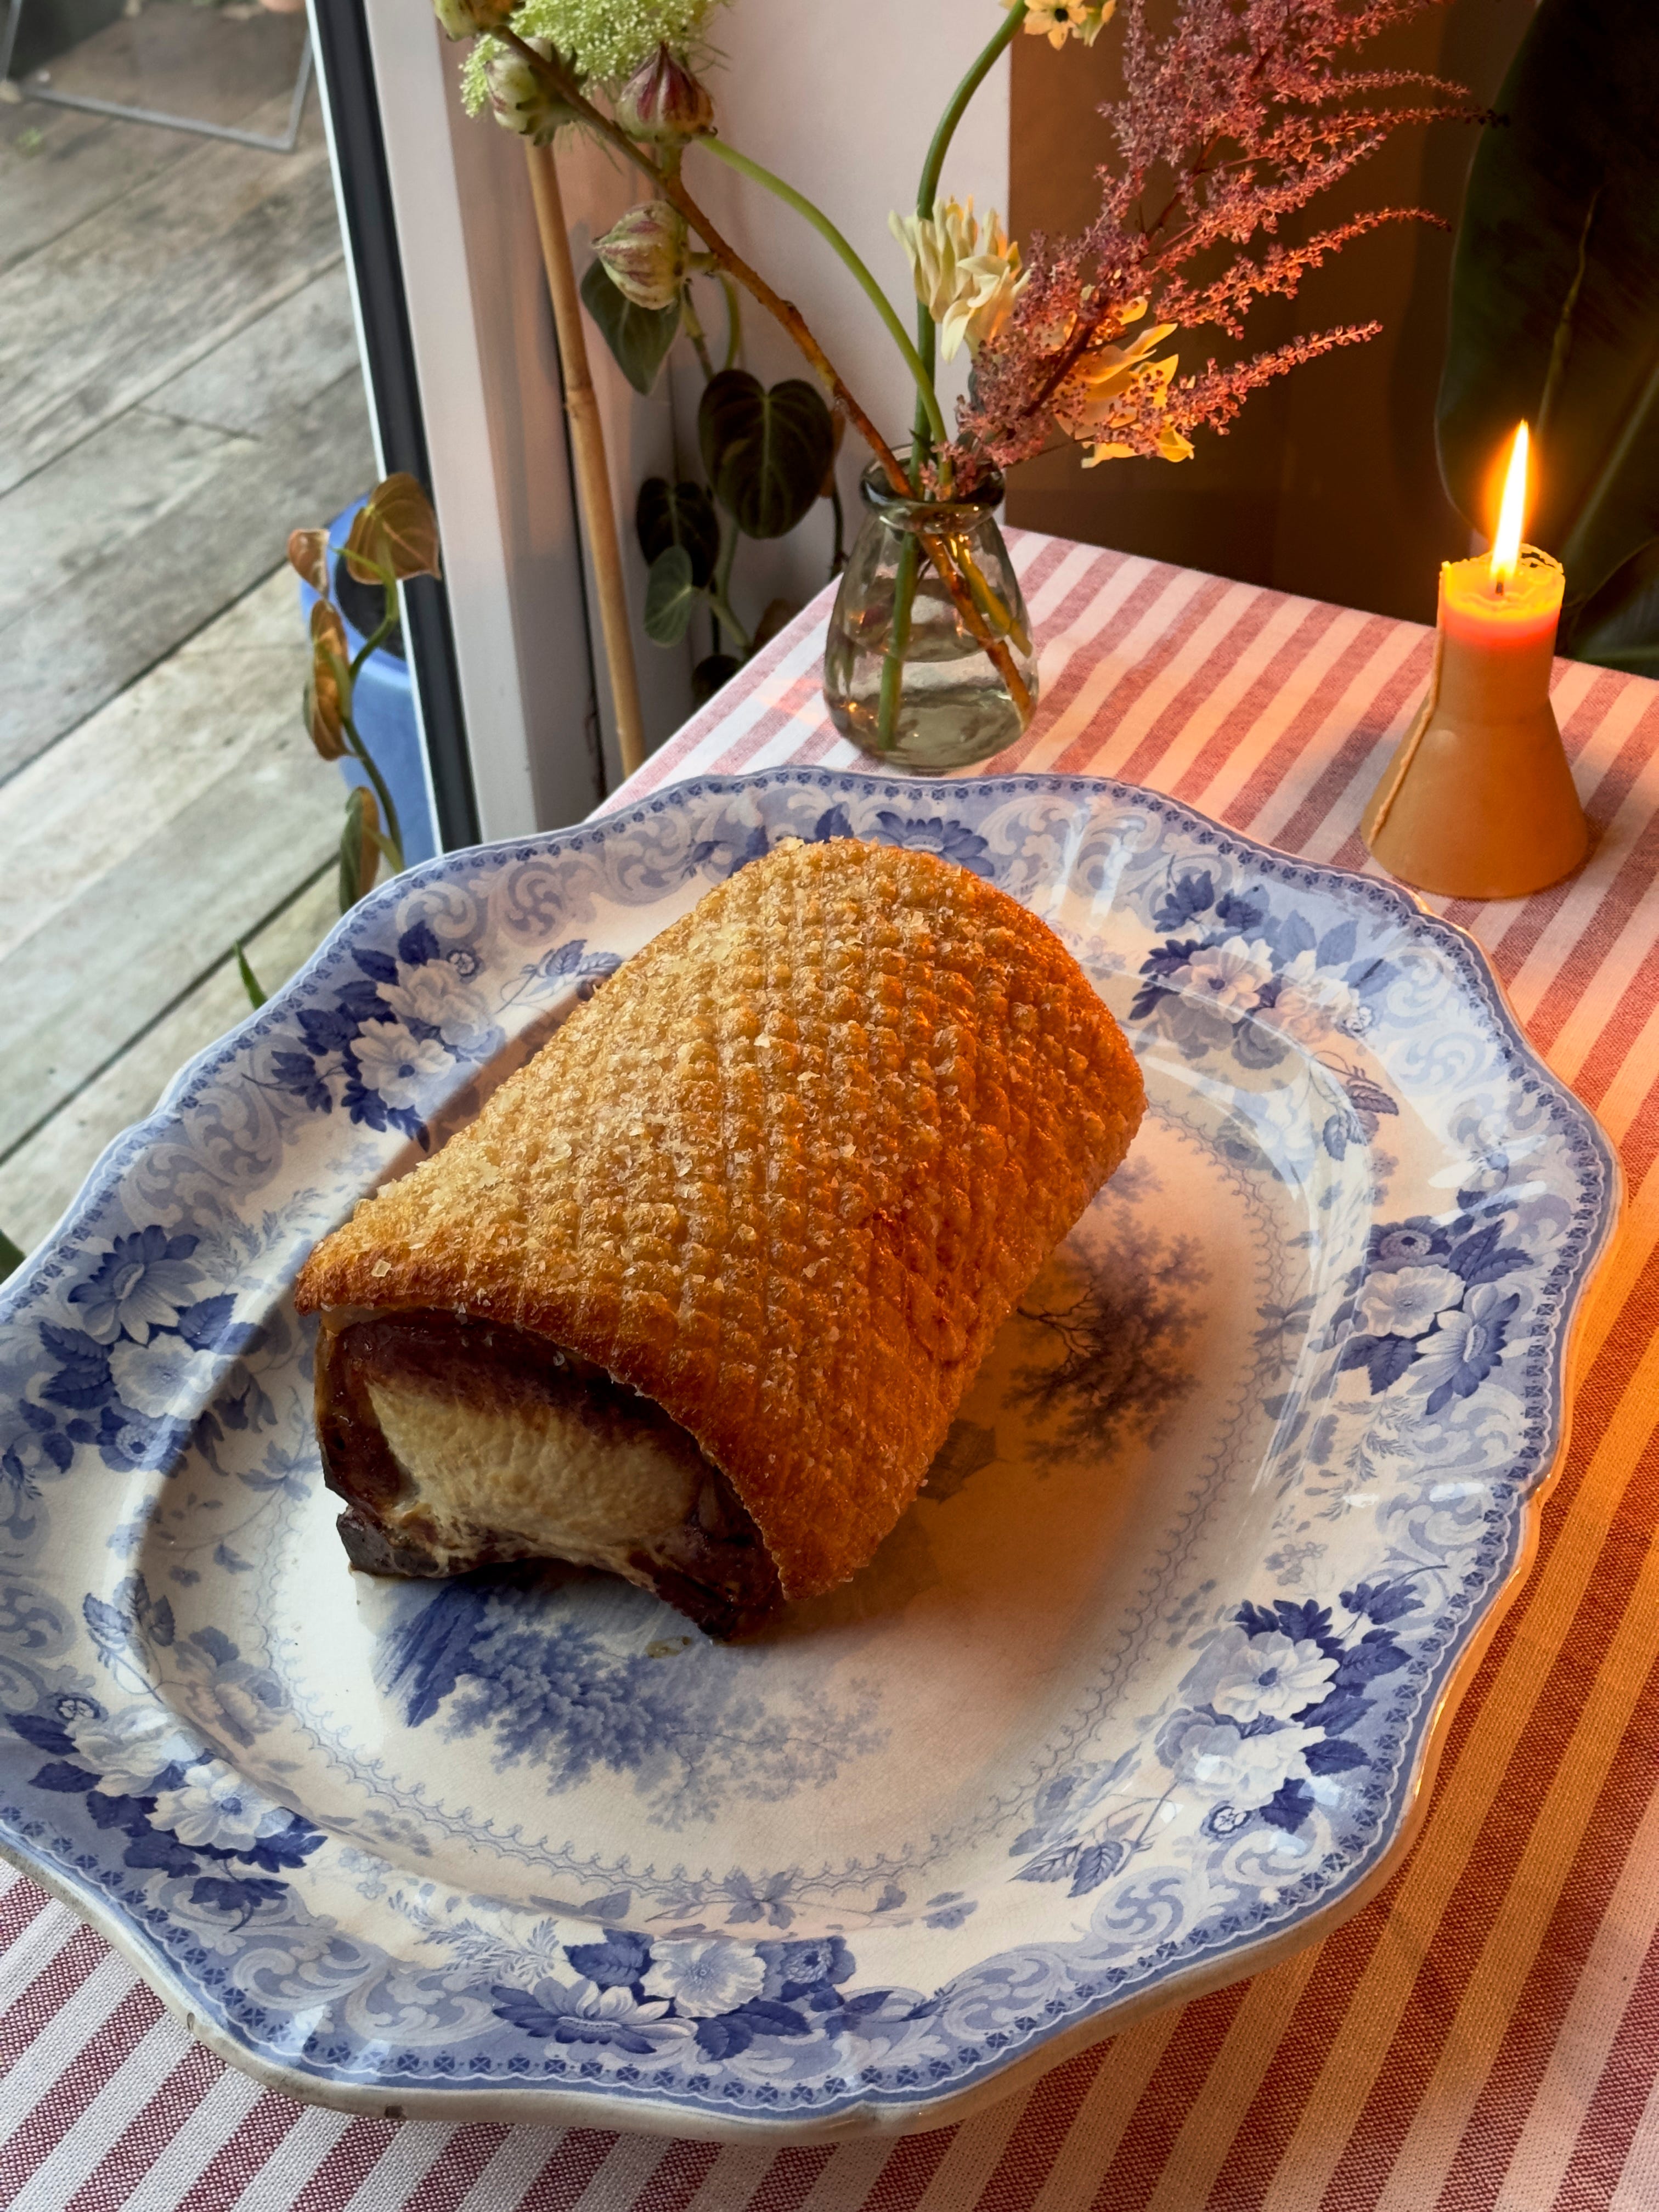
After 25 minutes, turn the oven down to 160. Now everyone has different preferences for their pork - some like it well done, some like it pinker, I fall into the latter, but I daresay I slightly overcooked the one you see in the pictures here. I cooked this one for 1 hour 40 at 160 and next time I would do it for 1 hour 25. It rests for 20 minutes at least after cooking and keeps rising in temperature internally as it does. So, if you are not keen on the idea of pinker pork, then stick with 1 hour 40 and a good 20 minute rest and you will be grand. If you are at all concerned, you can probe your pork with a meat thermometer - anything above 60 degrees in the middle will be cooked through after resting. For smaller pieces of pork - allow for 20 minutes per 500g.
Meanwhile you can make the gravy. Heat the oil in a large saucepan and add the pancetta. Cook it slowly for around 10 - 15 minutes until rendered and caramelised. Add in the garlic and sage and fry for a couple of minutes until fragrant, then pour in the white wine. Bring it to the boil and reduce it by half, then add the pickle brine and do the same again. Then add the pickles themselves and the chicken stock and bring to a simmer. Lower the heat and cook gently for 20 minutes until slightly reduced. Check the seasoning - I don’t find this needs much salt thanks to the peppers. Set aside until needed.
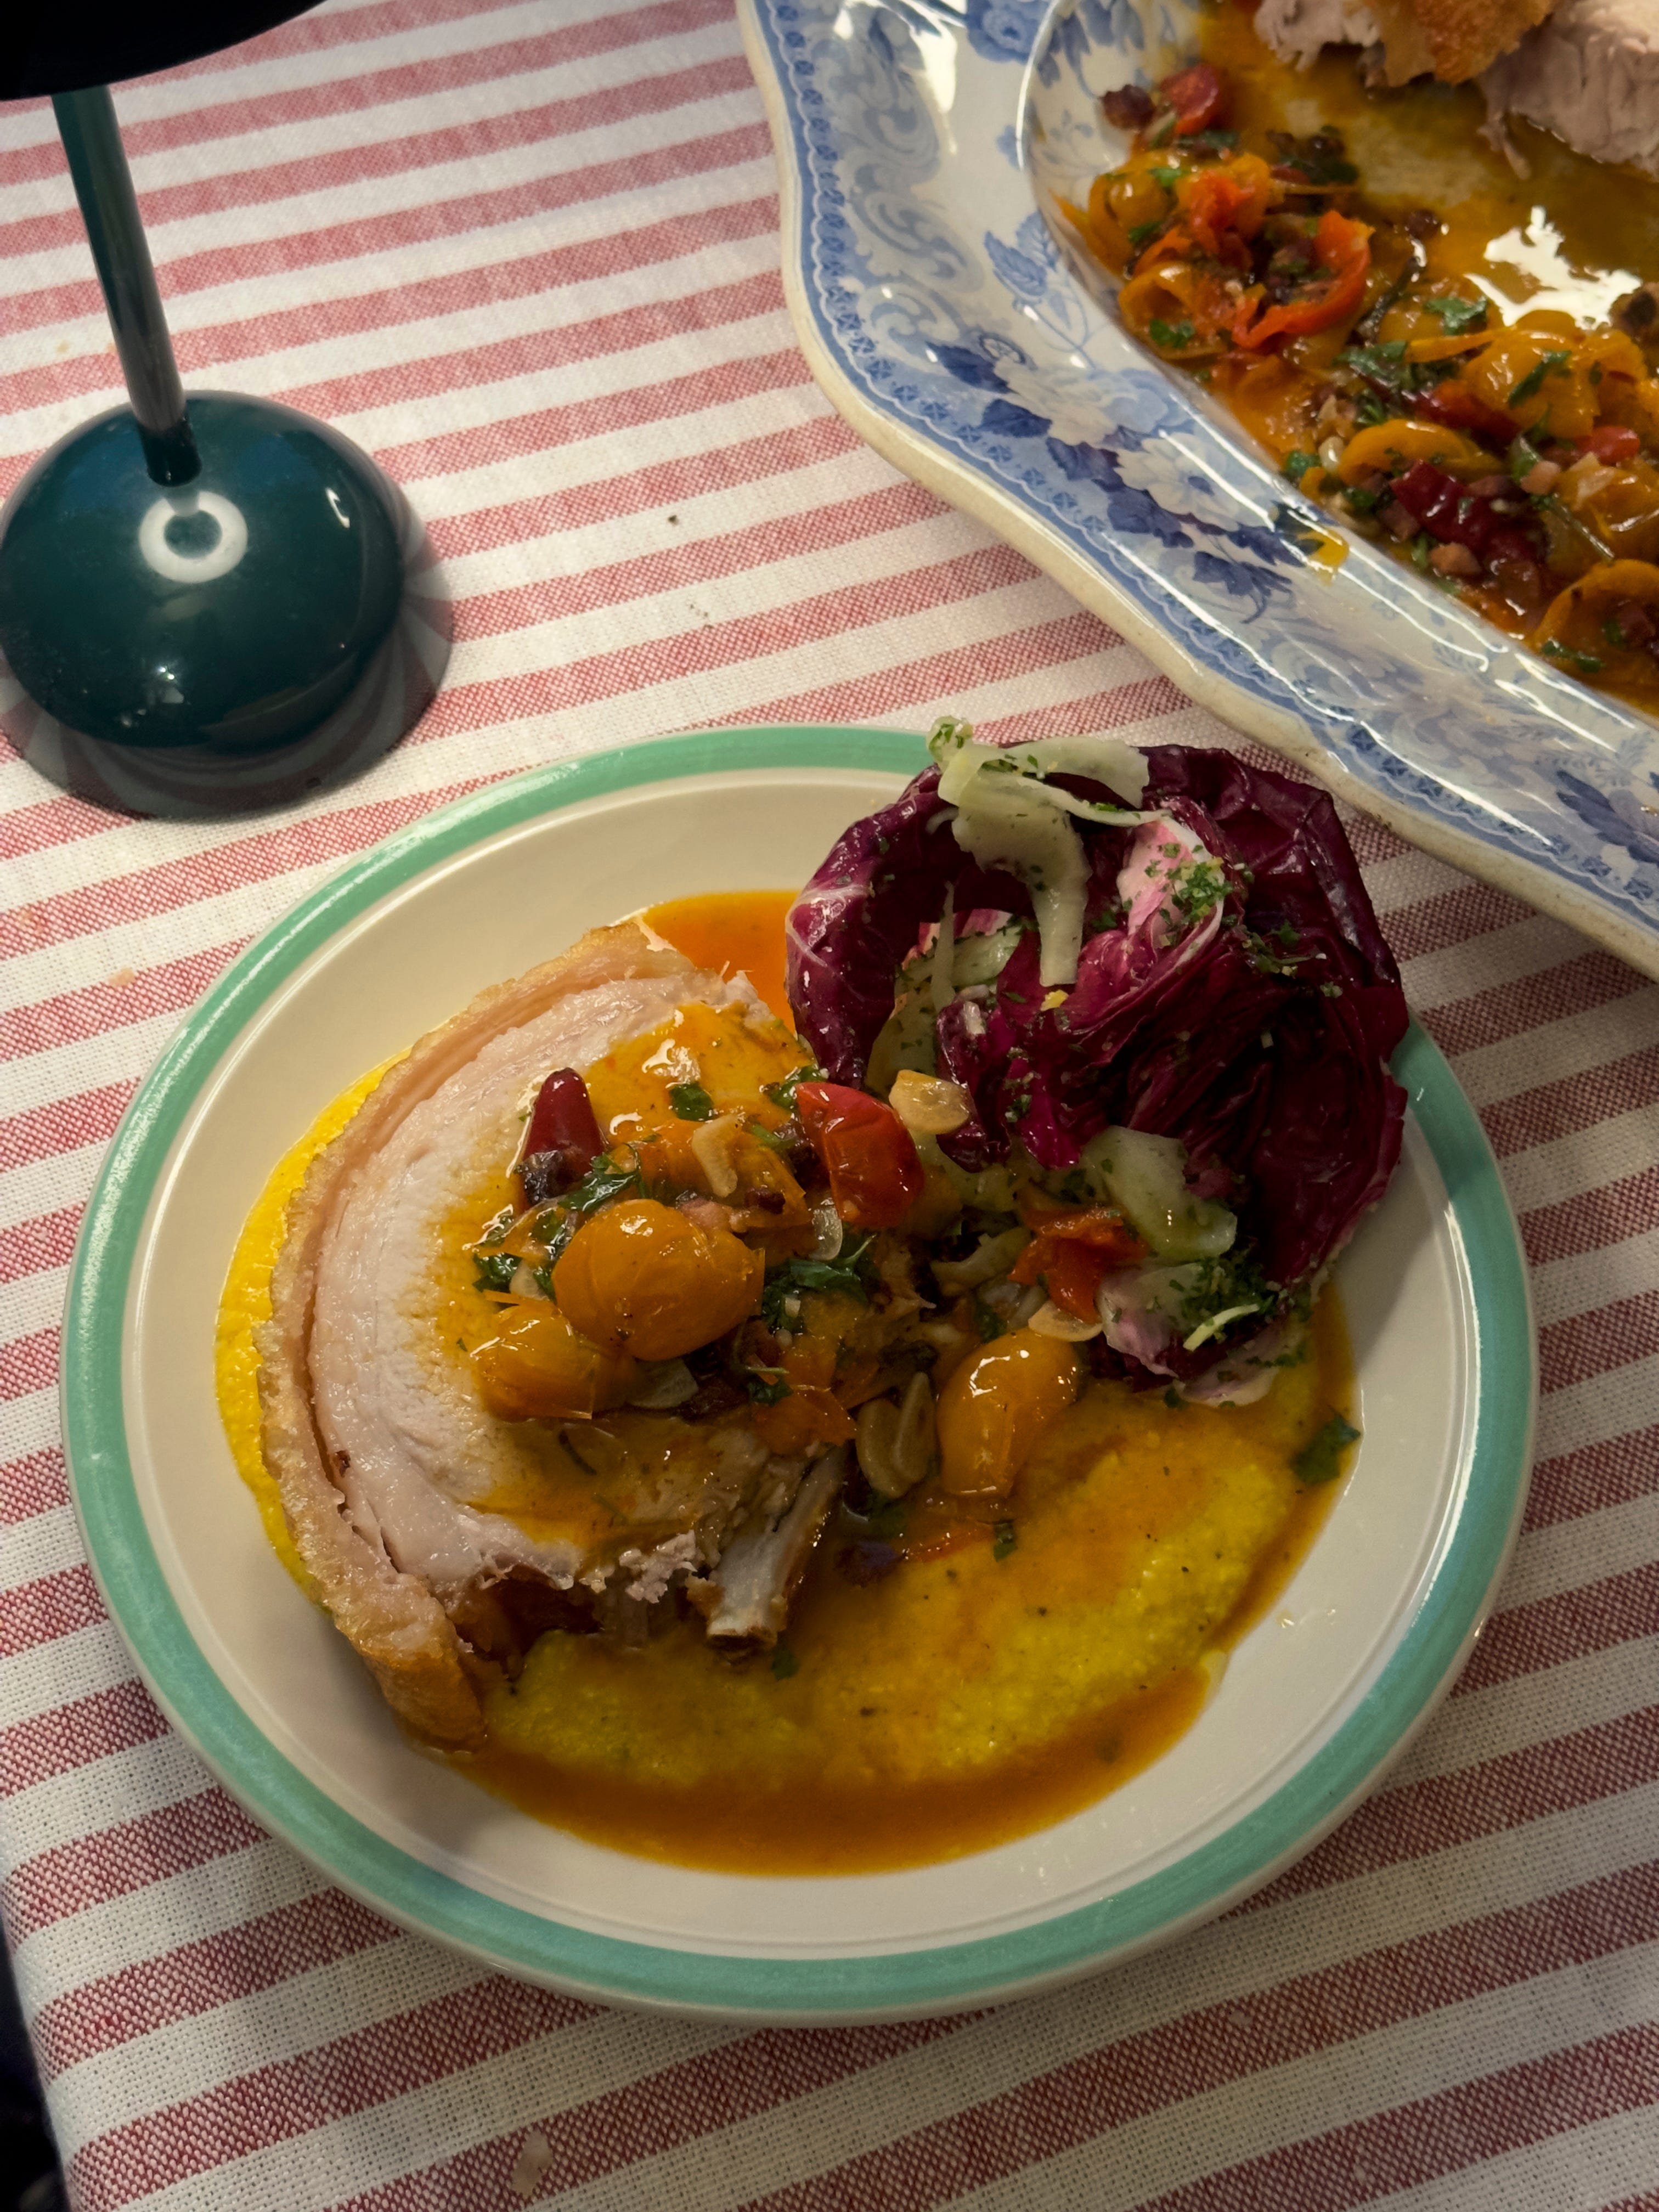
When the pork is cooked and rested, pour the resting juices into the gravy and bring it up to the boil. Take it off the heat and stir in the cold diced butter, it will become slightly thicker and glossy. Stir in the parsley and it is ready to go. Carve the pork into chops and arrange it on the platter, spooning the gravy either side of it.
MAKE AHEAD -
Don’t forget to dry out your pork in your fridge!
You can make the gravy up to 3 days ahead, simply reheat, add the resting juices and finish with butter and parsley when you wish to serve it.
SUBSTITUTIONS
You can also do my slow roast pork shoulder or rib of beef if you prefer.
The gravy would be lovely with rosemary and basil instead of sage and parsley.
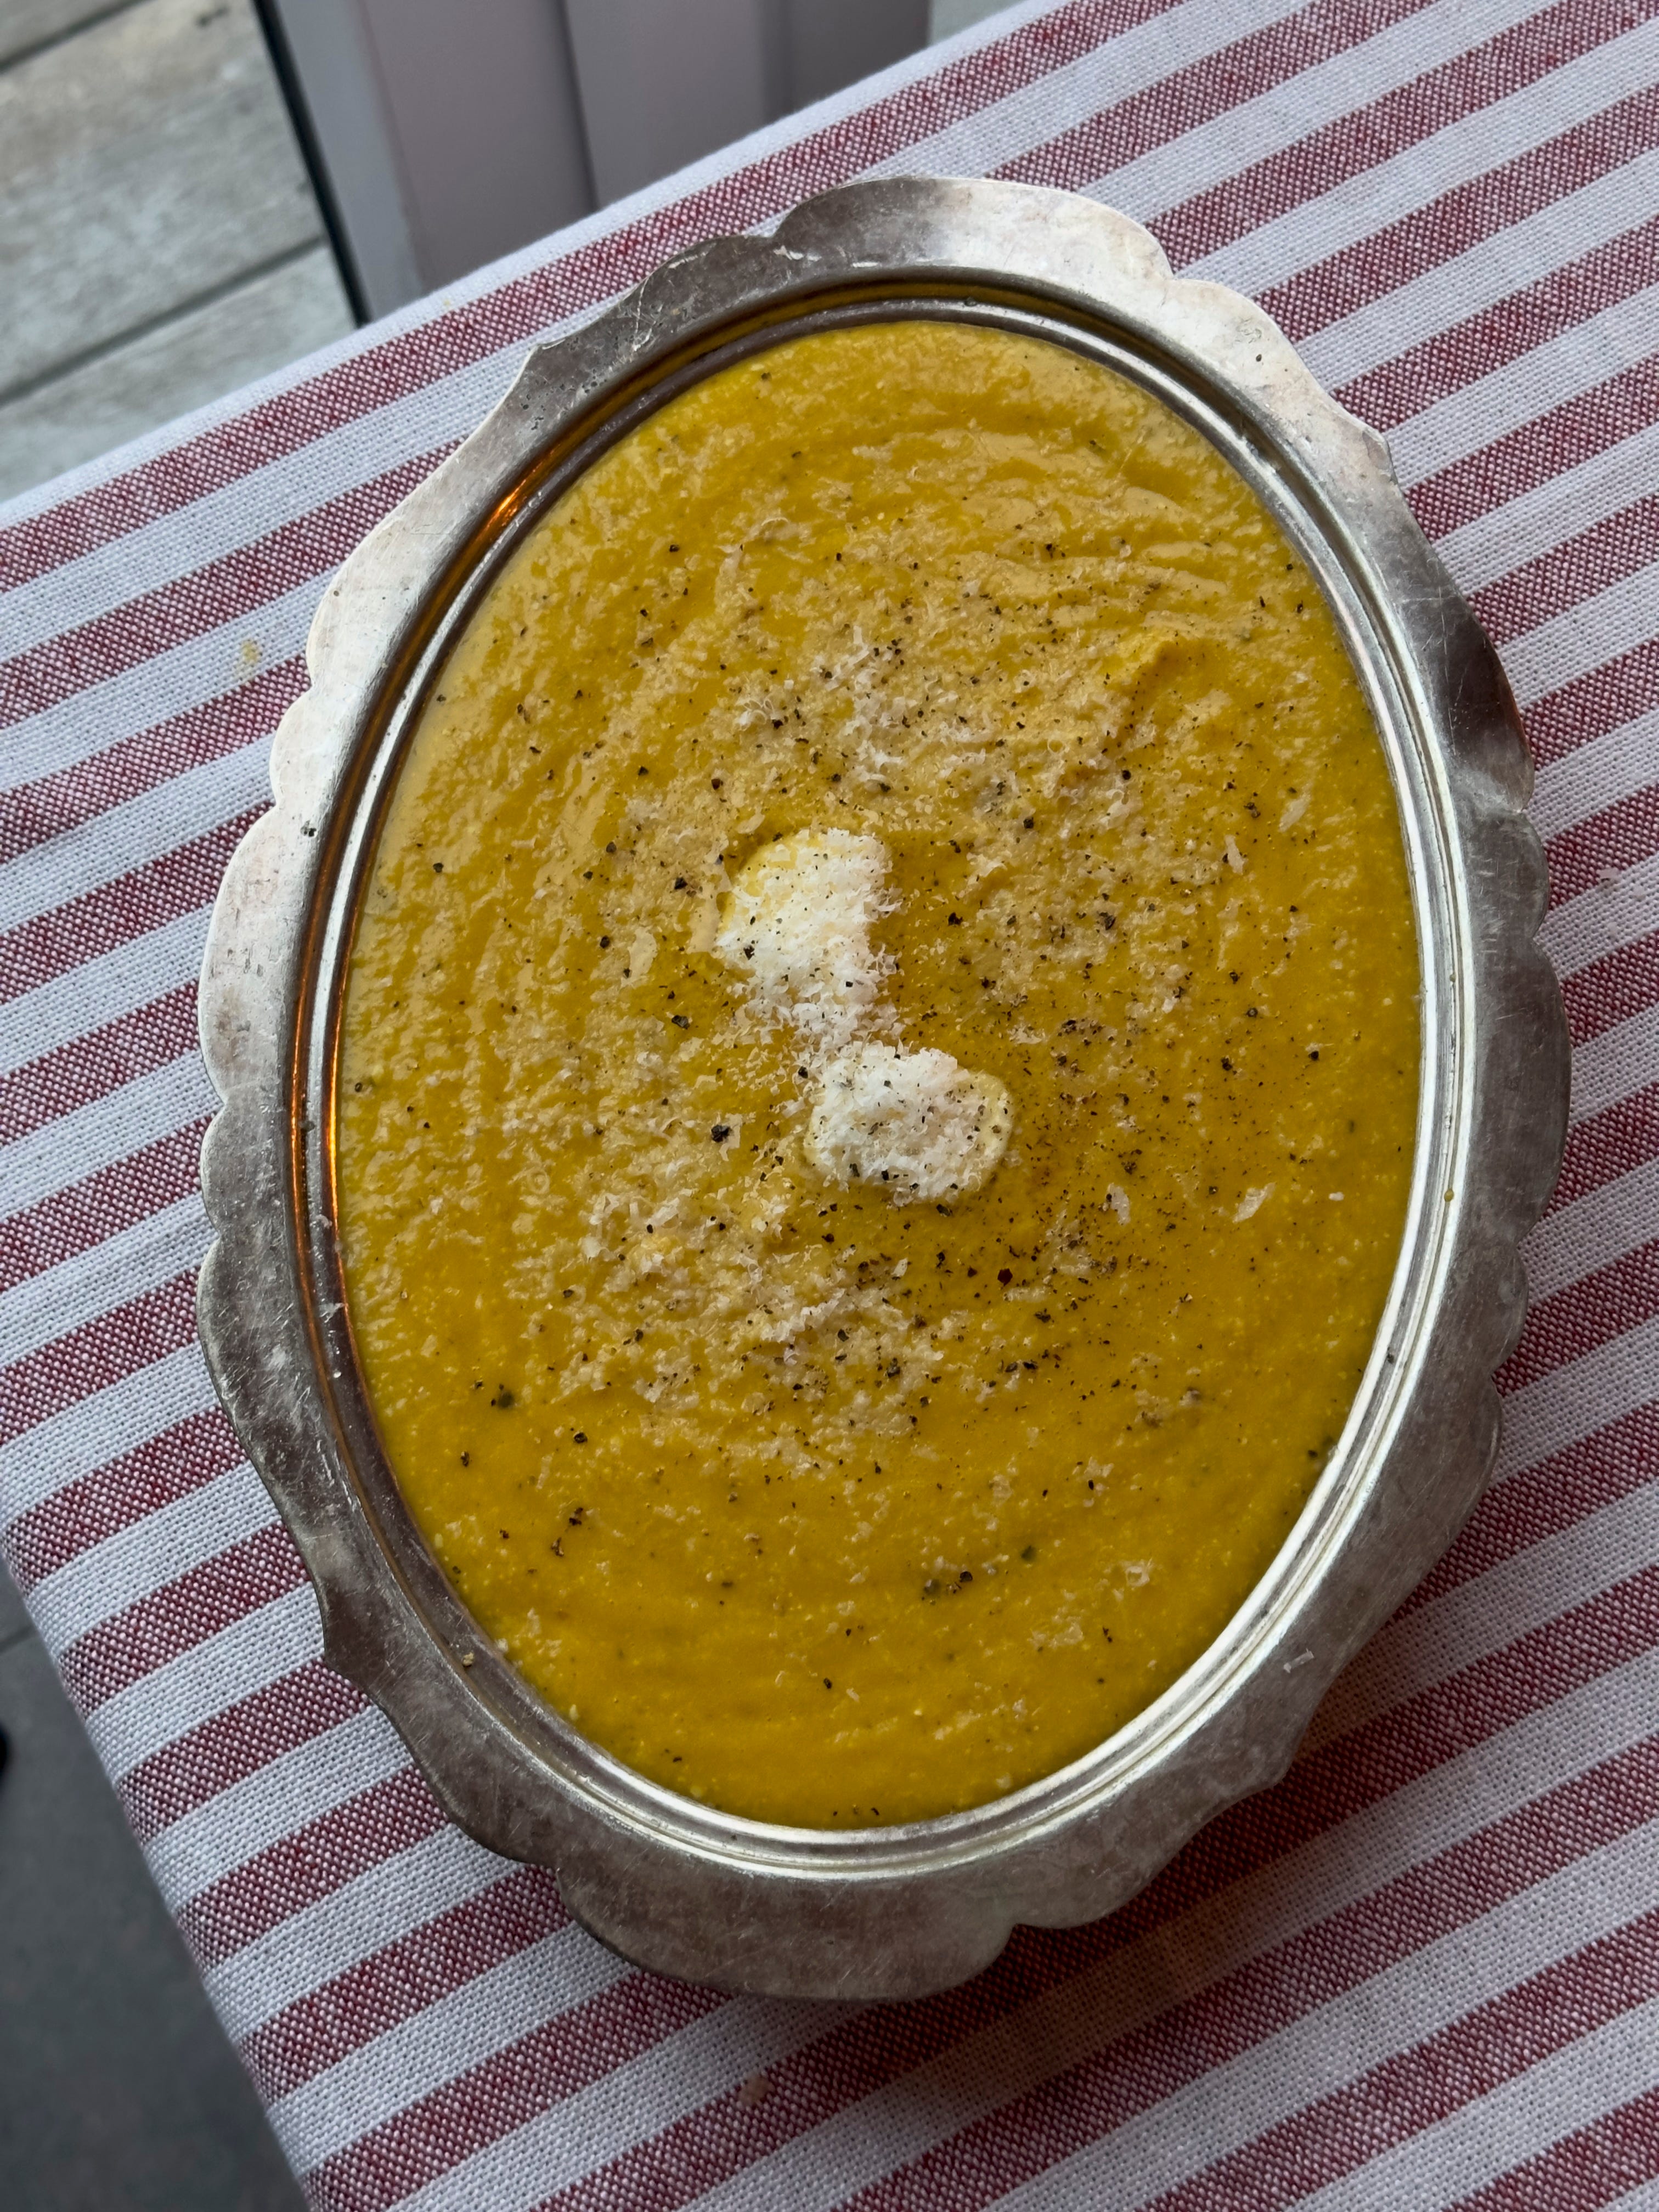
PUMPKIN POLENTA
In a small village in the Kiso Valley in Japan it’s 8 am and chilly, and I am absolutely hoofing down a bowl of pumpkin rice porridge given to me by the owner of our guesthouse.
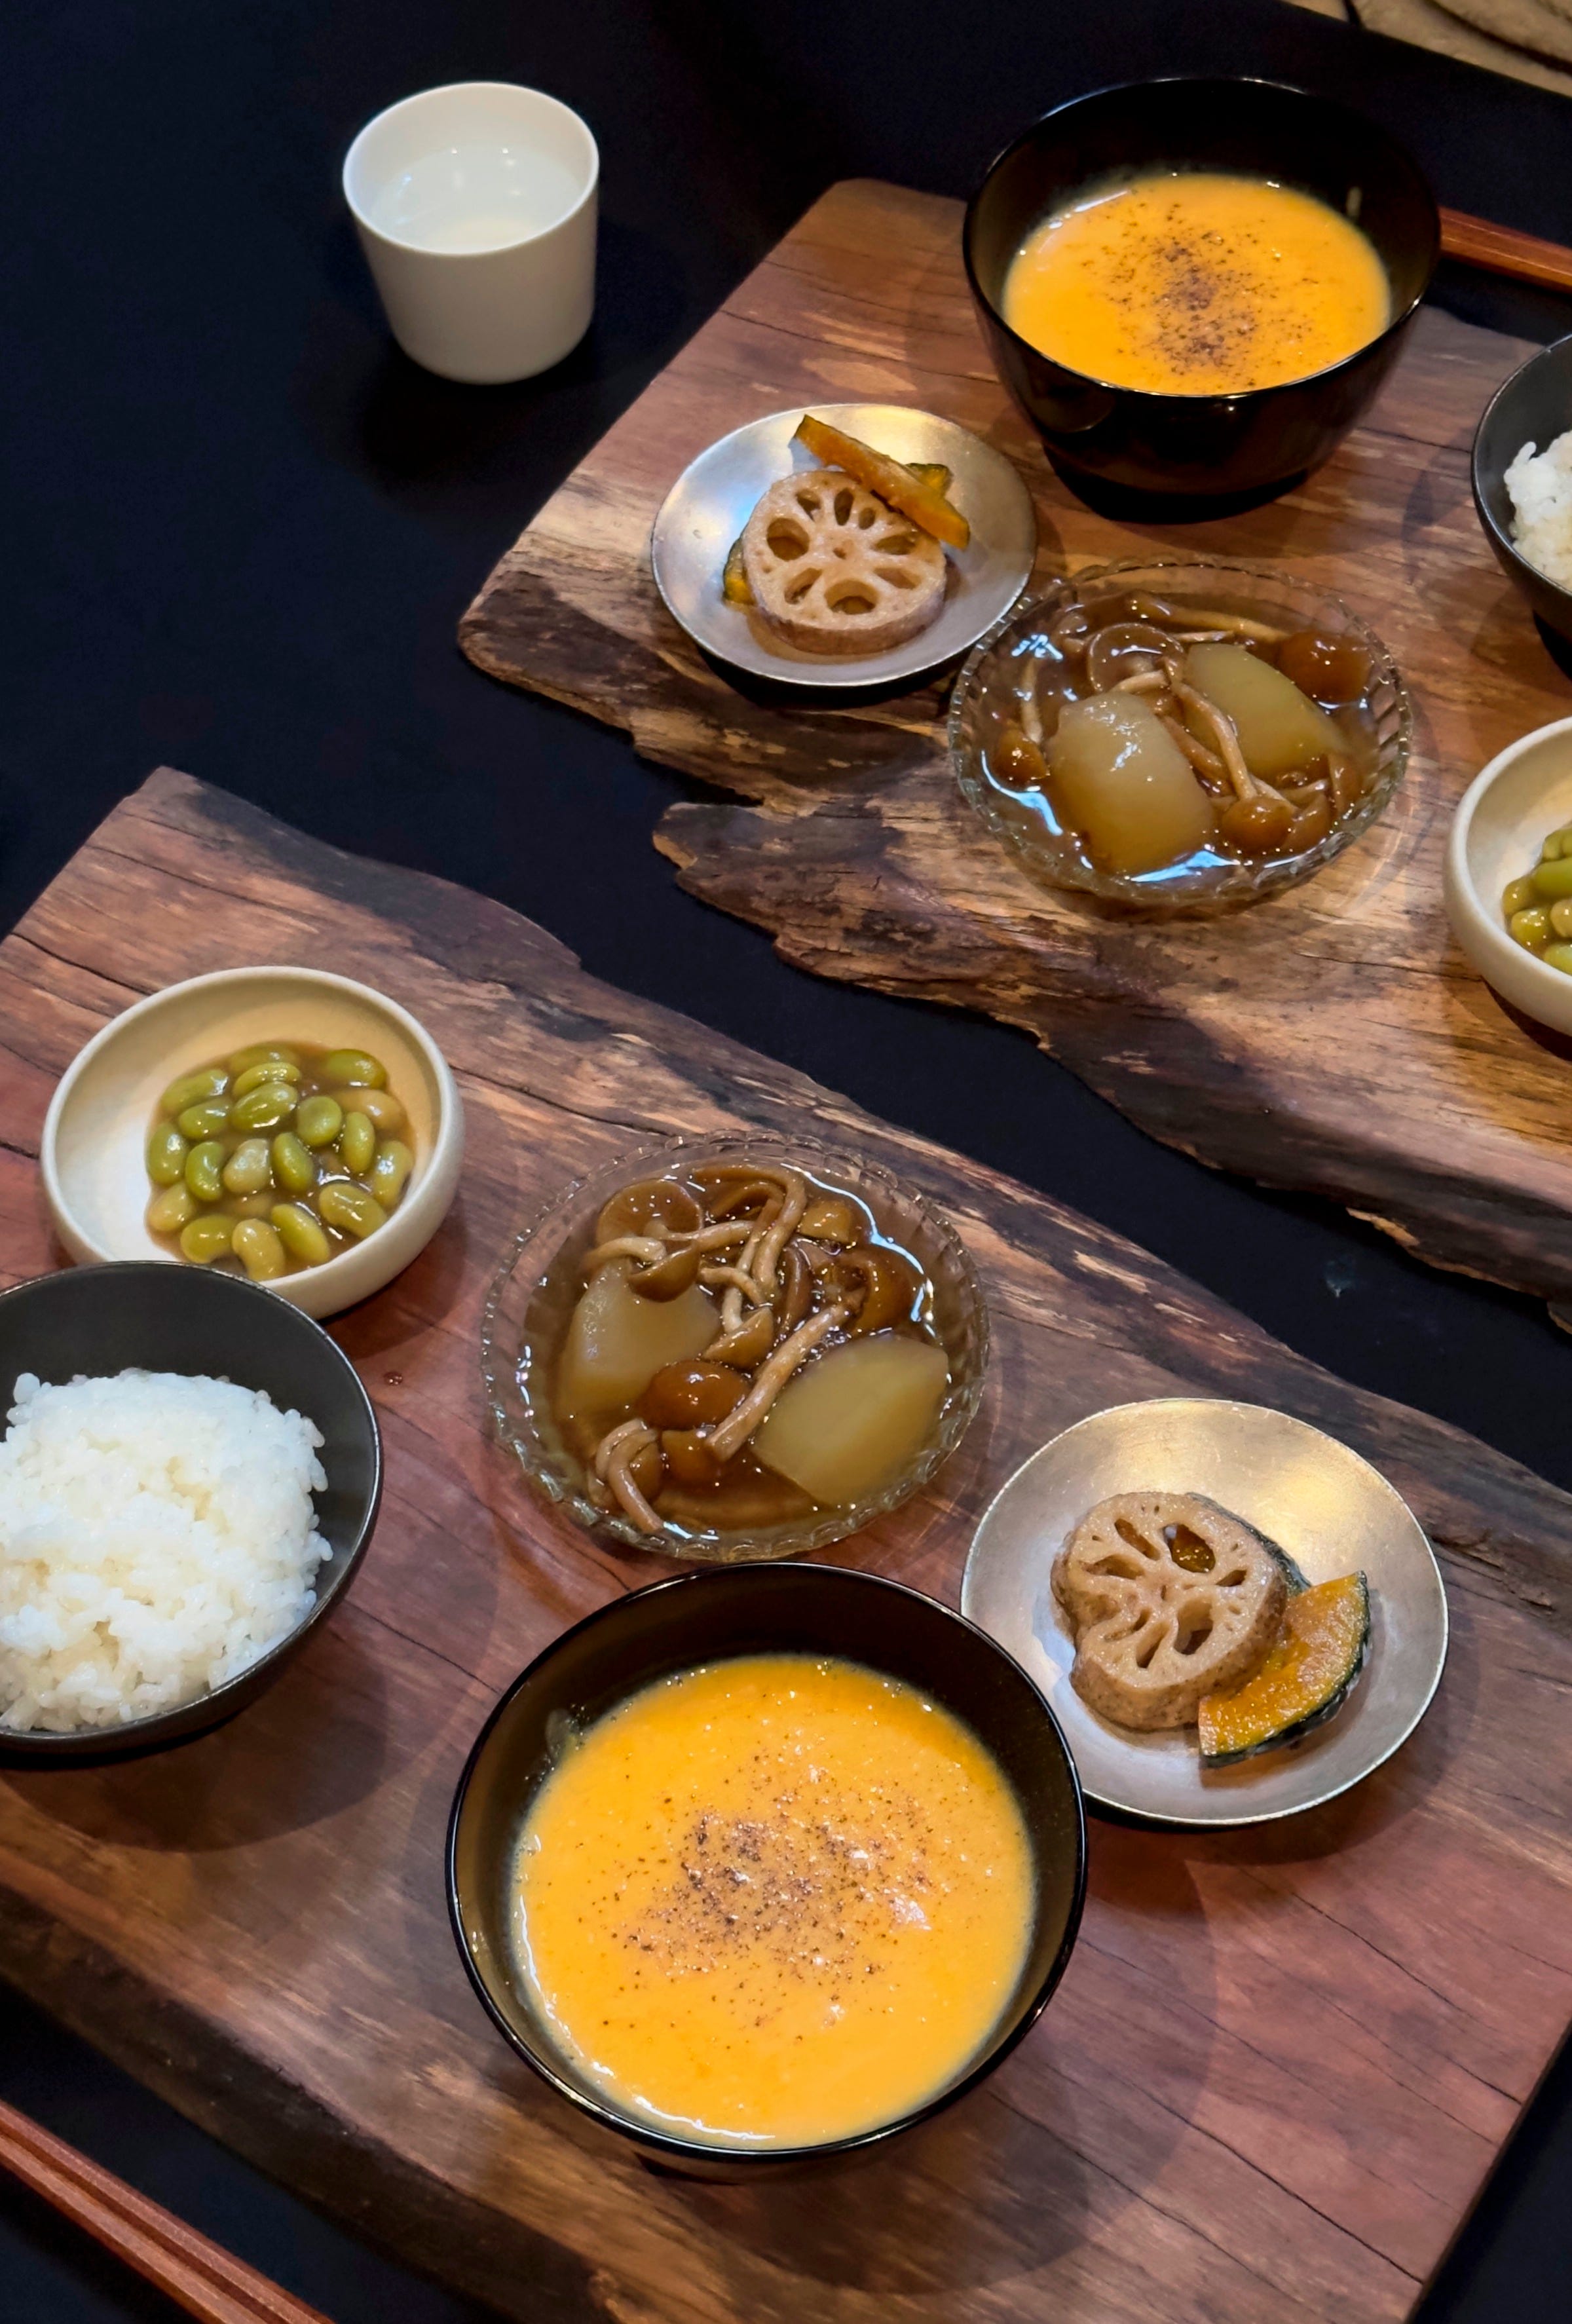
It is rich, sweet and peppery and the perfect thing to set me up for a day walking the Nakasendo trail. That bowl of pumpkin porridge was so delicious I’ve not stopped thinking about it, and Pumpkin Polenta felt like a great little riff on it for this menu. Polenta has long been one of my favourite foods, as most starchy butter-vehicles are. Here with a luscious pumpkin puree stirred through and spiked with parmesan and black pepper, it is a supremely comforting side dish and is delightfully muted against the pork with its briny gravy and the bitter salad. A welcome pile of creamy mush, if you know what I mean.
Serves 6 as a side
For the pumpkin puree
1 small Delica pumpkin
20g butter
For the polenta
300g good quality polenta
60g butter, diced
100g parmesan, finely grated
1 tsp freshly gound black pepper
1.3l water
For the pumpkin puree you have 2 options - you can either steam or roast your pumpkin. I steamed mine because that’s how they had prepared it in Japan, but of course if you prefer roasting then that is great too. Here are the relevant methods for both.
TO STEAM - preheat the oven to 170 fan. Halve and deseed the pumpkin. Cut it into 6 or 8 slices. You do not need to peel it. Pop it on a rack in a deep oven tray. Pour about an inch worth of hot water into the bottom of the tray. Cover with foil and pop in the oven for around 45 - 50 minutes, until the pumpkin flesh is tender. Scoop the flesh off the skin while still hot and blitz in a blender with the butter until smooth.
TO ROAST - preheat the oven to 180 fan. Halve and deseed the pumpkin. Cut it into 6 or 8 slices. You do not need to peel it. Toss the pumpkin in 2 tbsps olive oil and a pinch of salt. Roast on a tray for 45 minutes to an hour, until the pumpkin flesh is tender. Scoop the flesh off the skin while still hot and blitz in a blender with the butter until smooth.
Bring the water to a rolling boil, then pour the polenta into the water in a steady stream, whisking all the time. The mix will look thin to start but will quickly start to thicken. Turn the heat to low, and cover the surface of the polenta with a piece of parchment paper - this will stop it drying out. Leave to cook on a very low heat for 45 minutes to an hour, stirring every 10 to 15. It should just be gently blipping away, not boiling or simmering. You will find it sticks a bit to the bottom of the pan but as long as it’s on a very low heat it won’t burn. You will almost certainly need extra water at the end to get it to the consistency you prefer so keep a freshly boiled kettle ready to go. When the polenta is soft ie. you can’t detect any graininess, take off the baking paper and give it a good whisk. Pour in the pumpkin puree and stir well. Bring it to a simmer, then remove from the heat. Add a splash or two of hot water if it feels too thick, Whisk in the parmesan and butter and season VERY well, it will need a lot of salt and pepper. Serve with a couple of knobs of butter on top, for good measure.
MAKE AHEAD -
The pumpkin puree can be made up to 3 days ahead.
The polenta can be made up to 3 days ahead, but be prepared for it to solidify. You will need to rehydrate it when you reheat it.
SUBSTITUTIONS -
This pumpkin puree would be delicious in a risotto or through pasta.
Use instant polenta if you wish, you may find the liquid levels need altering though.
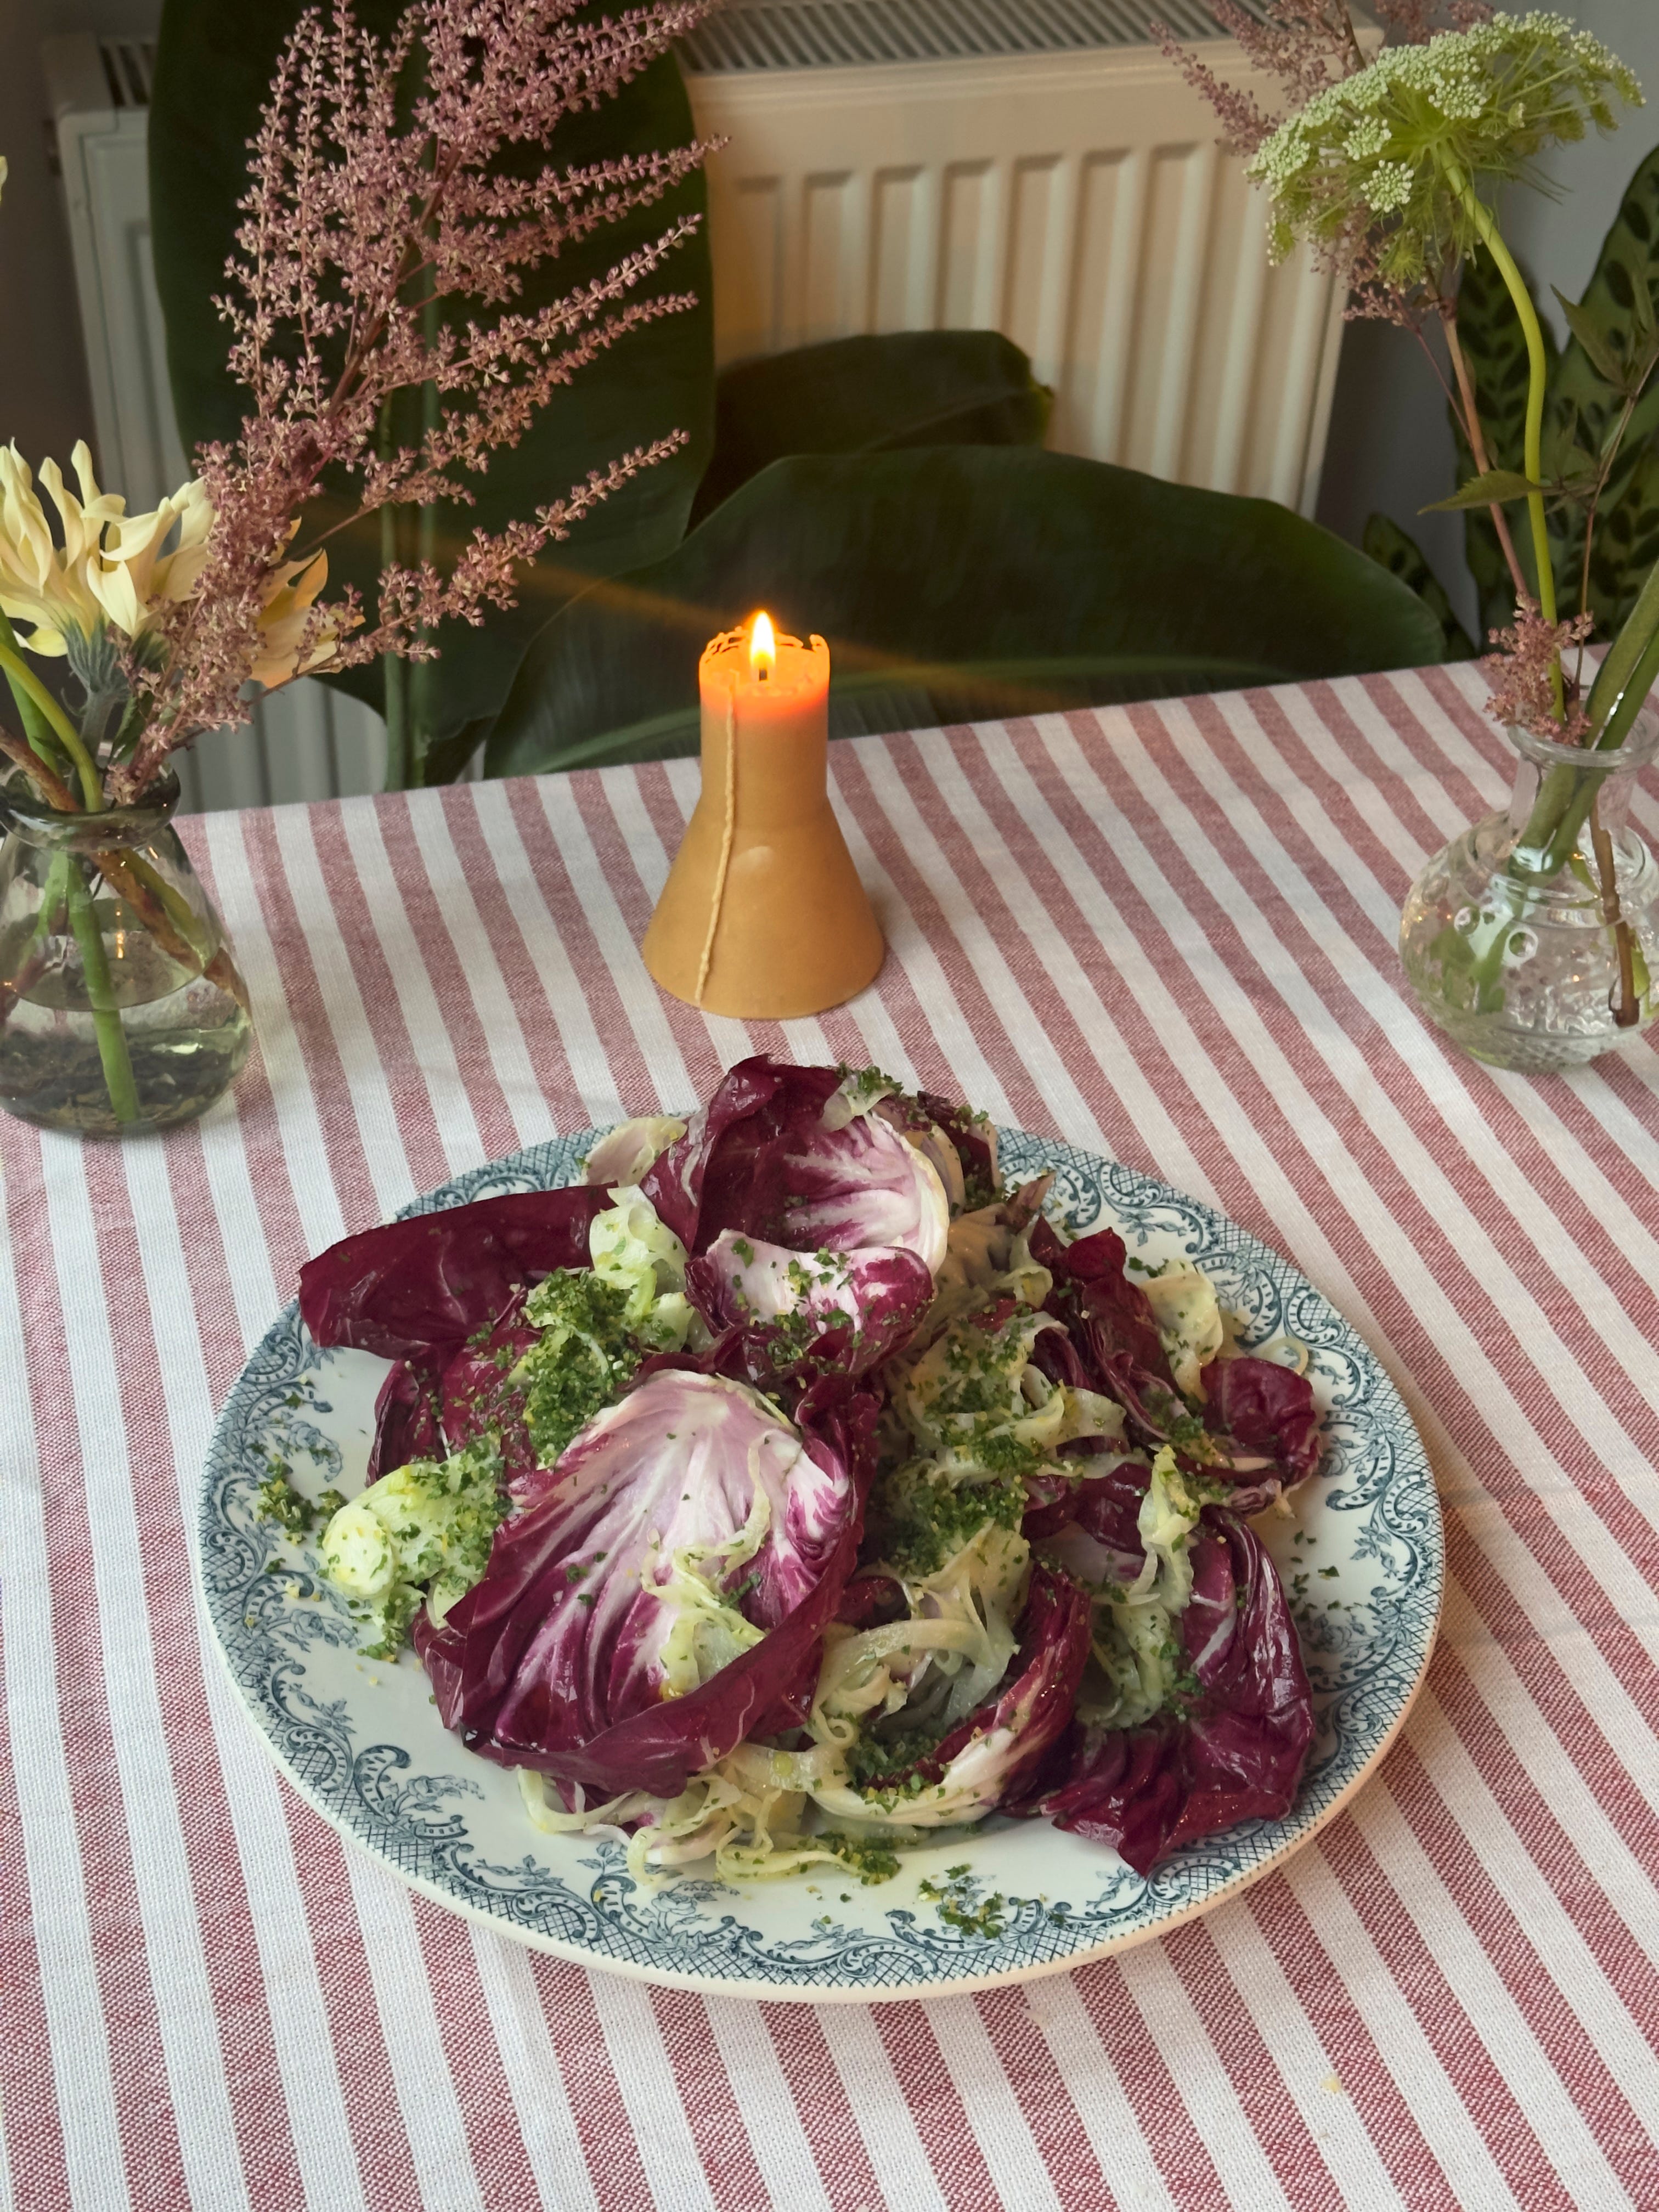
RADICCHIO, FENNEL AND GREMOLATA
Gremolata is definitely one of my favourite secret weapons. Considering it’s only 3 ingredients finely chopped, it feels like a bit of a cheat. But there’s something that happens when you finely chop lemon zest instead of grating it that, combined with the raw garlic and grassy parsley, makes an exciting, vibrant and zingy punch of flavour. Here it forms the dressing for our salad and is wondrous with the bitter radicchio and fennel. Together with the fattier elements on our plate this provides perfect balm and balance. Don’t skip this dish, it is perfect.
Serves 6 as a side
1 large radicchio, leaves separated and halved
2 small bulbs of fennel
1 clove of garlic, very finely chopped
Zest and juice of 1 lemon - zest very finely chopped with a sharp knife.
25g parsley, finely chopped
3 tbsps olive oil
Salt and pepper
To make the gremolata, finely chop the lemon peel. Your life will be infinitely easier and your gremolata better if you use a properly sharp knife. Finely chop the garlic too and then the parsley leaves. If your knife is sharp you won’t bruise any of your ingredients, meaning you will end up with a consistency that is easy to sprinkle rather than something more squidgy. Combine the chopped lemon, garlic and parsley together in a bowl.
Using a mandolin or sharp knife, very finely shave the fennel. It will oxidise if left alone, so instead add to it the lemon juice, olive oil and 2 teaspoons of your gremolata, plus a big pinch of salt. It can sit like this for 1 hour.
When you are close to serving, combine the fennel with the radicchio and more gremolata, saving a bit for the top. Season again with salt and pepper.
Serve with an extra sprinkling of gremolata.
MAKE AHEAD -
This is best made on the day
SUBSTITUTIONS -
Use chicory, watercress, tardivo, rocket or even kale if you can’t find radicchio.
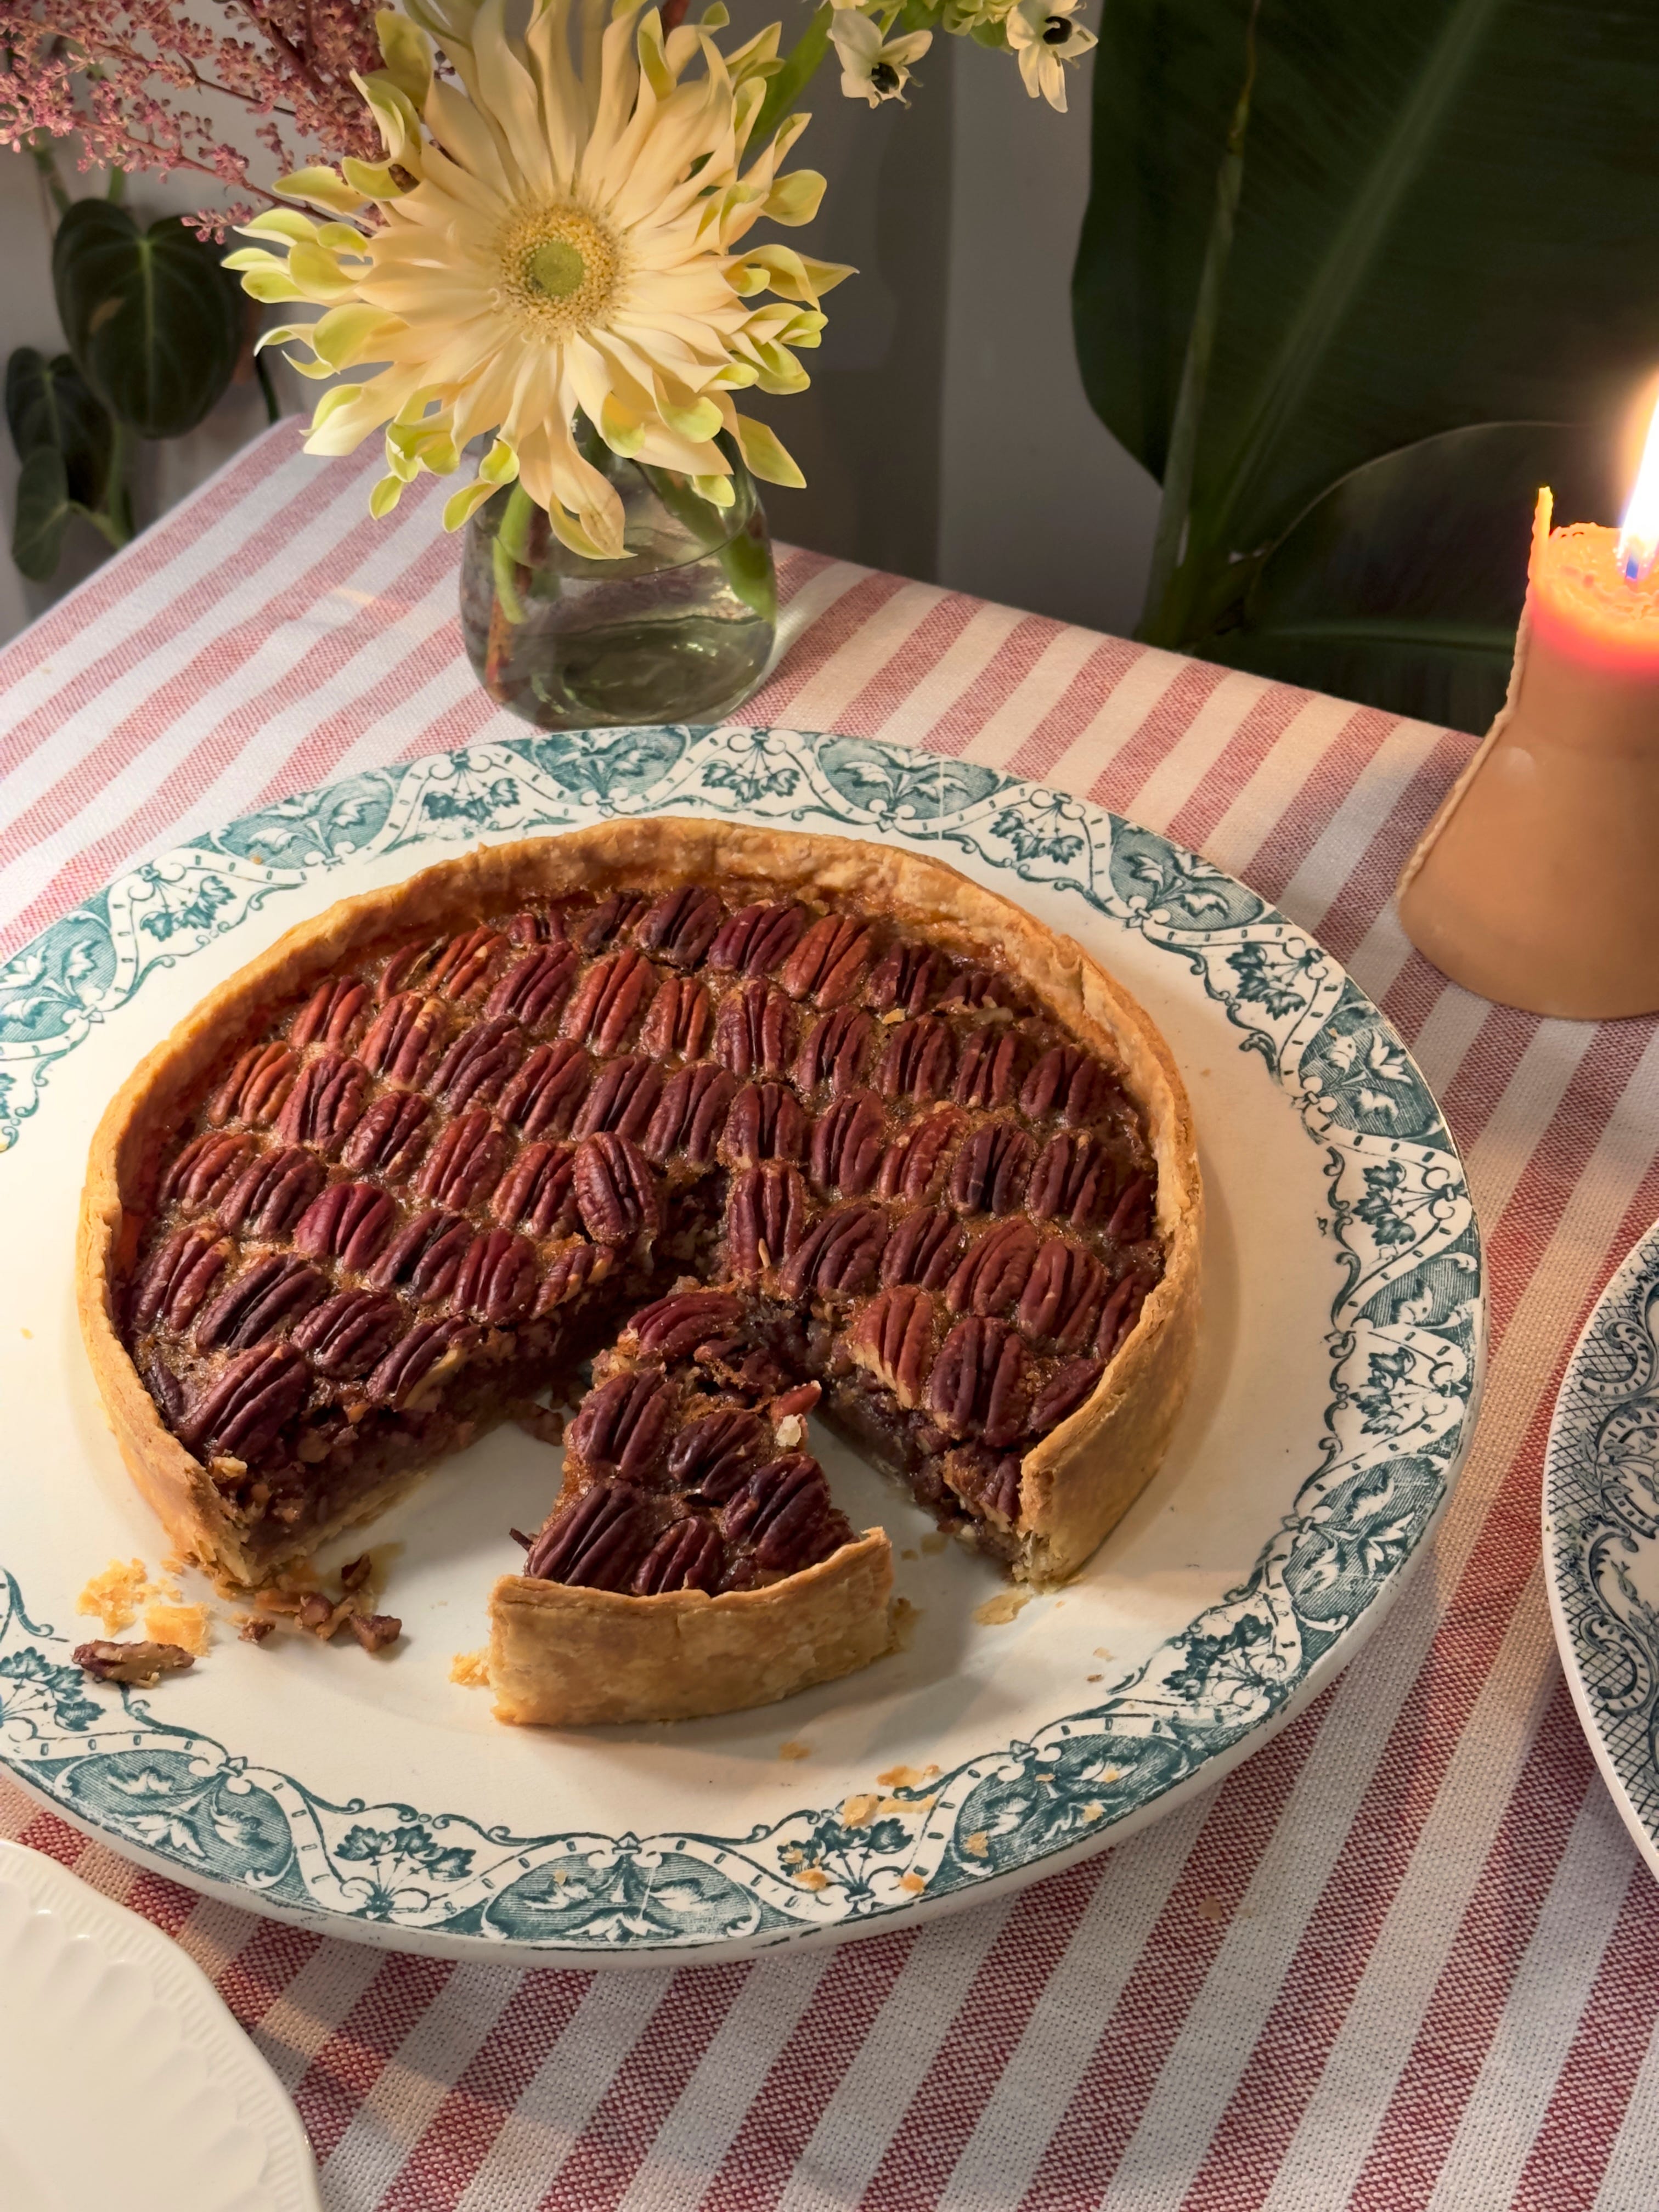
PECAN PIE
I remember my mum whipping out a shop-bought Pecan Pie quite often for guests when I was growing up, but I was always deeply suspicious of something that seemed so healthy. Of course I needn’t have worried given that this pie is literally the opposite of healthy. The filling of a Pecan Pie is kind of like a nutty, toffee custard and it is just heaven. I haven’t riffed too much on the classic style, my only tweak being some extra cinnamon and vanilla, as I think pecans work beautifully with both. Pecan Pie reheats really well, so feel free to make this the day before. I have included a pastry recipe here, but if you prefer to use shop bought then use all-butter Shortcrust.
For the pastry (makes enough for 2 9 inch tarts, freeze half!)
125g cold unsalted butter, roughly diced
250g plain flour
1 medium egg
25 ml iced water
½ tsp salt
2 tsps caster sugar
A pinch of ground cinnamon
For the filling
90g runny honey
90g golden syrup
125g light brown sugar
70g butter
3 large eggs, beaten
½ tsp vanilla bean paste
½ tsp cinnamon
A big pinch of flakey sea salt
A tiny pinch of cornflour
250g pecans - 125g finely chopped, 125g whole ones for the top
9 inch / 23cm tart or springform cake tin.
To make the pastry pop the flour and salt into the base of a food processor. Add the diced butter and then pulse a few times to combine. You are looking to reduce the butter into smaller chunky nubbins, around the size of a pine nut/flaked almond, rather than aiming for a breadcrumb texture like when you make a crumble. The chunks of butter are what help keep the pastry flakey.
Tip the butter and flour mix into a large mixing bowl and make a well in the middle. Beat the egg, mix them briefly with the iced water and then pour the whole lot in. Use a butter knife to stir the eggs and water into the pastry until it is just starting to become a clumpy, shaggy mass. Now use your hands in the bowl to bring the dough into a very rough ball - there will still be plenty of unmixed flour and butter pieces, don’t worry, that’s exactly right! Cover tightly and rest in the fridge for 10 minutes - this allows the flour to hydrate a bit more before you finish mixing it, which in turn prevents you from overworking it.
After 10 minutes turn the dough out onto a clean surface. Use your hands to very gently scrunch and press the mix into a more cohesive ball. This is not a pasta or bread dough; as little kneading as possible is required so only do that a couple of times, folding the dough onto itself each time. You should still be able to see chunks of butter in the dough. Use a dough scraper to collect any sticky bits from the surface and press them back into the dough. Cover the dough with clingfilm and rest in the fridge for at least 2 hours.
Bring your dough out 10 minutes before you roll it. Split it in half. Roll out the pastry on a lightly floured surface to a circle around 11/12 inches / 28/29cm - it should be around 3mm thick. Fold it up like a book then put it into the tin, unfolding it inside - this is a much easier way to line the tin with the pastry. If using a cake tin, coax the pastry up the sides of the tin so that it is an even height and width all the way round - around 6 cm. Prick the base of the pastry with a fork and chill for another hour or so.
Preheat the oven to 170 fan. Cover the tart case with a piece of parchment and then fill to the top with baking beans. Bake for 20 minutes with the beans, then remove them and bake for a further 10 - 15 minutes without to crisp up the base. Remove from the oven and reduce the temperature to 160.
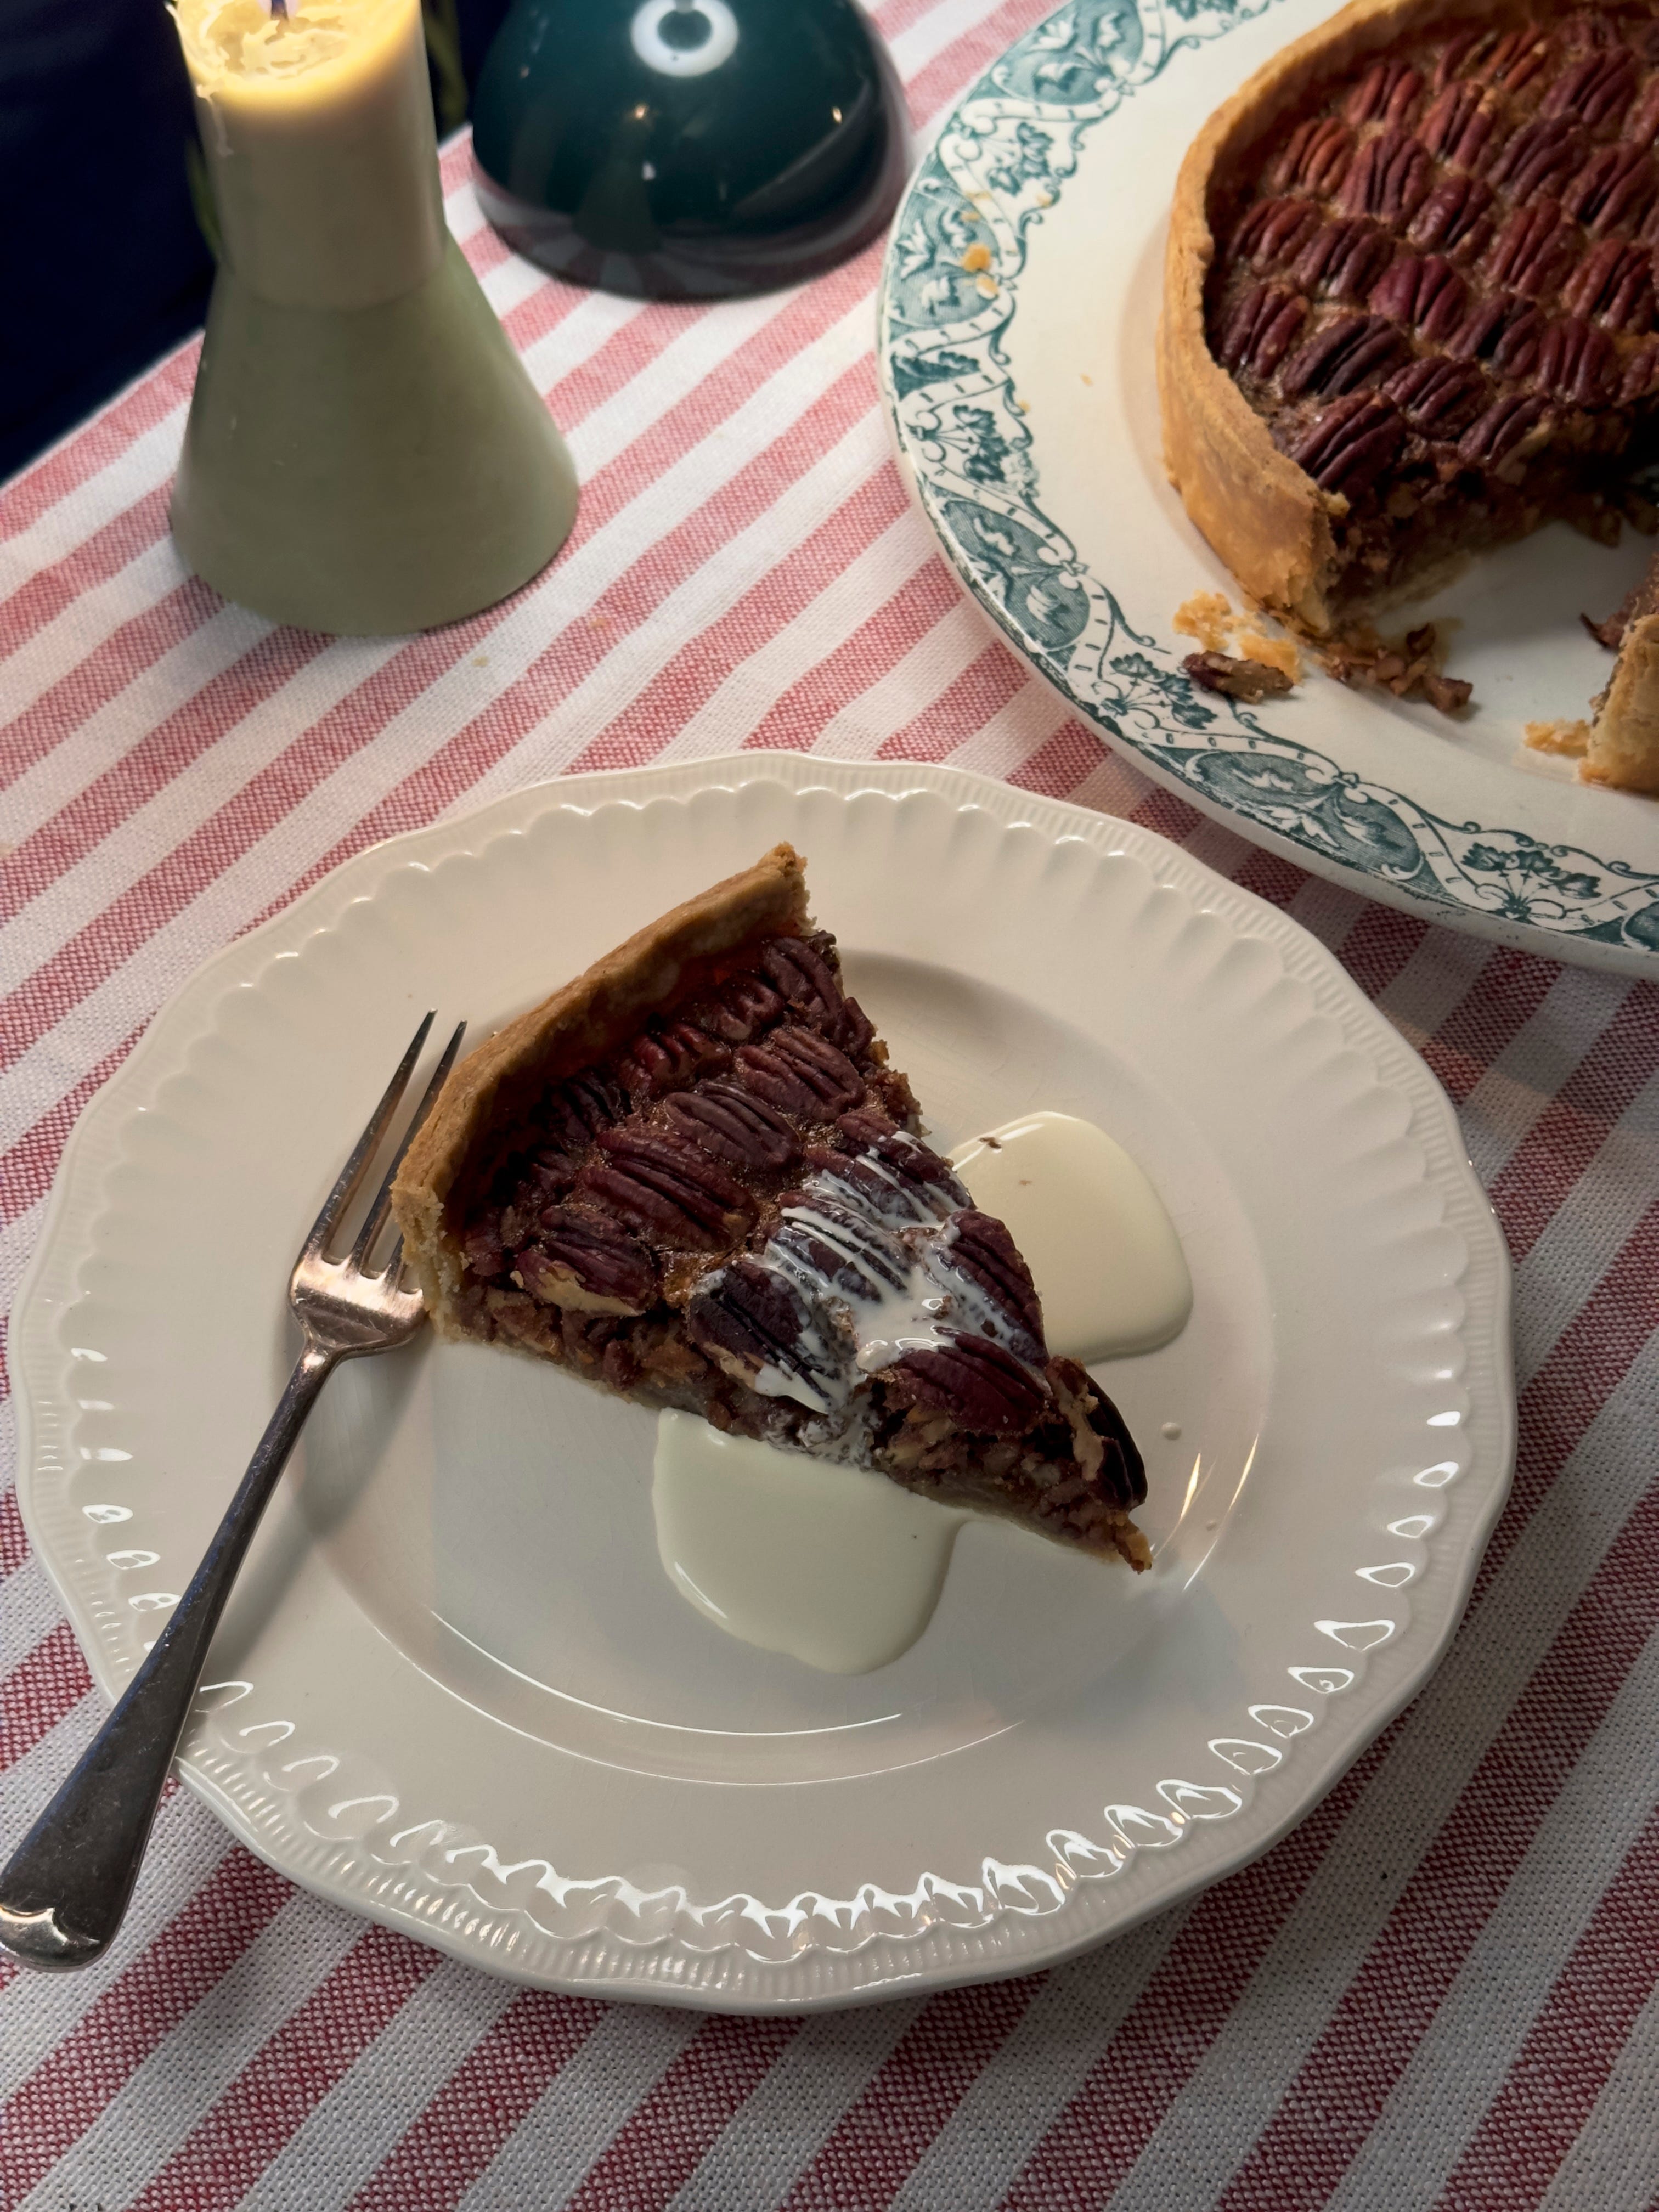
Meanwhile make the filling. In a bowl combine the eggs, vanilla, cinnamon, salt and a tiny pinch of cornflour. Heat the butter, sugar, honey and golden syrup together in a pan until melted and just coming to a boil. Set aside for 2 minutes, then pour the hot mix into the eggs, whisking all the time. It will become a thick brown goo. Stir through the chopped pecans and then pour into the tart case. Arrange the whole pecans on the top - I like to put them in lines but concentric circles are also lovely, as is just a satisfying jumble if you don’t want anything too neat. Bake for 35 - 40 minutes until the top is dark and the filling just set, with a slight wobble. Let the Pecan Pie cool on a rack for 30 minutes before releasing from its tin. If making ahead, let it cool to room temperature and keep covered overnight. Reheat in the oven at 160 for 15 - 20 minutes.
Serve warm with plenty of double cream.
MAKE AHEAD -
You can make the pastry up to 1 day ahead and line the tin too.
You can blind bake the pie base up to 1 day ahead.
You can make the Pecan Pie up to 1 day ahead and reheat when needed.
SUBSTITUTIONS -
None!
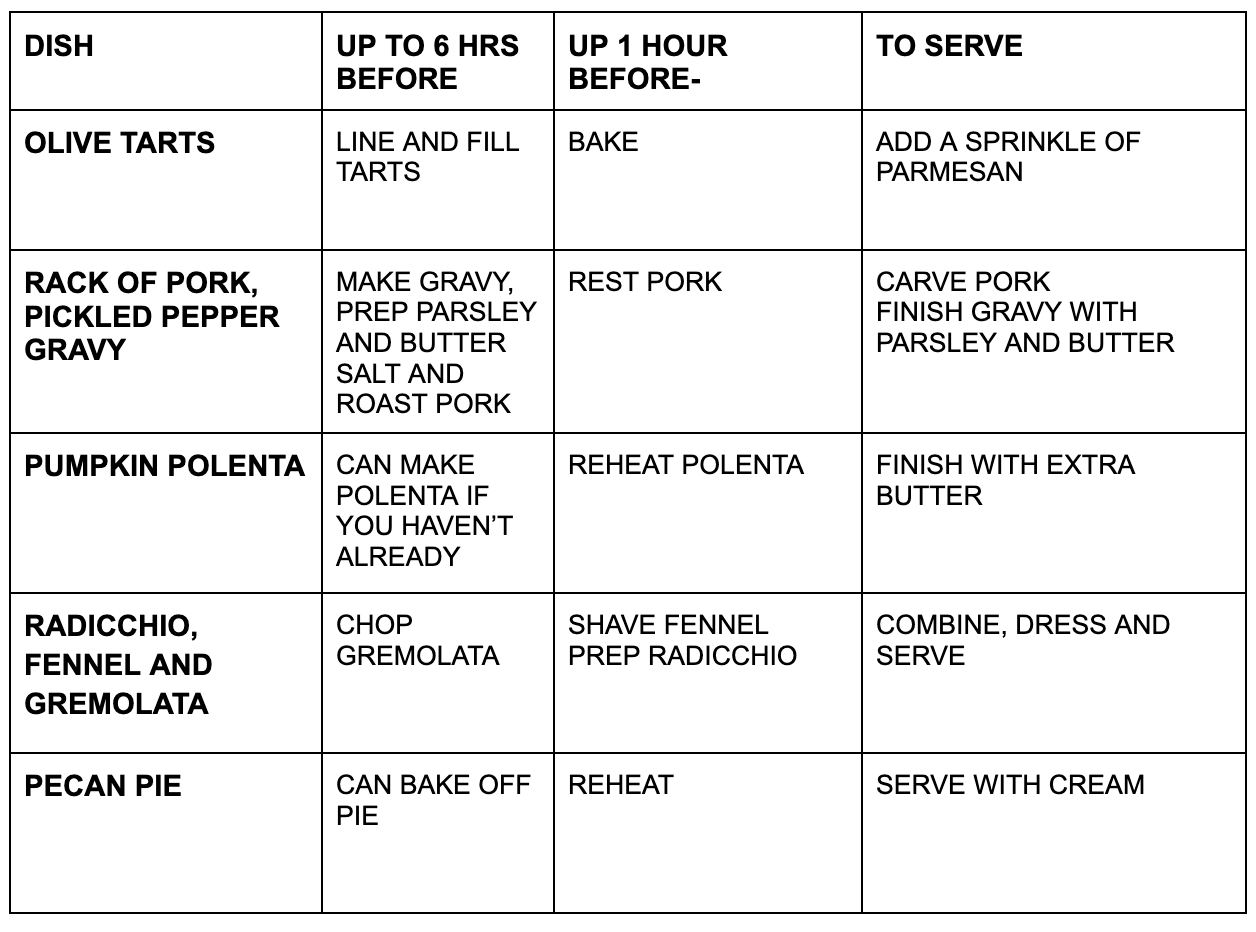
TIMEPLAN
This first plan should help you see what you can get done in advance, so that for each course on the day you have at least 1, maybe 2 major parts of it taken care of. I appreciate that not everyone’s weeks are easily peppered with dinner party prep, but if you’re hosting after work or on a day where you can’t be in the kitchen, getting ahead is going to save your arse.
MISE-EN-PLACE
This is the fancy name we give to the food prep each section in the restaurant needs to do for their dishes. Hopefully breaking down each dish like this will help you feel organised.
Use the hour before your guests arrive to organise your space too- I find it helpful to group ingredients by dish so it is all in the same place. Little ramekins are really useful for this.