


THE VEGGIE ONE
GETTIN VEGGIE WITH IT

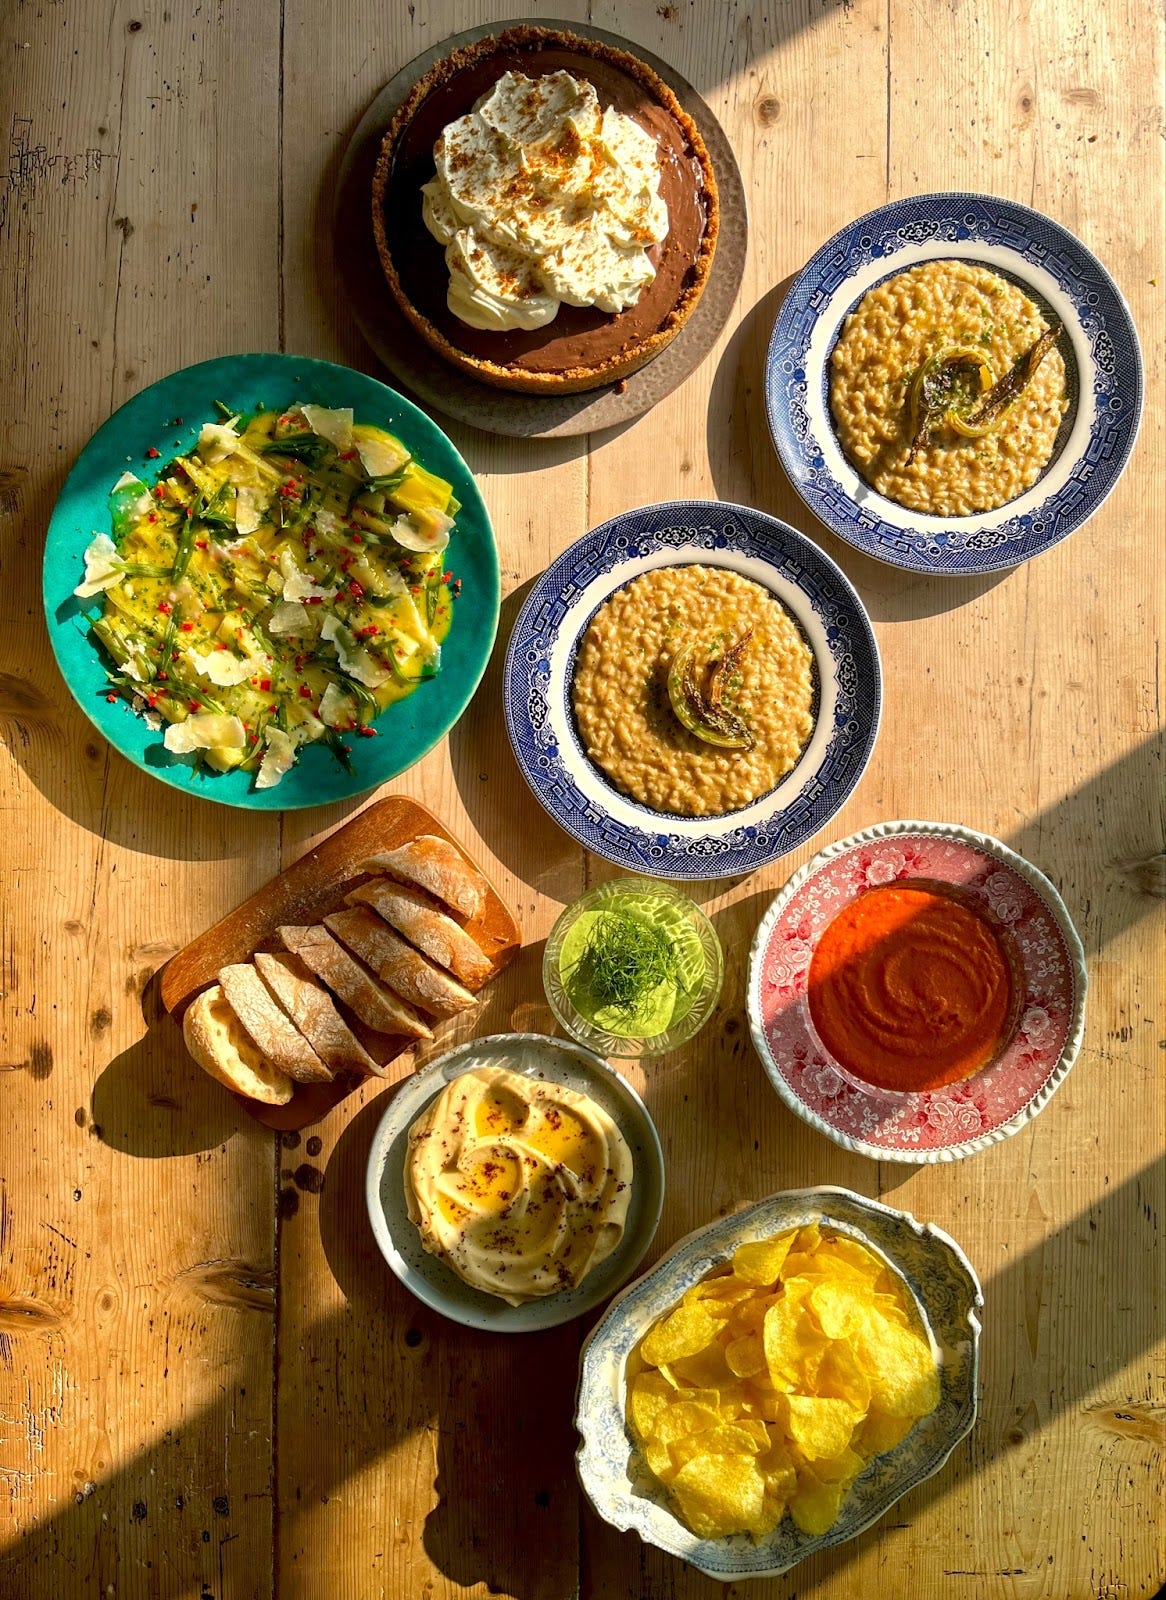
MENU TO SERVE 6 PEOPLE
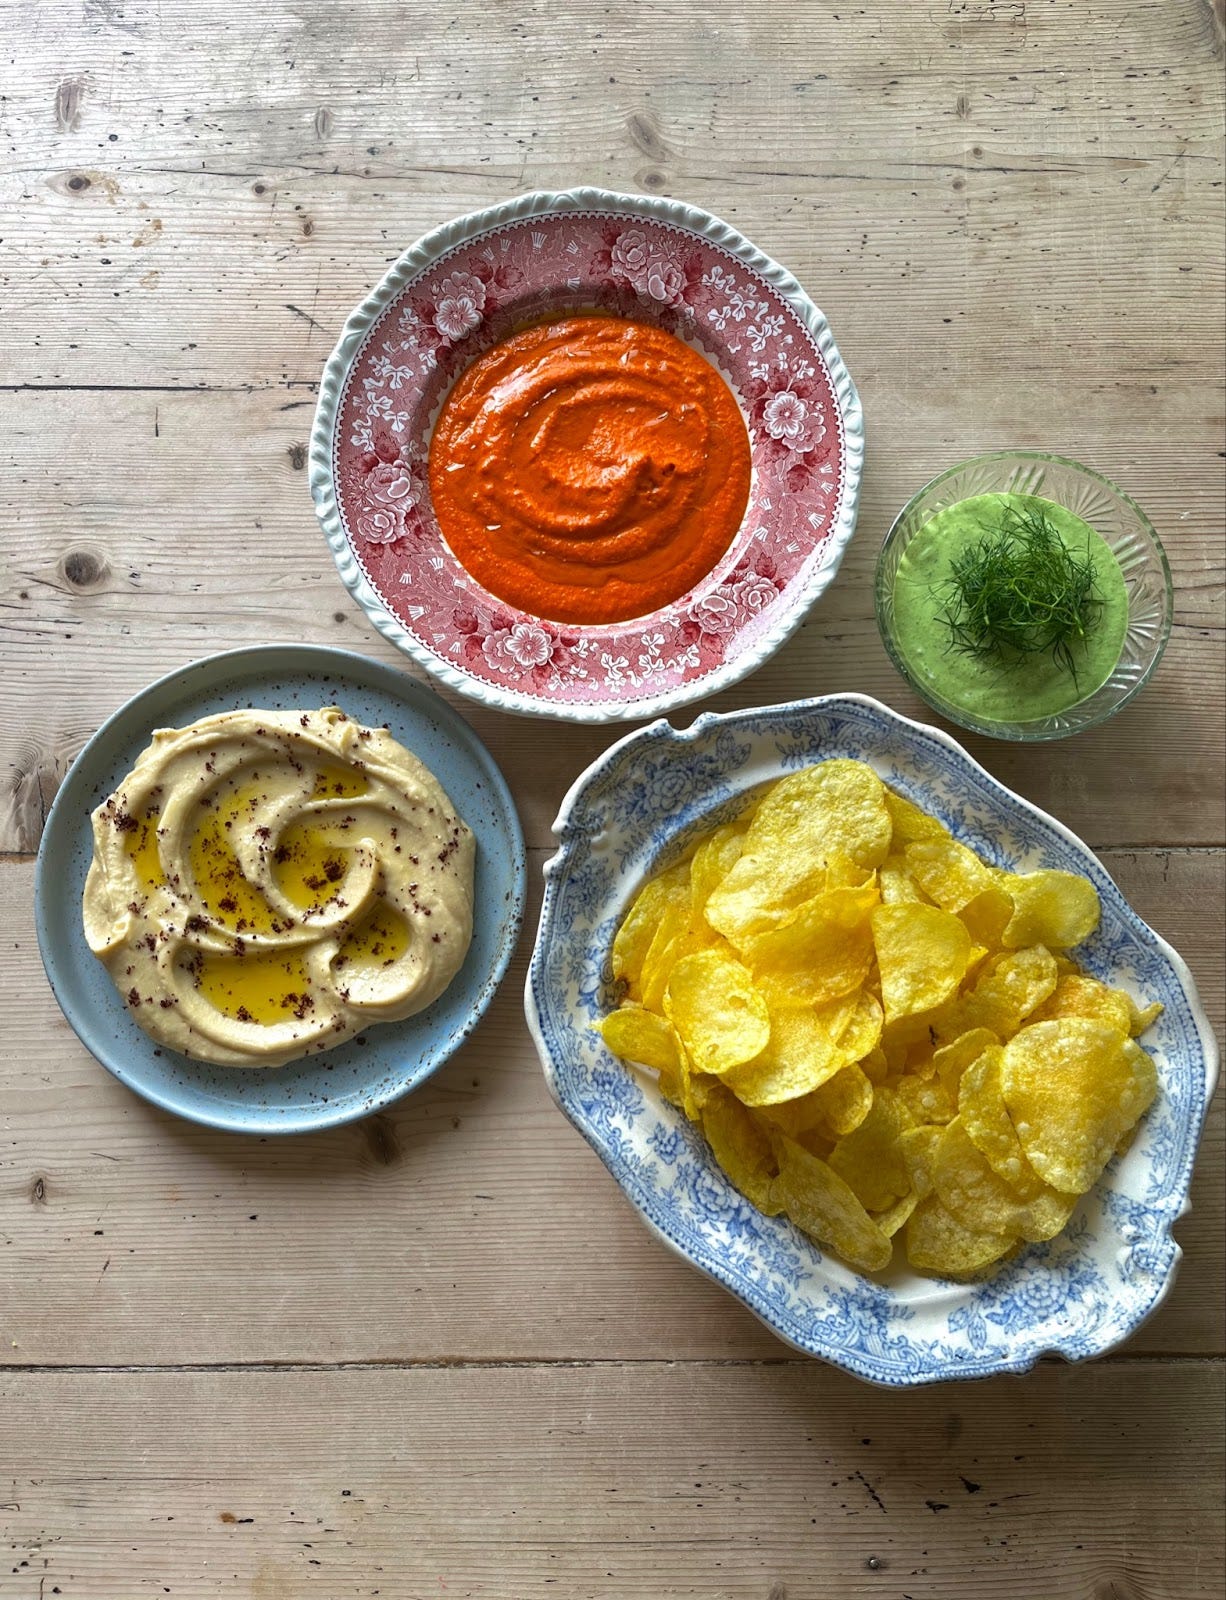
SNACK- CRISPS AND DIP
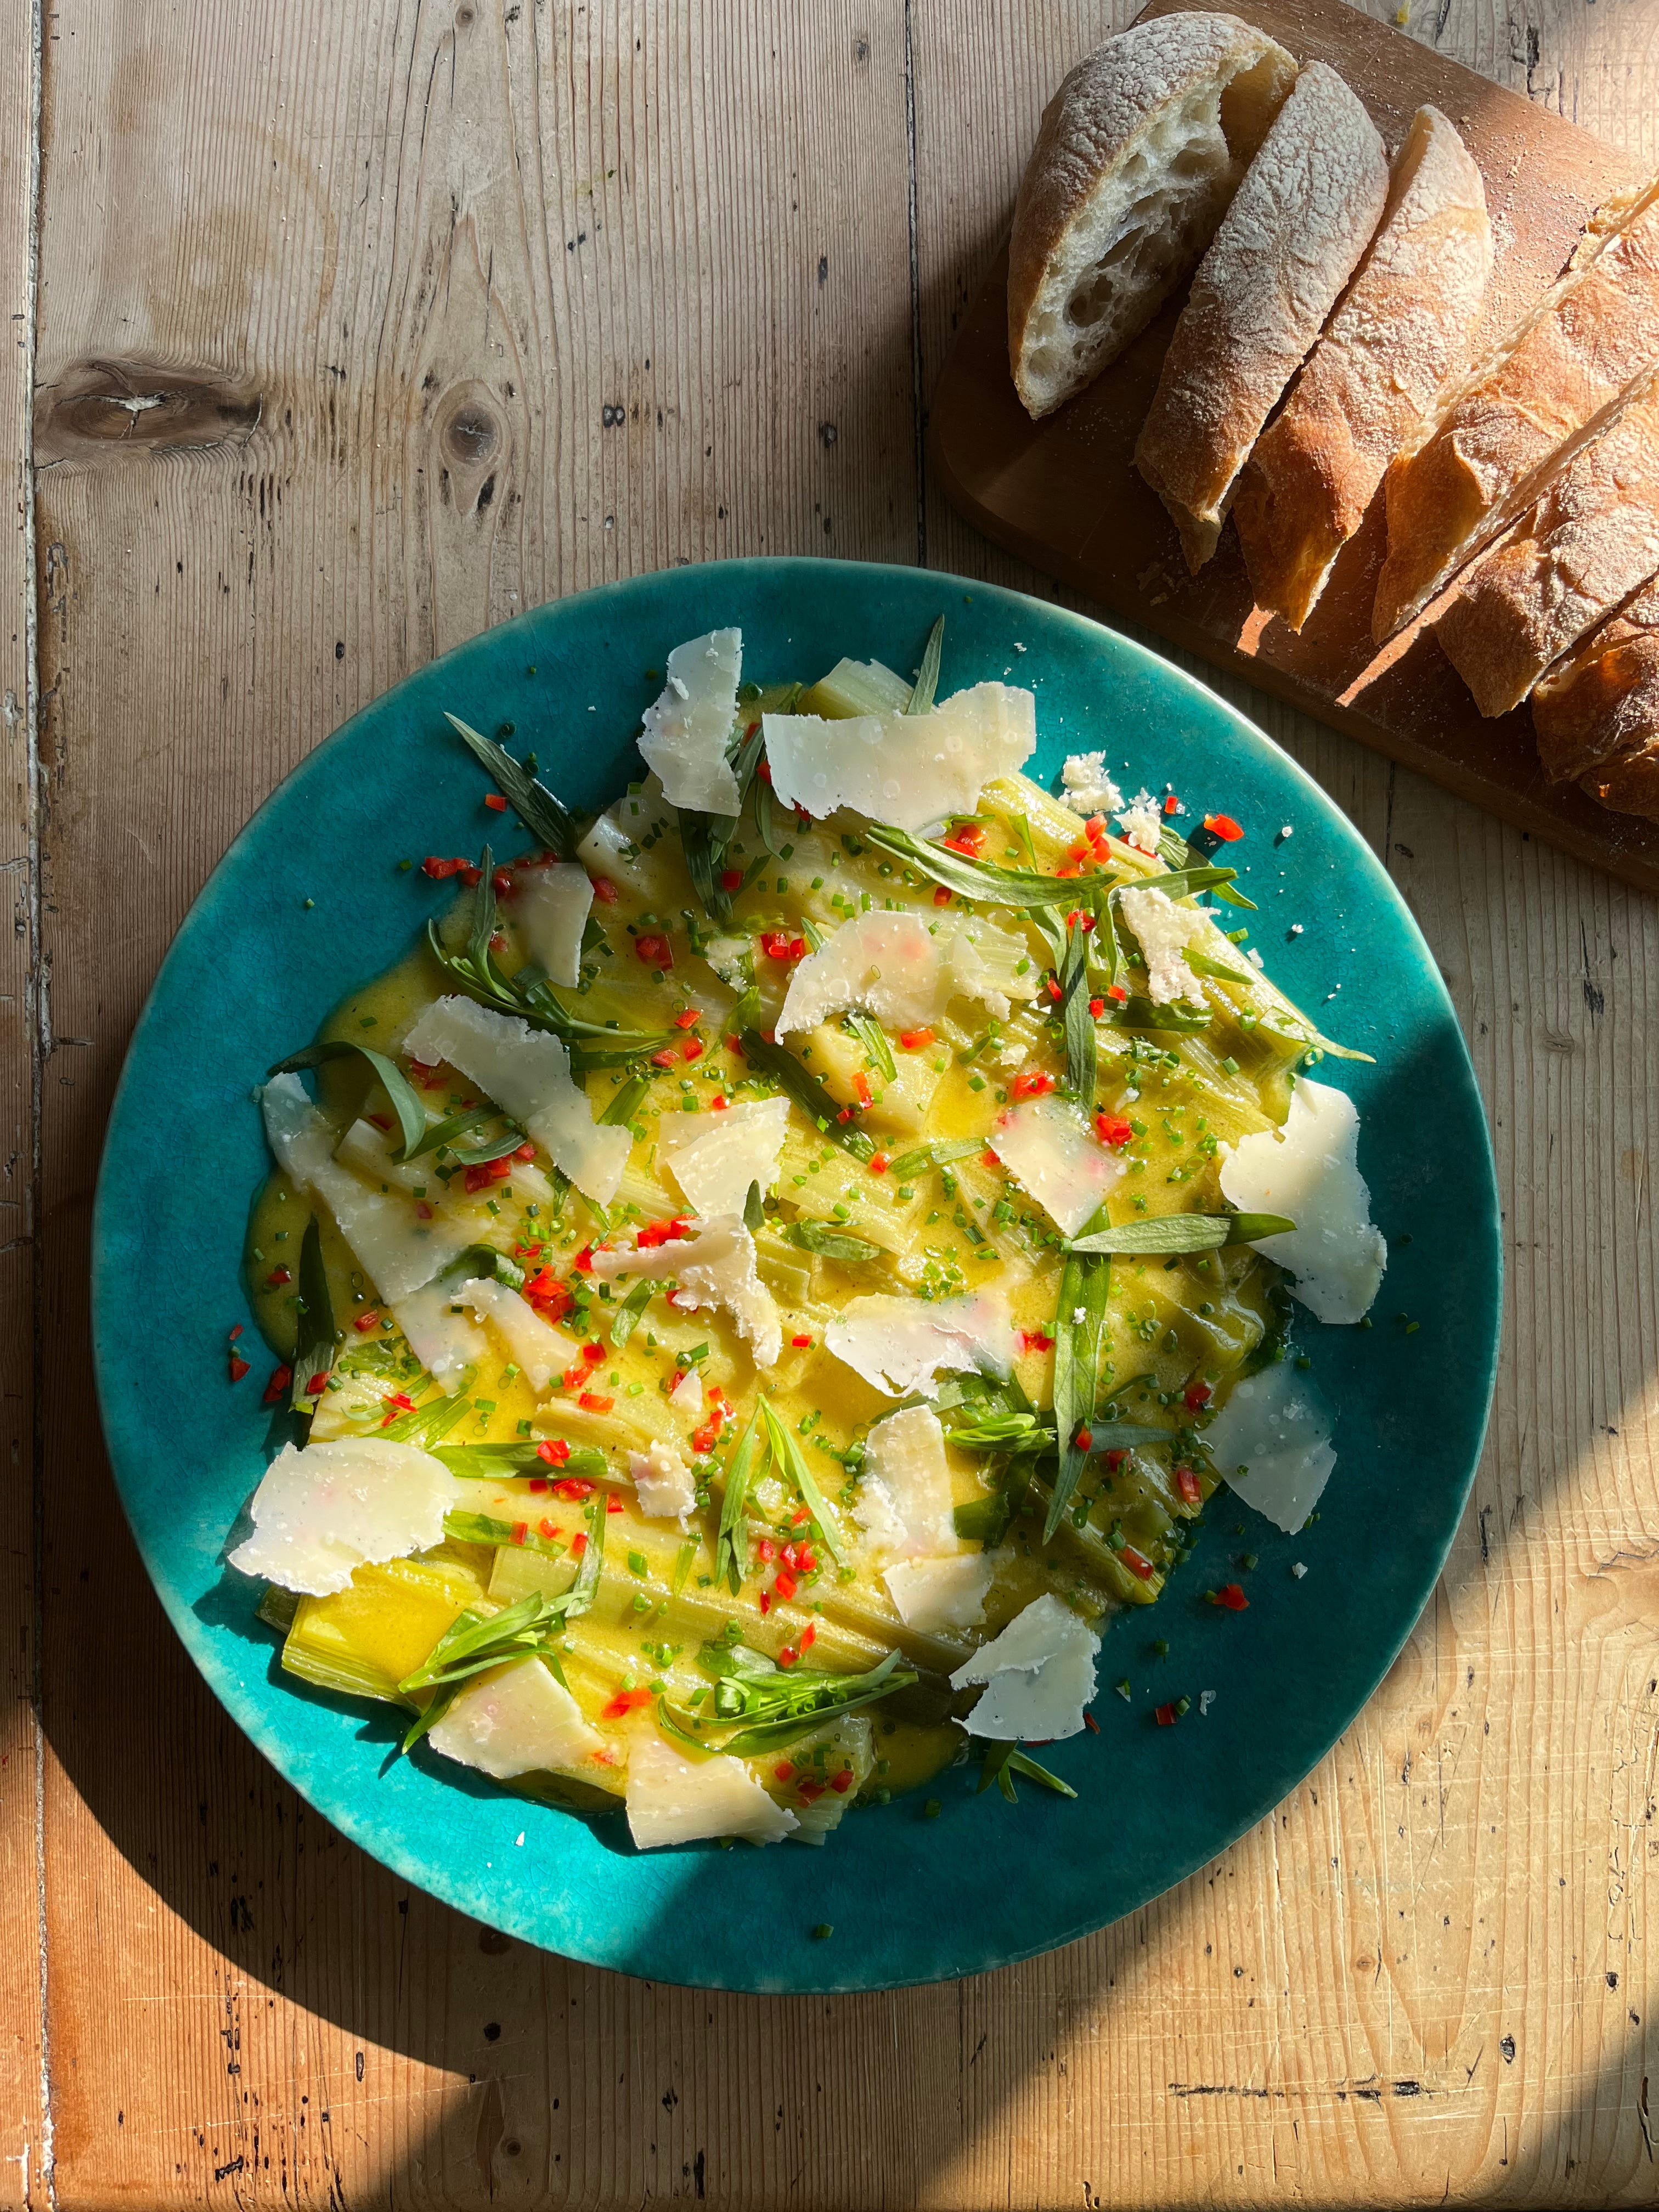
STARTER- LEEKS VINAIGRETTE
MAIN- ROASTED CAULIFLOWER RISOTTO
PUDDING- CHOCOLATE CREAM PIE
I think amongst meat eaters there is a common misconception that vegetarian food is easier. I actually think the opposite. Meat is a crowd pleaser. People are so much more ready to question plates of vegetables, more than they would a plate of overcooked chicken or wrinkly sausages. My brothers used to be like this. Meat was a familiar thing, the ketchup was in the fridge and they knew exactly what they were going to get. But when I suggested a mushroom this or an aubergine that I would receive a barrage of questions and concerns and then usually a suggestion to add bacon. I am happy to say that these days my brother's palates have improved immensely and they don’t need convincing anymore (shame about their personalities).

Vegetarian and indeed vegan cookery is so inspiring to me because it’s challenging. I love taking a limp courgette and transforming it into a deeply satisfying, spiced topping for toast with eggs or transforming a hairy sweet potato into an easy lunch with the help of a hot oven, spicy salsa, cooling yoghurt and herbs. No bacon needed. So this dinner party is all about celebrating veg and veg centric eating, with a menu of dishes that are easy, elegant and exciting. Dietary requirements can often feel like the death sentence of a menu but truthfully, they offer an opportunity to be creative and vegetables deserve the chance to take centre stage. NOT TO MENTION the veggie/vegan in your life deserves to feel LOVED and SEEN. NOT TO MENTION THE ENVIRONMENT DESERVES TO BE SAVED.
Lots of good reasons to make this DIVINE veggie dinner. Of course, I have tailored the menu to make your life as host easier so you aren’t flapping and everything comes out beautiful. I’m especially excited to reveal the trade secrets in making a stunning risotto without sweating over the hob while your guests are finishing all the wine. Plus I am taking on the behemoth of British household snacks; crisps and dip, and giving you my three BEST EVER DIP RECIPES to hold onto forever.

A NOTE ON PARMESAN - Some of you will know and some of you won't, but parmesan uses animal rennet, so technically it is not vegetarian. I am using it in a couple of these recipes but if you are a strict vegetarian feel free to swap for a vegetarian alternative.
SNACK- CRISPS AND DIP
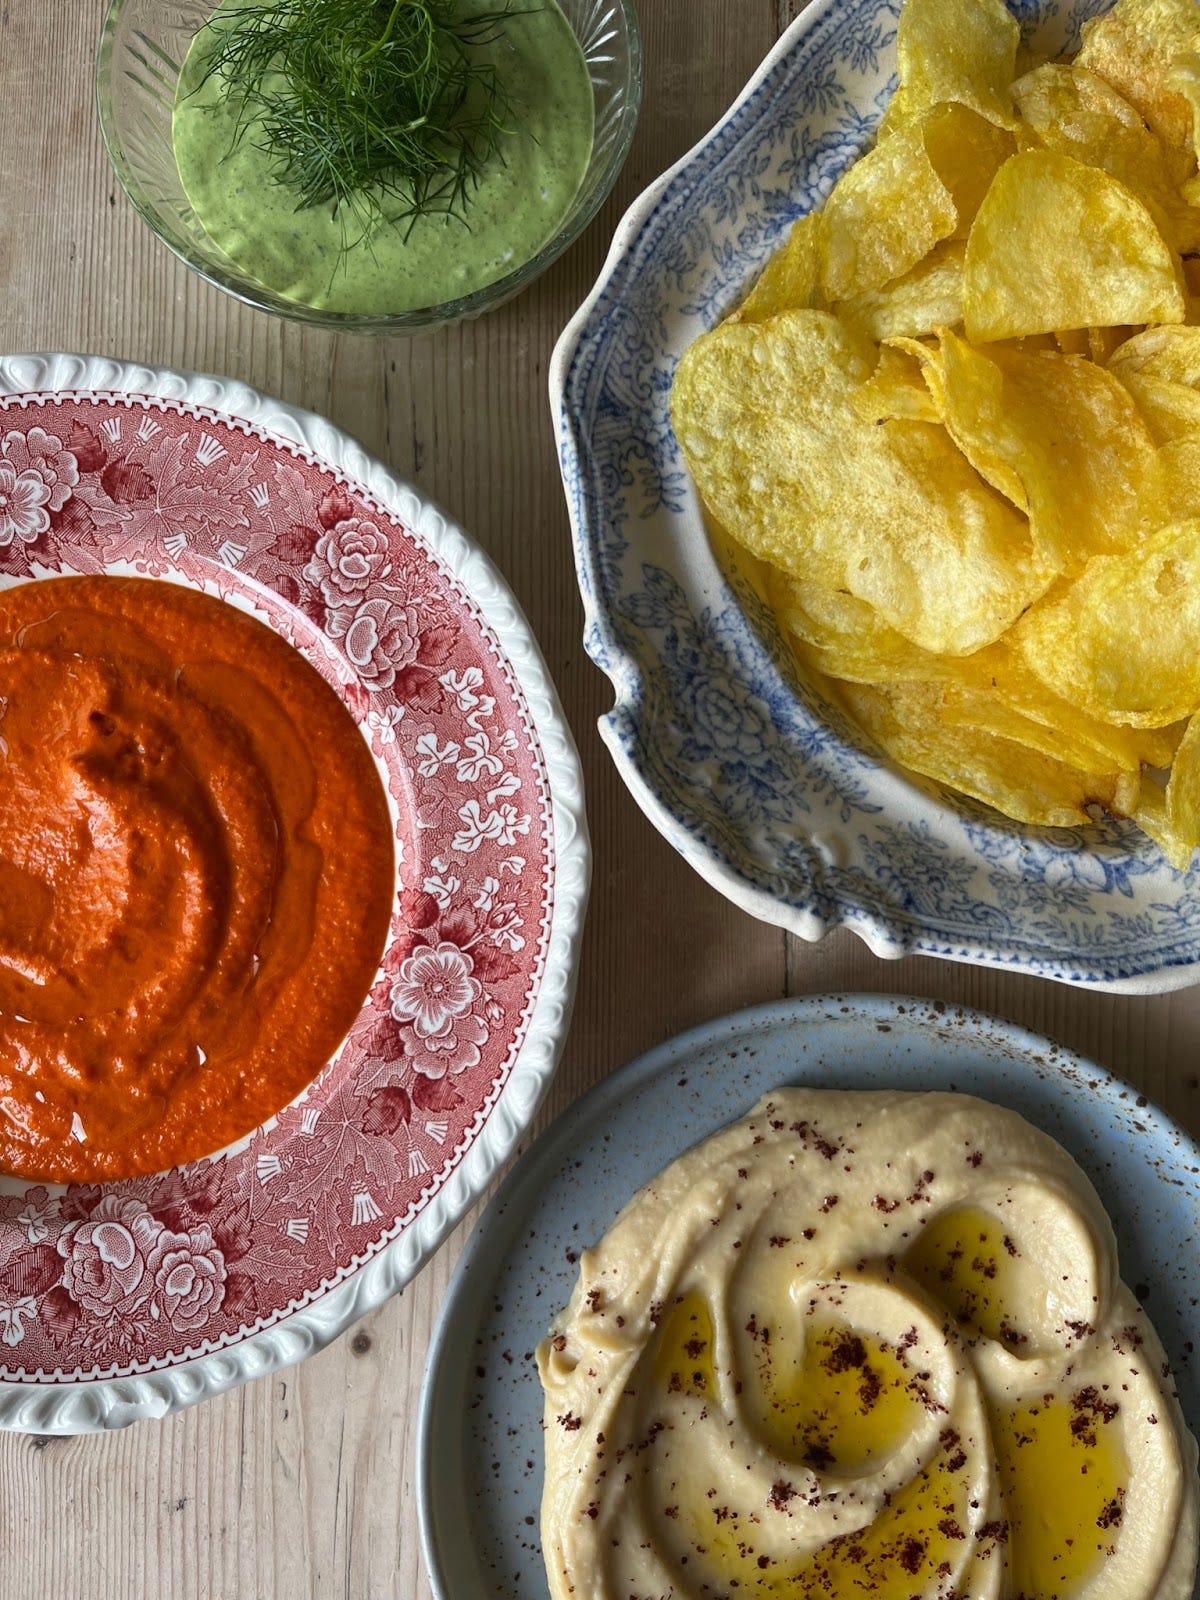
I categorise my life into two distinct eras- BC and AC aka BEFORE CRISPS (before I turned 2) and AFTER CRISPS (since then). I do not mince my words when I say I have a medical addiction to crisps. What is more, I think I can count on one hand the amount of parties/dinners/pre-drinks/sleepovers/dates I have attended where crisps and dip did not feature. They are just the absolute pinnacle of excellence in an entertaining situation and are NOT as many would like to say a “lazy” option. I said in my last dinner party that menu planning is about being smart, mixing easy with hard. Crisps and dip are always the easiest thing but NEVER deliver anything less than moreish deliciousness.
Here I am giving you my three most used and most versatile dip recipes. I strongly suggest getting excellent crisps for these dips. I love the delicious Spanish olive oil ones or the very thin, very crispy Italian salties.
Hummus, of course, is so much more than a dip and I do not wish to downplay its culinary significance, however it is also an absolutely iconic vehicle for crisps so we are making it. Romesco sauce is also not a dip as such and can be used in a myriad of different ways but here I am using it as a smokey, spiced foil for crunchy, thinly sliced fried potato. Finally, the creamy one. I’ve gone down the jalapeño-dill road (as I have done many times before) for a fresh, luxy sauce that pays homage to all the other creamy ones (garlic and onion, sour cream and chive, thousand island) but also just somehow improves on them. Exciting times.
FLOOFY HUMMUS
If you haven’t tried making hummus from dried chickpeas, then absolutely do because it is glorious. However, for the purpose of this dinner party I am trying to cut down work, and using warm jarred chickpeas is the next best thing. Don’t drain them! The liquid is gold! And don’t even think about putting olive oil in it! Just use it at the end as a drizzle!
400g chickpeas from a jar (I like Bold Bean Co) plus their juice! (about 100ml - in case you’re using a humongous jar)
1 clove of garlic, peeled
Juice of half a lemon
1 tbsp good quality tahini
1-2 tbsp water
Salt to taste
To top-
Best quality extra virgin olive oil and a sprinkle of sumac or literally anything you want!
Gently warm the chickpeas in their juice in a pan or microwave, just so that they are warmer than body temperature but not hot. This will help them break down easier in the blender. Pop them and their liquid in a blender with the garlic, lemon juice, tahini, salt and 1 tablespoon of water to start. Blitz until smooth, add another spoon of water if necessary.
To serve, smoosh the hummus onto a plate and top with delicious olive oil and a sprinkle of sumac.
MAKE AHEAD -
Hummus is at its best within its first 24 hours, so you can make it the day before if necessary, but fresher is better.
SUBSTITUTIONS -
Use butter beans or cannellini beans instead of chickpeas
If you can’t find or don’t like sumac, then some finely chopped parsley is great. Equally any of the following are great ways to dress hummus - toasted sesame seeds or pinenuts, a sprinkle of dukkah, a sprinkle of smoked paprika, toasted and crushed coriander and nigella seeds
ROMESCO
I love using up stale bread in my romesco as it creates a beautiful thick sauce and makes it cheaper than using all almonds.
40g stale bread
25g flaked almonds
1 small clove of garlic
1 red chilli
½ tsp smoked paprika
400g roasted red peppers from a jar, drained well and roughly chopped
40ml extra virgin olive oil
1 tbsp sherry vinegar
Salt to taste
Preheat the oven to 160 fan. Tear the bread into small pieces and place on an oven tray with the almonds. Pop into the oven to toast for 8 minutes until the bread is crunchy and the almonds are browned. If the almonds are colouring too quickly, remove them first! Remove from the oven and leave to cool for about 15 minutes before using.
Pop all your ingredients including the bread and almonds into a blender and blitz together, shaking if it takes a while to get going. Season and serve!
MAKE AHEAD -
This sauce keeps really well, you can make it up to three days before you need it.
SUBSTITUTIONS -
If you have a nut allergy, omit the almonds and make up their weight in the stale bread. Equally if you have a gluten allergy omit the bread and make up the weight in almonds, or use gluten free bread if you prefer.
Use red wine vinegar if you have it and can’t be arsed to buy a brand new bottle of sherry vinegar to just use a tablespoon full.
CREAMY JALAPEÑO AND DILL DIP
I’ve modelled this dip on all the good creamy options out there, and using dried garlic and dill here really works to help give a ranch dressing vibe.
300g full fat creme fraiche
20g fresh dill fronds (picked from the hard stems)
1 small handful of fresh parsley
1 small handful of fresh coriander
1 small handful of fresh chives
30g pickled jalapeños, drained
½ tsp garlic powder
½ tsp dried dill
Salt to taste
Extra dill fronds to garnish
Pop all of your ingredients minus the extra dill in a blender and blitz until you get a vibrant green sauce.
MAKE AHEAD-
This dip, like the hummus, is at its best in its first 24hrs.
SUBSTITUTIONS-
If you want to keep this plant based, swap the creme fraiche for a mild plant alternative like soya yoghurt. I wouldn’t recommend coconut yoghurt here as it is a strong flavour to compete with.
If you don’t like jalapeños, use a chopped sweet pickle like Mrs Ellwoods Cucumber spears instead. Then it is Dill Pickle Dip.
If you don’t like dill, then just bung in a load of chives instead. But dill is great, you should try and come round to it.
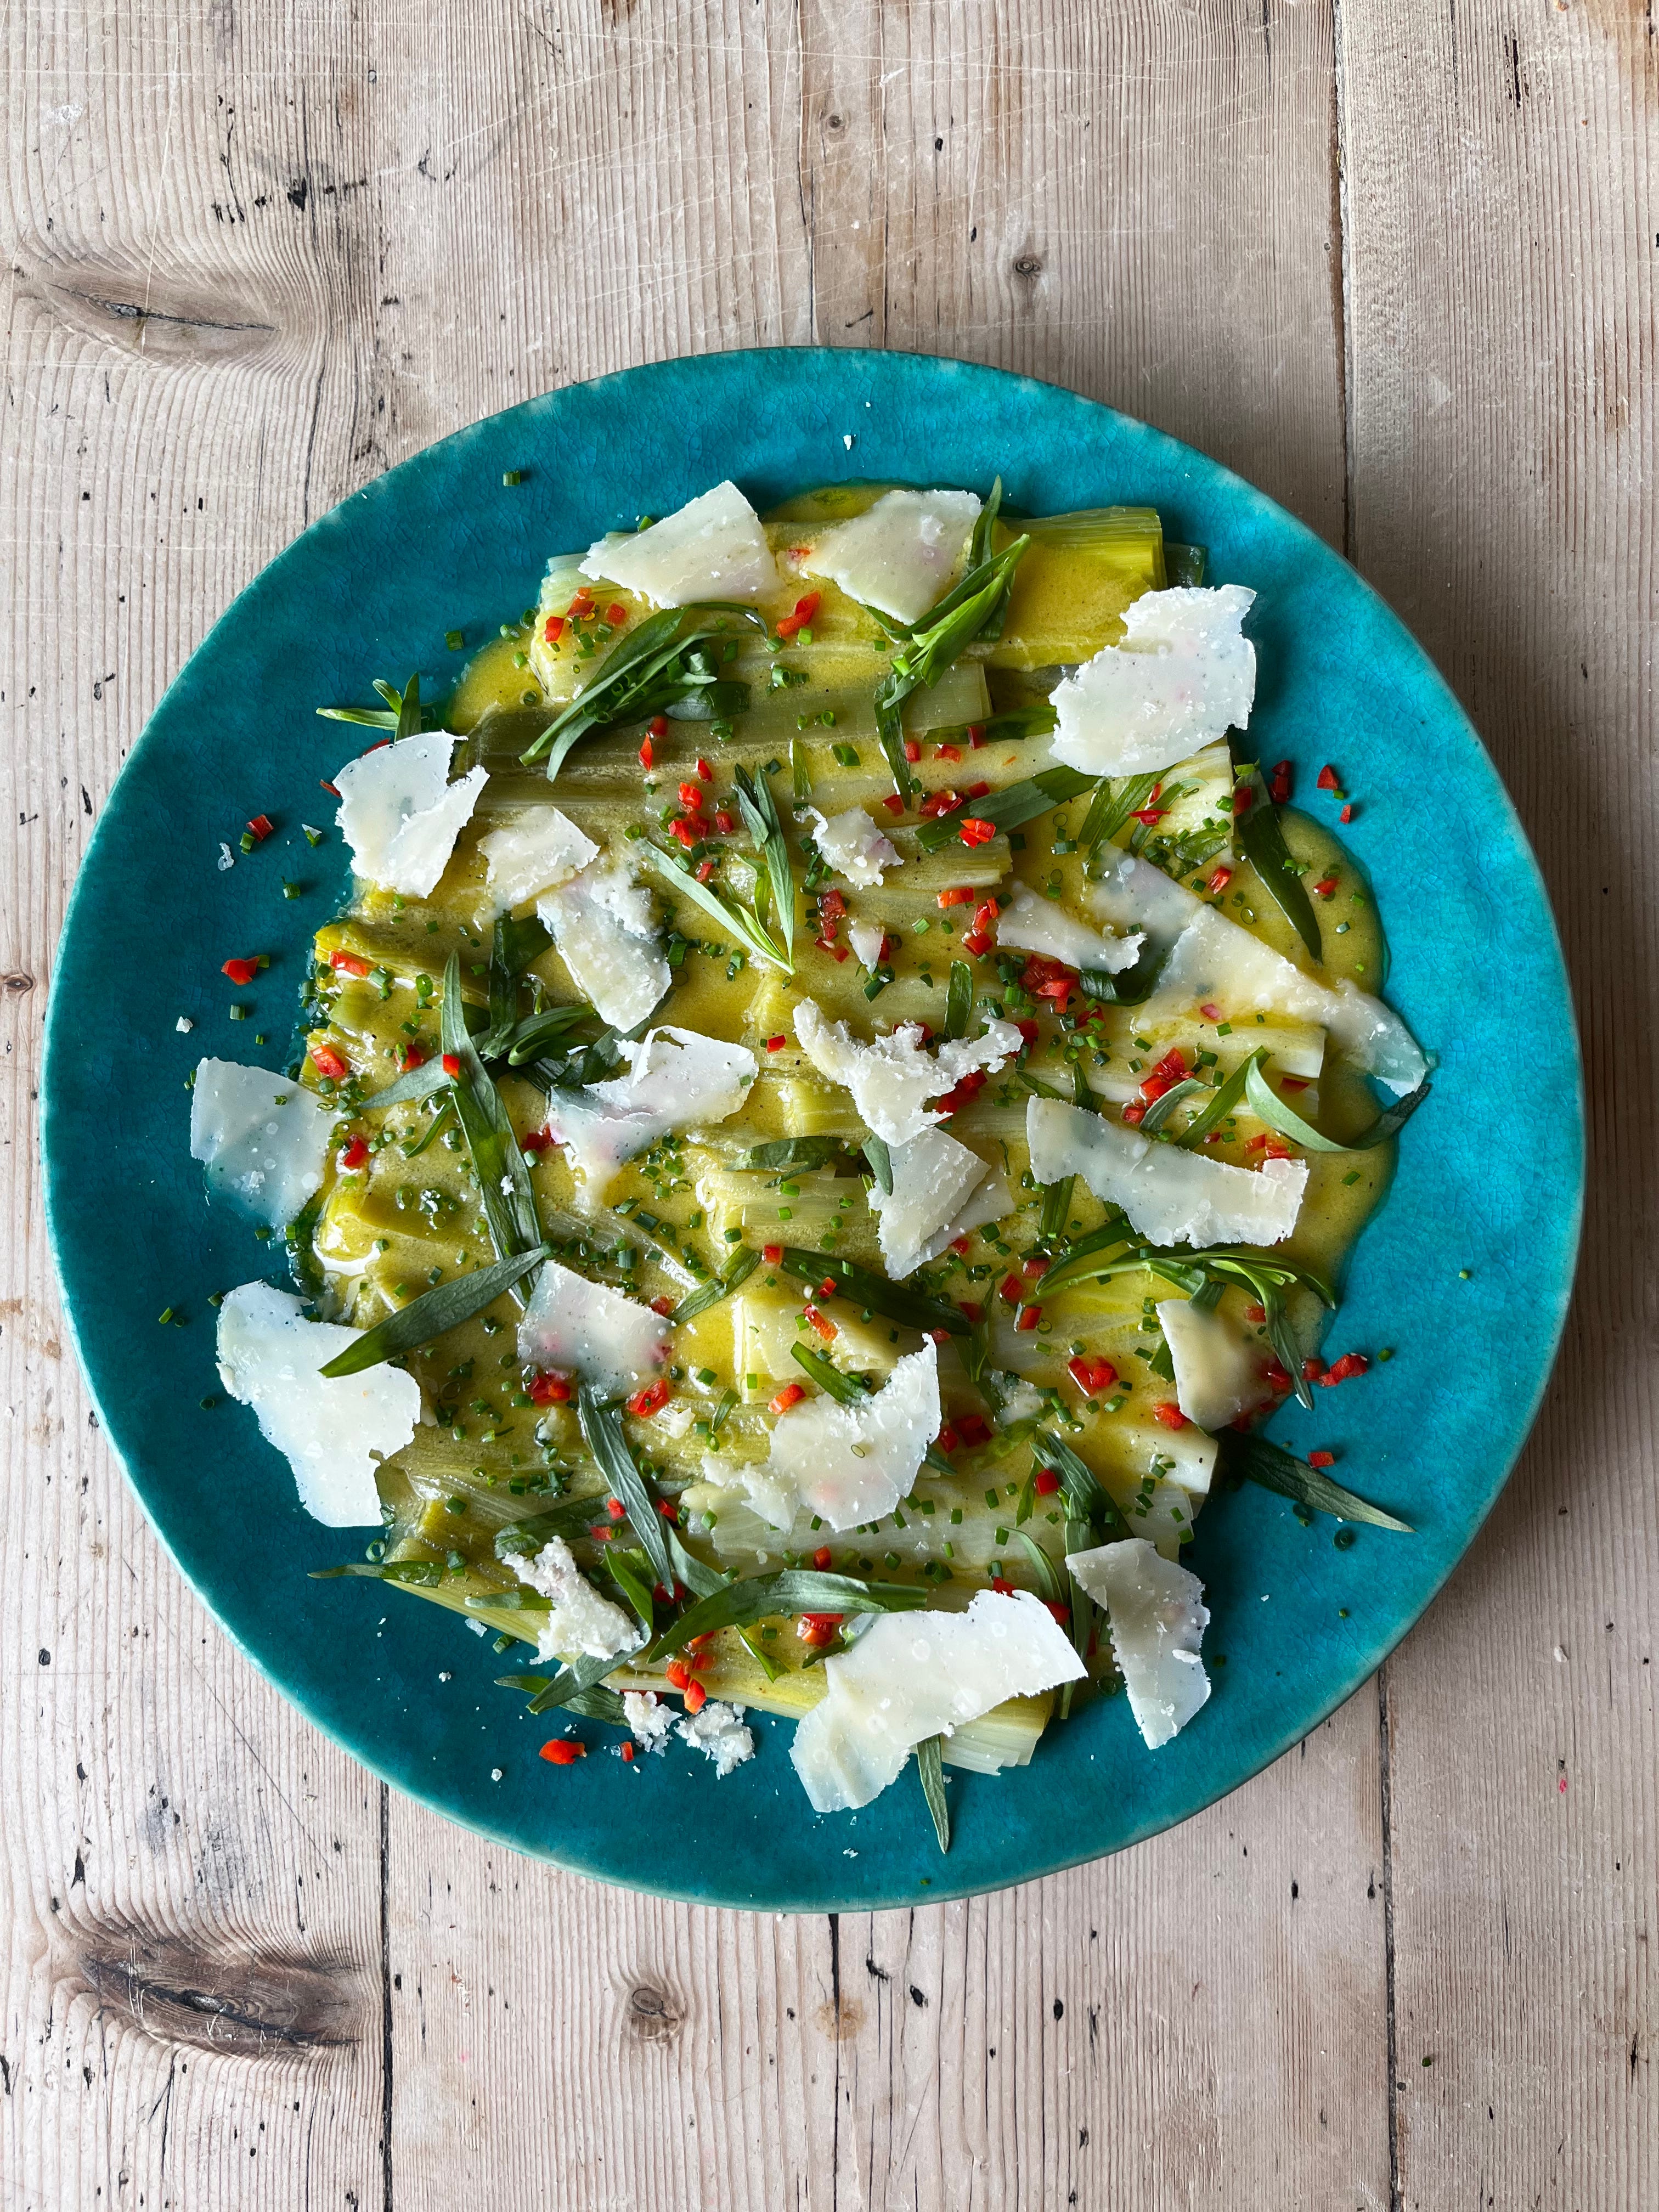
STARTER- LEEKS VINAIGRETTE
I couldn’t write a vegetarian menu and ignore the leek, a true unsung hero of the vegetable world. Not only are they super cheap but they are unbelievably versatile. This dish of poached leeks marinated in a simple vinaigrette and topped with delicious bits is a great lesson in the treatment of vegetables - gentle, thoughtful cooking brings out the best in them.
Leeks vinaigrette typically features boiled egg which I love, but in this recipe I’ve kept things simple and left it out, in favour of things that only require a quick turn on the chopping board.
The temperatures of this dish are important - the leeks should be dressed while they are warm, so they absorb the dressing best. However they should be left to cool before serving, as it is in this cooling process that our flavour compounds combine. BUT do not serve them cold - room temperature is best both texturally and on the palate. Coldness mutes flavour, the leeks will be slimy when cold and the dressing congealed. I’ll go into this in the time plan but the point is: if you’ve made ahead and kept in the fridge please, please let them rise to room temp before serving!!!
4 large leeks, trimmed, washed and cut in half or thirds widthways, depending how big your pan is that you are poaching in and how big the leeks are- they need to be completely submerged
For the Vinaigrette
1 tbsp dijon mustard
2 tbsps tarragon or cider vinegar
½ tsp caster sugar
80ml extra virgin olive oil
A squeeze of lemon
Salt and pepper to taste
To Garnish
A handful of tarragon leaves, picked but left whole
A small handful of chives, finely chopped
1 red chilli, deseeded and finely chopped
50g parmesan or pecorino cheese, shaved
Warm crusty bread
Bring a large pan of water to a boil, seasoning it well like a soup. When the water is boiling, turn down to a gentle simmer and pop the leek pieces in. I like to then weigh the leeks down gently with a bowl that is slightly smaller than the pan, so they stay underwater. Poach the leeks in the gently simmering water for 18 minutes, or until a butter knife pierces the centre easily. Remove from the water gently using tongs, transferring the leeks to kitchen paper to drain. Do not be tempted to pour the whole thing in a colander, they will disintegrate. Leave to drain well and cool slightly.
To make the vinaigrette, combine the mustard, vinegar, sugar and salt and pepper in a bowl until well mixed. Then slowly pour in the oil, whisking all the time to create a glossy dressing. Add a squeeze of lemon to finish if you like it tart. When your leeks have drained, cut them in half vertically and discard the first couple of very stringy outer layers of flesh. Pat the leeks dry, then arrange them on your serving plate. Pour over the vinaigrette, spreading really well over the leeks. Leave to sit covered at room temperature until needed, or if making the day before pop in the fridge overnight. When you are ready to serve make sure you bring the leeks out of the fridge at least an hour before serving.
Top the leeks with the tarragon leaves, chives, chilli and cheese and serve with plenty of warm crusty bread.
MAKE AHEAD-
The leeks can be poached and dressed with the vinaigrette up to 2 days before serving, just make sure to remove from the fridge at least an hour before serving… (I know, I know, you get it!) Only garnish right before serving.
SUBSTITUTIONS -
You can use wholegrain mustard in your vinaigrette if you prefer, and swap the tarragon vinegar for cider or white wine vinegar if you can’t find it.
The toppings here are very interchangeable, similar to the hummus - play around and see what you like! Dill would be delicious as would parsley, chilli can be left out and lemon or lime zest can be added. You can add a chopped hard boiled egg and chopped gherkin and capers too. If you want to keep it vegan, leave out the cheese or replace with toasted hazelnuts or pecans.
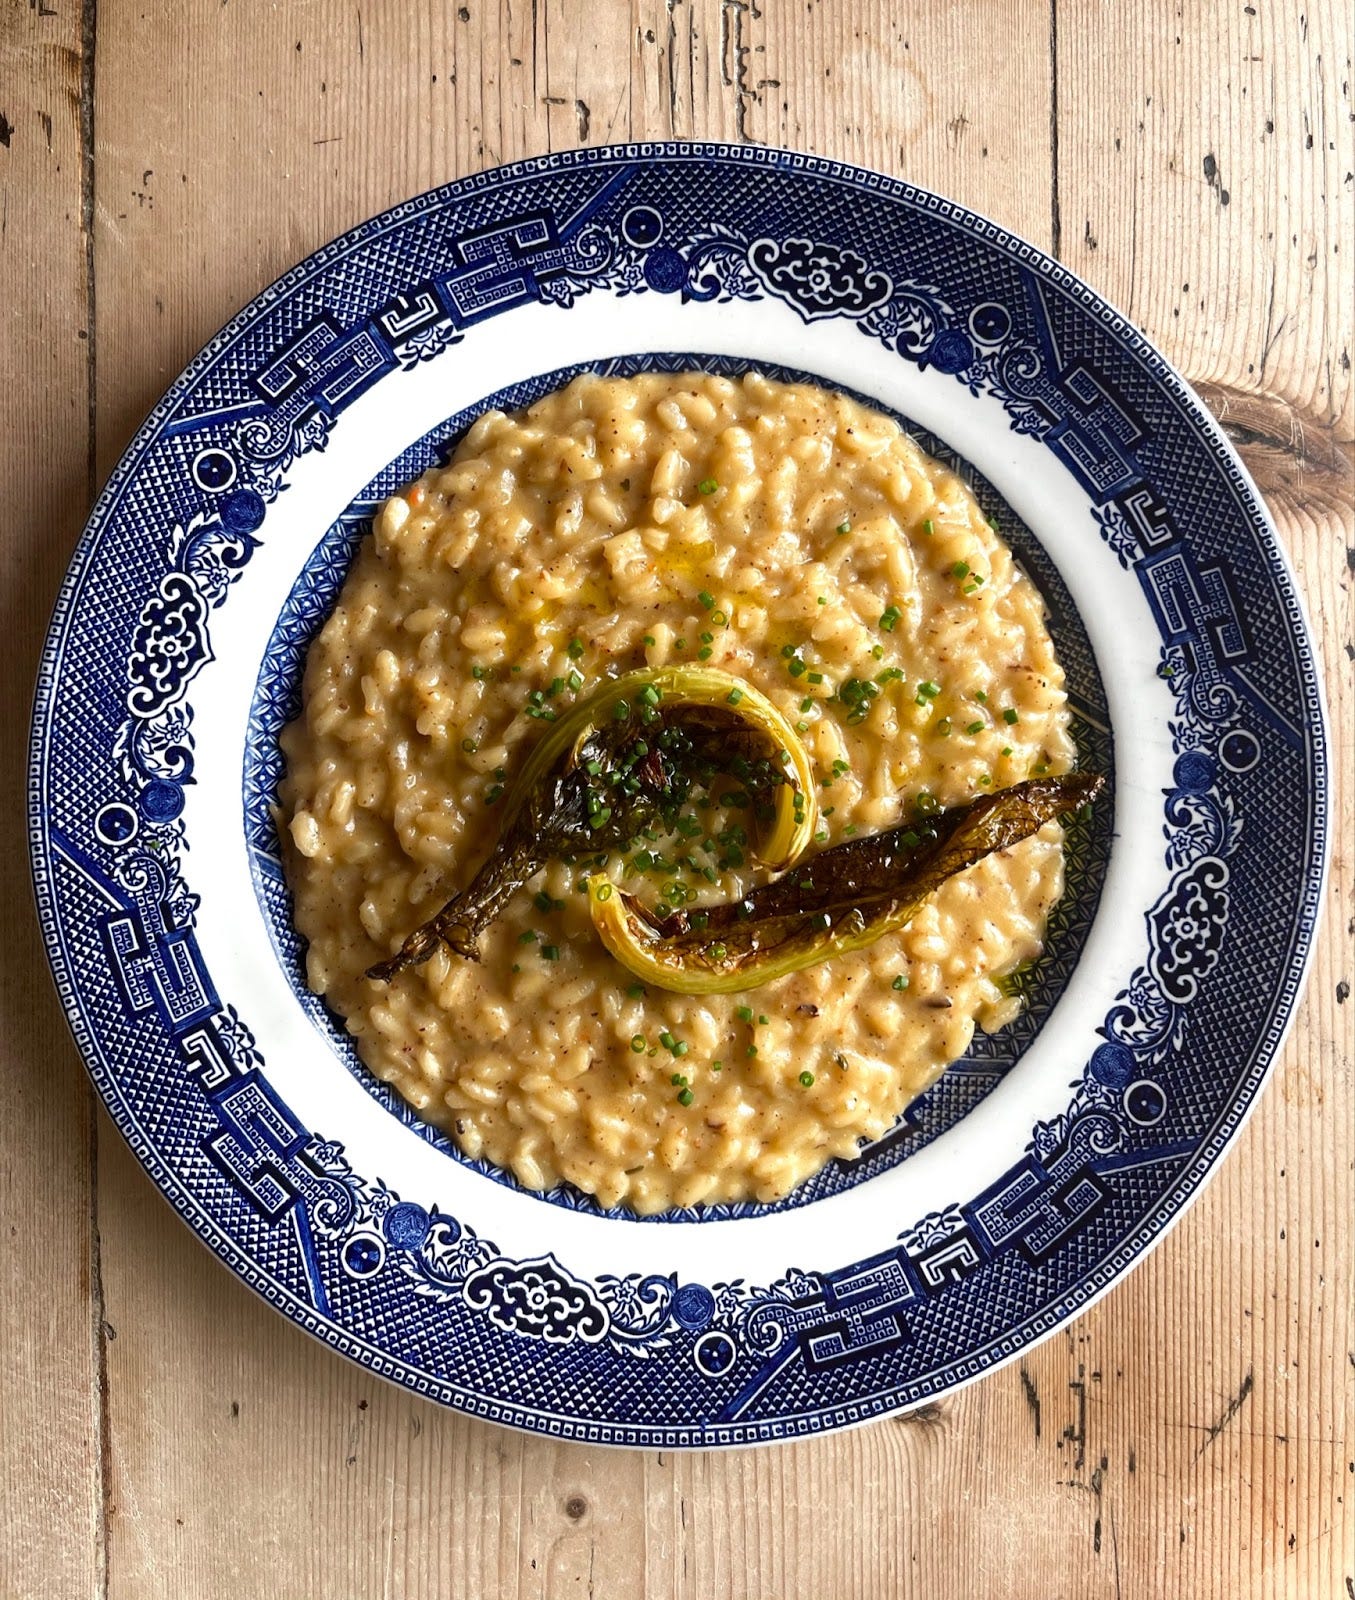
MAIN- ROASTED CAULIFLOWER RISOTTO
A risotto for a crowd is a daunting thing, and I understand why. However there are two ways to make your life easier when doing risotto for a dinner party and I am using both of them in this dish. Here we are going to make a risotto base, where the rice is over halfway cooked ahead of time, and then cooled down quickly. This means you only need 10 or so minutes to finish it on the heat while your guests are refilling their glasses. It’s a technique employed in restaurants to avoid kitchen congestion caused by risottos being cooked to order, and it works really well. This recipe also employs one of my favourite risotto techniques - a silky purée. Roasting the cauliflower until caramelised and tender, then blitzing with melted butter and milk to make a heavenly cauliflower purée means you get the best out of the vegetable and you can sling it straight into the risotto when you reheat, giving a luxurious, creamy finish.
I warn you now, this risotto takes a lot of butter. I promise you it’s for its own good. If you know my cooking, this won’t come as a huge surprise.
For the cauliflower purée:
1 small cauliflower, around 800g, chopped into florets, leaves left whole
4 tbsps olive oil
Salt and Pepper
60ml whole milk
25g butter
A grating of fresh nutmeg
For the risotto base
500g carnaroli rice
1 onion, finely chopped
2 tbsps oil
150ml dry white wine
80g butter, diced
2.4l hot vegetable stock
100g of parmesan cheese, grated
A handful of chives, finely chopped
To make the puree, preheat your oven to 200 fan. Toss the cauliflower florets and leaves in the oil, salt and pepper and spread across two baking trays - if this is two crowded the cauliflower will steam and not roast, so definitely worth dirtying that second tray. *IF YOU ARE MAKING THIS AHEAD OF TIME DON’T ROAST THE LEAVES, DO THAT THE DAY YOU ARE SERVING.
Roast for 15 mins, then turn, removing any pieces or leaves that are lovely and golden already, and roast any that need longer for a further 8-10 minutes until soft and caramelised. Warm the milk and 25g of butter in a pan until the butter has melted. Set the leaves aside until later, but pop the florets into a blender along with the milk, butter and nutmeg and blend until really smooth. If the mix is too thick to blend, add up to 40ml extra milk to help it along. Set aside until needed.
To make the risotto base, make sure you have everything you need ready to go. Take a large heavy bottomed pan and heat the oil and 30g of butter on a medium heat. When the butter sizzles, add the onion and sweat for 8 minutes or so - you don’t want colour, you want the onion to sweat and soften. Add a good pinch of salt to the onion, this will help it release moisture and not burn. When the onion is soft, add the rice and mix really well. At this point you need to keep an eye on the rice as it can burn quite easily. What we want is the rice to move in the fat and toast, which forms a protective shell around the rice grain. This seals in the starch and prevents the rice from popping and becoming mushy, it helps the grains stay whole during the cooking process. It also gives a lovely deep flavour. I like to toast my rice, moving it all the time to prevent burning, for around 4 minutes until it smells intensely ricey.
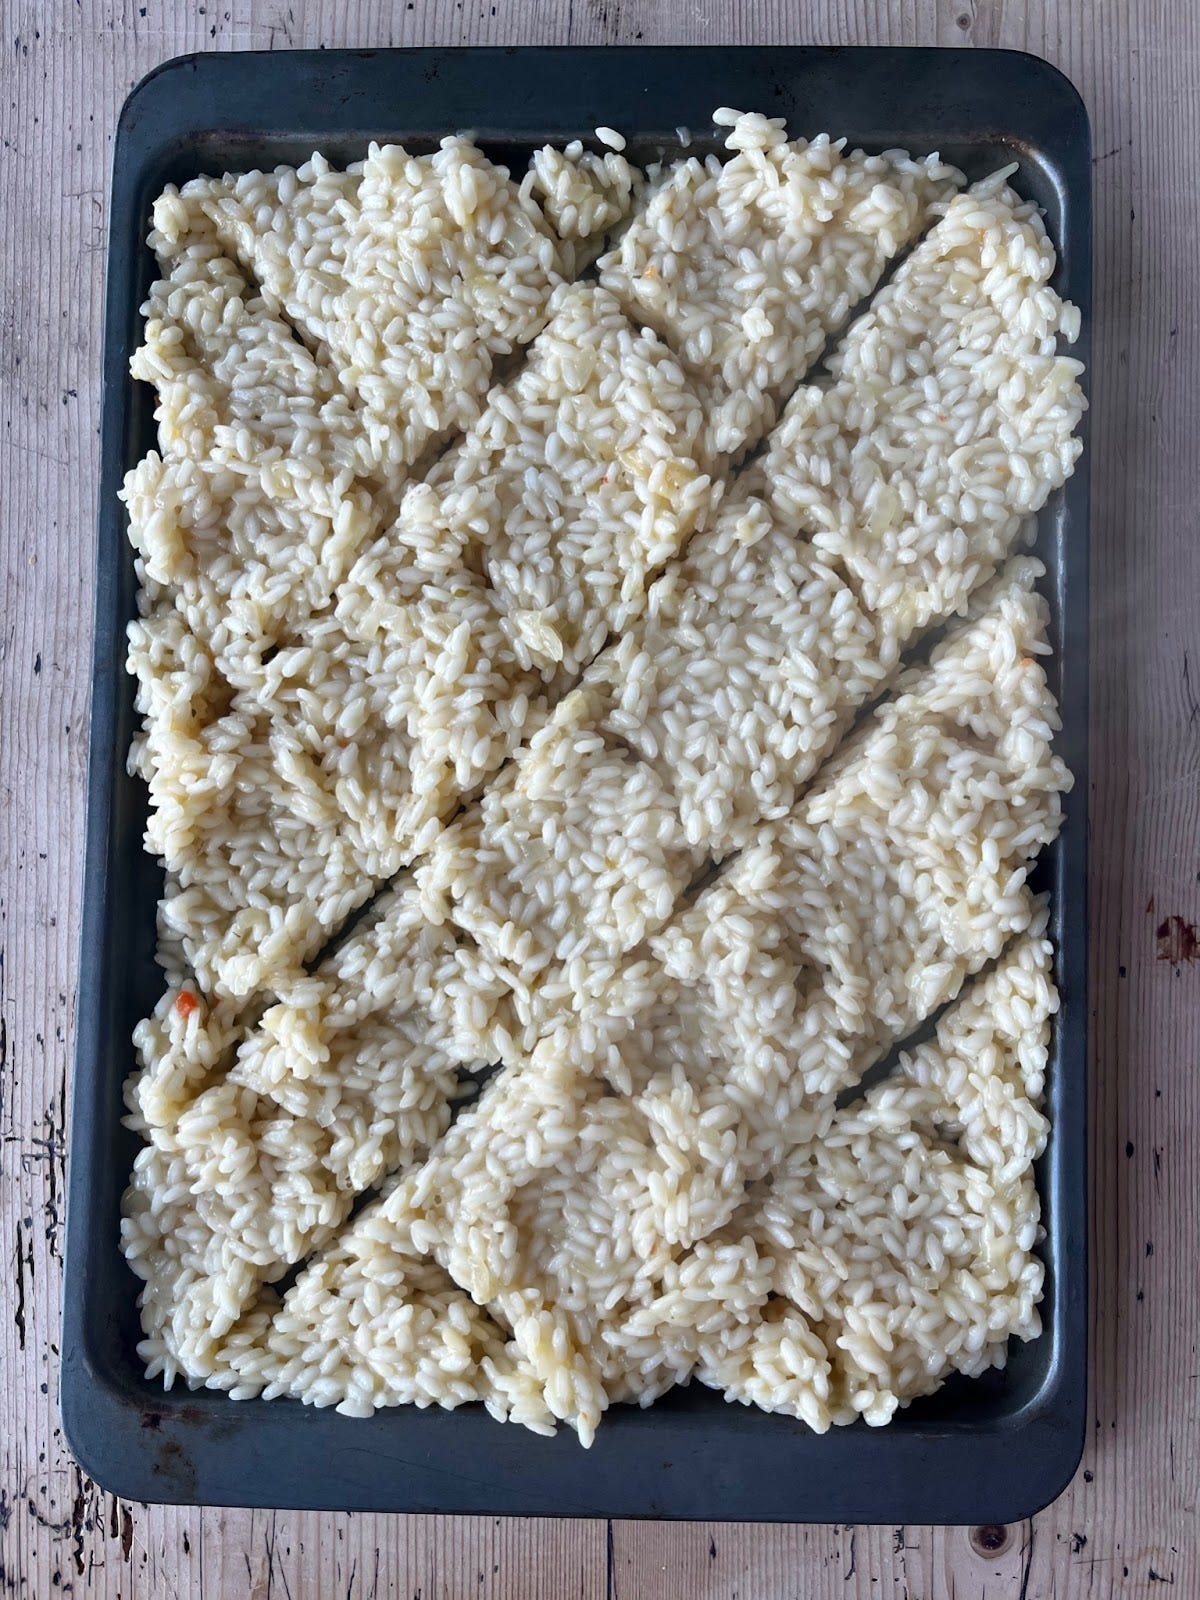
After the rice has toasted, add the wine and stir well to combine. Keep stirring the rice and wine until the wine has been completely absorbed and the mix has dried out. Now you can add 2 ladles of your hot stock, stir well and set a timer for 14 minutes. You don’t have to stir constantly but you do need to keep things moving, and each time the stock has been completely absorbed and the mix is dry, this is the right moment to add more. After 14 minutes of this, take the pan off the heat and pour the mix onto a large tray and spread it out, this helps it cool down much quicker.
I was also taught to draw diagonal lines through the mix with my spoon to help the heat escape. If its a cool day, stick this outside for 20 minutes or so before fridging, if not, let it cool to body temp before covering with cling film and popping in the fridge until needed. Keep the remaining stock for finishing the risotto later.
After you have had your starter, reheat the stock, pop the risotto base into a pan, breaking up any really solid bits with a spoon to speed up heating and add a ladle of stock to it on a medium heat. Be attentive, the risotto will absorb lots of stock here and potentially catch, so add more stock if you hear it sizzling. In another frying pan, add a drop of oil and reheat the crispy leaves from earlier, these will be your garnish. When the risotto is properly hot and bubbling, add the cauliflower puree with some stock.
After this the rice should only need 5 or 6 more minutes of cooking, adding stock as before. You want a mix that is a glossy, sloppy consistency, it should make a little wave in the pan if you shake it. After 5 minutes, take the pan off the heat and beat in the remaining cold butter and parmesan. Add a little bit of water or stock if it gets too thick. Plate up the risotto, slap the bottom of the plates so it sits flat, and top with the delicious crispy leaves and the finely chopped chives
MAKE AHEAD - You can make the cauliflower puree up to three days before your dinner and the risotto base up to 2 days before. Make sure you save the leaves to be roasted on the day of serving though!
SUBSTITUTIONS -
Use plant based butter, milks, cheese to keep it vegan.
If you’re not a fan of cauliflower, a roasted tomato (recipe on my instagram) or roasted pepper purée work really well too!
I like using carnaroli rice but arborio will also work.
PUDDING - CHOCOLATE CREAM PIE
My friend Jess, a gorgeous all-American gal, made one of these for me a while ago and I was struck by how unbelievably delicious it was. It also struck me that it's such a fun, easy pudding that for some reason we don’t really do over here in Blighty. So here we are! It’s basically a cheesecake crust, filled with a thick, moussey chocolate custard, and then topped with whipped cream. In the immortal words of the patron saint of dairy, Ina Garten, how bad can that be?

For the base
250g digestive biscuits
250g biscoff biscuits
60g caster sugar
160g butter, melted
For the filling
4 egg yolks
40g cornflour
175g caster sugar
200g dark chocolate, chopped
500ml whole milk
250ml double cream
30g cold butter, diced
Pinch of salt
½ tsp instant coffee powder
½ tsp ground cardamom (optional)
For the topping
300ml double cream
3 tbsps icing sugar
1 tsp vanilla paste- optional
Preheat the oven to 180 fan.
Crush the biscuits into a fine crumb, either in a food processor or in a sandwich bag with a rolling pin (my preferred, stress relieving method). Mix them with the sugar and melted butter until they are the texture of wet sand. Take a deep 23cm springform tin and tip nearly all the mix into it, saving 3 tablespoons or so back. Use a spoon to press the mix into the base of the tin and up the sides - it should make a pretty thick, sturdy base. I like the uneven line that you get by pressing the mix up the sides, it won’t go all the way up to the top - you want it to be about 2 cm thick on the bottom and 1cm on the sides. Use some of the mix you set aside to help build thickness on the sides if they need it. Make sure to carefully press the top of the sides so they are nicely compacted and won’t crumble too much when you slice later. When you are happy, pop the tin in the oven for 10 minutes to bake, then remove and leave to cool.
In a large bowl whisk the egg yolks, sugar and cornflour together to make a thick paste. Heat the milk and double cream together in a large saucepan until just steaming, then pour this over the egg yolk mix, whisking well to combine. Return the hot milk and egg mix to your saucepan and pop onto a low-medium heat. You can’t walk away now! Keep stirring gently, check there isn’t any mix sticking and over cooking at the bottom of the pan. Eventually all the bubbles on the top of the mix will disappear and the mix will start to thicken, this will take about 10 minutes. As the mix thickens, switch back to a whisk to avoid any lumps. As soon as the mix is lovely and thick and gently bubbling, remove from the heat. You just made a creme patissière! Now add the chopped chocolate, coffee powder, cardamom and whisk to combine. The chocolate will melt and turn your creme pat into a glossy chocolate delight. Coffee is great here because it makes the whole thing taste really intensely chocolatey (trust me) and the cardamom is a lovely background spice to lift and refine the flavours. Finally, beat in the butter to make it extra silky, then pour into the base of your tin. Smooth it out a bit if you like, then cover the surface with clingfilm to prevent a skin. Pop back into the fridge to set for at least 6 hours. Make sure your fridge doesn’t smell before you do this, if your housemate has left half an onion in there uncovered, or you’ve got some leftover fish curry hanging around - your pie will taste like it. So be very careful to keep your fridge clean and stinky things well contained, nothing worse than a pudding tasting like old fridge IMHO.
When it’s time to serve, gently release your pie from the tin and transfer to a plate, sliding it off the base too if you’re brave but don’t be hard on yourself if you don’t - it will still taste and look great! Whip the cream, sugar and vanilla together to super soft peaks - you want the cream to be leaving thick ribbons on its surface not even peaking really.
Top the pie with the cream, then sprinkle over some of the leftover biscuit base. Serve immediately!

MAKE AHEAD-
You can make the biscuit base up to 1 day before you fill it
You can make the chocolate custard and fill the base up to one day before you serve it, but always whip the cream topping fresh!
SUBSTITUTIONS -
If you don’t want to use dairy, sub out the cream, milk and butter for plant based alternatives.
If you don’t like the idea of cardamom or coffee, use cinnamon or even a splash of amaretto for a nutty finish.
TIMEPLAN
This first plan should help you see what you can get done in advance, so that for each course on the day you have at least 1, maybe 2 major parts of it taken care of. I appreciate that not everyone’s weeks are easily peppered with dinner party prep, but if you’re hosting after work or on a day where you can’t be in the kitchen, getting ahead is going to save your arse.

MISE-EN-PLACE
This is the fancy name we give to the food prep each section in the restaurant needs to do for their dishes. Hopefully breaking down each dish like this will help you feel organised.
Use the hour before your guests arrive to organise your space too- I find it helpful to group ingredients by dish so it is all in the same place. Little ramekins are really useful for this.

STYLING
CRISPS AND DIP
You have two options here, in my opinion. You can go for ultimate party kitsch and do a delightful platter which keeps everything central in your room and looks fabulous. Or you can spray your crisps and dip around your entertaining space in lots of little bowls in a Hansel and Gretel style bread trail, leading everyone eventually to more crisps and more dip. In terms of plating, only smear the hummus on a plate, don’t even dare think of a bowl. The romesco is such a strong red and just gets a drizzle of oil on top, so whack it in something with reds or whites in it to complement it. The dill and jalapeño green is fab in blues, whites, greys or glass and can carry off a more retro vibe because of its colour.
LEEKS VINAIGRETTE
This dish looks so spectacular all together on one or two large, flat plates or platters. You don’t want to hide the leeks in something lipped. I love the colours of this dish on blues, turquoise, greens and whites. Make sure you have some dead space between the edge of the dish and the leeks for the dressing to pool- it’s lovely to see.
CAULIFLOWER RISOTTO
In a move that is unusual to me, I do suggest plating individually for this one. It’s such a quick one to do, 2 ladles and a quick slap to level it out (on the bottom of the plate not the top ffs), then the crispy leaves and herbs to garnish. Risotto is not easily shared and I like the simplicity of a plate of rice - something about it is chic to me. The golden tones look great on greys and blues, but it would also work so well on beiges, oranges and browns - sometimes an echo is a beautiful thing. Feel free to drizzle extra oil on top.
CHOCOLATE CREAM PIE
This is an easy one - keep it whole! As I said above, if it doesn’t come off the bottom of your tin don’t stress. This is definitely such a show stopper, bring it to the table on one lovely plate and then serve it with your guests watching. I recommend heating your knife (a sharp one, not serrated) before you try to slice. In the pastry section we used to do this with a blow torch but at home I suggest boiling the kettle and filling a large jug with the hot water. Dip your knife into it and then wipe off the water very quickly before slicing. It will go through the moussey cream neatly and easily.
FOR THE TABLE
I love using herbs as little accents on a table instead of flowers, so pick up some thyme and rosemary and stick them in empty jars, a little nod to our earthy feast. There are plenty of greens and golds in this weeks palette, so perhaps use yellow linens or napkins to compliment this, plus old wooden boards on your table with your bread will look fab (you can see where I get my old, vintage wooden boards if you subscribe to MORE PLEASE, here.
Well, that’s your lot! I hope you have enjoyed THE VEGGIE ONE, I know I did. And trust me, there is plenty more where that came from in the veggie realm. If you don’t fancy doing an entirely veggie feast then at least you have some excellent, easy options for your veggie friends when they come over. And guys, a dip recipe is for life, not just for christmas, so you are bloody welcome. Thanks for being here, all my love, Rosie x
Crying, screaming, throwing up, DROOLING with excitement! Is there anything Rosie can't do? Nb: NO.
Outstanding 👏👏👏 I also have the crisp addiction. Thanks for feeding and validating it!