


THE LUXY SUMMER DINNER ONE
A menu that is as easy as it is chic.

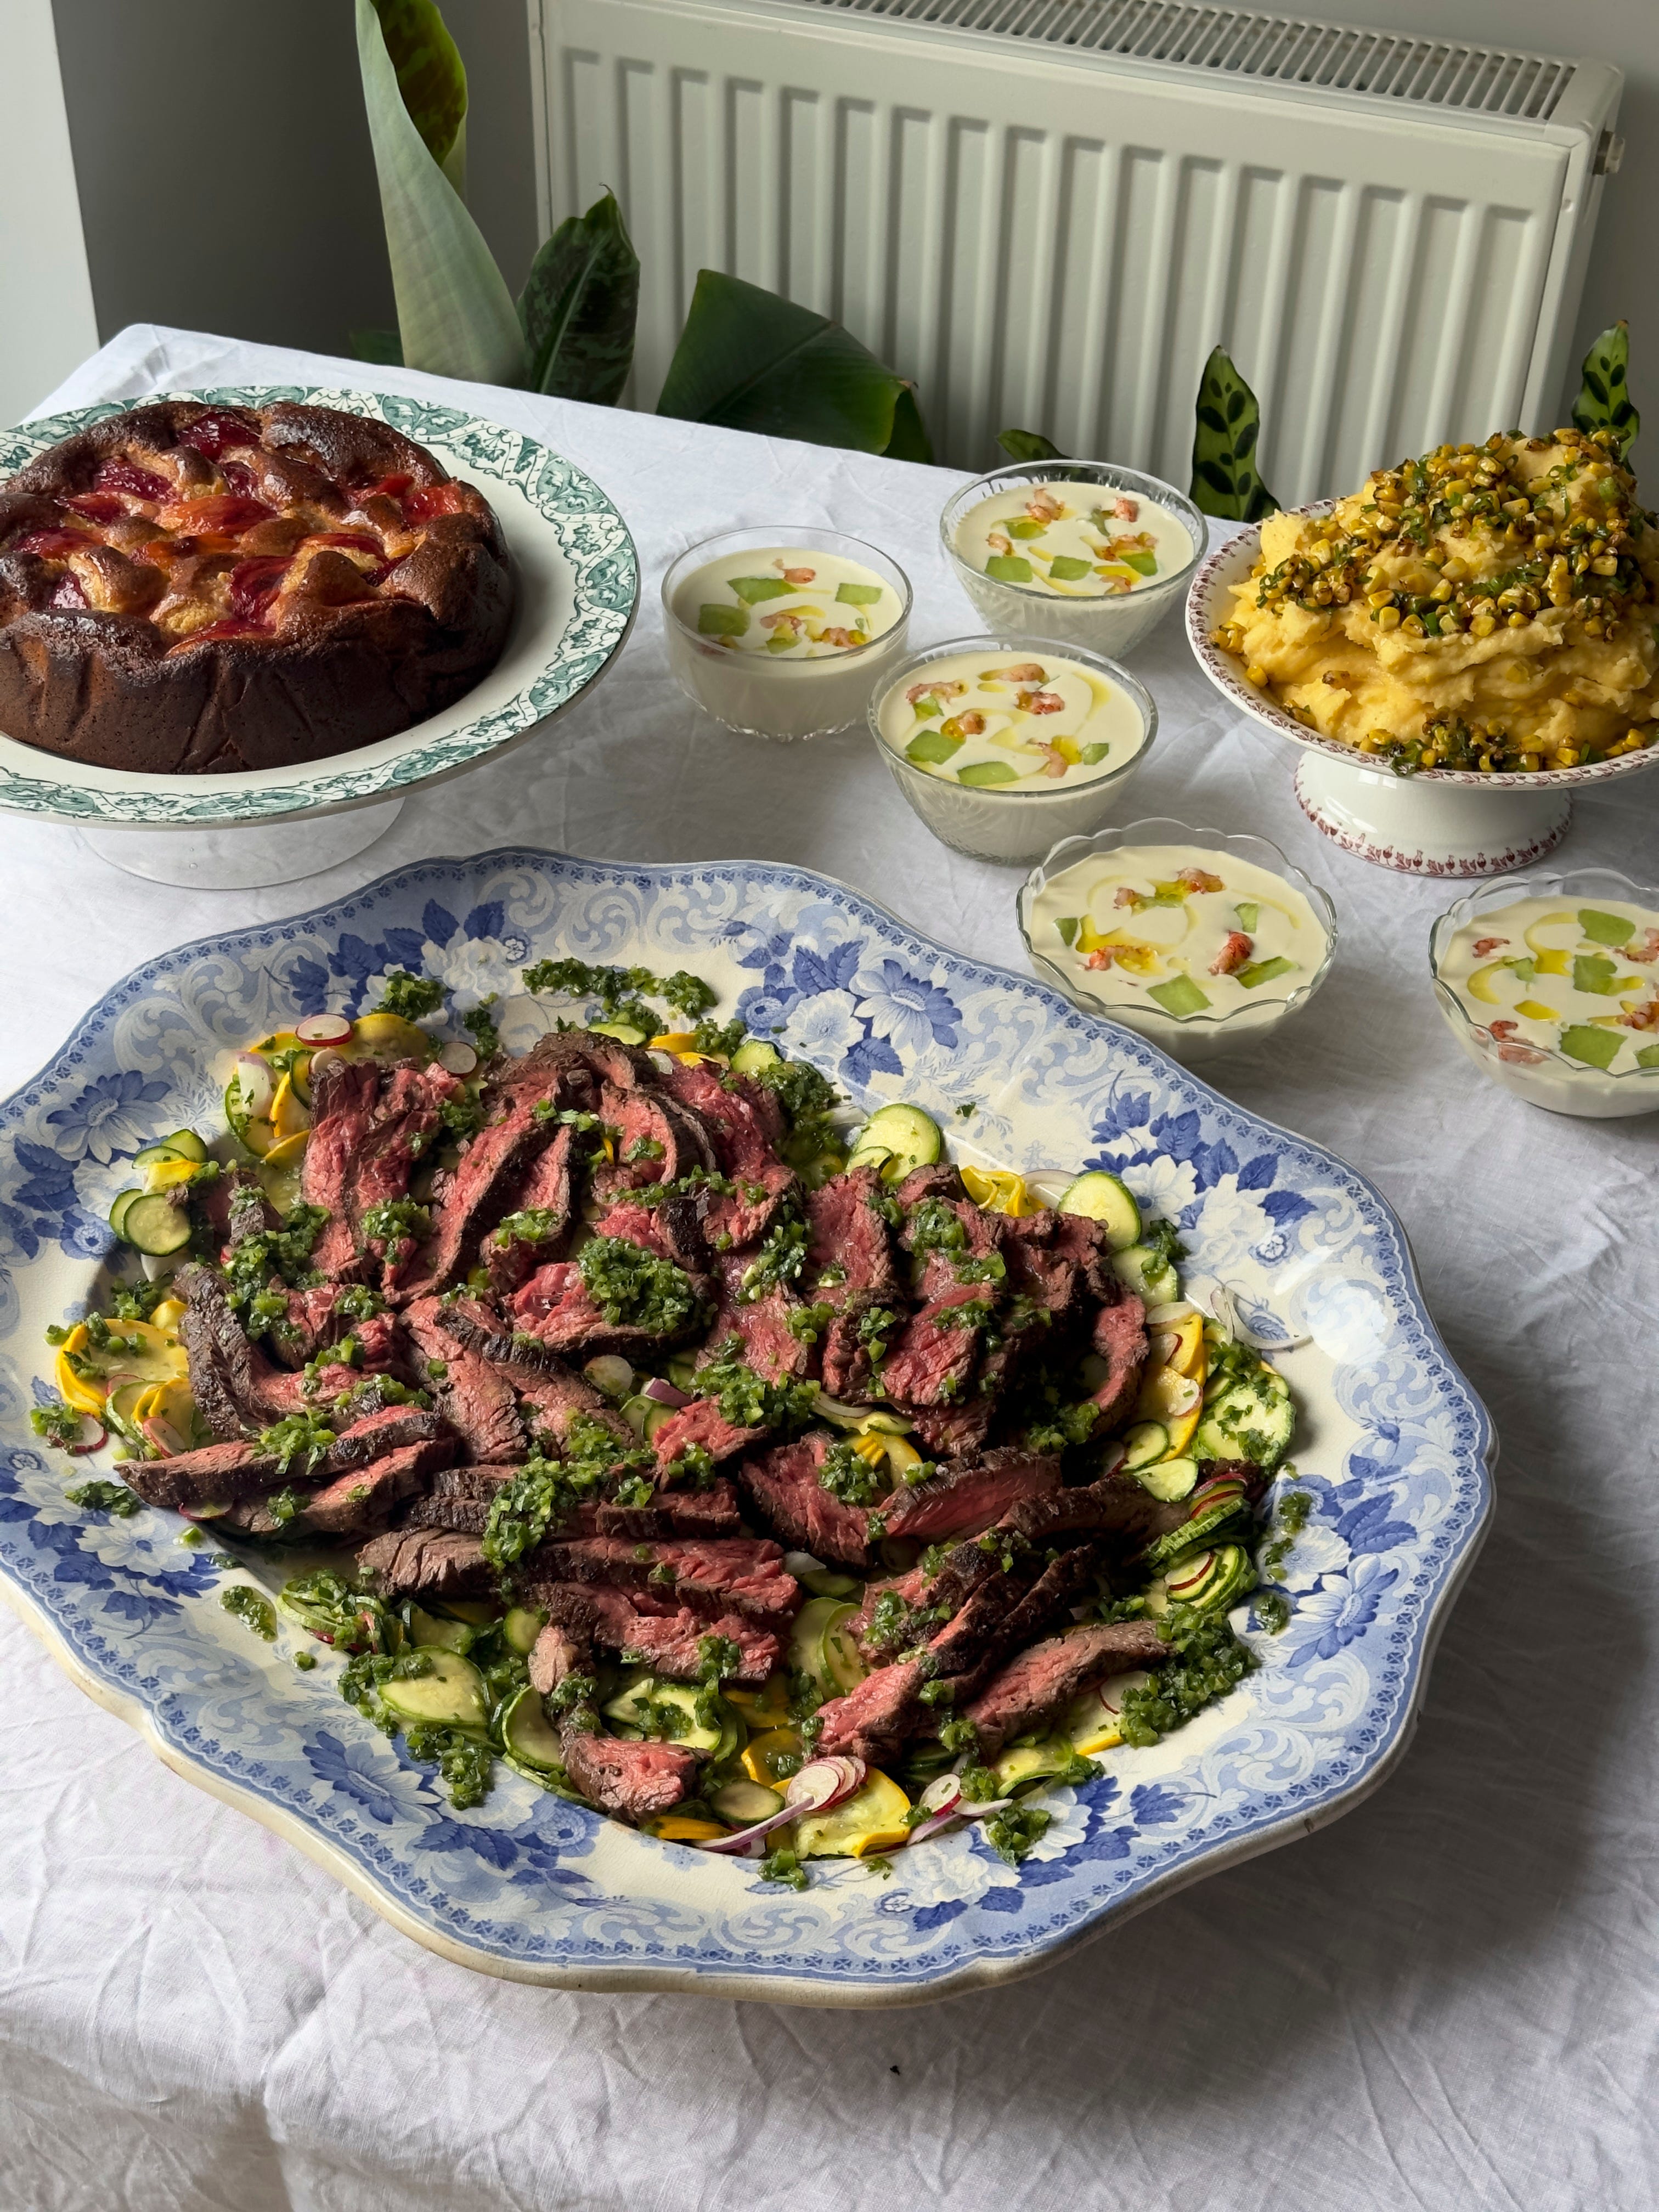
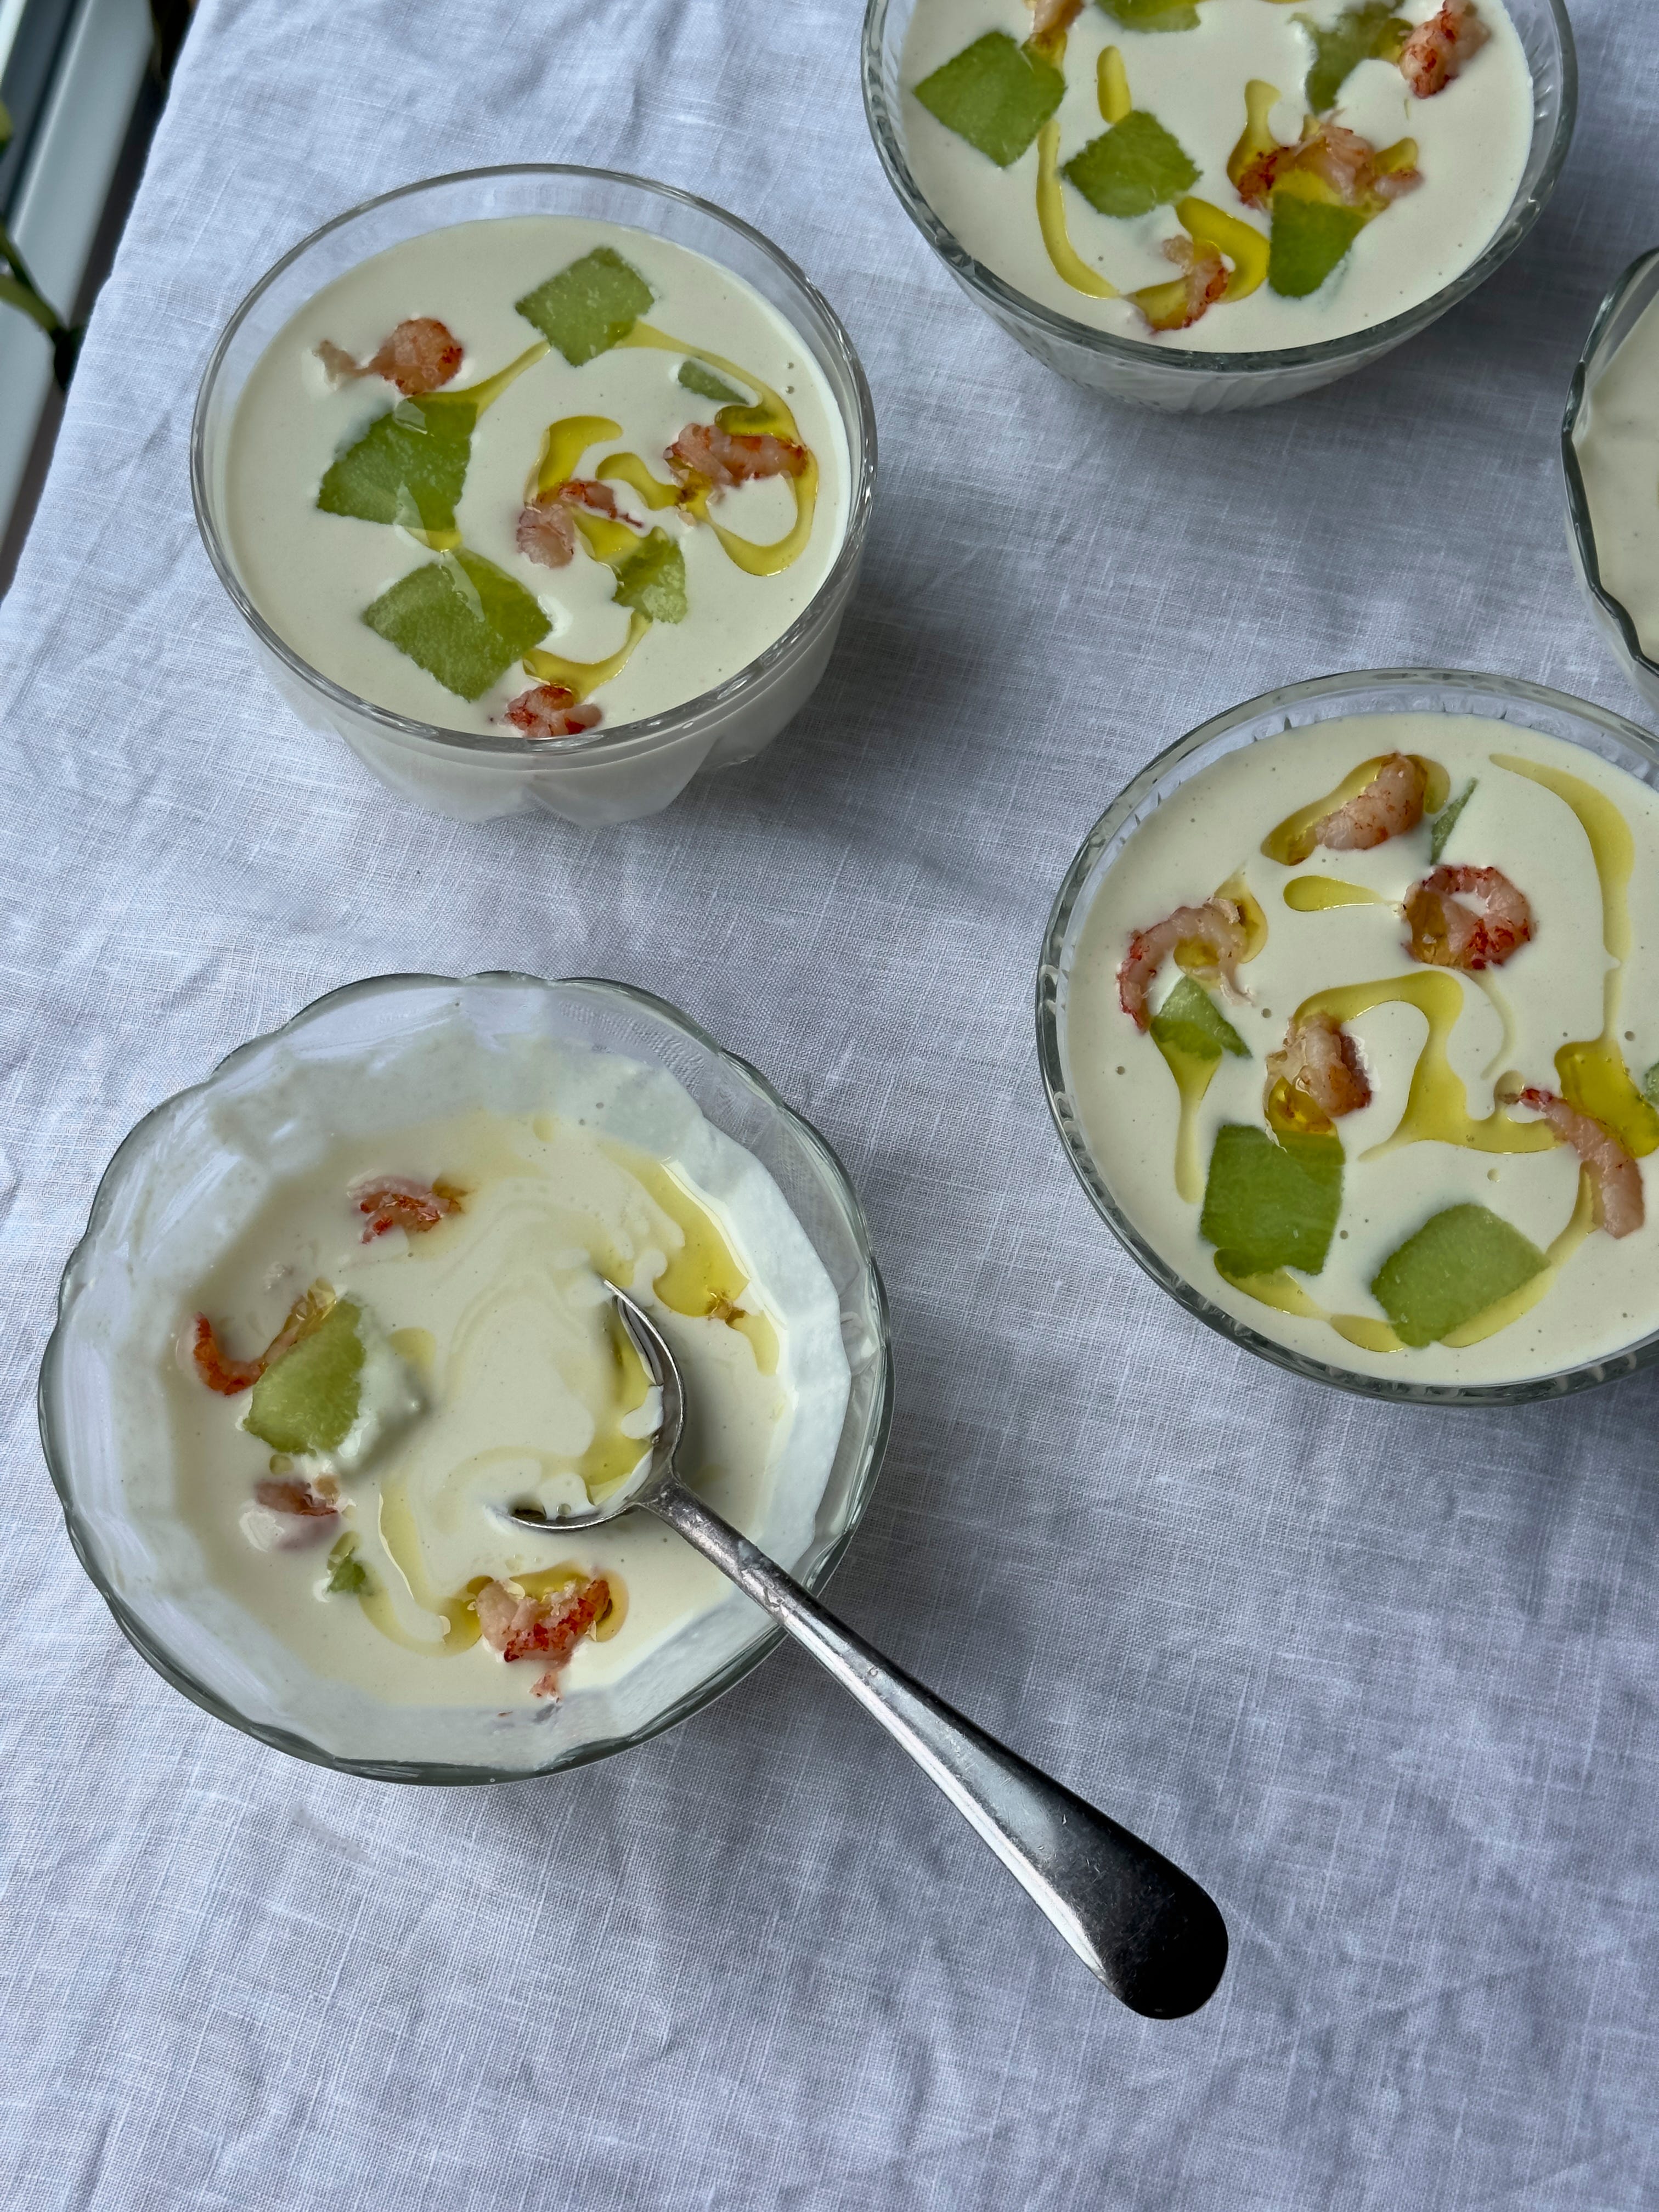
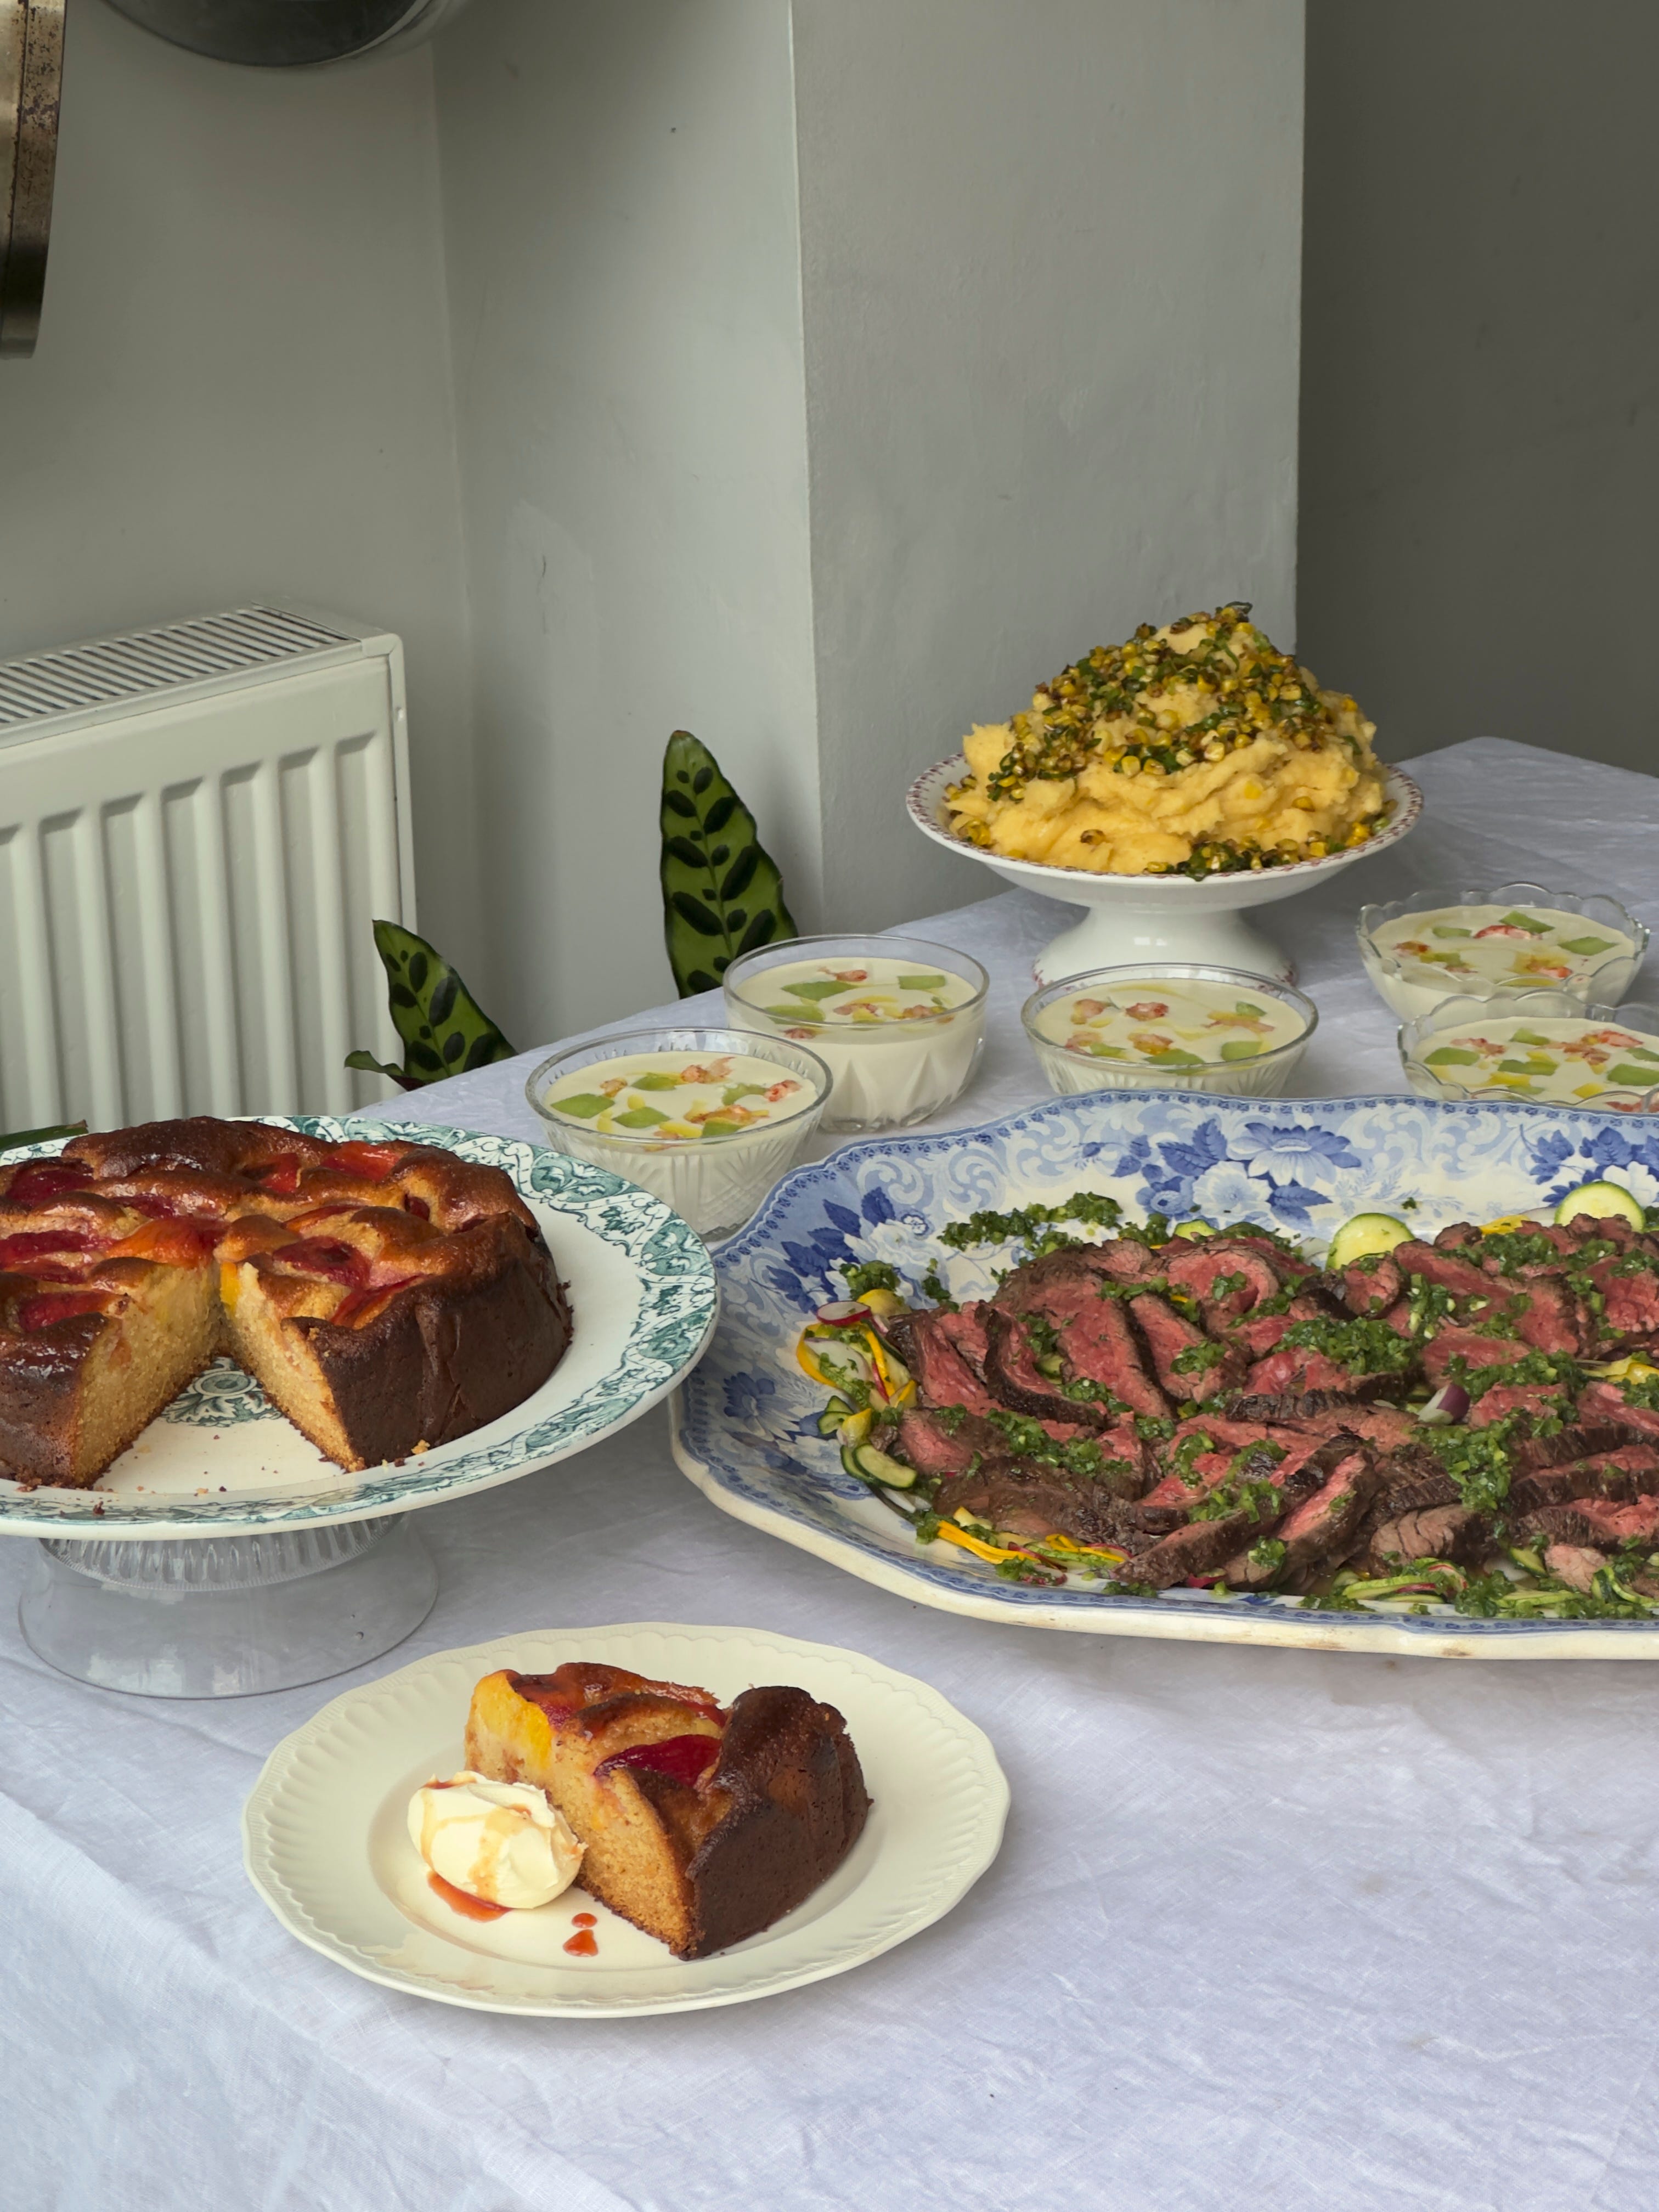
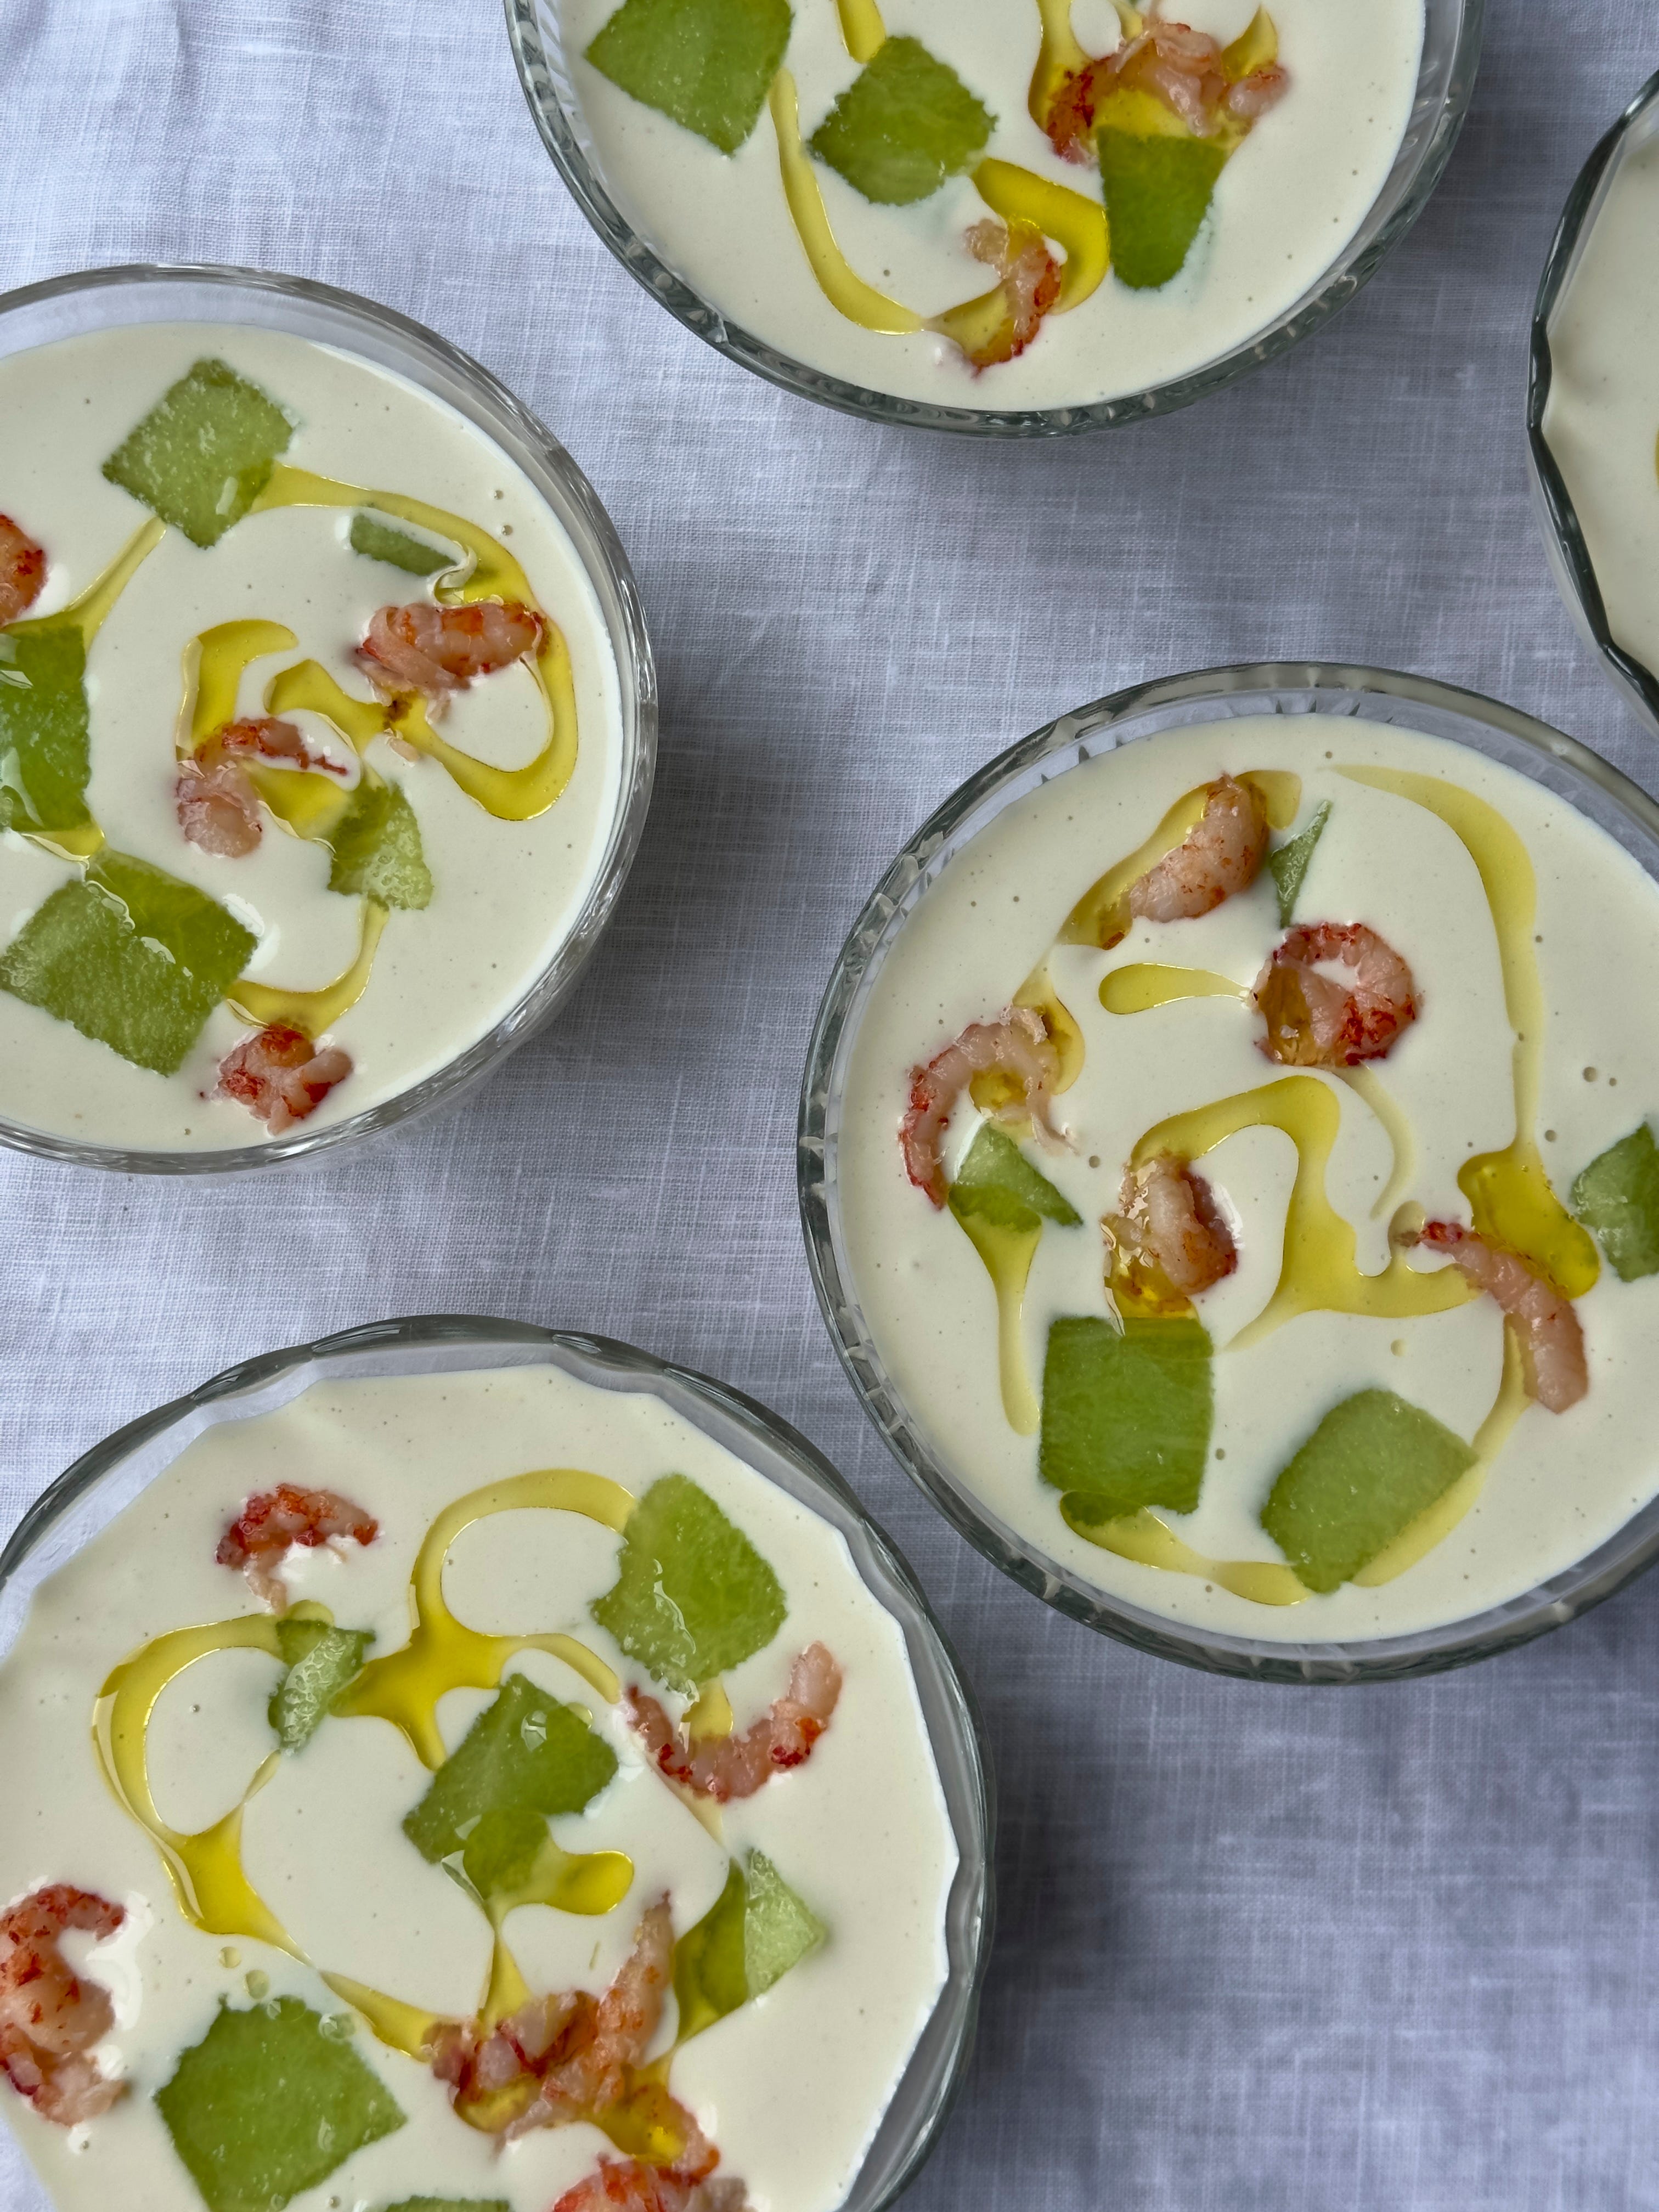
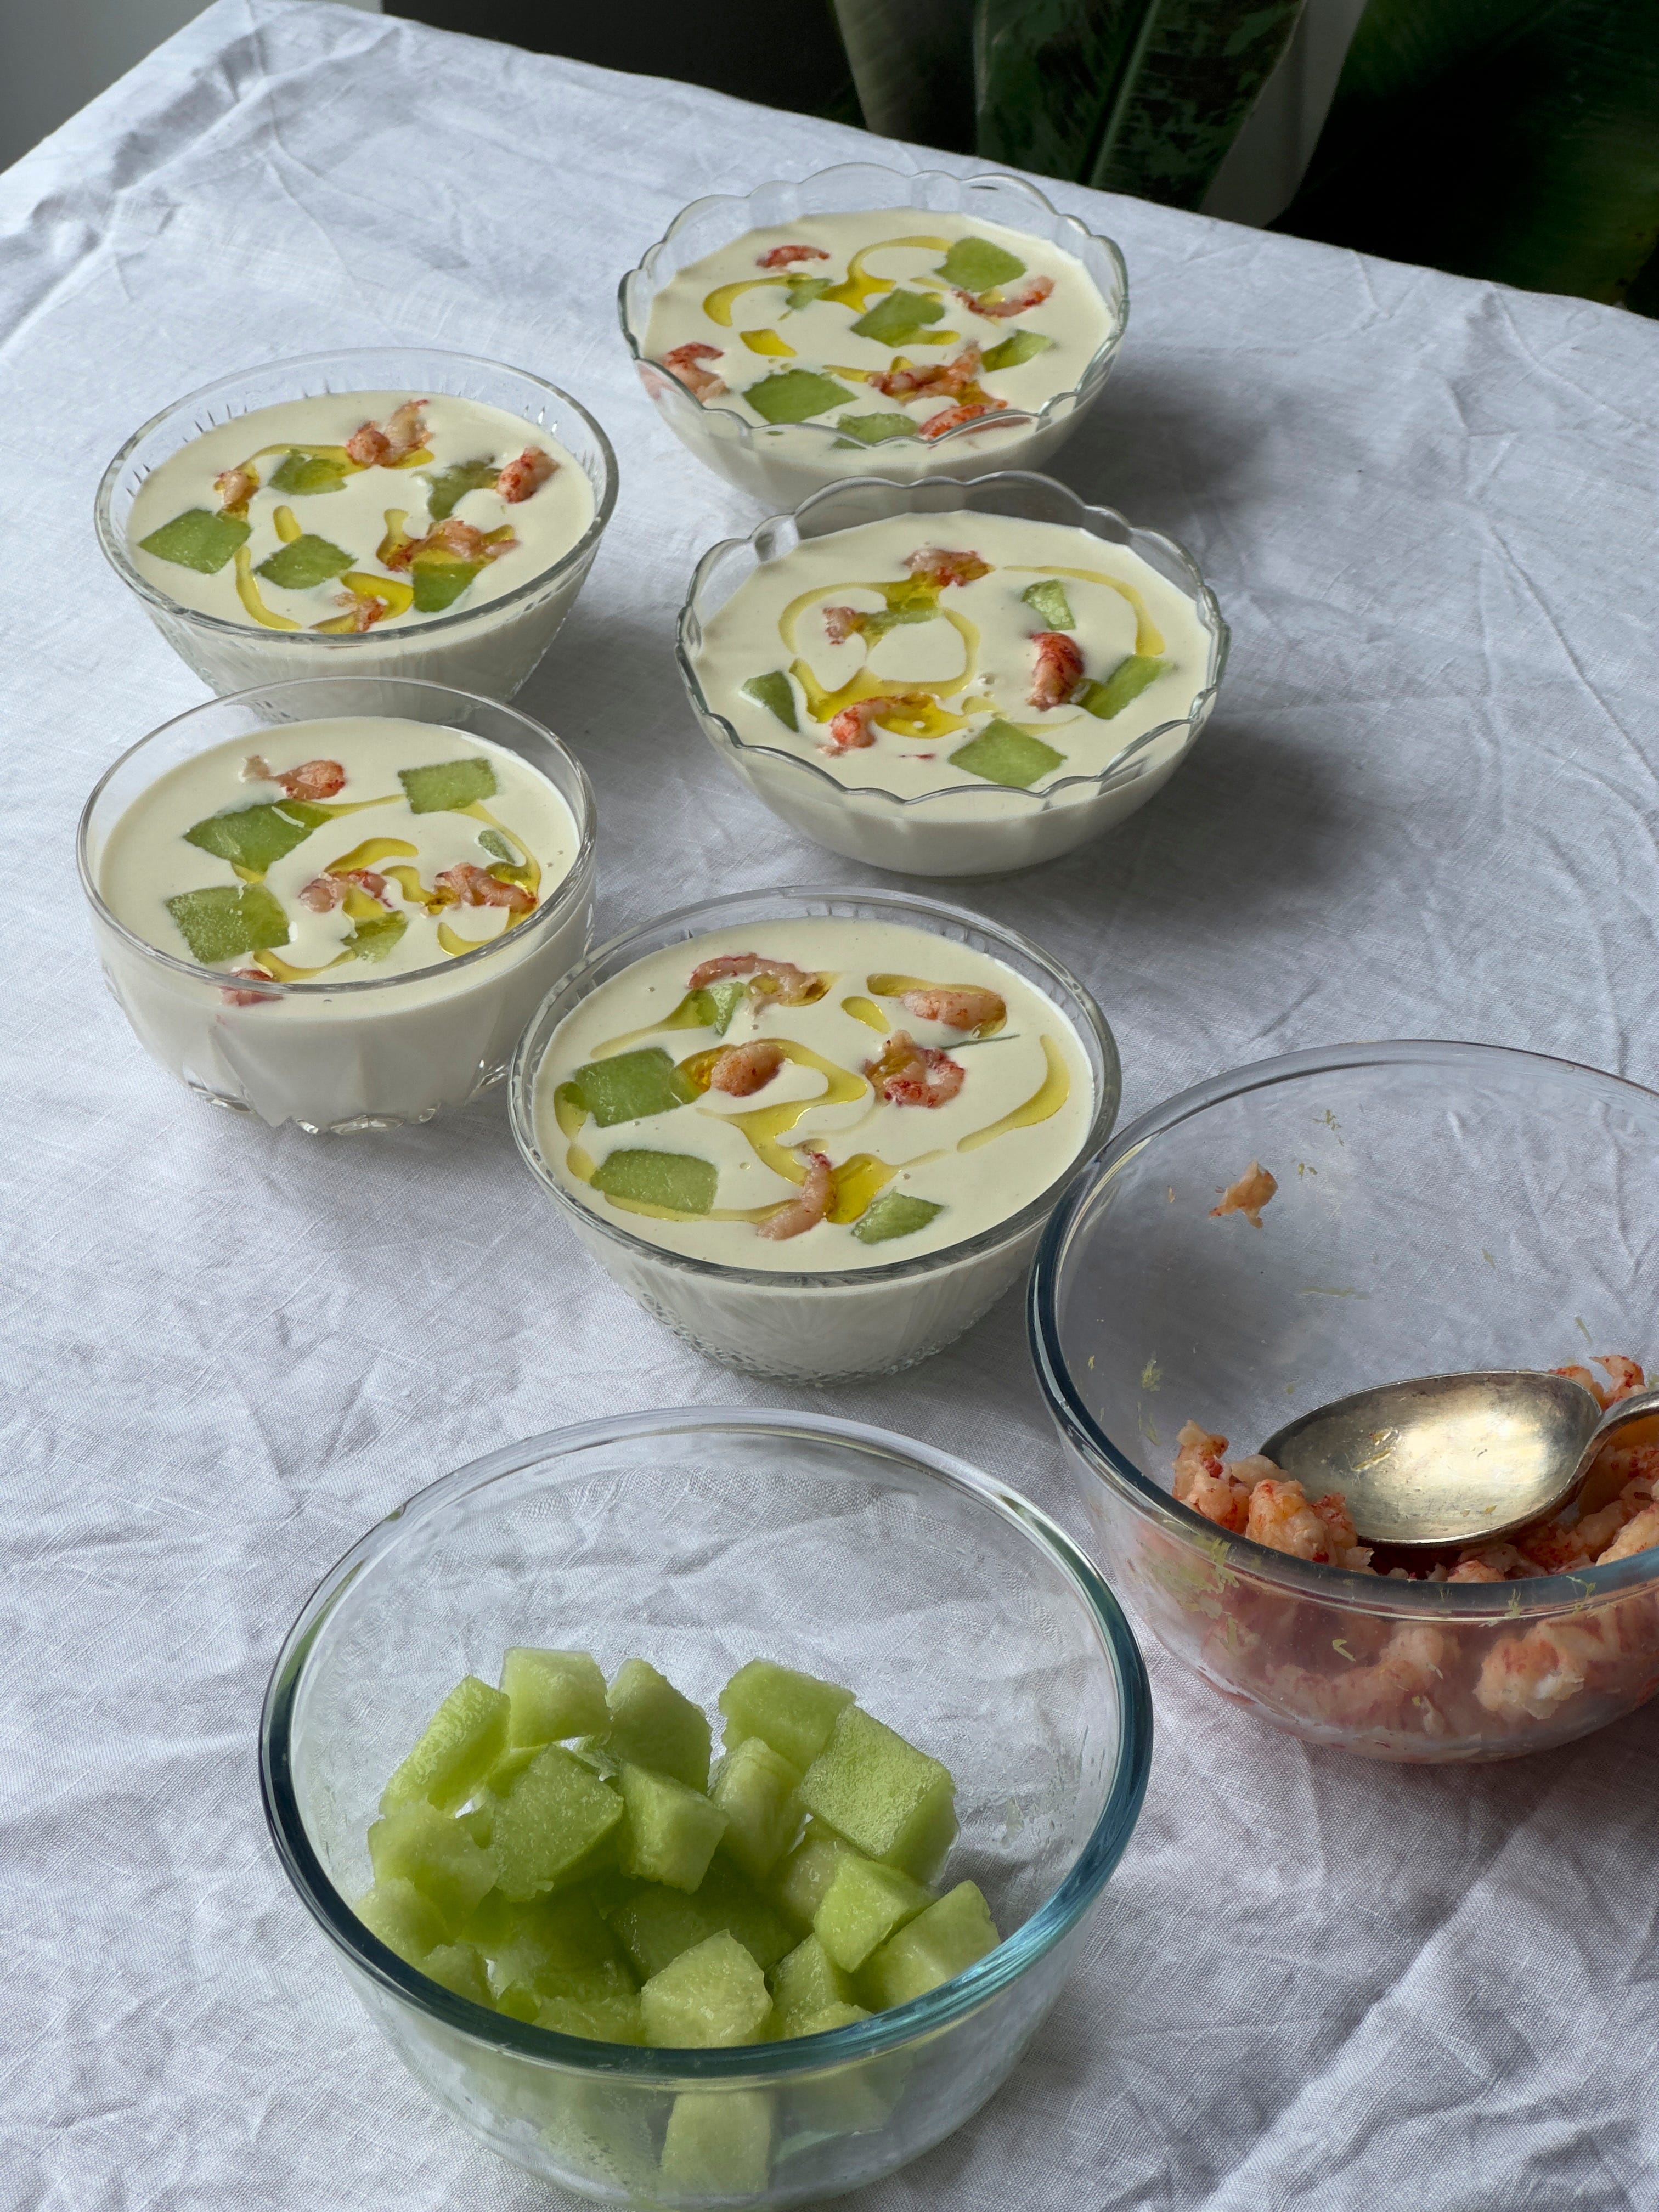
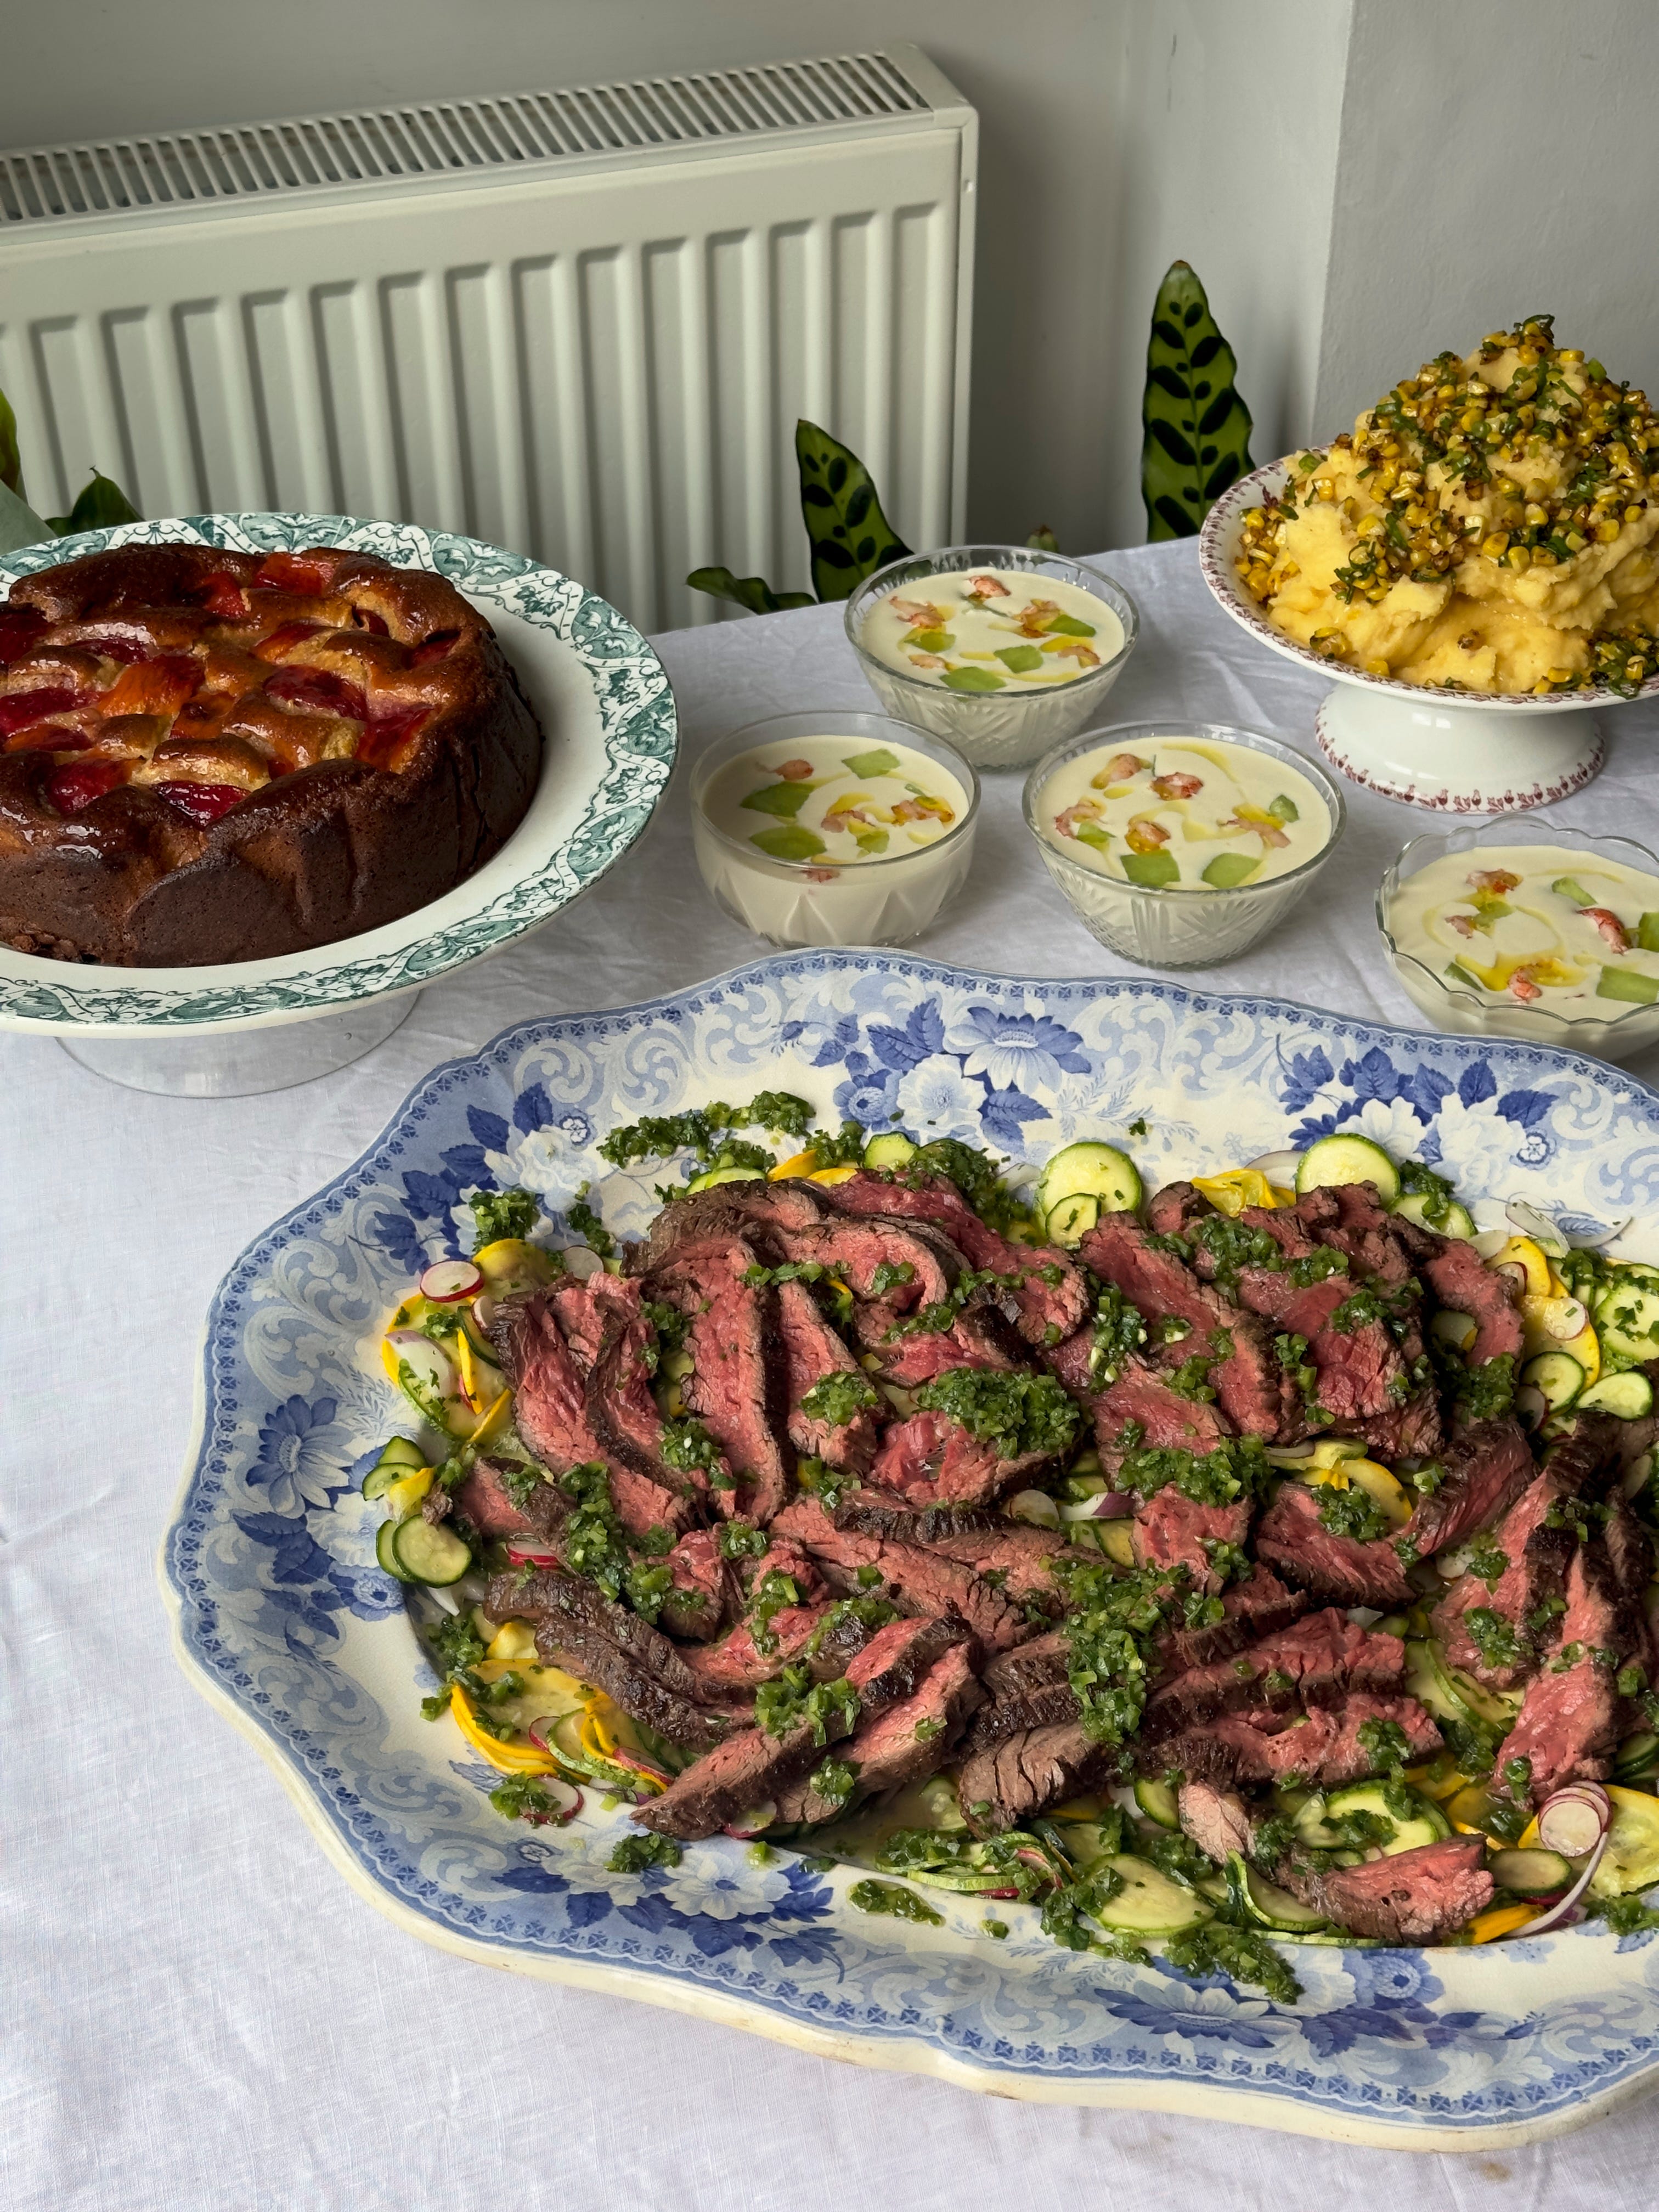
AJO BLANCO, CRAYFISH AND MELON
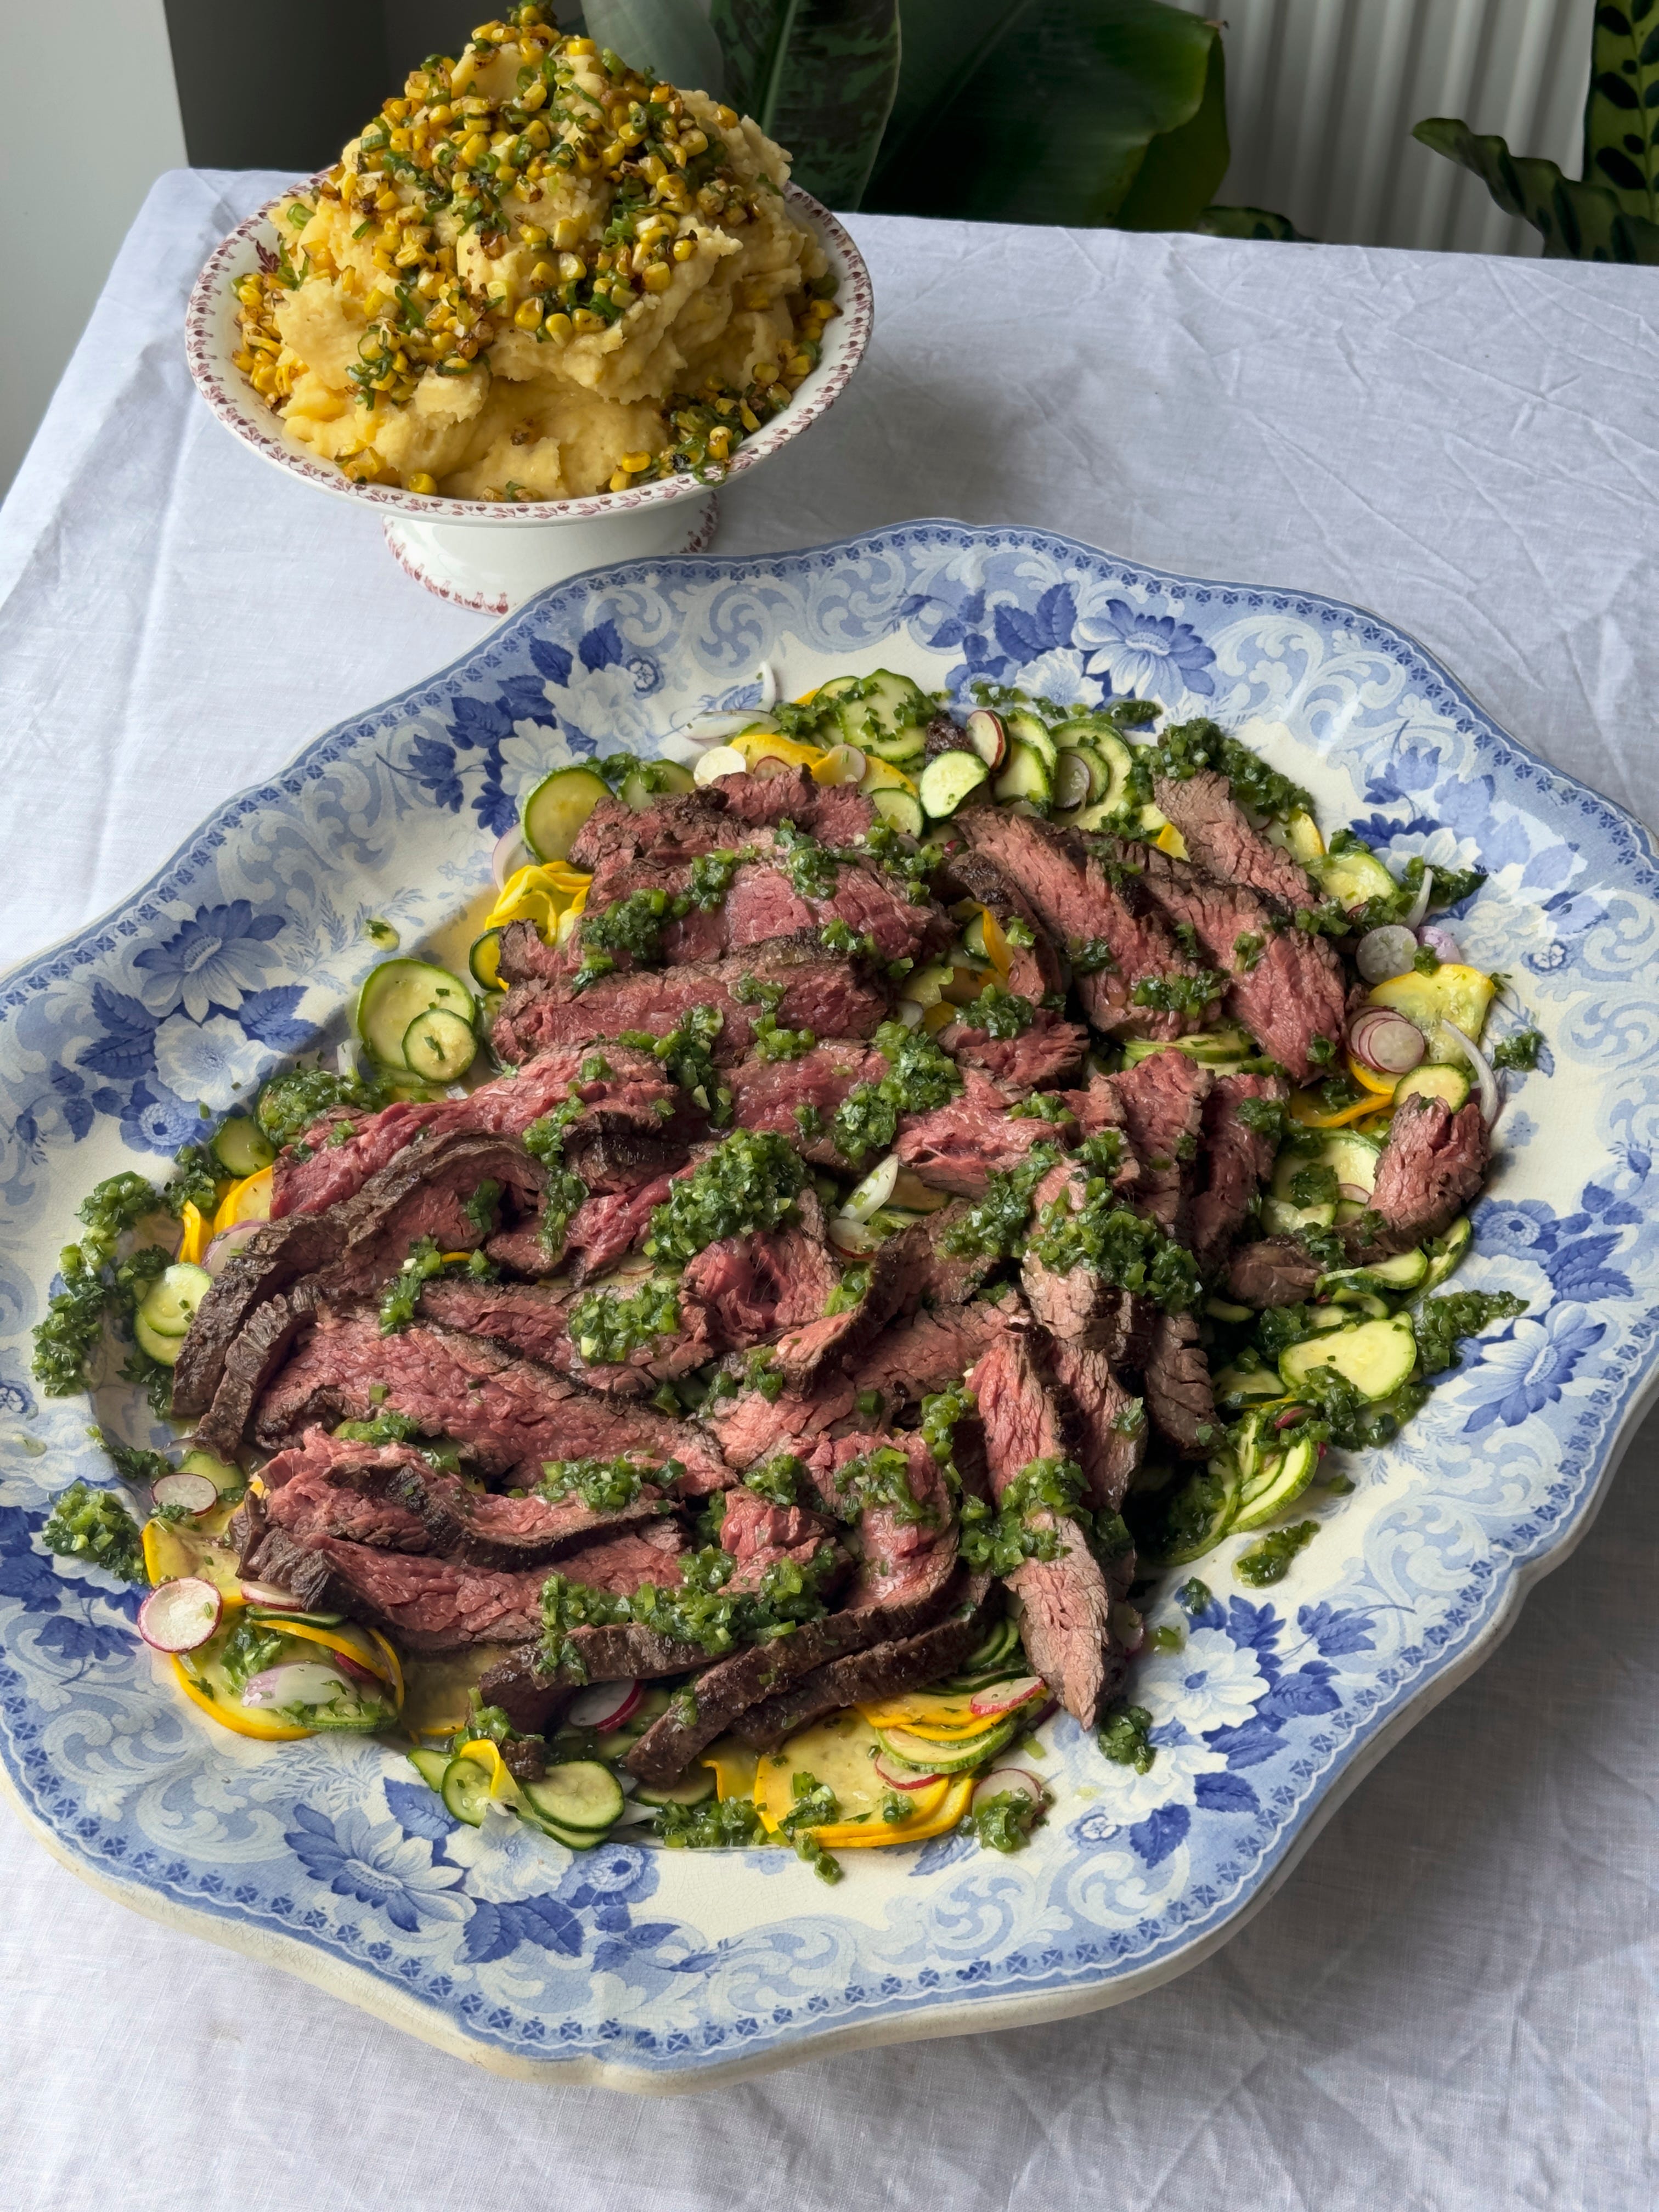
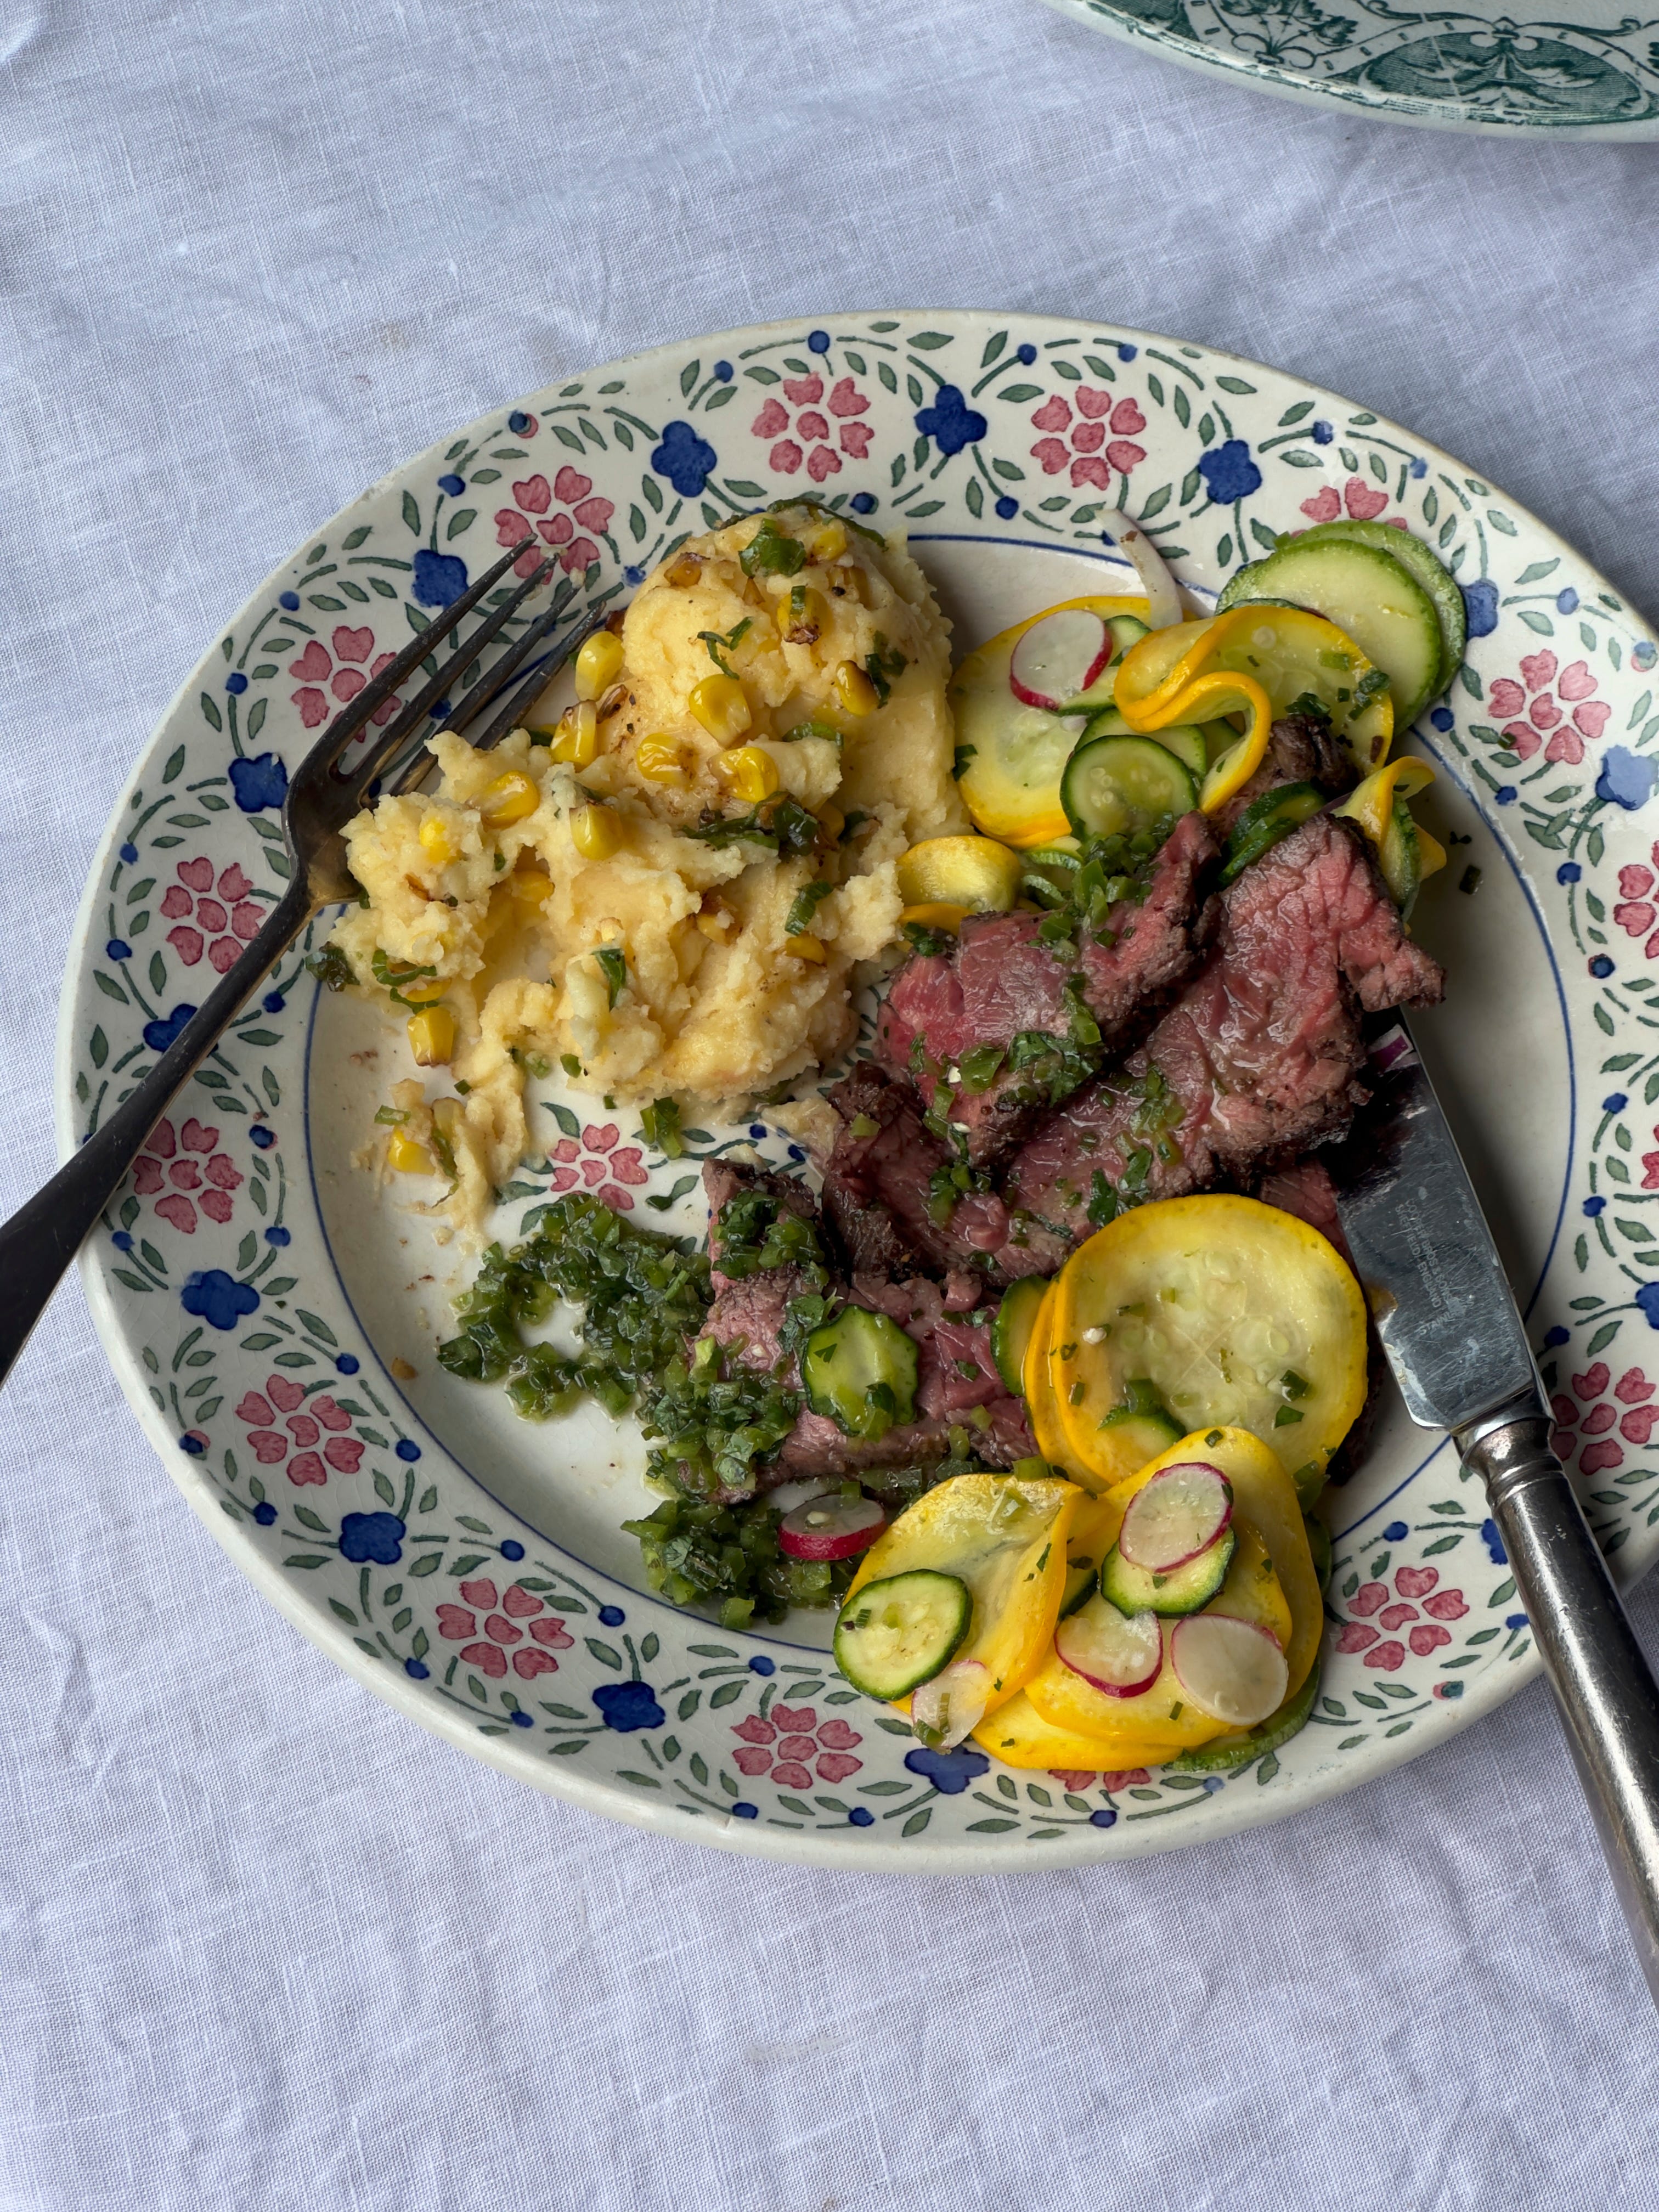
BAVETTE WITH COURGETTES, RADISHES AND JALAPEÑO
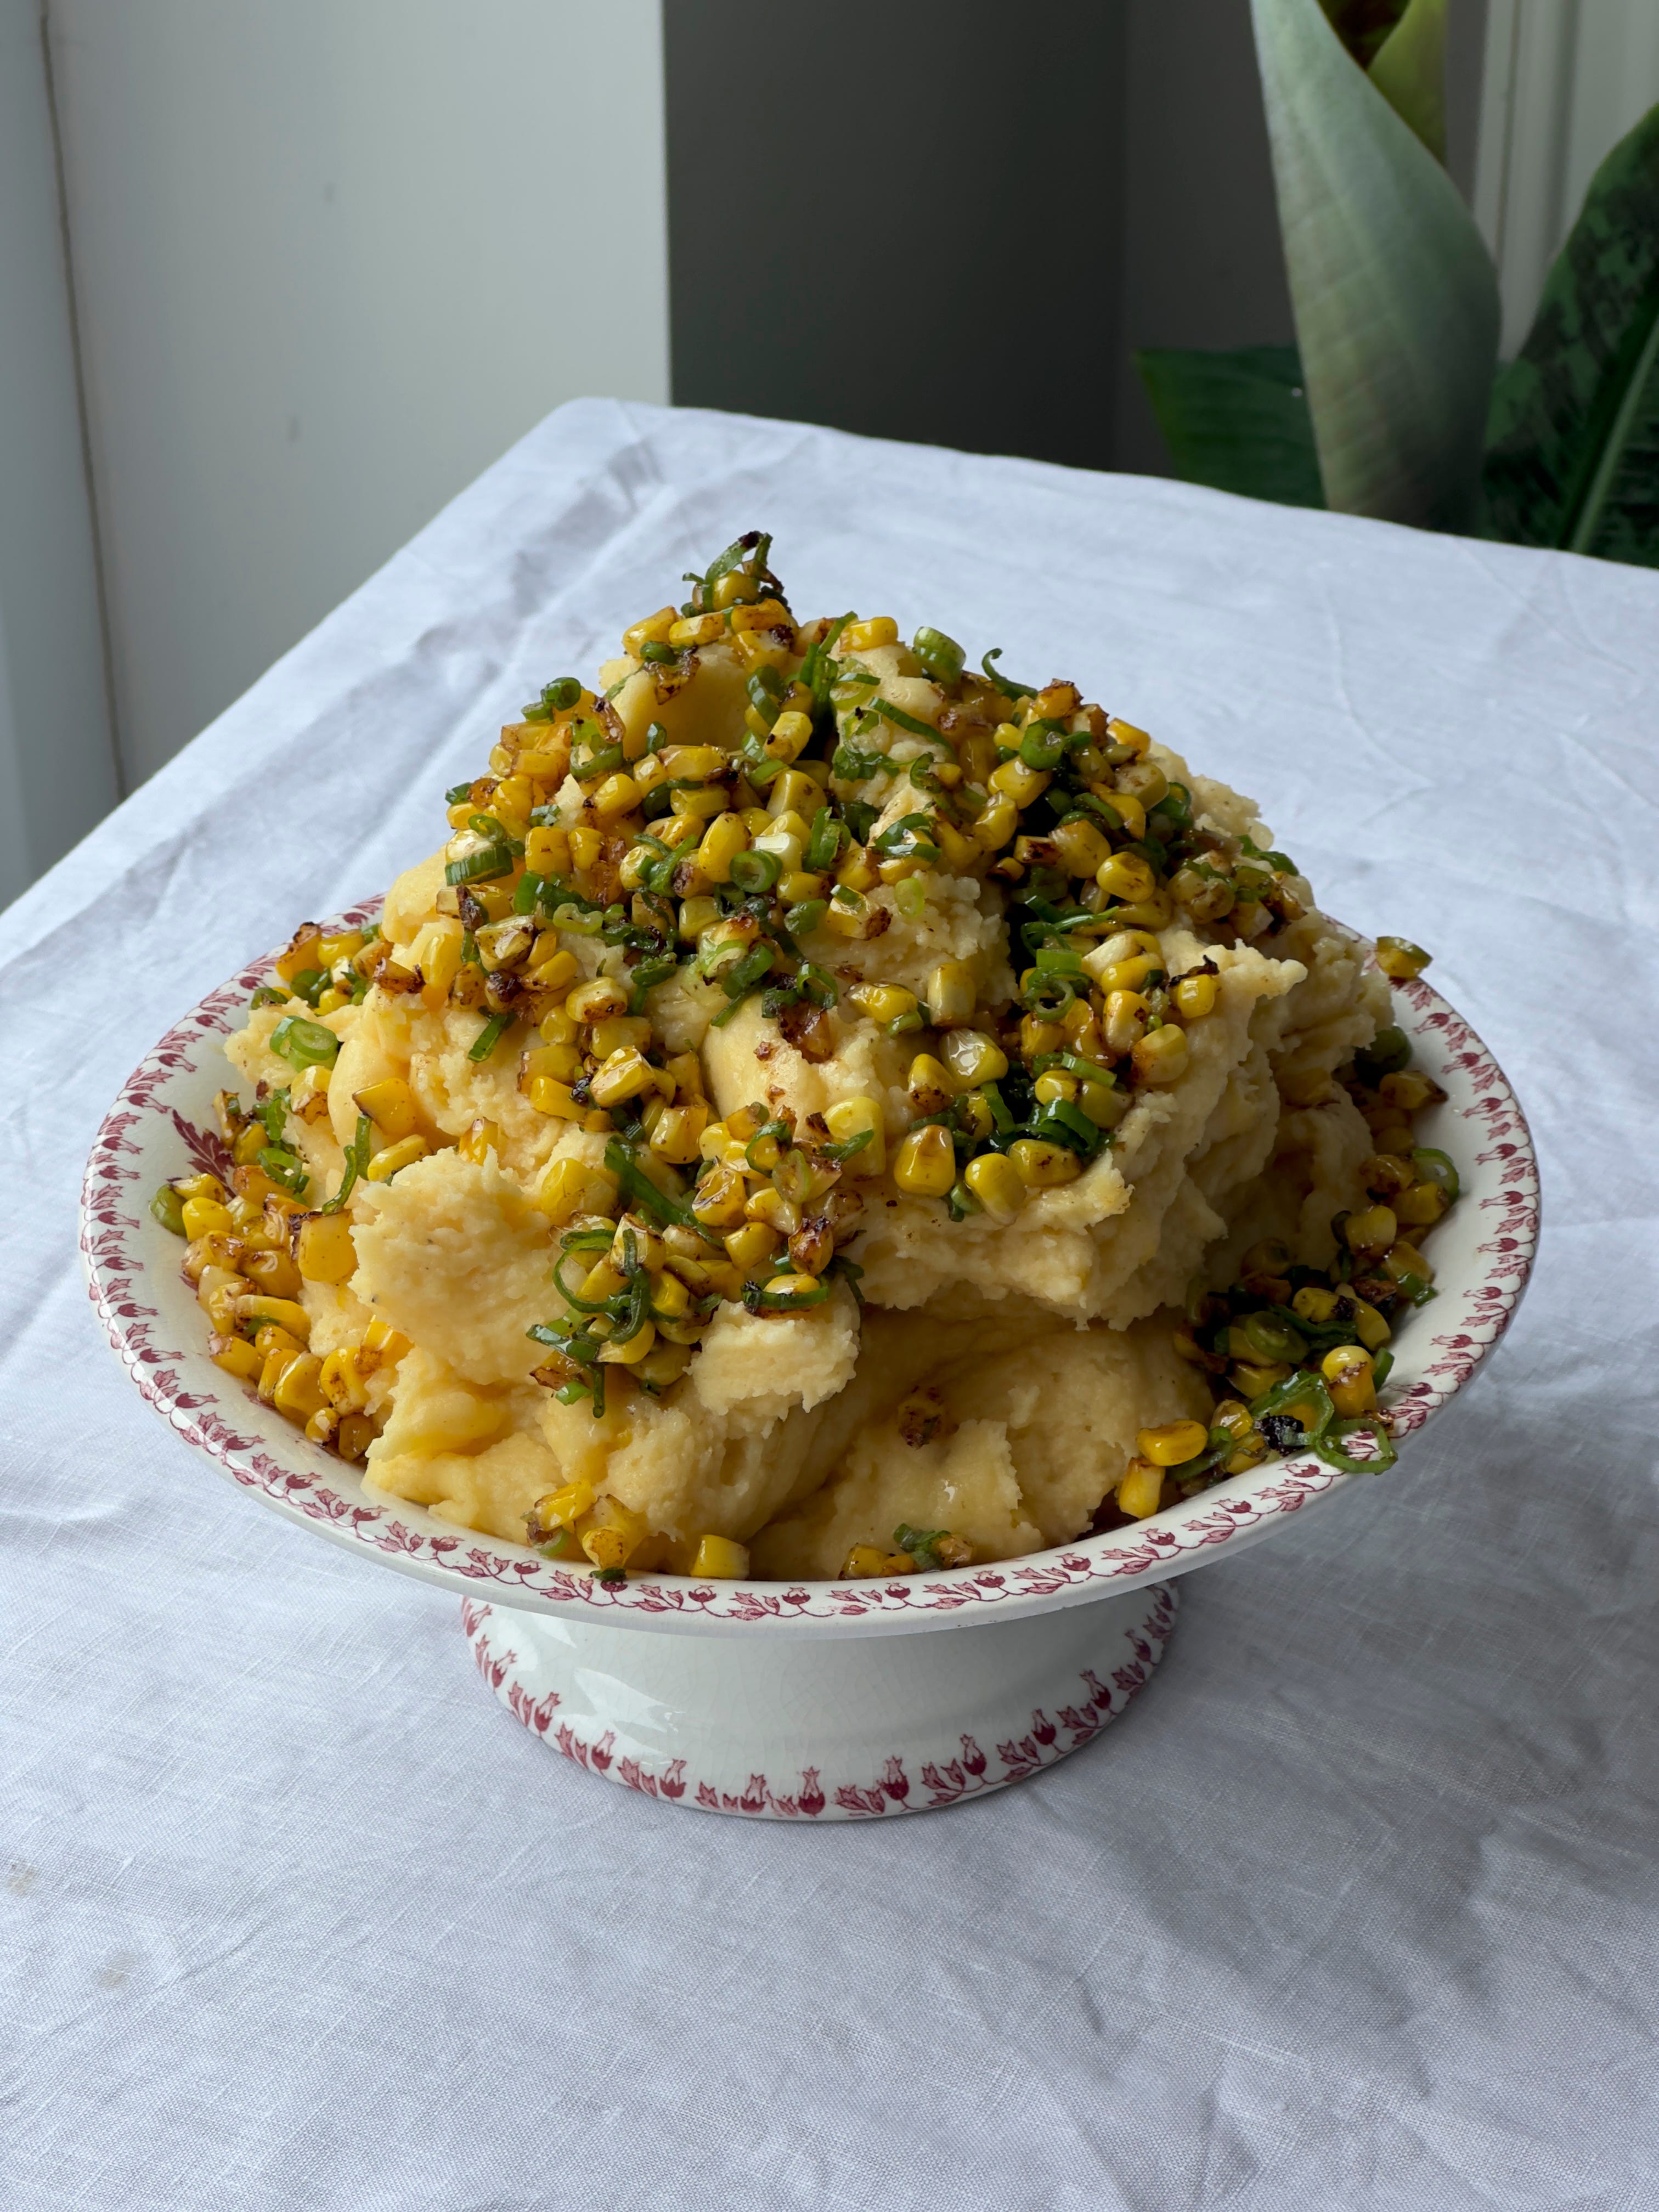
CREAMED CORN MASH
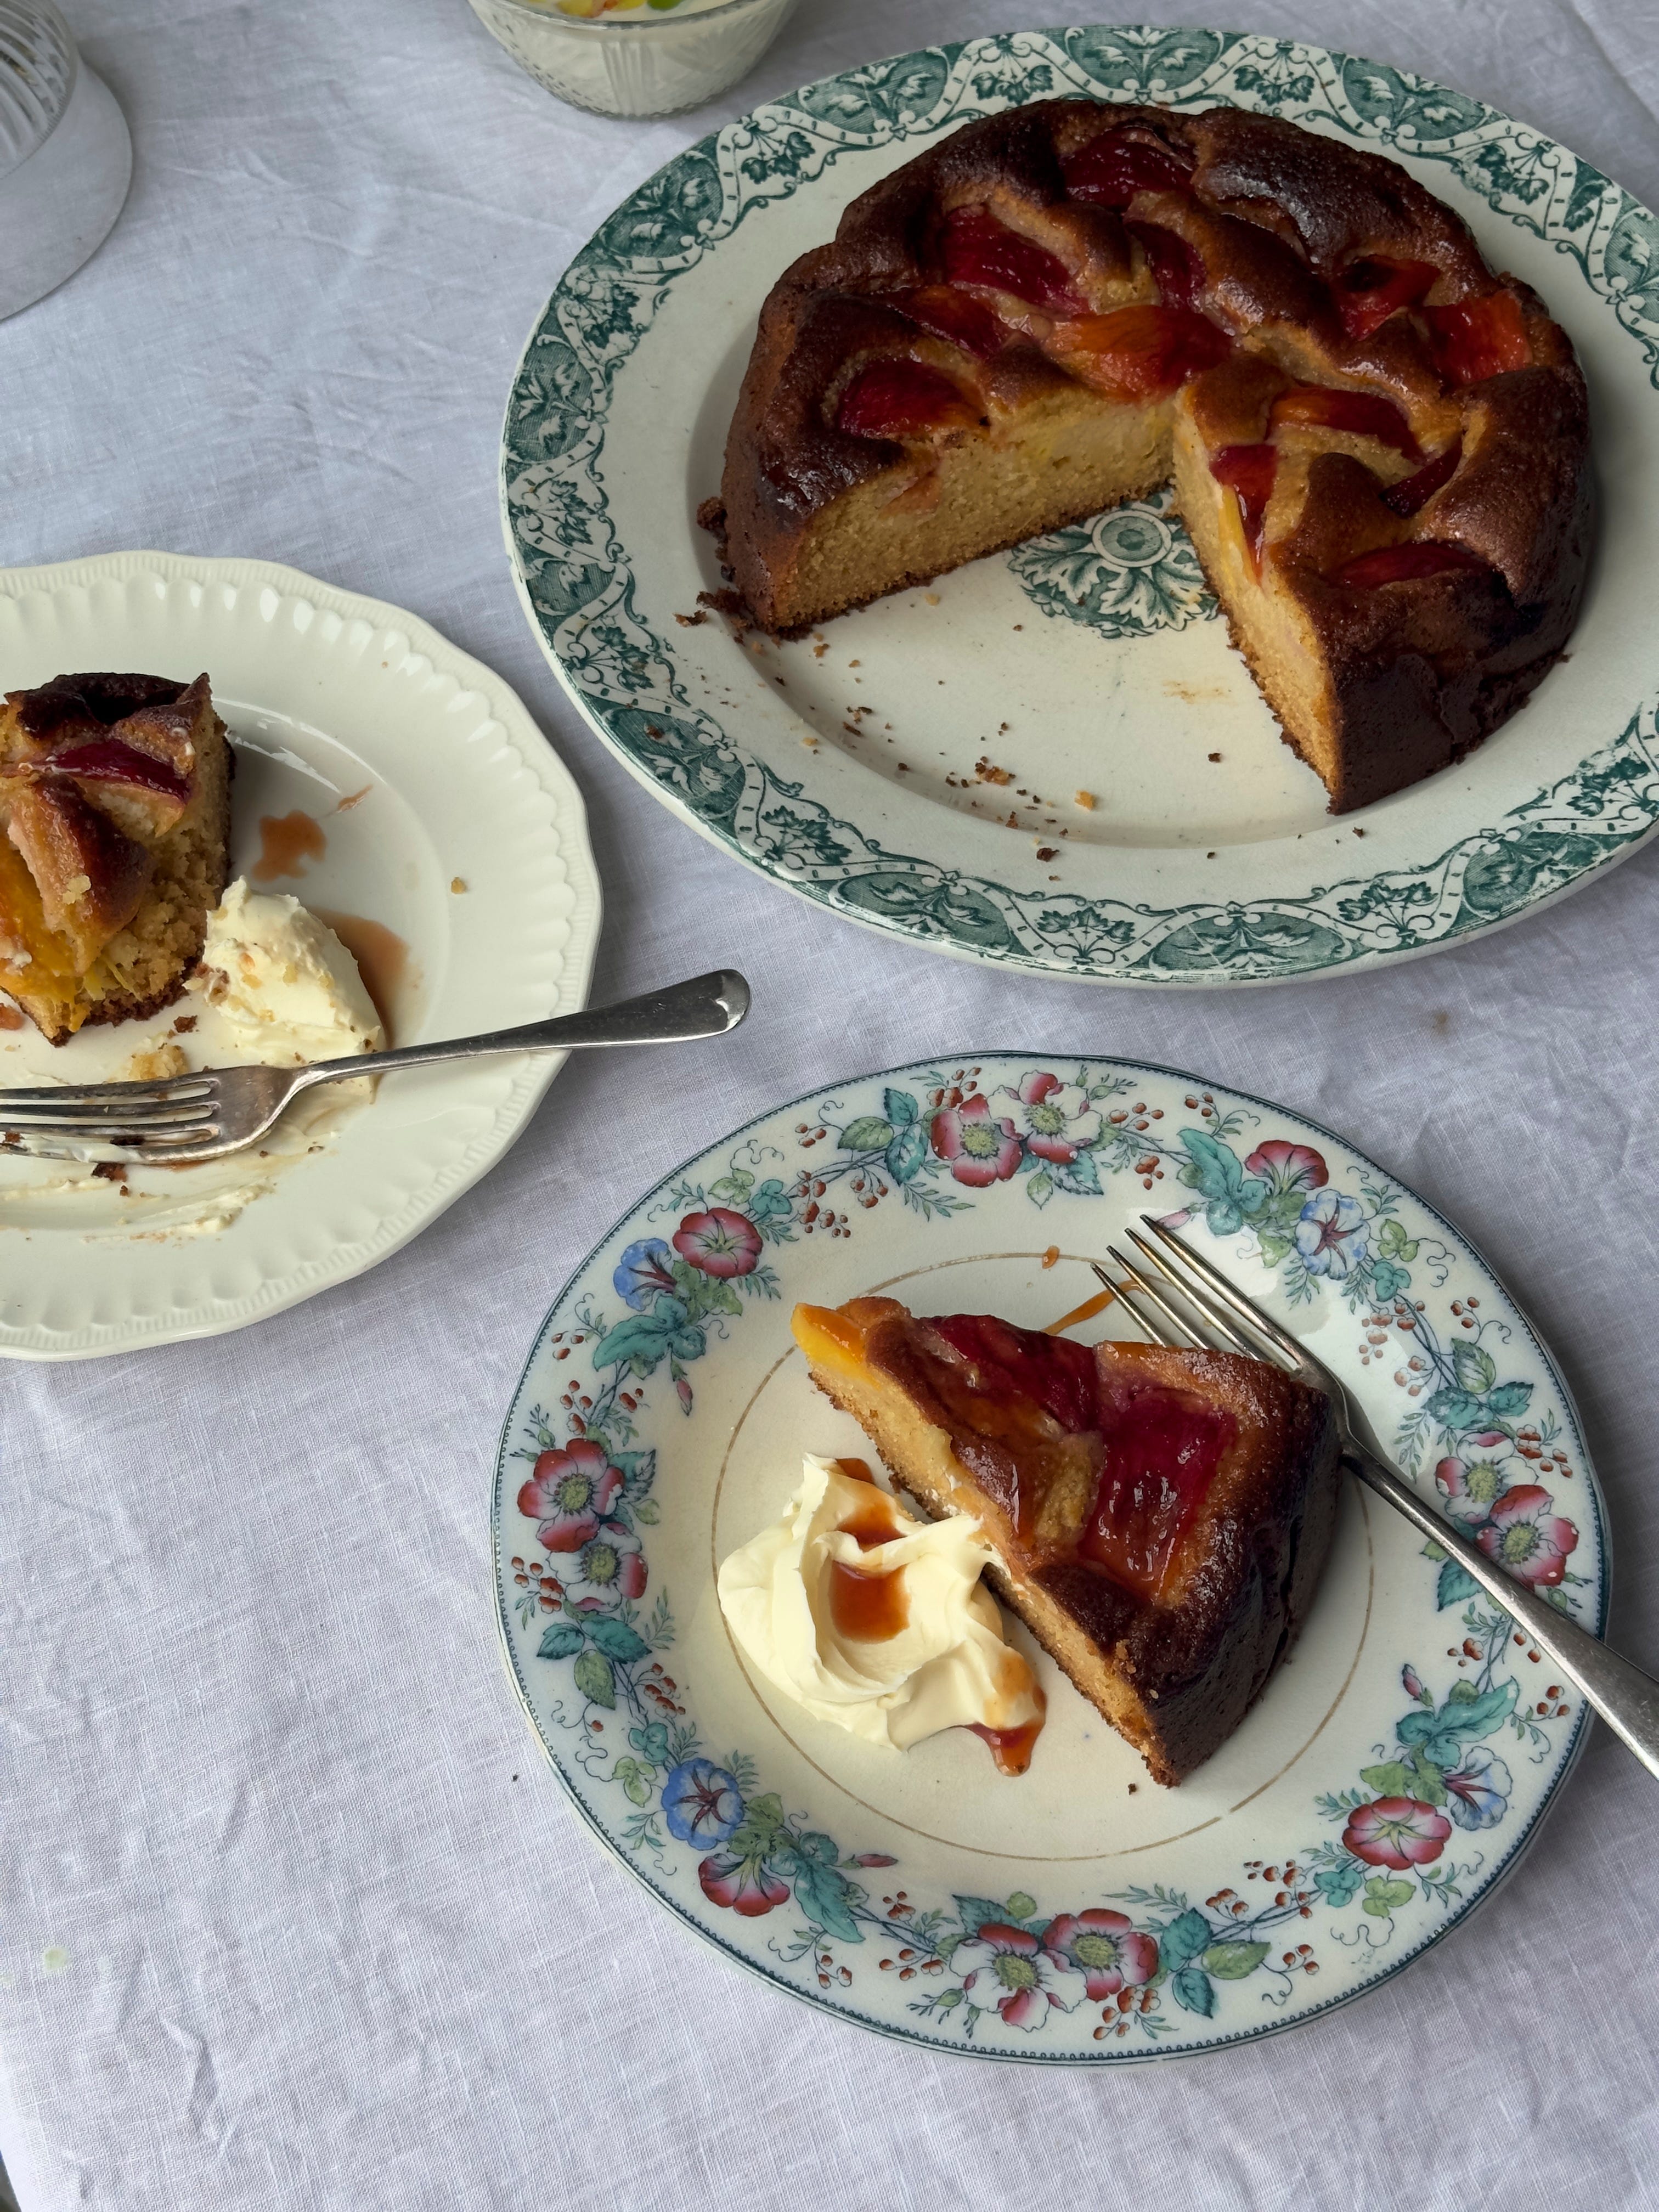
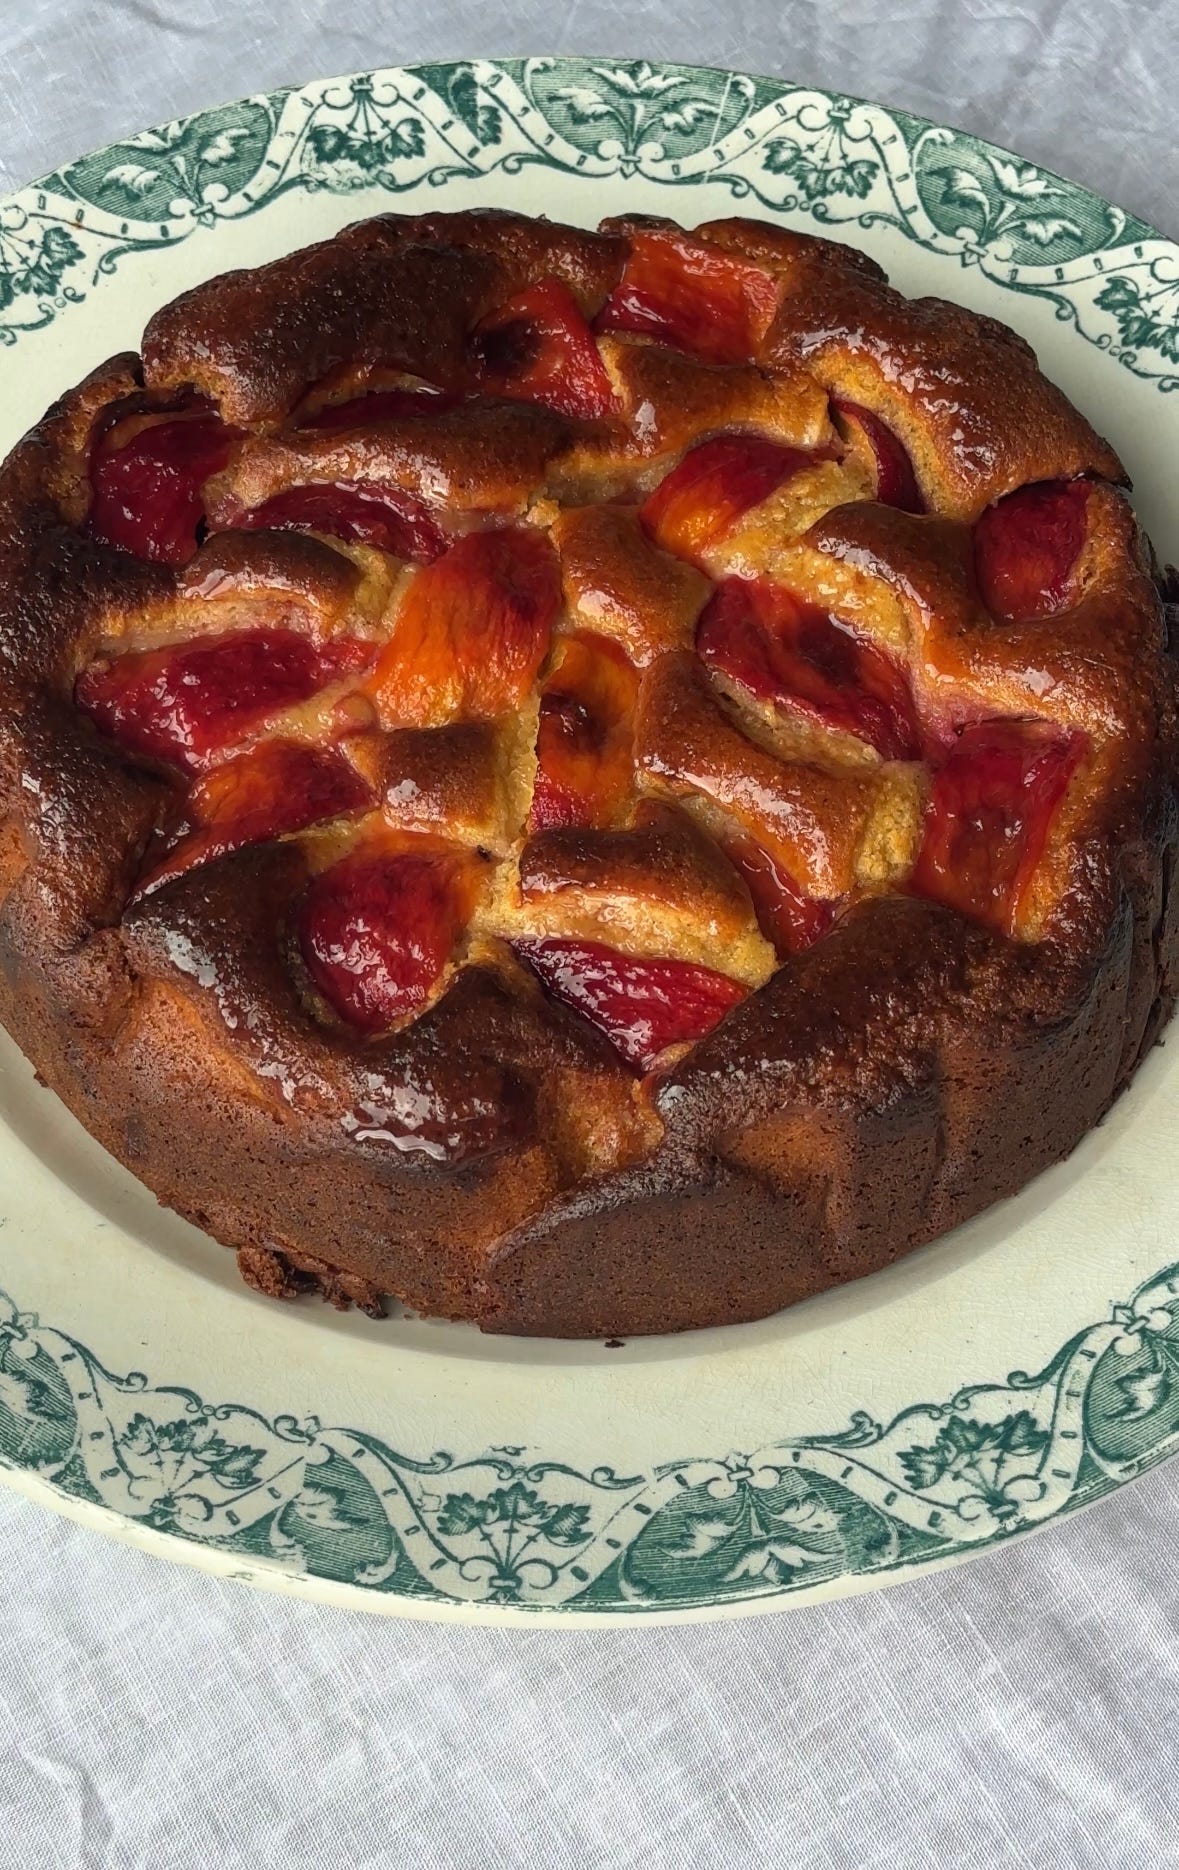
HONEYED PEACH AND RICOTTA CAKE
Ok listen, I know this is barely a “summer” we are having here in the UK. It’s pissing with rain half the time at the moment, so it actually crossed my mind to do something along the lines of comfort food. But then I remembered that even though we aren’t getting sunshine, we still have some very beautiful produce to celebrate, and probably some gorgeous people in your life who deserve a dinner that makes them feel loved. And you, my sweet subscribers, deserve to learn a new menu and some new tricks that are really very simple but make you look like Martha Fricking Stewart.
So today we are exploring a genre of summer dinner party cookery that I will describe to you as “luxy”. This doesn’t mean complicated, this doesn’t mean time consuming. It means intuitive, creative and classy. It means, as I always say, making something look and taste like more than the sum of its parts, so your guests are wowed and you are smug. Oh, and we are finally doing a Steak main course for a Dinner Party!
I would perhaps describe this menu as something a TikTok private chef might make for their celebrity client. Why do all the private chefs have TikTok by the way? Where do they find the time?? Why do their clients allow them to film in their houses? So many questions! But seriously I mean this in a good way. These dishes are each sensational in their own right, but also employ a few nifty tricks to make them easy and sensationally delicious.
Before I get started, there are lots of new faces here. So here’s a reminder of what you get with The Dinner Party. Feel free to skip this bit if it’s old news for you.
THE DINNER PARTY - One free post a month.
Once a month I send an episode with a menu and recipes for a Dinner Party to serve 6 people (or 2 people, very occasionally). Almost always, I use a “family style” approach - everything is served to share.
Most often these are 4 courses, sometimes they are 3, sometimes they are big spreads with 5 or 6 dishes for buffet style dining, like The Garden Party One, The One that’s Picky Tea, The Bottomless Brunch One.
The menus treat a wide range of different occasions, moods, themes, celebrations and restrictions.
Each Dinner Party will also outline a TIME PLAN and “MISE-EN-PLACE” list (read - jobs) for you to use while preparing the menu, that starts 3 days before your event. Part of the reason why I started this newsletter was to help home-cooks prep like restaurant chefs ahead of their dinner parties, getting well ahead where possible and thinking laterally about their menus.
Finally there is a section on styling your dinner party with food styling tips as well as general table scaping ideas.
MORE PLEASE - This is the paid level of The Dinner Party. Paying subscribers receive 3 additional posts a month, with at least 7 extra recipes. It is also the best way to support my work here, without my paid subscribers I would not be able to do the newsletter at all.
The first More Please arrives on the same day as The Dinner Party. It will have 3 additional recipes, usually to serve 2 or 4 people, with a focus on weeknight dinners or one course meals. This week we have Yoghurt and Cucumber Rice, Coconut Chicken Salad and Borlotti Beans with Tuna in Tomato Dressing.
A Seasonal Supper arrives the following week with a dish that highlights an ingredient at it’s absolute BEST. Coming next week is a glorious Aubergine and scamorza pasta from Capri that I simply adore.
Finally, a third More Please episode towards the end of the month will look at a specific genre of cooking, ingredient, technique or need, with 3 additional recipes. Previous episodes include Canapés, Pumpkin, Prawns, Cucina Povera, Chicken Dinners, Tarts, Traybakes, Tomatoes. This month we will be talking about PICNICS.
More Please is also where you will find my Travel Guides, Restaurant and Kit Recommendations and Guest Recipes.
Access to the full Recipe Archive of over 300 recipes.
Right then!
Our starter is the utterly divine chilled Spanish almond soup Ajo Blanco. It’s silky and refreshing and bright, and not to mention piss easy, and topped with diced green melon and some lemony crayfish it is wildly delicious, plus it looks chic as hell.
For our main event, it’s the easiest steak in the world to cook - Bavette, with a gorgeous Courgette and Radish Salad and Jalapeño dressing. The only thing you have to cook is the steak. Alongside it, Creamed Corn Mash, my new obsession. Creamy mashed spuds are sweetened with the most delicious, lightly spiced creamed corn, plenty of Parmesan and some buttery charred corn on top. It’s the summer glow up mashed potatoes needed.
And finally a gorgeous homely and comforting Honeyed Peach and Ricotta Cake. Honey roast peaches honey sit atop a sponge made with brown butter and ricotta, so it’s tender and slightly caramelly and oh so good with a dollop of crème fraiche. This menu is a summer delight and I can’t wait for you to make it.
AJO BLANCO, MELON AND CRAYFISH
I am very much in my chilled soup bag at the moment, because bunging a load of veg and a few crusts of bread in the blender for dinner feels like cheating but tastes like winning. Anyway this is a little less vegetal, a little more creamy and rich thanks to the almonds and really very, very delicious. Traditionally it’s topped with grapes but I really like the fragrance of green melon here and the addition of crayfish (this could also be white crab meat, prawns or brown shrimp) lifts this into luxy dinner party territory. It’s vegan otherwise, so a great one when you need a chic starter for a plant based pal.
For the soup
200g blanched almonds
600ml water + 4 ice cubes
2 small garlic cloves
250g rustic white bread (I used the inside of a couple of ciabatta loves), torn into small chunks - this should be the weight after removing the crusts. Crusts will turn your soup brown, so save them for croutons another time.
150ml extra virgin olive oil
4 tbsps sherry vinegar
Salt to taste, but plenty of it
To garnish
½ a small, ripe Galia melon
100g cooked crayfish tails
Zest of half a lemon
Excellent extra virgin olive oil for drizzling
At least 3 hours before you want to eat, preheat the oven to 150 fan. Toast the almonds for 8 minutes - you aren’t really looking to get any colour, just to get them to be a bit more fragrant and nutty. Leave to cool while you soak the bread in the iced water. It will become claggy and soggy and a bit gross looking but that’s the point. When the almonds are cold, blend them in a large jug blender with the remaining soup ingredients including the bread and water, or in two batches in large bullet blender until very very smooth. The salting is, as always, up to you but this soup is rich and can take a good whack. Taste as you blend, adding more if necessary. Once blended, you will need to pass through a fine sieve as there may be some still almond fibres. Chill the smooth, sieved soup in the fridge for at least 2 hours.
To serve, toss the crayfish tails in the lemon zest. Pop a teaspoon of crayfish into the bottom of your bowls or glasses or whatever you are serving in. Pour over the chilled soup. Pop a few pieces of diced melon on top plus the remaining crayfish and then drizzle with good olive oil. Serve with a dry as hell chilled sherry or Albariño.
MAKE AHEAD -
The soup is best made fresh on the day, but can sit in the fridge for up to 8 hours before serving.
SUBSTITUTIONS -
Swap the Galia melon for cantaloupe, or use green grapes or even diced green apple.
The crayfish tails could be white crab meat, brown shrimp, small North Atlantic prawns or even good tinned cockles.
BAVETTE WITH COURGETTES, RADISHES AND JALAPEÑO
Cooking steak for a crowd is very intimidating, I know. I think years of disastrous Come Dine With Me episodes of people asking the guests how they want it cooked, before proceeding to wheel out 4 steaks that are each identically rubbery. Well NOT US GUYS. Firstly, Bavette, also known as Hanger or Flank, is a great choice because it is best served rare or medium rare, but also because it is so much cheaper than other cuts and doesn’t have a large fat cap to contend with, making the actual cooking of it very simple and quick. It can also be bought in large pieces from your butcher, meaning you only have to cook 2 or 3 actual steaks on the day to serve many more.
Your bavette will have uneven thickness, that is the nature of it, so my advice when cooking steak for other people - don’t ask how they want it cooked. Cook the thickest parts to rare or medium rare knowing that there will always be thinner bits that are more well done. Then, when you are serving it, people can help themselves to the bits they like. This is not a restaurant, this is your house and you don’t have to cook to order. Your friends are hopefully grown up enough to figure it out.
I love this dish because the steak is the only thing that gets cooked. The salad that sits underneath it is tender, thinly sliced and salted courgettes with radishes, red onion and a glorious herby jalapeño dressing. A perfect, easy summery side to our gorgeous bavette.
COOKING THE BAVETTE - My method below is pan-fried, because it was pouring with rain on the day I shot this. If you would like to cook it on the BBQ then I suggest following Helen Graves instructions in her excellent new book BBQ Days and BBQ Nights.
1.2kg piece of bavette, or 2 - 3 large pieces up to that weight - speak to your butcher about this!
2 tbsps flakey sea salt
1 tbsp freshly ground black pepper
4 tbsps veg oil
4 garlic cloves
70g butter
For the salad - you may want to use a mandolin for this
1 large yellow courgette, finely sliced
200g baby courgettes, finely sliced
2 small grezzina courgettes or 1 medium sized green courgette, finely sliced
150g breakfast radishes, finely sliced
1 red onion, sliced
1 tsp flakey sea salt
For the dressing
4 jalapeños, seeds removed (if you prefer) and finely chopped
1 small clove of garlic, grated
A small handful of chives, finely chopped
Large handful coriander, finely chopped
100ml olive oil
Zest and juice of 2 limes
1 tsp caster sugar
Salt to taste
Cut your bavette into 2 or 3 large pieces that will fit in your biggest frying pans. Season each piece well with the salt and pepper and leave to come to room temperature for an hour or so.
Combine all the sliced courgettes of various shapes and sizes together and season with the salt. Leave to sit alongside the steak. Keep the red onion and radish sliced but separate for now in the fridge, their colour will run if added to the salted courgettes and we don’t want that!
Make the dressing by combining all the ingredients together and seasoning to taste - if you prefer it on the zingier side then leave out the sugar.
You will need to take 15 minutes away from your guests to cook the steak. If you have two large pans that can fit all 2 or 3 pieces in, then perfect! But if not, don’t worry. Start with the thickest bit first and then continue. Heat the oil in the pans until smoking on the highest heat possible, then carefully lay in your steaks. For pieces that are 2-3 inches thick, seal for 2 minutes a side until a good crust has formed. For anything thinner, go for 1 minute a side. Once sealed, turn the heat down to medium and add in the butter and garlic, splitting the quantity between your pans if necessary. The butter will immediately start to foam and bubble. Cook the steaks in the butter for another 3 minutes a side, or 2 minutes if thinner pieces, tilting the pan and spooning the foaming butter over your steak a few times each side. Use a meat thermometer if you prefer to check the doneness, I like to cook my bavette to 50 - 51 degrees, it will rise a couple degrees more as it rests. Put the steaks on a tray to rest for 10 - 15 minutes while you plate up everything else.
Drain any excess liquid from the courgettes, then mix them well with the radishes, onion and half the jalapeño dressing.
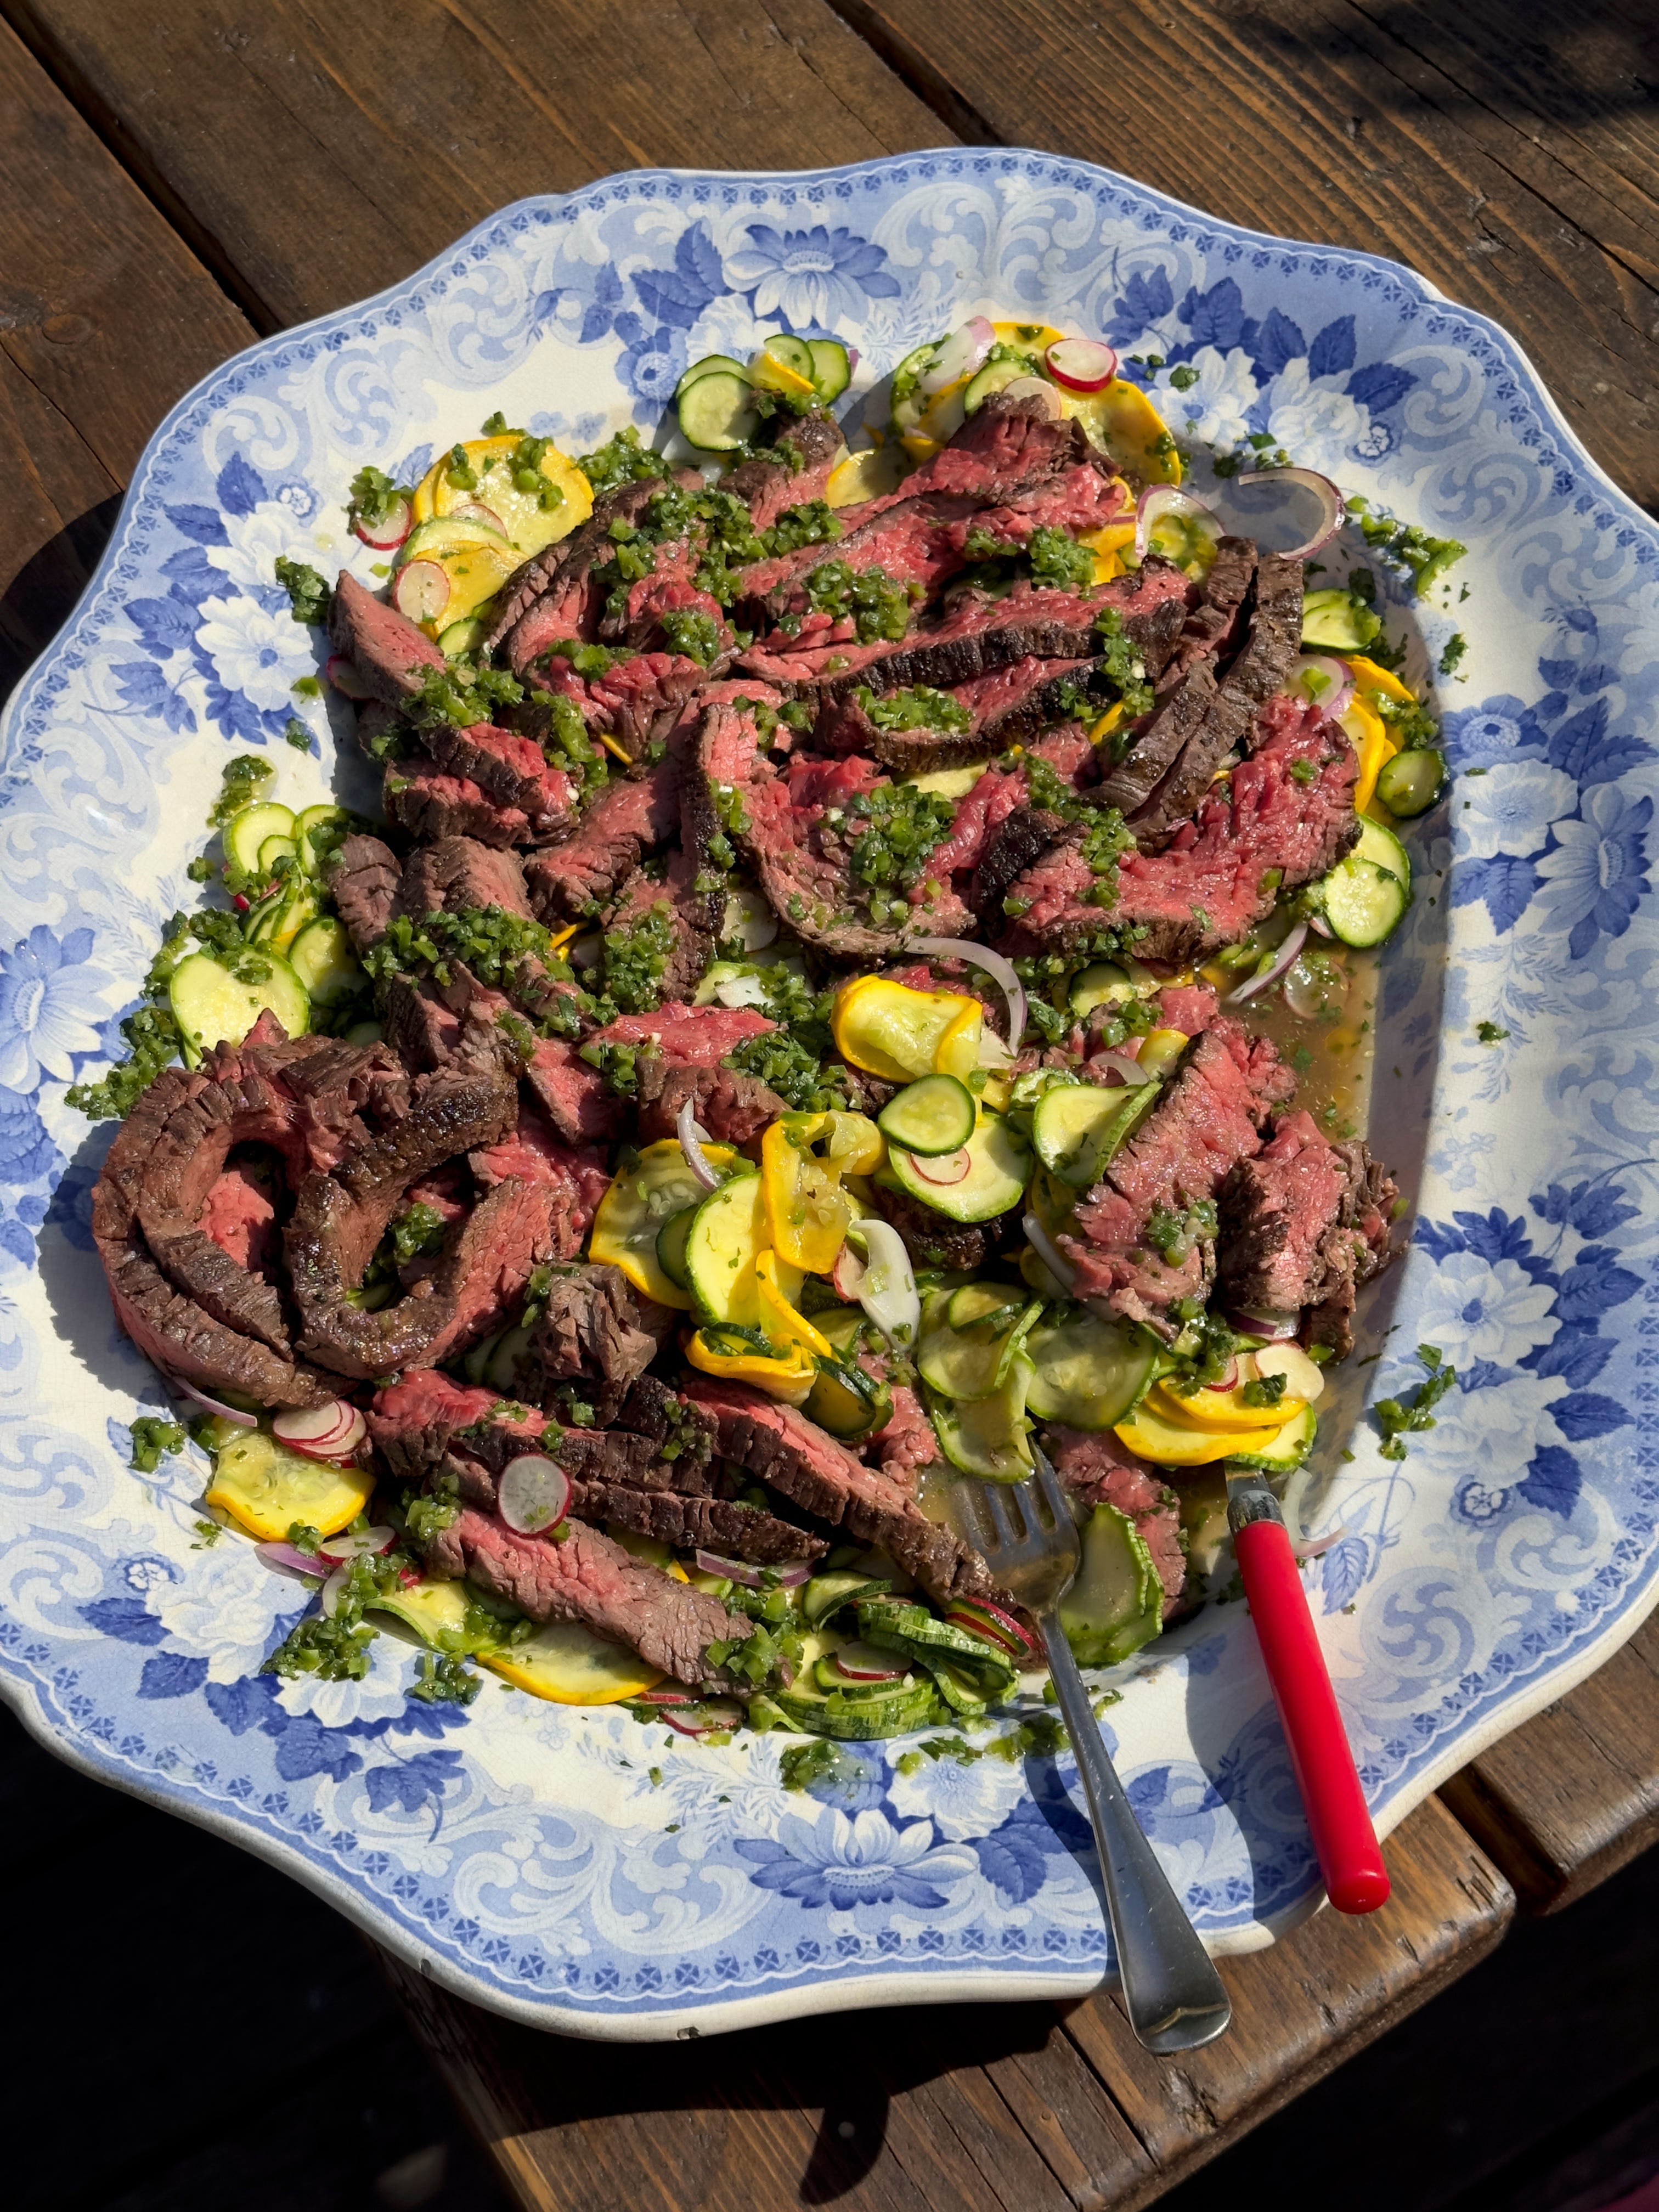
You will notice that bavette is made of lots of long lines of meat - this is called the “grain” of the meat. Lots of recipes will advise you to slice your cooked bavette “against the grain” which basically means you don’t carve along the lines of the meat, you slice right through them the other way, which means your pieces of meat will be much more tender and easier to eat. So take note of the line of your grain and make sure to carve through it, not with it. Slice it into thin, even slices. Spread the salad out on a big platter or a couple of plates, then top with the sliced bavette and then drizzle over the remaining dressing.
MAKE AHEAD -
The courgettes can be sliced and kept in the fridge for up to 24 hours. Only salt them an hour or less before using them.
The dressing will keep for up to 24 hours in the fridge.
SUBSTITUTIONS -
This would also work well with my Reverse seared T-Bone or Cold Roast Lamb.
Use thinly sliced cucumber, carrot, daikon, kohlrabi or asparagus instead of courgette in the salad.
If using green chillies instead of jalapeños, make sure you check how hot they are - you have to eat a bit to try I’m afraid.
Swap the coriander for tarragon or mint if you prefer.
CREAMED CORN MASH
I love creamed corn, and I love mash, and yes I could have just made one or the other here sure, but then where’s the fun in that? This is a lush summery mash recipe that is perfect accompaniment to our bavette, or indeed any BBQ. Rich, slightly sweet from the corn and gorgeously creamy, you will wonder why you haven’t put creamed corn in your mash before. I really like using fresh corn for this but the tinned stuff will of course work very well too.
1.2kg maris piper potatoes, peeled and chunked
30g butter
50g parmesan cheese, finely grated
4 small sweetcorn cobs, around 500g of corn once stripped from the cob - 375g for the creamed corn, 125g to garnish
For the creamed corn
375g sweetcorn
300ml double cream
50ml whole milk
25g butter
2 garlic cloves, crushed
1/2 tsp cumin
½ tsp paprika
Salt and pepper to taste
For the top
50g butter
125g sweetcorn
2 spring onions, finely sliced
Put the potatoes in a large saucepan and cover with cold water. Season generously, bring to a boil and simmer until completely tender - around 15 - 20 minutes.
Meanwhile, make the creamed corn. Put all the ingredients together in a saucepan and bring to a simmer on a medium heat. Turn the heat down to low and let the corn cook in the cream mixture until soft - around 8 minutes or so. Blitz about two thirds in a blender until smooth - I like to keep some of the cream corn unblended for texture, but this is up to you. Pass through a sieve, check the seasoning and adjust if necessary. When your potatoes are cooked, immediately drain them and mash them with a potato ricer. Combine the mashed potatoes with the butter, creamed corn and parmesan and mix well. You will need to add more seasoning with the potatoes now in, but be prepared to be physically unable to stop eating it.
When you are about to serve the mash, reheat it if necessary, using a little milk if it is a bit stiff. If you are serving this with steak as above, you can use the same pan you cooked the steak in to cook your remaining corn for the top. Heat the butter in the steak pan on a medium heat and add the corn. Leave to sizzle for a couple of minutes, the corn kernels should start to brown slightly. Take them off the heat and add in the spring onions, stirring well.
Pile the mash high into a bowl and then pour over the fried corn, spring onions and butter. Serve immediately.
MAKE AHEAD -
The creamed corn mash can be made up to 3 days ahead.
SUBSTITUTIONS -
Use vegan dairy substitutes to keep this plant based
HONEYED PEACH AND RICOTTA CAKE
We are right in that most heavenly part of the year where there is just so much good fruit about. As luxurious it is to have that perfect fruit just completely unaltered and raw, it is also so divine to cook and bake with it all too. This cake is a divine use for any stone fruit, but I do especially love peaches and honey together. The batter is enriched with ricotta and ground almonds making it moist, and the brown butter and honey give it a warm, toasty hum. It’s of course a very easy cake, because you know me, and it has a really wonderful rustic charm to it.
For the peaches
3 yellow peaches, halved
3 tbsps honey
For the cake
180g plain flour
75g ground almonds
2 tsps baking powder
1 tsp fine salt
120g butter, browned
180g caster sugar
45g honey
160g ricotta, softed with a spoon so it is easier to mix in
3 eggs, beaten
3 tbsps whole milk
1 tsp vanilla bean paste
Crème fraiche to serve
Preheat the oven to 200 fan. Halve the peaches and pop them in a lined baking tray. Drizzle over the honey and bake in the oven for 15 minutes. This little pre-roast helps to soften the peaches, get a little bit of caramelised honey and peach syrup to glaze with, and also will mean you can easily take out the pits and peel them. Leave the peach halves too cool for 10 - 15 minutes before pitting them, easing off their skin and slicing roughly. Turn the oven down to 170 fan. Line a 23 cm springform tin with baking paper.
Heat the butter in a saucepan over a medium heat until foaming and bubbling. Once the foam starts to die down and the butter smells and looks golden and nutty, remove the pan from the heat and pour into a bowl to cool while you weigh everything up. I use a handheld electric beaters for recipe but you can make it in a stand mixer too or even by hand if you prefer.
In a bowl, whisk the cooled brown butter, sugar and honey together until just combined - they won’t cream up like with soft butter so don’t worry if it looks weird. Add in each egg one at a time, as well as a tablespoon of milk, beating well in between to combine. Now add the ground almonds, folding with a spatula, followed by the flour, baking powder and salt. Finally add in the ricotta and vanilla and fold again to make a smooth, amber cake batter. Pour this batter into the tin. Arrange the peach slices on top of the batter, taking care to space them evenly. Don’t discard the syrup left in their roasting tin, we will use this later to brush on the cake. Bake the cake in the middle of your oven at 170 for 55 - 60 minutes. It will go a deep golden brown because of the honey and browned butter in the mix, and that’s ok! After that time, or when a skewer comes out clean, remove the cake and leave it to cool in the tin.
Before presenting the cake, use the peach and honey juice to glaze the top, brushing it all over.
Serve with dollops of crème fraiche and any leftover honeyed peach syrup.
MAKE AHEAD -
You can roast the peaches separately up to 24 hours ahead if you wish. Keep in the fridge in their tray, but make sure you let them get to room temperature before you add them to the cake batter.
The cake can be made up to 24 hours ahead, but keep in the tin until you mean to serve it.
Only glaze the top when you are ready to serve.
SUBSTITUTIONS -
Plums or cherries would also work so well here, although they may not need the initial roast.
TIMEPLAN
This first plan should help you see what you can get done in advance, so that for each course on the day you have at least 1, maybe 2 major parts of it taken care of. I appreciate that not everyone’s weeks are easily peppered with dinner party prep, but if you’re hosting after work or on a day where you can’t be in the kitchen, getting ahead is going to save your arse.

MISE-EN-PLACE
This is the fancy name we give to the food prep each section in the restaurant needs to do for their dishes. Hopefully breaking down each dish like this will help you feel organised.
Use the hour before your guests arrive to organise your space too- I find it helpful to group ingredients by dish so it is all in the same place. Little ramekins are really useful for this.

STYLING
When hosting a luxy dinner a tablecloth is really a good move. I love this white linen one from H&M as it cleans really easily and actually looks best a bit crumpled, with a bit of texture. But in case white scares you, here are some other ones I have been lusting after.


From left to right, La Redoute, Noo Ma, Etsy
Anyway back to the task in hand. I think glass bowls or goblets are best for the soup, I like to mix and match a bit because I never have enough of one type. For our steak, a giant platter that is relatively flat is best. I like blue here against all the greens and yellow of the courgette and pink of the meat. It’s fun to pile the mash on a plate with a foot, so as to build some height on the table. Or do what I do sometimes, which is to pop an upturned bowl underneath a normal plate. Finally the cake is easy - whole, by itself on blue or green toned plate to pick up the oranges and corals.
I made this at the weekend and it went down an absolute storm. That mash!
Thank you for your beautiful recipes - fully signed up and now ordered your book too.
This amazing, thank you so much. You put such a lot of work into it for us!